本文档记录在 D3000M 上烧录 Ubuntu + Phytium-Linux-Kernel-6.6 的过程。sudo ip link set enaphyt56i0 up# 清掉旧地址(没有也没关系)sudo ip addr flush dev enaphyt56i0# 配 IP/掩码sudo ip addr add 192.168.1.73/16 dev enaphyt56i0# 配默认路由sudo ip route replace default via 192.168.0.1 dev enaphyt56i0# 配 DNS(临时)sudo sh -c 'printf "nameserver 192.168.0.1\nnameserver 8.8.8.8\n" > /etc/resolv.conf'# 验证ip addr show enaphyt56i0ip routeping -c 3192.168.0.1ping -c 3192.168.1.78ping -c 38.8.8.8ping -c 3 ports.ubuntu.com
sudo apt updatesudo apt install -y gdisksudo sgdisk -d 8 /dev/nvme0n1sudo sgdisk -n 8:0:0 -t 8:8300 -c 8:"UBUNTU_ROOT" /dev/nvme0n1sudo partprobe /dev/nvme0n1sudo mkfs.ext4 -F -L ubuntu-root /dev/nvme0n1p8lsblkkylin@kylin-pc:/mnt/ubuntu$ lsblkNAME MAJ:MIN RM SIZE RO TYPE MOUNTPOINTmmcblk0 179:0028.9G 0 disk mmcblk0boot0 179:3204M 1 disk mmcblk0boot1 179:6404M 1 disk nvme0n1 259:00238.5G 0 disk ├─nvme0n1p1 259:10512M 0 part /boot/efi├─nvme0n1p2 259:202G 0 part /boot├─nvme0n1p3 259:3051.1G 0 part /├─nvme0n1p4 259:4016G 0 part ├─nvme0n1p5 259:5034G 0 part /data├─nvme0n1p6 259:6015.7G 0 part [SWAP]├─nvme0n1p7 259:7030G 0 part /media/kylin/75a059f9-ca40-4665-8436-eb0f└─nvme0n1p8 259:8089.2G 0 part
挂载 Ubuntu 分区到 /mnt/ubuntusudo mkdir -p /mnt/ubuntusudo mount /dev/nvme0n1p8 /mnt/ubuntudf -hT /mnt/ubuntu
安装 debootstrap 并拉 Ubuntu 22.04(jammy)ARM64 rootfssudo apt updatesudo apt install -y debootstrap ca-certificatessudo debootstrap --arch=arm64 jammy /mnt/ubuntu http://ports.ubuntu.com/#可能会由于 debootstrap 版本太旧导致:No such script: /usr/share/debootstrap/scripts/jammy#如果想要使用22.04,那么可以先拉20.04sudo debootstrap --arch=arm64 focal /mnt/ubuntu http://ports.ubuntu.com/
sudo mount --bind /dev /mnt/ubuntu/devsudo mount --bind /proc /mnt/ubuntu/procsudo mount --bind /sys /mnt/ubuntu/syssudo chroot /mnt/ubuntu /bin/bash
cat > /etc/apt/sources.list <<'EOF'deb http://ports.ubuntu.com/ jammy main restricted universe multiversedeb http://ports.ubuntu.com/ jammy-updates main restricted universe multiversedeb http://ports.ubuntu.com/ jammy-security main restricted universe multiverseEOFapt updateapt dist-upgrade -y
#起个名字echo d3000m-ubuntu > /etc/hostname#设置密码passwd#建立个用户adduser zhaousermod -aG sudo zhao#装点工具apt install vim ssh net-tools pciutils usbutils -y
到这一步,已经有了一套能用的 Ubuntu 根文件系统了,只是它现在还没有内核而已sudo apt updatesudo apt install -y debhelper dh-exec \ bc bison flex libssl-dev libelf-dev libncurses-dev dwarves \ fakeroot dpkg-dev rsync xz-utils kmod cpiosudo apt install -y build-essential bc bison flex libssl-dev libelf-dev \ libncurses-dev dwarves fakeroot dpkg-dev rsync gitsudo apt installbuild-essential bc flex bison libssl-dev libncurses5-dev dwarves -y
cd ~git clone --branch linux-6.6 https://gitee.com/phytium_embedded/phytium-linux-kernel.gitcd phytium-linux-kernel
make ARCH=arm64 phytium_defconfig
make -j$(nproc) ARCH=arm64 bindeb-pkg
编译完成后会在上一层目录生成多个。deb 文件,后面要拷进 Ubuntu rootfs 里。把内核 。deb 安装进刚才的 Ubuntu 根里sudo mount /dev/nvme0n1p8 /mnt/ubuntusudo mount --bind /dev /mnt/ubuntu/devsudo mount --bind /proc /mnt/ubuntu/procsudo mount --bind /sys /mnt/ubuntu/syssudo cp ~/linux-image-6.6*.deb /mnt/ubuntu/root/sudo cp ~/linux-headers-6.6*.deb /mnt/ubuntu/root/sudo chroot /mnt/ubuntu /bin/bash
cd /rootdpkg -i linux-image-6.6*.debdpkg -i linux-headers-6.6*.deb
应该能看到 vmlinuz-6.6... 和 initrd.img-6.6...apt updateapt install initramfs-tools -yupdate-initramfs -c -k 6.6.63-phytium-embedded-v3.3+
apt updateapt install -y ubuntu-standardapt install -y sudo openssh-server network-manager ca-certificates \ vim less curl wget net-tools iproute2 locales tzdatasystemctl enable sshsystemctl enable--now NetworkManager
exitsyncsudo umount /mnt/ubuntu/dev /mnt/ubuntu/proc /mnt/ubuntu/sys /mnt/ubuntu/runsudo umount /mnt/ubuntusync
sudo fsck.ext4 -f -y /dev/nvme0n1p8
配置 Grub 之前需要先了解 D3000M 板卡默认的启动路径UEFI NVRAM BootOption → \EFI\kylin\shimaa64.efi → \EFI\kylin\grubaa64.efi → 读取 \EFI\kylin\grub.cfg因此我们需要将新安装的 Ubuntu 系统给添加到该 grub.cfg 上,让固件能够识别该路径#已经挂载了ls /boot/efi/EFI/kylin
拿到 Ubuntu rootfs(p8)的 UUIDsudo blkid -s UUID -o value /dev/nvme0n1p8sudo mount /dev/nvme0n1p8 /mnt/ubuntuls -l /mnt/ubuntu/bootsudo umount /mnt/ubuntu##你一般会看到:#/boot/vmlinuz-6.6.xx-...#/boot/initrd.img-6.6.xx-...# 并且还有两个很方便的“永远指向最新”的软链接:#/boot/vmlinuz#/boot/initrd.img
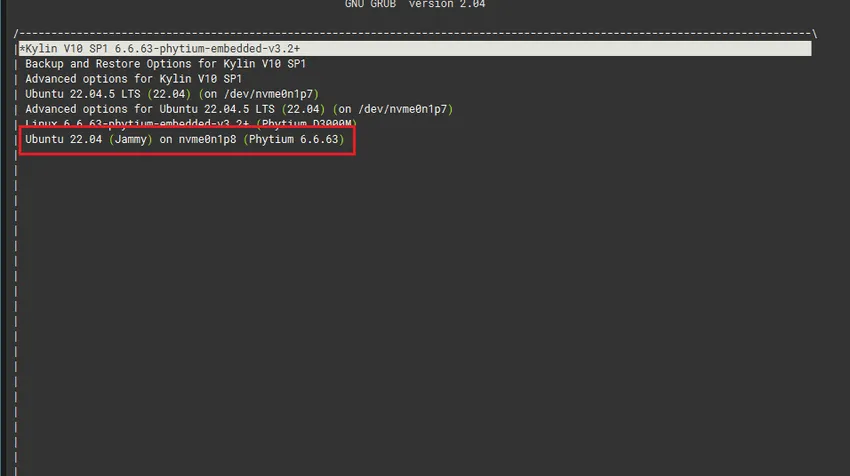
sudo tee /boot/efi/EFI/kylin/custom.cfg > /dev/null <<'EOF'menuentry 'Ubuntu 22.04 (Jammy) on nvme0n1p8 (Phytium 6.6.63 v3.3+)' --unrestricted {insmod part_gpt insmod ext2# p8: ubuntu-root search --no-floppy --fs-uuid --set=root c1900155-2575-4919-a5c1-0ed0d1b2fc04 linux /boot/vmlinuz-6.6.63-phytium-embedded-v3.3+ root=UUID=c1900155-2575-4919-a5c1-0ed0d1b2fc04 ro rootwait initrd /boot/initrd.img-6.6.63-phytium-embedded-v3.3+}EOF
重启后,即可选择我们对应新安装的 Ubuntu 启动,其对应位飞腾 6.6 内核sudo mkdir -p /mnt/ubuntusudo mount /dev/nvme0n1p8 /mnt/ubuntuls /mnt/ubuntu/boot
把这个 config 拷回你的内核源码目录作为 .configcd ~/phytium-linux-kernelcp /mnt/ubuntu/boot/config-6.6.63-phytium-embedded-v3.3+ .config
make ARCH=arm64 olddefconfig
cd ~/phytium-linux-kernel# 示例:加个后缀标识这次改动export LOCALVERSION=-phytium-custom1make -j"$(nproc)" ARCH=arm64 LOCALVERSION=$LOCALVERSION bindeb-pkg
sudo mount /dev/nvme0n1p8 /mnt/ubuntusudo mount --bind /dev /mnt/ubuntu/devsudo mount --bind /proc /mnt/ubuntu/procsudo mount --bind /sys /mnt/ubuntu/syssudo mount --bind /run /mnt/ubuntu/run# 拷贝 debsudo cp ../*.deb /mnt/ubuntu/root/sudo chroot /mnt/ubuntu /bin/bash
cd /rootdpkg -i ./*.deb || apt -f install -y
ls -lh /boot | egrep "vmlinuz|initrd|config|System.map"exit
syncsudo umount /mnt/ubuntu/dev /mnt/ubuntu/proc /mnt/ubuntu/sys /mnt/ubuntu/runsudo umount /mnt/ubuntusyncsudo fsck.ext4 -f -y /dev/nvme0n1p8
sudo mount /dev/nvme0n1p8 /mnt/ubuntusudo mount --bind /dev /mnt/ubuntu/devsudo mount --bind /proc /mnt/ubuntu/procsudo mount --bind /sys /mnt/ubuntu/syssudo mount --bind /run /mnt/ubuntu/run# 拷贝 debsudo cp ../*.deb /mnt/ubuntu/root/sudo chroot /mnt/ubuntu /bin/bashcd /bootls -1 vmlinuz-* initrd.img-* | tail -n 10
sudoln-sfvmlinuz-6.6.63-phytium-embedded-v3.3+-phytium-custom1vmlinuz-currentsudoln-sfinitrd.img-6.6.63-phytium-embedded-v3.3+-phytium-custom1initrd-current
sudo tee /boot/efi/EFI/kylin/custom.cfg > /dev/null <<'EOF'menuentry 'Ubuntu 22.04 on nvme0n1p8 (current kernel)' --unrestricted { insmod part_gpt insmod ext2search --no-floppy --fs-uuid --set=root c1900155-2575-4919-a5c1-0ed0d1b2fc04 linux /boot/vmlinuz-current root=UUID=c1900155-2575-4919-a5c1-0ed0d1b2fc04 ro rootwait initrd /boot/initrd-current}EOFsyncsudo umount /mnt/ubuntu/dev /mnt/ubuntu/proc /mnt/ubuntu/sys /mnt/ubuntu/runsudo umount /mnt/ubuntusync
- M.2 双协议/SATA 通用硬盘底座接 NVMe 连接虚拟机
#查看启动盘符lsblk -o NAME,SIZE,MODEL,SERIAL,TYPE,MOUNTPOINTsudo fdisk -l /dev/sdX#设置目标盘变量DISK=/dev/sdX# 把新 NVMe 做成 GPT:ESP + ROOT#ESP 用 FAT32(UEFI 必须),ROOT 用 ext4sudo apt updatesudo apt install -y gdisk dosfstools e2fsprogssudo sgdisk -Z $DISK# 1) ESP 512MiBsudo sgdisk -n 1:1MiB:+512MiB -t 1:EF00 -c 1:ESP $DISK# 2) ROOT 剩余所有空间sudo sgdisk -n 2:0:0 -t 2:8300 -c 2:UBUNTU_ROOT $DISKsudo partprobe $DISKlsblk $DISK#格式化sudo mkfs.vfat -F32 -n ESP ${DISK}1sudo mkfs.ext4 -F -L ubuntu-root ${DISK}2#取 UUIDROOT_UUID=$(sudo blkid -s UUID -o value ${DISK}2)ESP_UUID=$(sudo blkid -s UUID -o value ${DISK}1)echo ROOT_UUID=$ROOT_UUIDecho ESP_UUID=$ESP_UUID
# 挂载到 /mnt/ubuntusudo mkdir -p /mnt/ubuntusudo mount ${DISK}2 /mnt/ubuntusudo mkdir -p /mnt/ubuntu/boot/efisudo mount ${DISK}1 /mnt/ubuntu/boot/efidf -hT /mnt/ubuntu /mnt/ubuntu/boot/efi# 在 amd64 机器上 debootstrap 出 arm64 Jammy rootfssudo apt install -y debootstrap qemu-user-static binfmt-support ca-certificates# 第一阶段(foreign)sudo debootstrap --arch=arm64 --foreign jammy /mnt/ubuntu http://ports.ubuntu.com/# 把 qemu 放进 rootfs,才能 chroot 执行 arm64 程序sudo cp /usr/bin/qemu-aarch64-static /mnt/ubuntu/usr/bin/# 绑定必要目录sudo mount --bind /dev /mnt/ubuntu/devsudo mount --bind /proc /mnt/ubuntu/procsudo mount --bind /sys /mnt/ubuntu/syssudo mount --bind /run /mnt/ubuntu/runsudo cp -L /etc/resolv.conf /mnt/ubuntu/etc/resolv.conf# 进入 chroot 执行第二阶段sudo chroot /mnt/ubuntu /debootstrap/debootstrap --second-stage
#进入 chrootsudo chroot /mnt/ubuntu /bin/bashcat > /etc/apt/sources.list <<'EOF'deb http://ports.ubuntu.com/ jammy main restricted universe multiversedeb http://ports.ubuntu.com/ jammy-updates main restricted universe multiversedeb http://ports.ubuntu.com/ jammy-security main restricted universe multiverseEOF#避免 sudo: unable toresolve hostecho d3000m-ubuntu > /etc/hostnamecat > /etc/hosts <<'EOF'127.0.0.1 localhost127.0.1.1 d3000m-ubuntuEOFexitROOT_UUID=$(sudo blkid -s UUID -o value ${DISK}2)ESP_UUID=$(sudo blkid -s UUID -o value ${DISK}1)echo ROOT_UUID=$ROOT_UUIDecho ESP_UUID=$ESP_UUID# fstab:根分区 + ESPcat > /etc/fstab <<EOFUUID=${ROOT_UUID} / ext4 defaults,noatime,errors=remount-ro 01UUID=${ESP_UUID} /boot/efi vfat umask=007701EOF#ROOT_UUID和ESP_UUID根据实际替换#进入 chrootsudo chroot /mnt/ubuntu /bin/bash# 创建用户adduser zhaousermod -aG sudo zhaopasswd rootexit
sudo apt updatesudo apt install -y git build-essential bc bison flex \ libssl-dev libelf-dev libncurses-dev dwarves \ fakeroot dpkg-dev rsync xz-utils kmod cpio \ gcc-aarch64-linux-gnu binutils-aarch64-linux-gnu
cd ~git clone --branch linux-6.6 https://gitee.com/phytium_embedded/phytium-linux-kernel.gitcd phytium-linux-kernelmake ARCH=arm64 phytium_defconfigmake -j"$(nproc)" ARCH=arm64 \ CROSS_COMPILE=aarch64-linux-gnu- \ KBUILD_DEBARCH=arm64 \ bindeb-pkg#编完 deb 在上一级目录:ls -lh ../*.deb
把飞腾 6.6 内核 deb 装进 /mnt/ubuntu(arm64 rootfs)sudo cp ../*.deb /mnt/ubuntu/root/sudo chroot /mnt/ubuntu /bin/bashcd /rootdpkg -i ./*.deb || apt -f install -y# 确认 /boot 有 vmlinuzls -lh /boot | egrep "vmlinuz|System.map|config" || trueexit
在宿主机上安装 ARM64 UEFI GRUB(生成 /EFI/BOOT/BOOTAA64.EFI)sudo apt updatesudo apt install -y grub-efi-arm64-bin grub-commonsudo grub-install \--target=arm64-efi \--efi-directory=/mnt/ubuntu/boot/efi \--boot-directory=/mnt/ubuntu/boot \--removable --no-nvram --rechecksudo ls -l /mnt/ubuntu/boot/efi/EFI/BOOT/BOOTAA64.EFI
KVER="6.6.63-phytium-embedded-v3.3+"ROOT_UUID=$(sudo blkid -s UUID -o value /dev/sdc2)sudo mkdir -p /mnt/ubuntu/boot/grubsudo tee /mnt/ubuntu/boot/grub/grub.cfg >/dev/null <<EOFsetdefault=0set timeout=5ROOT_PARTUUID=$(sudo blkid -s PARTUUID -o value ${DISK}2)ESP_PARTUUID=$(sudo blkid -s PARTUUID -o value ${DISK}1)echo ROOT_PARTUUID=$ROOT_PARTUUIDecho ESP_PARTUUID=$ESP_PARTUUIDecho ROOT_UUID=$ROOT_UUIDsudo mkdir -p /mnt/ubuntu/boot/grubsudo tee /mnt/ubuntu/boot/grub/grub.cfg >/dev/null <<EOFsetdefault=0set timeout_style=countdownset timeout=3insmod part_gptinsmod ext2search --no-floppy --fs-uuid --set=root xxxxxxxxxxxxxxmenuentry "Ubuntu 22.04 (Phytium 6.6.63) (NVMe)" { linux /boot/vmlinuz-6.6.63-phytium-embedded-v3.3+ root=UUID=xxxxxxxxxxxxxx rw rootwait console=ttyAMA0,115200n8 console=tty0 initrd /boot/initrd.img-6.6.63-phytium-embedded-v3.3+}EOFxxxxxxxxxxxxxx为$ROOT_UUID
syncsudo umount -l /mnt/ubuntu/dev /mnt/ubuntu/proc /mnt/ubuntu/sys /mnt/ubuntu/runsudo umount -l /mnt/ubuntu/boot/efisudo umount -l /mnt/ubuntusyncsudo fsck.ext4 -f -y ${DISK}2
sudo ip link set enaphyt56i0 up# 清掉旧地址(没有也没关系)sudo ip addr flush dev enaphyt56i0# 配 IP/掩码sudo ip addr add 192.168.1.73/16 dev enaphyt56i0# 配默认路由sudo ip route replace default via 192.168.0.1 dev enaphyt56i0# 配 DNS(临时)sudo sh -c 'printf "nameserver 192.168.0.1\nnameserver 8.8.8.8\n" > /etc/resolv.conf'# 验证ip addr show enaphyt56i0ip routeping -c 3192.168.0.1ping -c 3192.168.1.78ping -c 38.8.8.8ping -c 3 ports.ubuntu.com
ls -lh /boot | egrep "vmlinuz|initrd|System.map|config" || trueuname -rsudo apt updatesudo apt install -y kmod initramfs-toolssudo update-initramfs -c -k6.6.63-phytium-embedded-v3.3+ls -lh /boot/initrd.img-6.6.63-phytium-embedded-v3.3+
sudo apt updatesudo apt install -y ubuntu-standard \ sudo vim less curl wget ca-certificates \ openssh-server network-manager \ iproute2 net-tools pciutils usbutils xdg-user-dirssudo systemctl enable--now sshsudo systemctl enable--now NetworkManager