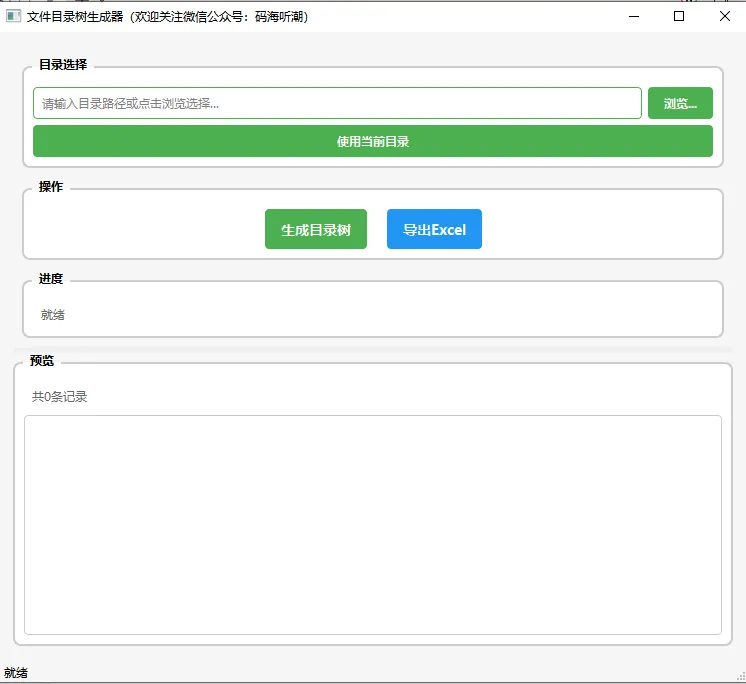
import sysfrom PyQt6.QtWidgets import ( QApplication, QMainWindow, QWidget, QVBoxLayout, QHBoxLayout, QPushButton, QLineEdit, QLabel, QFileDialog, QTableWidget, QTableWidgetItem, QProgressBar, QGroupBox, QSplitter, QHeaderView)from PyQt6.QtCore import Qt, QSizefrom PyQt6.QtGui import QFontclass MainWindow(QMainWindow): """主窗口""" def __init__(self): super().__init__() self.setWindowTitle("文件目录树生成器(欢迎关注微信公众号:码海听潮)") self.setMinimumSize(750, 650) # 设置窗口样式 self.setStyleSheet(""" QMainWindow { background-color: #f5f5f5; } QGroupBox { font-weight: bold; border: 2px solid #cccccc; border-radius: 8px; margin-top: 10px; padding-top: 10px; background-color: white; } QGroupBox::title { subcontrol-origin: margin; left: 10px; padding: 0 5px 0 5px; } QPushButton { background-color: #4CAF50; border: none; color: white; padding: 8px 16px; border-radius: 4px; font-weight: bold; } QPushButton:hover { background-color: #45a049; } QPushButton:pressed { background-color: #3d8b40; } QPushButton:disabled { background-color: #cccccc; } QLineEdit { padding: 6px; border: 1px solid #cccccc; border-radius: 4px; font-size: 12px; } QLineEdit:focus { border-color: #4CAF50; } QTableWidget { border: 1px solid #cccccc; border-radius: 4px; background-color: white; gridline-color: #e0e0e0; } QTableWidget::item { padding: 4px; } QHeaderView::section { background-color: #f0f0f0; padding: 4px; border: 1px solid #cccccc; font-weight: bold; } QProgressBar { border: 1px solid #cccccc; border-radius: 4px; text-align: center; background-color: white; } QProgressBar::chunk { background-color: #4CAF50; border-radius: 3px; } """) # 创建中心部件 central_widget = QWidget() self.setCentralWidget(central_widget) # 主布局 main_layout = QVBoxLayout(central_widget) main_layout.setSpacing(10) main_layout.setContentsMargins(15, 15, 15, 15) # 创建分割器 splitter = QSplitter(Qt.Orientation.Vertical) # 上半部分:控制区域 control_widget = QWidget() control_layout = QVBoxLayout(control_widget) control_layout.setSpacing(10) # 路径选择组 path_group = QGroupBox("目录选择") path_layout = QVBoxLayout(path_group) # 路径输入行 path_input_layout = QHBoxLayout() self.path_input = QLineEdit() self.path_input.setPlaceholderText("请输入目录路径或点击浏览选择...") self.browse_btn = QPushButton("浏览...") path_input_layout.addWidget(self.path_input) path_input_layout.addWidget(self.browse_btn) # 使用当前目录按钮 self.use_current_btn = QPushButton("使用当前目录") path_layout.addLayout(path_input_layout) path_layout.addWidget(self.use_current_btn) control_layout.addWidget(path_group) # 操作按钮组 button_group = QGroupBox("操作") button_layout = QHBoxLayout(button_group) self.generate_btn = QPushButton("生成目录树") self.generate_btn.setMinimumHeight(40) self.generate_btn.setStyleSheet("font-size: 14px;") self.export_btn = QPushButton("导出Excel") self.export_btn.setMinimumHeight(40) self.export_btn.setStyleSheet("font-size: 14px; background-color: #2196F3;") self.export_btn.setEnabled(False) # 创建水平布局用于居中显示按钮 button_widget_layout = QHBoxLayout() button_widget_layout.addStretch() button_widget_layout.addWidget(self.generate_btn) button_widget_layout.addWidget(self.export_btn) button_widget_layout.addStretch() button_widget_layout.setSpacing(20) button_layout.addLayout(button_widget_layout) control_layout.addWidget(button_group) # 进度显示组 progress_group = QGroupBox("进度") progress_layout = QVBoxLayout(progress_group) self.progress_bar = QProgressBar() self.progress_bar.setVisible(False) self.status_label = QLabel("就绪") self.status_label.setStyleSheet("color: #666; padding: 5px;") progress_layout.addWidget(self.progress_bar) progress_layout.addWidget(self.status_label) control_layout.addWidget(progress_group) splitter.addWidget(control_widget) # 下半部分:预览区域 preview_group = QGroupBox("预览") preview_layout = QVBoxLayout(preview_group) # 添加预览信息标签 preview_info_layout = QHBoxLayout() self.preview_count_label = QLabel("共0条记录") self.preview_count_label.setStyleSheet("color: #666; padding: 5px;") preview_info_layout.addWidget(self.preview_count_label) preview_info_layout.addStretch() self.preview_table = QTableWidget() self.preview_table.setAlternatingRowColors(True) self.preview_table.horizontalHeader().setStretchLastSection(True) preview_layout.addLayout(preview_info_layout) preview_layout.addWidget(self.preview_table) splitter.addWidget(preview_group) # 设置分割器比例 splitter.setStretchFactor(0, 1) splitter.setStretchFactor(1, 2) main_layout.addWidget(splitter) # 状态栏 self.statusBar().showMessage("就绪")def main(): app = QApplication(sys.argv) # 设置应用程序字体 font = QFont("微软雅黑", 9) app.setFont(font) window = MainWindow() window.show() sys.exit(app.exec())if __name__ == "__main__": main()







 10个月宝宝每天需要喝多少奶粉?