Python Pillow模块详细介绍
- 2026-07-04 05:22:42
1. 创始时间与作者
创始时间:Pillow 是PIL(Python Imaging Library)的一个分支,首次发布于 2009年(作为PIL的替代品)
核心开发者:
Alex Clark:Pillow项目的创始人和主要维护者
PIL原作者:Fredrik Lundh(原始PIL库的作者)
开源社区贡献:超过300位开发者参与贡献
项目定位:Python图像处理标准库,提供广泛的图像文件格式支持、强大的图像处理能力
2. 官方资源
GitHub 地址:https://github.com/python-pillow/Pillow
PyPI 地址:https://pypi.org/project/Pillow/
文档地址:https://pillow.readthedocs.io/
官网地址:https://python-pillow.org/
3. 核心功能

4. 应用场景
1. 图像基本操作
from PIL import Image# 打开图像img = Image.open('input.jpg')# 调整大小img_resized = img.resize((800, 600))# 旋转img_rotated = img.rotate(45, expand=True)# 裁剪box = (100, 100, 500, 400) # left, upper, right, lowerimg_cropped = img.crop(box)# 保存img_cropped.save('output.png', format='PNG')
2. 图像滤镜与增强
from PIL import Image, ImageFilter, ImageEnhanceimg = Image.open('photo.jpg')# 应用滤镜img_blur = img.filter(ImageFilter.GaussianBlur(radius=5))img_sharp = img.filter(ImageFilter.SHARPEN)# 颜色增强enhancer = ImageEnhance.Color(img)img_vivid = enhancer.enhance(1.5) # 增强50%# 对比度调整contrast = ImageEnhance.Contrast(img)img_high_contrast = contrast.enhance(2.0)# 亮度调整brightness = ImageEnhance.Brightness(img)img_brighter = brightness.enhance(1.3)# 组合保存img_vivid.save('enhanced.jpg', quality=95)
3. 图像合成与水印
from PIL import Image, ImageDraw, ImageFont# 打开背景图和logobackground = Image.open('background.jpg')logo = Image.open('logo.png').convert('RGBA')# 调整logo大小logo = logo.resize((200, 200))# 创建水印位置position = (background.width-logo.width-20, background.height-logo.height-20)# 合成图像background.paste(logo, position, logo) # 第三个参数是mask,用于透明部分# 添加文字水印draw = ImageDraw.Draw(background)font = ImageFont.truetype('arial.ttf', 36)text = "Copyright © 2023"text_width, text_height = draw.textsize(text, font)draw.text( (background.width-text_width-20, 20),text,fill=(255, 255, 255, 128),font=font)# 保存结果background.save('watermarked.jpg', quality=90)
4. 批量图像处理
from PIL import Imageimport osinput_dir = 'input_photos/'output_dir = 'processed_photos/'os.makedirs(output_dir, exist_ok=True)# 处理所有JPG文件for filename in os.listdir(input_dir):if filename.lower().endswith(('.jpg', '.jpeg', '.png')):img_path = os.path.join(input_dir, filename)with Image.open(img_path) as img:# 转换为RGB模式(避免某些操作不支持RGBA)img = img.convert('RGB')# 统一调整大小(保持宽高比)img.thumbnail((1200, 1200))# 添加简单边框bordered = Image.new('RGB', (img.width+20, img.height+20), 'white')bordered.paste(img, (10, 10))# 保存为WebP格式output_path = os.path.join(output_dir, f"{os.path.splitext(filename)[0]}.webp")bordered.save(output_path, format='webp', quality=85)print(f"处理完成!保存至 {output_dir}")
5. 底层逻辑与技术原理
核心架构
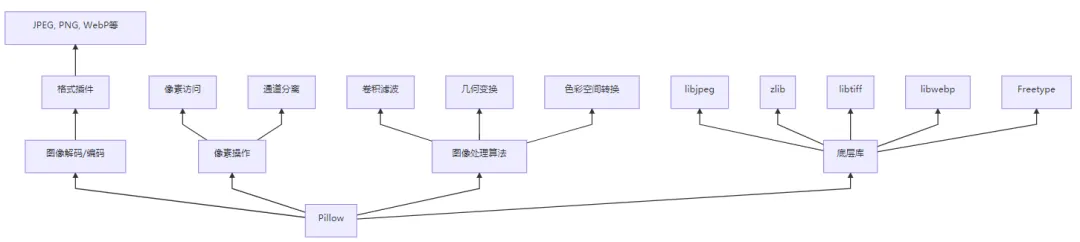
关键技术实现
图像格式支持:
通过插件系统支持多种图像格式
使用C扩展包装底层图像库(如libjpeg, libpng等)
自动检测文件格式
内存管理:
延迟加载(打开文件时不立即加载所有像素)
分块处理大图像
支持内存映射文件
图像处理算法:
双线性/双三次插值缩放
卷积核滤波(模糊、锐化、边缘检测)
仿射变换(旋转、扭曲、透视)
颜色矩阵转换(RGB/CMYK/HSV转换)
绘图系统:
基于路径的绘图(贝塞尔曲线)
抗锯齿文字渲染
透明度合成(alpha compositing)
6. 安装与配置
基础安装
pip install Pillow完整功能安装
# 包含所有可选库支持(推荐)pip install "Pillow[heif,avif,webp,raqm]"
平台特定依赖
| 平台 | 推荐安装 |
|---|---|
| Ubuntu/Debian | sudo apt-get install libjpeg-dev libtiff-dev libwebp-dev libfreetype6-dev |
| Fedora | sudo dnf install libjpeg-devel libtiff-devel libwebp-devel freetype-devel |
| macOS (Homebrew) | brew install jpeg libtiff webp freetype |
| Windows | 预编译包已包含依赖,无需额外安装 |
验证安装
from PIL import Imageprint(Image.__version__)# 检查格式支持print(Image.features.features)# 输出: {'libjpeg_turbo': True, 'libwebp': True, ...}
7. 核心API详解
主要模块
| 模块 | 功能 | 示例 |
|---|---|---|
Image | 基础图像操作 | Image.open(), Image.new() |
ImageDraw | 2D绘图 | ImageDraw.Draw(), draw.text() |
ImageFilter | 滤镜效果 | ImageFilter.GaussianBlur() |
ImageEnhance | 图像增强 | ImageEnhance.Contrast() |
ImageOps | 高级操作 | ImageOps.autocontrast() |
ImageFont | 字体处理 | ImageFont.truetype() |
ImageColor | 颜色处理 | ImageColor.getrgb() |
常用图像操作
| 方法 | 描述 | 示例 |
|---|---|---|
open() | 打开图像 | img = Image.open('file.jpg') |
save() | 保存图像 | img.save('output.png') |
show() | 显示图像 | img.show() |
resize() | 调整大小 | img.resize((800,600)) |
crop() | 裁剪区域 | img.crop((left, top, right, bottom)) |
rotate() | 旋转图像 | img.rotate(45, expand=True) |
convert() | 模式转换 | img.convert('L') # 转灰度 |
thumbnail() | 创建缩略图 | img.thumbnail((200,200)) |
8. 高级用法
1. 图像高级合成
from PIL import Image, ImageChops# 创建渐变遮罩width, height = 800, 600gradient = Image.new('L', (width, height))for y in range(height):for x in range(width):gradient.putpixel((x, y), int(255* (x/width)))# 打开两张图像img1 = Image.open('image1.jpg').resize((width, height))img2 = Image.open('image2.jpg').resize((width, height))# 使用遮罩合成composite = Image.composite(img1, img2, gradient)composite.save('blended.jpg')
2. 生成动态GIF
from PIL import Image# 创建帧列表frames = []for i in range(10):# 生成每一帧img = Image.new('RGB', (200, 200), color=(i*20, 0, 255-i*20))# 在图像上绘制文本d = ImageDraw.Draw(img)d.text((50, 80), f"Frame {i+1}", fill=(255,255,255))frames.append(img)# 保存为GIFframes[0].save('animation.gif',format='GIF',append_images=frames[1:],save_all=True,duration=200, # 每帧200msloop=0# 无限循环)
3. 图像识别预处理
from PIL import Image, ImageFilter, ImageOpsdef preprocess_for_ocr(image_path):img = Image.open(image_path)# 转换为灰度img = img.convert('L')# 增强对比度img = ImageOps.autocontrast(img)# 二值化 (Otsu's method)threshold = 150# 实际应用中应动态计算img = img.point(lambda p: 255 if p>threshold else 0)# 降噪img = img.filter(ImageFilter.MedianFilter(size=3))# 保存预处理结果img.save('preprocessed.png')return imgpreprocessed_img = preprocess_for_ocr('document.jpg')
4. 高级绘图
from PIL import Image, ImageDraw, ImageFont, ImagePath# 创建画布img = Image.new('RGB', (800, 600), color='#f0f0f0')draw = ImageDraw.Draw(img)# 绘制多边形points = [(100,100), (200,50), (300,150), (250,250), (150,300)]draw.polygon(points, fill='blue', outline='black')# 绘制贝塞尔曲线draw.line([ (400, 100), (500, 200), (600, 150), (700, 300)], fill='red', width=3, joint='curve')# 绘制文本(高级排版)font = ImageFont.truetype('arial.ttf', 48)text = "Hello\nPillow!"draw.multiline_text( (400, 400),text,fill='green',font=font,align='center',spacing=20)# 绘制透明圆形overlay = Image.new('RGBA', img.size, (0,0,0,0))overlay_draw = ImageDraw.Draw(overlay)overlay_draw.ellipse([(500, 400), (700, 600)], fill=(255,0,0,128))img = Image.alpha_composite(img.convert('RGBA'), overlay).convert('RGB')img.save('drawing.png')
9. 最佳实践
资源管理
# 使用with语句确保文件关闭with Image.open('large.jpg') as img:# 处理图像img.thumbnail((1000, 1000))img.save('thumbnail.jpg')
大图像处理
# 分块处理大图像tile_size = 512with Image.open('huge_image.tif') as img:for y in range(0, img.height, tile_size):for x in range(0, img.width, tile_size):box = (x, y, min(x+tile_size, img.width), min(y+tile_size, img.height))tile = img.crop(box)process_tile(tile)
性能优化
# 避免频繁复制图像img = img.copy() # 仅在需要时复制# 使用C优化操作img = img.filter(ImageFilter.GaussianBlur) # C实现# 减少模式转换img = img.convert('RGB') # 只转换一次
安全考虑
# 限制图像大小防止DoS攻击MAX_SIZE = 10_000# 最大宽度或高度with Image.open(user_upload) as img:if max(img.size) >MAX_SIZE:raise ValueError("图像尺寸过大")# 继续处理...
10. 与同类工具对比
| 特性 | Pillow | OpenCV | scikit-image | Wand |
|---|---|---|---|---|
| 安装难度 | ⭐⭐ | ⭐⭐⭐⭐ | ⭐⭐⭐ | ⭐⭐⭐ |
| 文档质量 | ⭐⭐⭐⭐ | ⭐⭐⭐ | ⭐⭐⭐⭐ | ⭐⭐ |
| 功能广度 | ⭐⭐⭐⭐ | ⭐⭐⭐⭐⭐ | ⭐⭐⭐⭐ | ⭐⭐⭐⭐ |
| 易用性 | ⭐⭐⭐⭐⭐ | ⭐⭐⭐ | ⭐⭐⭐⭐ | ⭐⭐ |
| 性能 | ⭐⭐⭐ | ⭐⭐⭐⭐⭐ | ⭐⭐⭐ | ⭐⭐⭐ |
| 格式支持 | ⭐⭐⭐⭐⭐ | ⭐⭐⭐ | ⭐⭐⭐ | ⭐⭐⭐⭐ |
| 高级功能 | ⭐⭐⭐ | ⭐⭐⭐⭐⭐ | ⭐⭐⭐⭐ | ⭐⭐⭐⭐ |
11. 行业应用案例
Web开发
用户上传图片缩略图生成
图片水印添加
在线图片编辑器
数据科学
机器学习图像预处理
数据可视化图表生成
图像数据增强
数字艺术
生成艺术创作
图片滤镜应用
动态图像生成
文档处理
PDF文档图像提取
扫描文档预处理
OCR前图像优化
科学影像
显微镜图像处理
卫星图像分析
医学影像可视化
总结
Pillow 是Python图像处理的事实标准库,核心价值在于:
简单易用:直观的API设计,学习曲线平缓
格式支持广泛:支持超过50种图像格式
功能全面:从基础操作到高级处理一应俱全
社区强大:长期维护,文档完善
技术演进:
1995: PIL (Python Imaging Library) 首次发布
2009: Pillow 作为PIL的分支创建
2013: Pillow 2.0发布,成为主流替代品
2020: 支持Python 3.9+,放弃Python 2支持
2023: 9.0版本支持HEIF和AVIF格式
关键特性:
跨平台支持(Windows/Linux/macOS)
丰富的图像处理操作
强大的绘图功能
灵活的插件架构
与NumPy无缝集成
适用场景:
图像格式转换
图片编辑与合成
图像预处理(机器学习)
缩略图生成
图像分析
动态图像生成
安装使用:
pip install Pillow学习资源:
官方文档:https://pillow.readthedocs.io
教程:https://pillow.readthedocs.io/en/latest/handbook/tutorial.html
示例库:https://github.com/python-pillow/Pillow/tree/main/docs/examples
截至2023年,Pillow在PyPI的月下载量超过 5000万次,是Python生态中最流行的图像处理库。项目遵循 Historical Permission Notice and Disclaimer (HPND) 开源协议,可免费用于商业和非商业项目。

