用Python做科研级画图—— 不确定性表达:fill_between置信区间带
- 2026-09-02 20:09:19
大家好,我是你们的小帅学长。
很多同学画折线图时会默认只画“均值/预测值”那一条主线,图看起来干净、趋势也很清楚——但只要进入论文写作或答辩现场,几乎一定会被问到一句话:
“这条曲线稳吗?波动范围多大?差异显著吗?”
这句话背后的本质是:
科研不只关心“结果是什么”,还关心“结果有多可信”。
而把不确定性画出来,就是让你的图从“展示结果”升级到“表达可信度”。
这一篇我们用 Matplotlib 里最常用、也最标准的方式:fill_between,来画置信区间带/波动带。
01.先讲清楚:你画的“带子”到底是什么?
fill_between 画出来的阴影带,本质上是在表达:
某个中心曲线(均值/中位数/预测值)周围的范围
常见的三种“带子”含义(你写论文时一定要在图注说清楚):
均值 ± 标准差(mean ± std):展示波动性(不等于置信区间)
置信区间(CI,比如 95% CI):展示均值估计的不确定性
分位带(quantile band,如 10–90%):展示分布范围(更稳健)
02.什么时候必须画不确定性?
大多数场景如下:
多次重复实验 / 多站点 / 多年份:你展示的是总体趋势
模型对比:你想表达“谁更稳定/更可靠”
预测曲线:你想说明“预测区间”而不只是点估计
论文/答辩:别人一定会追问稳定性与误差来源
03.fill_between 的论文级写法
先有中心线:y_mean
再有上下界:y_low, y_high
fill_between(x, y_low, y_high, alpha=...) 画带子
最后再把中心线画在带子上面
04.直接可用模板:均值 + 95% CI
下面这段代码会输出一张“论文常见”的置信区间带折线图:
import osimport numpy as npimport matplotlib as mplimport matplotlib.pyplot as pltfrom matplotlib import font_manager as fmfrom matplotlib.ticker import MaxNLocator, FormatStrFormatter# == 字体 ==win_fonts = r"C:\Windows\Fonts"for p in [os.path.join(win_fonts, "times.ttf"),os.path.join(win_fonts, "timesbd.ttf"),os.path.join(win_fonts, "timesi.ttf"),os.path.join(win_fonts, "simsun.ttc"),]:if os.path.exists(p):try:fm.fontManager.addfont(p)except Exception:passmpl.rcParams["font.family"] = ["Times New Roman", "SimSun"]mpl.rcParams["axes.unicode_minus"] = Falsempl.rcParams["mathtext.fontset"] = "custom"mpl.rcParams["mathtext.rm"] = "Times New Roman"mpl.rcParams["mathtext.it"] = "Times New Roman:italic"mpl.rcParams["mathtext.bf"] = "Times New Roman:bold"OUT_DIR = r"D:\py_figs "os.makedirs(OUT_DIR, exist_ok=True)# == 示例数据 ==rng = np.random.default_rng(3)x = np.linspace(0, 10, 120)n_runs = 30ys = []for _ in range(n_runs):noise= 0.15 * rng.standard_normal(len(x))y= 0.9 * np.sin(x) + 0.1 + noiseys.append(y)ys = np.vstack(ys) # (n_runs, len(x))# 均值y_mean = ys.mean(axis=0)# 95% CI(近似):mean ± 1.96 * (std/sqrt(n))y_std = ys.std(axis=0, ddof=1)y_sem = y_std / np.sqrt(n_runs)y_low = y_mean - 1.96 * y_semy_high = y_mean + 1.96 * y_sem# == 画图:先带子后主线 ==fig, ax = plt.subplots(figsize=(6.8, 3.6))# 置信区间带(背景)ax.fill_between(x, y_low, y_high, alpha=0.25, linewidth=0)# 均值主线(前景)ax.plot(x, y_mean, linewidth=1.5)ax.set_title("不确定性表达:Mean + 95% CI / 均值与95%置信区间", fontsize=14)ax.set_xlabel("Time (day) / 时间(天)", fontsize=12)ax.set_ylabel("Value / 数值", fontsize=12)ax.xaxis.set_major_locator(MaxNLocator(nbins=6))ax.yaxis.set_major_locator(MaxNLocator(nbins=6))ax.yaxis.set_major_formatter(FormatStrFormatter("%.2f"))out_path = os.path.join(OUT_DIR, "fill_between_ci.jpg")fig.savefig(out_path, dpi=300, bbox_inches="tight", pad_inches=0.05)plt.close(fig)print("Saved:", out_path)
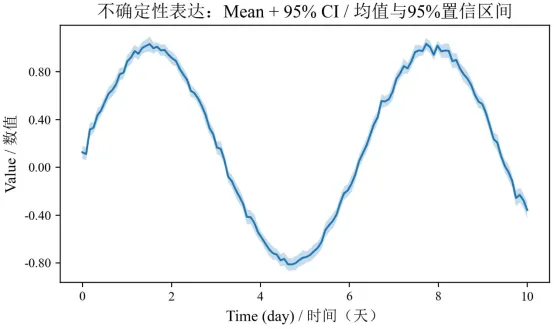
建议你在图注里明确一句话:
如果是 CI:
“Shaded area indicates the 95% confidence interval.”
“阴影表示 95% 置信区间。”
如果是 std:
“Shaded area indicates mean ± 1 standard deviation.”
“阴影表示均值 ± 1 标准差。”
如果是分位带:
“Shaded area indicates the 10th–90th percentiles.”
“阴影区域表示第10-90百分位区间。”
06.两个最容易误导的坑
一是 带子太深、把线吃掉
解决:带子 alpha 控制在 0.15–0.35;线一定要最后画、线宽略加粗。
二是 用 std 当 CI
std 和 CI 含义不同,论文里必须说清楚,不要混用术语。
只画一条曲线,你在展示趋势;把不确定性画出来,你才是在展示可信度——fill_between 这条阴影带,往往就是论文图“像不像科学”的分水岭。
下一篇我们聊一个更“容易被误用”的图:《面积图的边界:何时会误导 + 替代方案》。面积图看起来很直观,但在某些情况下会放大差异、制造错觉。下一篇我会告诉你什么时候该用、什么时候千万别用,以及更可靠的替代画法。
——期待你的关注——
