本教程适用于ParaView 6.0.1 版本,已在Windows 10和Ubuntu 24.04系统上通过测试。其他版本请根据实际情况调整操作。我相信VSCode里面的操作也大差不差。
问题背景
为什么要在Pycharm中配置ParaView Python开发环境?
- 代码提示:PyCharm 的智能提示功能可以大幅提升开发效率,尤其是对于复杂的 ParaView API。
- 调试支持:在 PyCharm 中可以设置断点、单步调试,方便排查问题。
- 集成开发环境:PyCharm 提供了强大的项目管理、版本控制和测试工具,适合进行大型项目开发。
遇到的问题
ParaView 自带的 pvpython.exe 是一个功能完整的 Python 解释器,但直接在 PyCharm 中配置会遇到以下问题:
- 无法识别解释器:PyCharm 报错 "Python is broken" 或 "wrong version"
本教程将逐一解决这些问题。
准备工作
确保已安装ParaView 6.0.1,并添加到系统环境变量中。可以在命令行输入 pvpython 来验证是否可用。
较老的Linux系统可能无法运行ParaView 6.0.1(缺乏高版本GLIBC),可以通过创建Ubuntu 24.04的docker容器来解决(我就是这么干的)。
配置 Python 解释器
原理
Pycharm无法识别pvpython。因此我们重新安装一个同版本的解释器,并将其配置为PyCharm的Python解释器。然后将ParaView的Python库路径加入PYTHONPATH环境变量,这样就可以在PyCharm中使用ParaView的Python API了。这样做相当于弃用了pvpython,即使删了pvpython,也不会影响Pycharm中的程序运行。
参考:paraview.simple Namesspace in IDE (e.g. Pycharm) - ParaView Support - ParaView
步骤
ParaView 6.0.1使用Python 3.12.7解释器。
在Windows系统上,下载python-3.12.7-*.exe。安装即可。
在Linux系统上,可以通过pyenv安装,也可以源码编译安装,我选择的是源码编译安装:
tar xvf Python-3.12.7.tgzcd Python-3.12.7mkdir build && cd build../configure \ --prefix=/opt/python3.12.7 \ --enable-optimizations \ --enable-shared \ --with-ensurepip=installmake -j && make installexport LD_LIBRARY_PATH=/opt/python3.12.7/lib:$LD_LIBRARY_PATHexport PATH=/opt/python3.12.7/bin:$PATH
终端输入python3,如果显示Python 3.12.7版本信息,则说明安装成功。
建议用venv装一个虚拟环境,这样方便以后安装第三方库。
打开Pycharm,将虚拟环境的python解释器路径(如~/myvenv/bin/python)添加到PyCharm的Python解释器列表中,并选择它作为当前项目的解释器。
此时代码尚无法运行,因为ParaView的Python库路径还没有加入PYTHONPATH环境变量中。
在Pycharm中,进入Edit Configurations,找到当前运行的配置,在Environment variables中添加:PYTHONPATH=E:\ParaView 6.0.1\bin\Lib\site-packages(Windows系统是这个路径,根据实际情况调整)
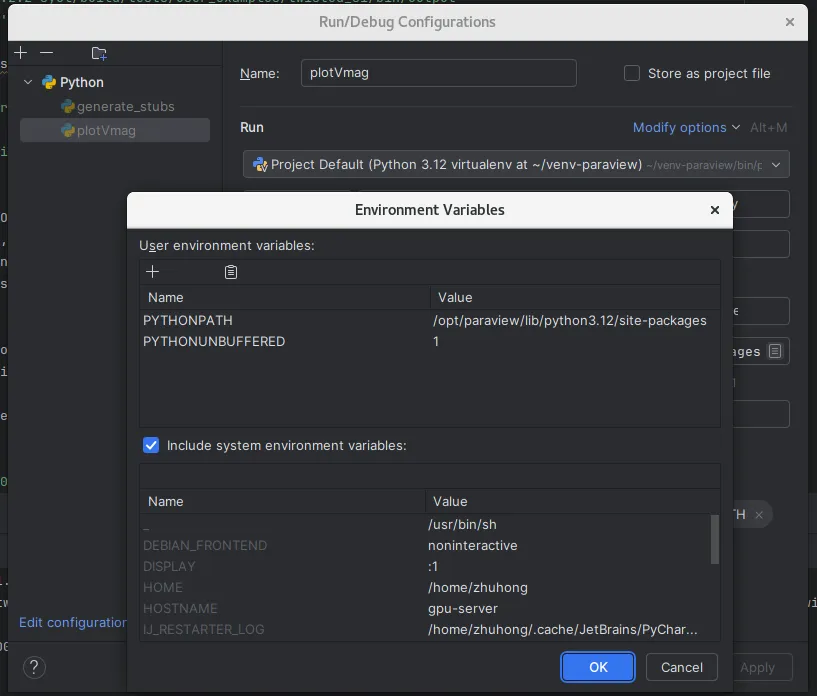
到这一步就可以运行ParaView的Python脚本了,也可以进行代码调试了。
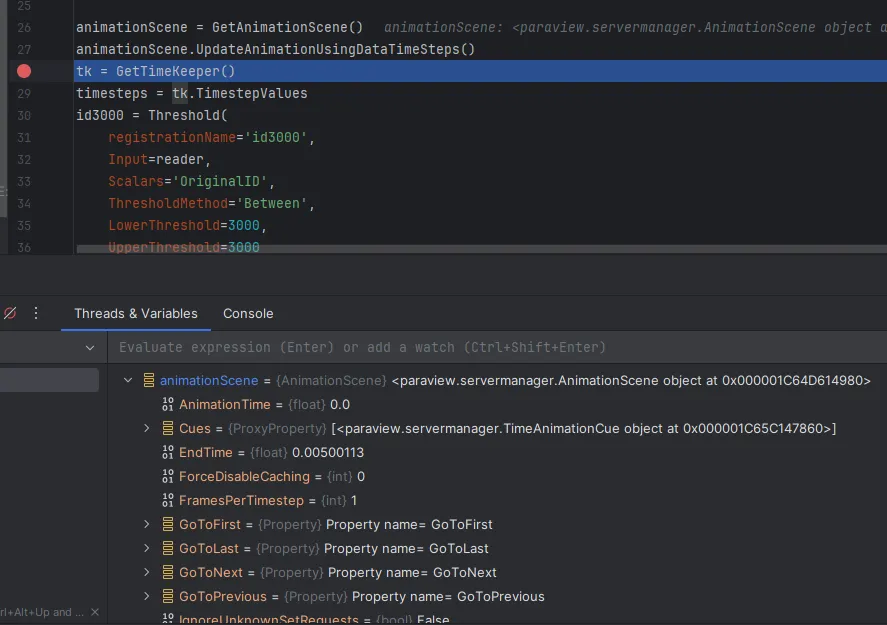
但代码提示和源码跳转仍然存在问题。下面我们将解决这个问题。
配置代码提示
步骤 1:标记 ParaView 库目录为 Sources Root
- 打开 File → Settings → Project: [your_project] → Project Structure
- 添加目录:
E:\ParaView 6.0.1\bin\Lib\site-packages
- 在目录树中找到该路径,选中它,此时上方Mark as后面的选项会高亮,选择
Sources。
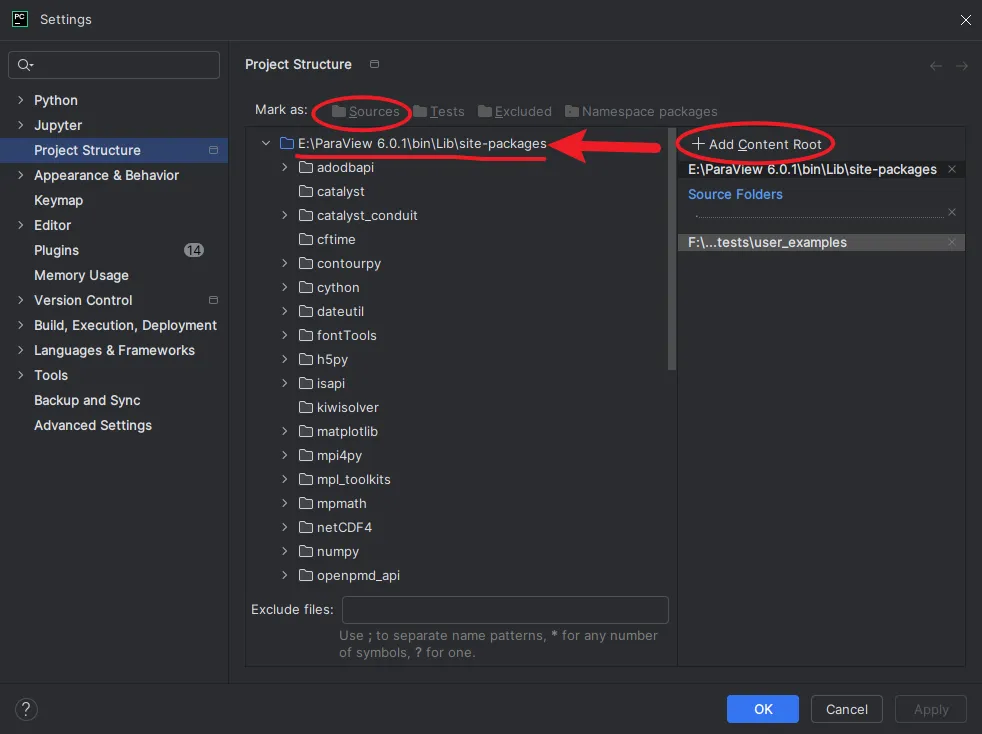
此步骤可以让部分静态定义的函数(如 GetAnimationScene、vtk_to_numpy)获得代码提示,也可以实现源码跳转。
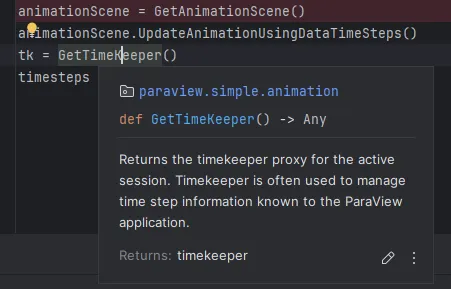
然而,许多函数(如 XMLPolyDataReader、Threshold、Sphere 等)是运行时动态生成的,不在静态的 .py 文件中定义。因此 PyCharm 无法进行静态分析,导致没有代码提示。
解决方案是生成 Stub 文件(.pyi),让 PyCharm 能够识别这些动态函数。
步骤 2:创建 Stub 生成脚本
创建文件 generate_stubs.py,内容如下:
"""生成 ParaView simple 模块的完整类型提示文件包含函数返回类型和类方法"""import osimport inspectfrom paraview import simplefrom paraview import servermanagerdefget_return_type(func_name):"""根据函数名推断返回类型""" return_types = {# Animation'GetAnimationScene': 'AnimationScene','GetTimeKeeper': 'TimeKeeper',# Views'GetActiveView': 'View','GetActiveViewOrCreate': 'View','CreateRenderView': 'RenderView','GetRenderView': 'RenderView','CreateView': 'View',# Sources/Filters/Readers'GetActiveSource': 'Proxy','FindSource': 'Proxy','GetSources': 'Dict[str, Proxy]',# Representation'Show': 'Representation','GetRepresentation': 'Representation','GetDisplayProperties': 'Representation',# Camera'GetActiveCamera': 'Camera',# 其他'servermanager.Fetch': 'vtkDataObject', }# Reader 类返回 Proxyif'Reader'in func_name:return'Proxy'# Writer 类返回 Proxyif'Writer'in func_name:return'Proxy'# Source/Filter 类(首字母大写的函数)if func_name[0].isupper() and func_name notin return_types:return'Proxy'return return_types.get(func_name, 'Any')defget_class_methods(cls):"""获取类的所有方法""" methods = []for name in dir(cls):if name.startswith('_'):continuetry: obj = getattr(cls, name)if callable(obj): methods.append(name)except:passreturn methodsdefgenerate_paraview_stubs():"""生成完整的 stub 文件"""# 收集 simple 模块中的符号 all_names = [name for name in dir(simple) ifnot name.startswith('_')] functions = [] classes = [] variables = []for name in all_names:try: obj = getattr(simple, name)if inspect.isclass(obj): classes.append((name, obj))elif callable(obj): functions.append((name, obj))else: variables.append((name, obj))except Exception as e: print(f"跳过 {name}: {e}")# 生成 stub 内容 lines = ['"""','ParaView simple 模块类型提示','自动生成的 stub 文件(包含返回类型)','"""','','from typing import Any, Optional, List, Tuple, Union, Dict','','# ========== 基础类型定义 ==========','class Proxy:',' def UpdatePipeline(self, time: float = ...) -> None: ...',' def UpdatePropertyInformation(self) -> None: ...',' def GetProperty(self, name: str) -> Any: ...',' def SetPropertyWithName(self, name: str, value: Any) -> None: ...',' def ListProperties(self) -> List[str]: ...',' def GetDataInformation(self) -> Any: ...','','class View:',' ViewSize: List[int]',' UseOffscreenRendering: bool',' UseOffscreenRenderingForScreenshots: bool',' def ResetCamera(self) -> None: ...',' def Update(self) -> None: ...','','class RenderView(View):',' CameraPosition: List[float]',' CameraFocalPoint: List[float]',' CameraViewUp: List[float]',' Background: List[float]','','class Representation:',' Visibility: int',' ColorArrayName: List[str]',' Opacity: float',' def SetScalarBarVisibility(self, view: View, visible: bool) -> None: ...','','class AnimationScene:',' StartTime: float',' EndTime: float',' NumberOfFrames: int',' PlayMode: str',' def UpdateAnimationUsingDataTimeSteps(self) -> None: ...',' def Play(self) -> None: ...',' def Stop(self) -> None: ...',' def GoToFirst(self) -> None: ...',' def GoToLast(self) -> None: ...',' def GoToNext(self) -> None: ...',' def GoToPrevious(self) -> None: ...',' def SetAnimationTime(self, time: float) -> None: ...','','class TimeKeeper:',' Time: float',' TimestepValues: List[float]','','class Camera:',' Position: List[float]',' FocalPoint: List[float]',' ViewUp: List[float]',' def Azimuth(self, angle: float) -> None: ...',' def Elevation(self, angle: float) -> None: ...',' def Roll(self, angle: float) -> None: ...',' def Zoom(self, factor: float) -> None: ...','', ]# 添加原有的类定义 lines.append('# ========== ParaView 类 ==========')for name, obj in sorted(classes, key=lambda x: x[0]):if name notin ['Proxy', 'View', 'RenderView', 'Representation', 'AnimationScene', 'TimeKeeper', 'Camera']: lines.append(f'class {name}:') lines.append(f' def __init__(self, *args: Any, **kwargs: Any) -> None: ...')# 添加类方法try: methods = get_class_methods(obj)for method in methods[:10]: # 限制方法数量 lines.append(f' def {method}(self, *args: Any, **kwargs: Any) -> Any: ...')except:pass lines.append('')# 添加函数(带返回类型) lines.append('# ========== Functions ==========')for name, obj in sorted(functions, key=lambda x: x[0]): return_type = get_return_type(name)try: sig = inspect.signature(obj) params = str(sig) lines.append(f'def {name}{params} -> {return_type}: ...')except (ValueError, TypeError): lines.append(f'def {name}(*args: Any, **kwargs: Any) -> {return_type}: ...') lines.append('')# 添加变量 lines.append('# ========== Variables ==========')for name, obj in sorted(variables, key=lambda x: x[0]): lines.append(f'{name}: Any')# 写入文件 stub_content = '\n'.join(lines) output_path = os.path.join( os.path.dirname(simple.__file__),'__init__.pyi' )with open(output_path, 'w', encoding='utf-8') as f: f.write(stub_content) print(f'✅ Stub 文件已生成: {output_path}') print(f' 函数: {len(functions)}') print(f' 类: {len(classes)}')return output_pathif __name__ == '__main__': generate_paraview_stubs()
运行这个脚本。预期输出:
✅ Stub 文件已生成: E:\ParaView 6.0.1\bin\Lib\site-packages\paraview\simple\__init__.pyi 函数: 200+ 类: 10+ 变量: 若干
步骤 3:重建 PyCharm 索引
- 在 PyCharm 中,点击 File → Invalidate Caches...
- 勾选 Invalidate and Restart
验证配置
from paraview.simple import *
输入 XML 后按 Ctrl + Space,应出现 XMLPolyDataReader 等提示
输入 Thre 后按 Ctrl + Space,应出现 Threshold 提示
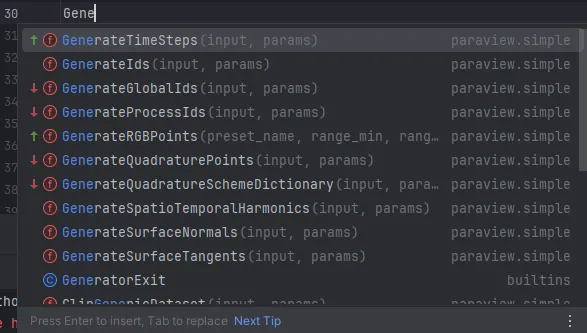
输入 Gene 后按 Ctrl + Space,应出现 GenerateRGBPoints 提示(参数名完整)
按住 Ctrl 点击函数名,可跳转到定义或 stub 文件
小技巧
在导入simple模块之前,添加以下代码,可以启用headless/batch模式(避免打开GUI,干扰程序运行):
from paraview import optionsoptions.batch = True
 10个月宝宝每天需要喝多少奶粉?