各位兄弟,我们一般备份配置文件可以采用tftp服务的方式备份到服务器中,但我今天介绍一个通过共享文件夹来备份配置文件的方法,下面我就直接上代码了:from netmiko import ConnectHandler
from concurrent.futures import ThreadPoolExecutor
import datetime
import os
import subprocess
import time # 移到顶部,修复语法问题
# ===================== 【必须修改的配置】 =====================
# 1. 交换机列表(H3C通用,S5110-28P完美兼容)
SWITCH_LIST = [
{"device_type": "hp_comware_telnet", "host": "10.0.0.21", "username": "admin", "password": "**********"},
{"device_type": "hp_comware_telnet", "host": "10.0.0.9", "username": "admin", "password": "**********"},
{"device_type": "hp_comware_telnet", "host": "10.0.0.27", "username": "admin", "password": "**********"},
{"device_type": "hp_comware_telnet", "host": "10.0.0.16", "username": "admin", "password": "**********"},
{"device_type": "hp_comware_telnet", "host": "10.0.0.25", "username": "admin", "password": "**********"},
{"device_type": "hp_comware_telnet", "host": "10.0.0.19", "username": "admin", "password": "**********"},
{"device_type": "hp_comware_telnet", "host": "10.0.0.10", "username": "admin", "password": "**********"},
{"device_type": "hp_comware_telnet", "host": "10.0.0.8", "username": "admin", "password": "**********"},
{"device_type": "hp_comware_telnet", "host": "10.0.0.22", "username": "admin", "password": "**********"},
{"device_type": "hp_comware_telnet", "host": "10.0.0.15", "username": "admin", "password": "**********"},
{"device_type": "hp_comware_telnet", "host": "10.0.0.17", "username": "admin", "password": "**********"},
{"device_type": "hp_comware_telnet", "host": "10.0.0.11", "username": "admin", "password": "**********"},
{"device_type": "hp_comware_telnet", "host": "10.0.0.18", "username": "admin", "password": "**********"},
{"device_type": "hp_comware_telnet", "host": "10.0.0.29", "username": "admin", "password": "**********"},
{"device_type": "hp_comware_telnet", "host": "10.0.0.5", "username": "admin", "password": "**********"},
{"device_type": "hp_comware_telnet", "host": "10.0.0.6", "username": "admin", "password": "**********"},
]
# 2. 【重要】带密码的网络共享文件夹配置
SHARE_CONFIG = {
"share_path": r"\\192.168.1.189\switch", # 共享路径
"username": "*******", # 共享文件夹登录账号
"password": "*******", # 共享文件夹登录密码
}
# 3. 并发线程数(老交换机建议 3~6,太高会掉线)
MAX_WORKERS = 7
# 全局Telnet超时(解决连接失败)
TELNET_TIMEOUT = 20
# ==============================================================
# ===================== 自动挂载/访问带密码的共享文件夹 =====================
def access_protected_share():
"""自动连接带密码的网络共享文件夹(Windows专用)"""
try:
# 先删除旧连接
subprocess.run(f'net use * /delete /y', capture_output=True, shell=True)
time.sleep(0.5)
# 建立新连接
cmd = (
f'net use {SHARE_CONFIG["share_path"]} '
f'/user:{SHARE_CONFIG["username"]} {SHARE_CONFIG["password"]} /persistent:no'
)
res = subprocess.run(cmd, capture_output=True, shell=True, text=True)
if res.returncode == 0:
print(f"✅ 成功连接共享文件夹:{SHARE_CONFIG['share_path']}")
else:
print(f"⚠️ 共享文件夹连接警告:{res.stderr}")
except Exception as e:
print(f"⚠️ 共享文件夹连接提示:{str(e)}")
# 执行共享文件夹认证
access_protected_share()
# ===================== 交换机备份函数(S5110-28P专用修复) =====================
def backup_h3c_config(switch):
ip = switch["host"]
now = datetime.datetime.now().strftime("%Y%m%d_%H%M%S")
filename = f"{ip}_配置备份_{now}.cfg"
save_path = os.path.join(SHARE_CONFIG["share_path"], filename)
print(f"\n▶ 开始备份:{ip}")
try:
# 添加超时,解决老交换机连接超时
switch["timeout"] = TELNET_TIMEOUT
switch["conn_timeout"] = TELNET_TIMEOUT
with ConnectHandler(**switch) as conn:
# 保存配置(S5110老款专用)
conn.send_command_timing("save force", delay_factor=2)
time.sleep(1)
# 读取配置
config = conn.send_command("display startup", read_timeout=30)
running_config = conn.send_command("display current-configuration", read_timeout=60)
# 写入文件:H3C中文必须用 GBK 编码,否则乱码
with open(save_path, "w", encoding="gbk") as f:
f.write(f"=== H3C 交换机配置备份 ===\n")
f.write(f"IP地址:{ip}\n")
f.write(f"备份时间:{datetime.datetime.now()}\n\n")
f.write("===== 启动配置信息 =====\n")
f.write(config)
f.write("\n\n===== 当前运行配置 =====\n")
f.write(running_config)
print(f"✅ 备份成功:{filename}")
return f"✅ {ip} 备份成功"
except Exception as e:
error = f"❌ {ip} 备份失败:{str(e)}"
print(error)
return error
# ===================== 主程序 =====================
if __name__ == "__main__":
print("=" * 65)
print(" H3C 交换机批量备份程序(S5110-28P 完美兼容)")
print("=" * 65)
start_time = datetime.datetime.now()
# 多线程并发备份
with ThreadPoolExecutor(max_workers=MAX_WORKERS) as executor:
results = executor.map(backup_h3c_config, SWITCH_LIST)
# 输出结果
print("\n" + "=" * 50)
print("备份结果汇总:")
for res in results:
print(res)
end_time = datetime.datetime.now()
print(f"\n总耗时:{(end_time - start_time).total_seconds():.2f} 秒")
print(f"备份目录:{SHARE_CONFIG['share_path']}")
print("✅ 全部任务完成!")
昨天分享的程序是采用ssh安全连接,由于ssh兼容性要求高,今天上面的程序是采用telnet连接的,眼尖的朋友可能从交换机列表已经可以看出来了,下面看下执行情况:
D:\python\pythonProject3\.venv\Scripts\python.exe "D:\python\pythonProject3\备份交换机配置文件(telnet)方式.py"
✅ 成功连接共享文件夹:\\192.168.1.189\switch
=================================================================
H3C 交换机批量备份程序(S5110-28P 完美兼容)
=================================================================
▶ 开始备份:10.0.0.21
▶ 开始备份:10.0.0.9
▶ 开始备份:10.0.0.27
▶ 开始备份:10.0.0.16
▶ 开始备份:10.0.0.25
▶ 开始备份:10.0.0.19
▶ 开始备份:10.0.0.10
✅ 备份成功:10.0.0.27_配置备份_20260329_081822.cfg
▶ 开始备份:10.0.0.8
✅ 备份成功:10.0.0.25_配置备份_20260329_081822.cfg
▶ 开始备份:10.0.0.22
✅ 备份成功:10.0.0.19_配置备份_20260329_081822.cfg
▶ 开始备份:10.0.0.15
✅ 备份成功:10.0.0.21_配置备份_20260329_081822.cfg
▶ 开始备份:10.0.0.17
✅ 备份成功:10.0.0.9_配置备份_20260329_081822.cfg
▶ 开始备份:10.0.0.11
✅ 备份成功:10.0.0.22_配置备份_20260329_081831.cfg
▶ 开始备份:10.0.0.18
✅ 备份成功:10.0.0.15_配置备份_20260329_081832.cfg
▶ 开始备份:10.0.0.29
✅ 备份成功:10.0.0.17_配置备份_20260329_081832.cfg
▶ 开始备份:10.0.0.5
✅ 备份成功:10.0.0.18_配置备份_20260329_081841.cfg
▶ 开始备份:10.0.0.6
✅ 备份成功:10.0.0.29_配置备份_20260329_081842.cfg
✅ 备份成功:10.0.0.6_配置备份_20260329_081848.cfg
✅ 备份成功:10.0.0.16_配置备份_20260329_081822.cfg
✅ 备份成功:10.0.0.10_配置备份_20260329_081822.cfg
✅ 备份成功:10.0.0.8_配置备份_20260329_081831.cfg
✅ 备份成功:10.0.0.11_配置备份_20260329_081833.cfg
✅ 备份成功:10.0.0.5_配置备份_20260329_081842.cfg
==================================================
备份结果汇总:
✅ 10.0.0.21 备份成功
✅ 10.0.0.9 备份成功
✅ 10.0.0.27 备份成功
✅ 10.0.0.16 备份成功
✅ 10.0.0.25 备份成功
✅ 10.0.0.19 备份成功
✅ 10.0.0.10 备份成功
✅ 10.0.0.8 备份成功
✅ 10.0.0.22 备份成功
✅ 10.0.0.15 备份成功
✅ 10.0.0.17 备份成功
✅ 10.0.0.11 备份成功
✅ 10.0.0.18 备份成功
✅ 10.0.0.29 备份成功
✅ 10.0.0.5 备份成功
✅ 10.0.0.6 备份成功
总耗时:65.36 秒
备份目录:\\192.168.1.189\switch
✅ 全部任务完成!
进程已结束,退出代码为 0
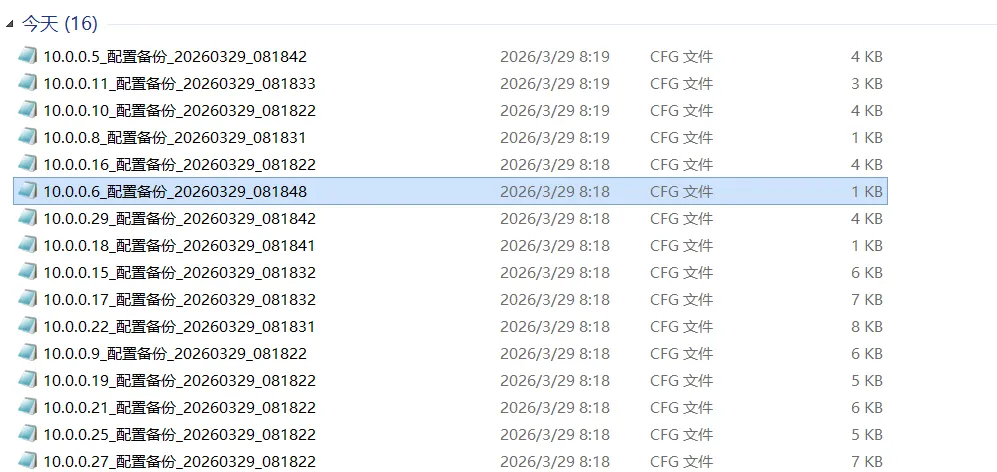
这次老旧的h3c交换机也做了测试,最后看下共享文件夹的备份情况:
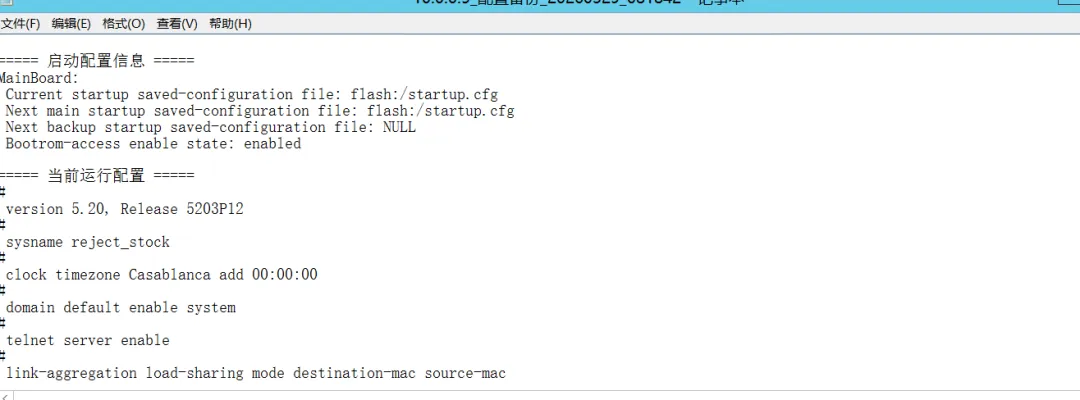
打开一个配置备份文件:
ok,都有了,今天就分享到这里,明天我们来讲下tftp的方式备份。
 10个月宝宝每天需要喝多少奶粉?
