造个工具系列 · 第5篇 | 完整源码见文末
我们时常会有给图片加水印的需求,今天就一起用 PySide6 + Pillow 来做一个批量给图片加水印的工具:
支持文字水印和图片水印
可以调整位置、透明度、大小
支持单张预览和批量处理
输出到独立目录,不覆盖原图
水印内容——文字水印(公司名、网址、个人ID)和图片水印(Logo)都需要支持。
水印位置——采用九宫格定位:左上、中上、右上、左中、正中、右中、左下、中下、右下。
项目代码目录结构
image-watermark/├── src/│ ├── main.py # 主入口,GUI 界面(纯代码构建)│ └── watermark_engine.py # 水印核心逻辑├── pyproject.toml # 项目配置与依赖(已配置清华源)└── README.md
环境要求:Python ≥ 3.10,推荐 3.13。
安装依赖:
pip install pyside6 Pillow
如果从后台获取项目源代码,解压后直接用 uv 同步:
uv sync
核心代码解析
1. 水印引擎(watermark_engine.py)
核心逻辑流程:创建透明图层 → 画水印 → 合成到原图。以下是文字水印的关键代码:
class WatermarkEngine: # 九宫格位置映射:(水平比例, 垂直比例, 对齐锚点) POSITIONS = { "左上": (0.05, 0.05, "la"), "中上": (0.50, 0.05, "ma"), "右上": (0.95, 0.05, "ra"), "左中": (0.05, 0.50, "lm"), "正中": (0.50, 0.50, "mm"), "右中": (0.95, 0.50, "rm"), "左下": (0.05, 0.95, "lb"), "中下": (0.50, 0.95, "mb"), "右下": (0.95, 0.95, "rb"), } @staticmethod def add_text_watermark(image, text, font_path, font_size=36, color=(255,255,255,128), position="右下", rotation=0, margin=10): """添加文字水印,返回带水印的 Image 副本(原图不动)""" base = image.convert("RGBA") txt_layer = Image.new("RGBA", base.size, (0, 0, 0, 0)) draw = ImageDraw.Draw(txt_layer) font = ImageFont.truetype(font_path, font_size) # 计算文字尺寸和九宫格坐标 bbox = draw.textbbox((0, 0), text, font=font) tw, th = bbox[2] - bbox[0], bbox[3] - bbox[1] xr, yr, anchor = WatermarkEngine.POSITIONS.get(position, ...) x = int(base.width * xr) - (tw // 2 if anchor[0] == "m" else margin) y = int(base.height * yr) - (th // 2 if anchor[1] == "m" else margin) draw.text((x, y), text, font=font, fill=color) # 旋转后居中裁剪 if rotation: txt_layer = txt_layer.rotate(rotation, expand=True, resample=Image.BICUBIC) dw, dh = txt_layer.size txt_layer = txt_layer.crop(( (dw - base.width) // 2, (dh - base.height) // 2, (dw + base.width) // 2, (dh + base.height) // 2 )) return Image.alpha_composite(base, txt_layer).convert("RGB")
process_file 是统一入口,根据 mode 参数分发到文字或图片水印方法:
@staticmethoddef process_file(input_path, output_path, mode, **kwargs): image = Image.open(input_path) if mode == "text": result = WatermarkEngine.add_text_watermark(image, **kwargs) elif mode == "image": result = WatermarkEngine.add_image_watermark(image, **kwargs) os.makedirs(os.path.dirname(output_path), exist_ok=True) result.save(output_path, quality=95) return output_path
2. 主界面(main.py)
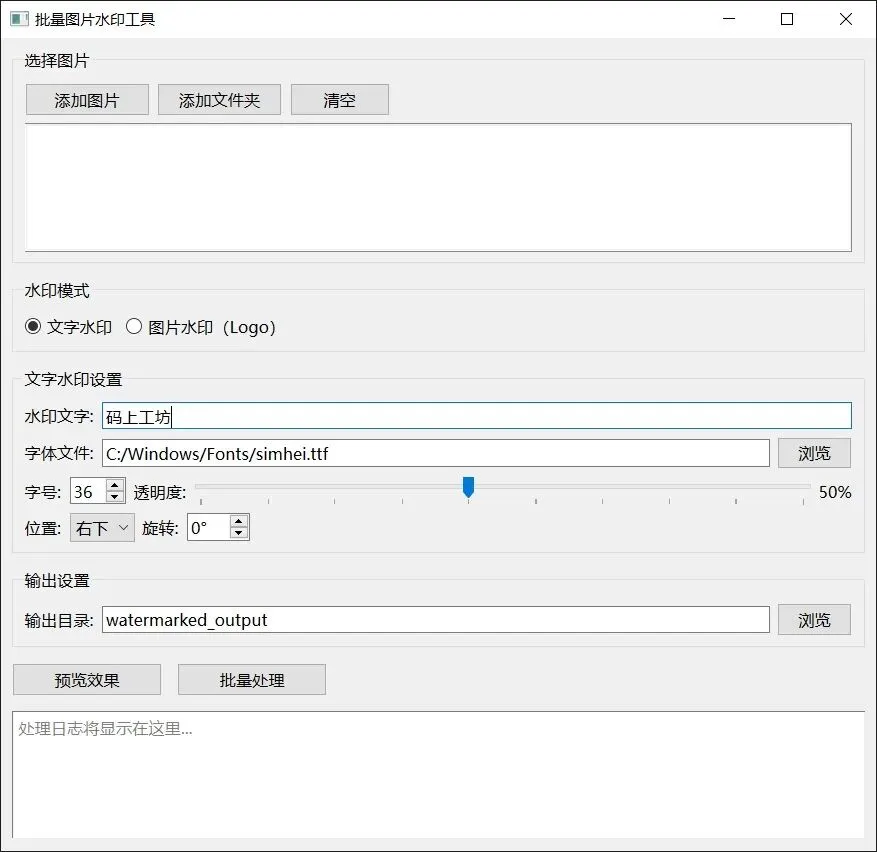
界面用 PySide6 纯代码构建:
后台处理线程:批量处理走 QThread,界面不卡死:
class ProcessThread(QThread): progress = Signal(int) finished = Signal(int) error = Signal(str) def run(self): for i, file_path in enumerate(self.files): try: output_name = Path(file_path).stem + "_watermarked" + Path(file_path).suffix WatermarkEngine.process_file(file_path, os.path.join(self.output_dir, output_name), **self.params) success += 1 except Exception as e: self.error.emit(f"{Path(file_path).name}: {e}") self.progress.emit(int((i + 1) / len(self.files) * 100)) self.finished.emit(success)
参数收集——从界面控件读取参数,打包成字典传给水印引擎:
def _get_params(self): if self.radio_text.isChecked(): return { "mode": "text", "text": self.text_input.text(), "font_path": self.font_path.text(), "font_size": self.font_size.value(), "color": (255, 255, 255, int(self.text_opacity.value() / 100 * 255)), "position": self.text_position.currentText(), "rotation": self.text_rotation.value(), } else: return { "mode": "image", "logo_path": self.logo_path.text(), "scale": self.logo_scale.value() / 100, "opacity": self.logo_opacity.value() / 100, "position": self.logo_position.currentText(), }
界面布局:文字水印和图片水印用 RadioButton 切换,对应设置面板互斥显示。包含文件选择区、参数设置区、输出目录、进度条、日志窗口。
界面代码约 350 行,主要是 PySide6 控件布局,完整源码关注后发送 "水印" 获取。
运行与使用
uv run python src/main.py
操作流程
- 调整参数:文字内容/字号/透明度/位置,或 Logo 图片/大小/透明度/位置
源码获取
关注后发送 "水印" 获取完整源码下载地址。
作者简介:码上工坊,探索用编程为己赋能,定期分享编程知识和项目实战经验。持续学习、适应变化、记录点滴、复盘反思、成长进步。
重要提示:本文主要是记录自己的学习与实践过程,所提内容或者观点仅代表个人意见,只是我以为的,不代表完全正确,欢迎交流讨论。
 10个月宝宝每天需要喝多少奶粉?