Python 中的锁(Locks)详解
1. 为什么需要锁
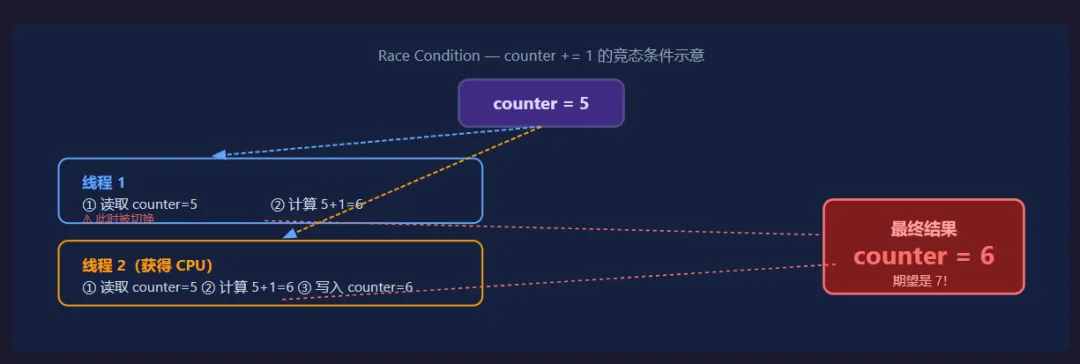
多线程/多进程环境下,多个执行单元同时访问共享资源会导致竞态条件(Race Condition):
▲ 两个线程同时对 counter+=1,因非原子操作导致结果错误(丢失一次更新)import threadingcounter = 0def increment(): global counter for _ in range(100000): counter += 1 # 非原子操作:读→加→写,三步之间可能被切换threads = [threading.Thread(target=increment) for _ in range(10)]for t in threads: t.start()for t in threads: t.join()print(counter) # 期望 1000000,实际结果不确定(每次都不同)
根本原因:counter += 1 在字节码层面是 3 条指令,线程可能在任意两条之间被切换。
锁通过**互斥(Mutual Exclusion)**保证同一时刻只有一个执行单元访问临界区。
2. threading 模块中的锁
2.1 Lock(互斥锁)
最基本的锁,两种状态:锁定和未锁定。
import threadinglock = threading.Lock()counter = 0def increment(): global counter for _ in range(100000): lock.acquire() # 获取锁(阻塞直到成功) try: counter += 1 # 临界区 finally: lock.release() # 释放锁(必须在 finally 中)# 推荐:使用上下文管理器def increment_safe(): global counter for _ in range(100000): with lock: # 自动 acquire + release counter += 1
核心 API:
| 方法 | 说明 |
|---|
acquire(blocking=True, timeout=-1) | 获取锁。blocking=False 时非阻塞,立即返回 True/False |
release() | 释放锁。非持有者调用会抛 RuntimeError |
locked() | 返回锁是否被持有 |
阻塞 vs 非阻塞:
if lock.acquire(blocking=False): # 尝试获取,拿不到立即返回 False try: do_something() finally: lock.release()else: print("锁被占用,执行其他逻辑")# 带超时if lock.acquire(timeout=2.0): # 最多等 2 秒 try: do_something() finally: lock.release()
2.2 RLock(可重入锁)
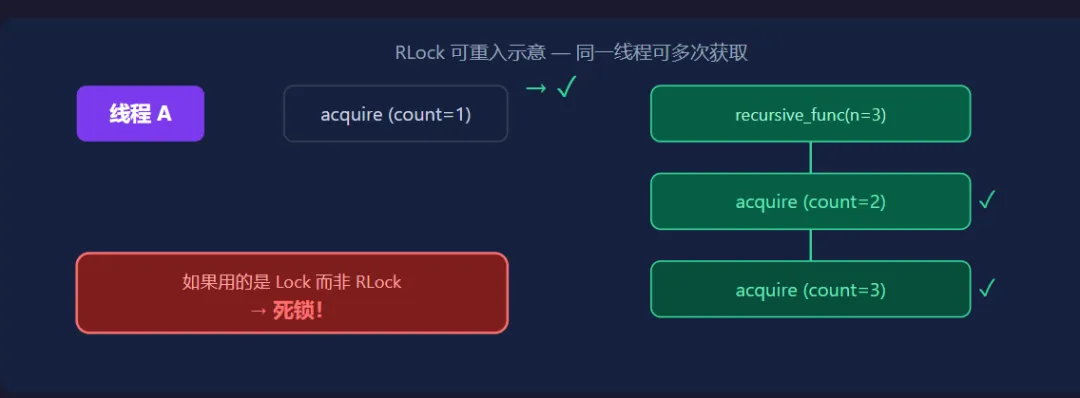
同一个线程可以多次 acquire,不会死锁。需要等次数的 release 才能真正解锁。
import threadingrlock = threading.RLock()def recursive_func(n): with rlock: if n <= 0: return print(f"深度 {n},锁被同一线程再次获取") recursive_func(n - 1) # 重入!Lock 会在这里死锁recursive_func(3)
Lock vs RLock:
| 特性 | Lock | RLock |
|---|
| 同一线程重入 | 死锁 | 允许 |
| 持有者追踪 | 不追踪 | 追踪持有线程和获取次数 |
| 释放要求 | 任意线程可释放(不推荐跨线程) | 必须由持有线程释放 |
| 性能 | 更快 | 略慢(有额外记录开销) |
使用建议:不确定函数调用链中有没有重入需求时,用 RLock;明确不会重入、追求极致性能时用 Lock。
2.3 Semaphore(信号量)
允许最多 N 个线程同时访问资源(Lock 是 N=1 的特殊信号量)。
import threadingimport timeimport random# 最多 3 个线程同时访问数据库连接池db_semaphore = threading.Semaphore(3)def query_database(thread_id): with db_semaphore: print(f"线程 {thread_id} 获取连接,当前并发数未知") time.sleep(random.uniform(0.5, 1.5)) # 模拟查询 print(f"线程 {thread_id} 释放连接")threads = [threading.Thread(target=query_database, args=(i,)) for i in range(10)]for t in threads: t.start()for t in threads: t.join()
典型场景:
2.4 BoundedSemaphore
与 Semaphore 的唯一区别:release() 次数不能超过 acquire() 次数,否则抛 ValueError。
sem = threading.Semaphore(3)sem.release()# 不报错,计数器变成 4(超出初始值)bsem = threading.BoundedSemaphore(3)bsem.release()# ValueError: Semaphore released too many times
意义:捕捉"释放次数多于获取次数"的 bug(这通常意味着代码逻辑错误)。
2.5 Condition(条件变量)
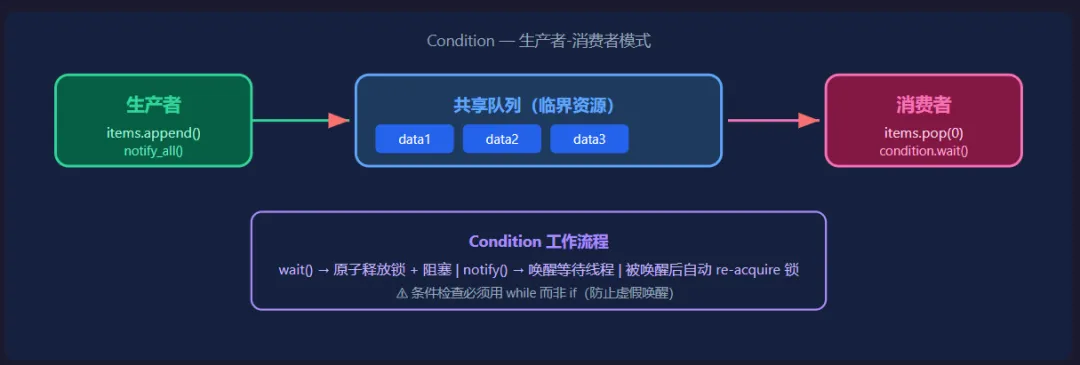
比锁更高级的同步原语:一个线程等待某个条件成立,另一个线程通知条件已满足。
import threadingimport timecondition = threading.Condition()items = []def consumer(): with condition: while not items: # 用 while 而非 if 防虚假唤醒 print("消费者:队列空,等待...") condition.wait() # 释放锁 + 阻塞,被 notify 后重获锁 item = items.pop(0) print(f"消费者:取出 {item}")def producer(): time.sleep(1) with condition: items.append("data") print("生产者:放入 data") condition.notify() # 唤醒 1 个等待线程 # condition.notify_all() # 唤醒所有等待线程threading.Thread(target=consumer).start()threading.Thread(target=producer).start()
关键点:
wait() 会原子性地释放锁并阻塞,被唤醒后重新获取锁再返回
条件检查用 while 而非 if:防止虚假唤醒(spurious wakeup)
notify(n=1) 唤醒 n 个等待线程;notify_all() 唤醒全部
生产者-消费者模式:
import threadingimport randomcond = threading.Condition()queue = []MAX_SIZE = 5def producer(): for i in range(10): with cond: while len(queue) >= MAX_SIZE: cond.wait() # 队列满,等待消费者消费 queue.append(i) print(f"生产 {i},队列: {queue}") cond.notify_all() # 通知所有消费者def consumer(name): while True: with cond: while not queue: cond.wait() # 队列空,等待生产者 item = queue.pop(0) print(f"{name} 消费 {item},队列: {queue}") cond.notify_all()threading.Thread(target=producer, daemon=True).start()threading.Thread(target=consumer, args=("C1",), daemon=True).start()threading.Thread(target=consumer, args=("C2",), daemon=True).start()
2.6 Event(事件)
最简单的线程间通信机制:一个线程发信号,其他线程等待信号。
import threadingimport timeevent = threading.Event() # 初始为 False(未设置)def waiter(): print("等待事件...") event.wait() # 阻塞直到 event.is_set() == True print("事件已触发,继续执行")def setter(): time.sleep(2) print("设置事件") event.set() # 设为 True,唤醒所有等待线程threading.Thread(target=waiter).start()threading.Thread(target=setter).start()
核心 API:
| 方法 | 说明 |
|---|
set() | 将内部标志设为 True,唤醒所有等待线程 |
clear() | 将内部标志重置为 False |
wait(timeout=None) | 阻塞直到标志为 True,可设置超时 |
is_set() | 查询当前标志状态 |
Event 是一次性信号弹,Condition 是可以反复使用的精密开关。
2.7 Barrier(屏障)
让 N 个线程在某个点互相等待,全部到达后才能继续。
import threadingimport timeimport randombarrier = threading.Barrier(3) # 3 个线程到齐才放行def worker(thread_id): print(f"线程 {thread_id} 阶段1 开始") time.sleep(random.uniform(0.5, 2)) print(f"线程 {thread_id} 阶段1 完成,等待其他线程...") barrier.wait() # 阻塞,凑齐 3 个才继续 print(f"线程 {thread_id} 阶段2 开始")threads = [threading.Thread(target=worker, args=(i,)) for i in range(3)]for t in threads: t.start()
适合场景:
3. multiprocessing 模块中的锁
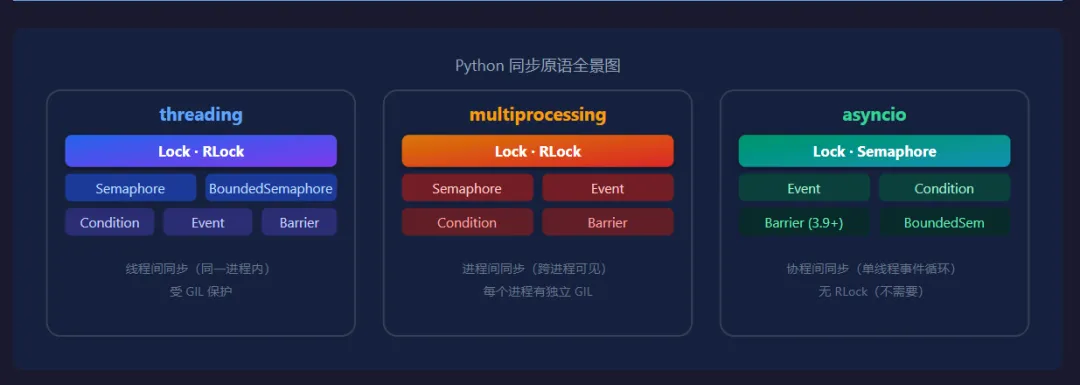
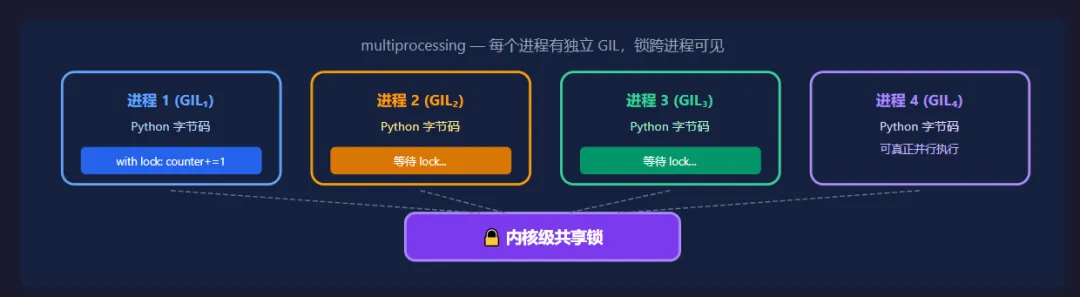
多进程共享内存时也需要同步。API 与 threading 几乎一致。
import multiprocessing# 与 threading 对应关系:# threading.Lock() → multiprocessing.Lock()# threading.RLock() → multiprocessing.RLock()# threading.Semaphore() → multiprocessing.Semaphore()# threading.Event() → multiprocessing.Event()# threading.Condition() → multiprocessing.Condition()# threading.Barrier() → multiprocessing.Barrier()lock = multiprocessing.Lock()counter = multiprocessing.Value('i', 0)def increment(): for _ in range(100000): with lock: counter.value += 1processes = [multiprocessing.Process(target=increment) for _ inrange(4)]for p in processes: p.start()for p in processes: p.join()print(counter.value) # 400000,正确
与 threading 的关键区别:
multiprocessing 锁存在于共享内存/内核对象中,跨进程可见
必须通过 multiprocessing.Manager 或在主进程创建后传给子进程
不能在 Pool.map 等不能 pickle 的上下文中直接使用(需用 Manager 或 initializer)
性能开销比 threading 锁大(涉及内核态/用户态切换)
Manager 共享锁:
import multiprocessingdef worker(lock, shared_list): with lock: shared_list.append(multiprocessing.current_process().name)if __name__ == '__main__': with multiprocessing.Manager() as manager: lock = manager.Lock() shared_list = manager.list() jobs = [multiprocessing.Process(target=worker, args=(lock, shared_list)) for _ inrange(5)] for j in jobs: j.start() for j in jobs: j.join() print(list(shared_list))
4. asyncio 模块中的锁
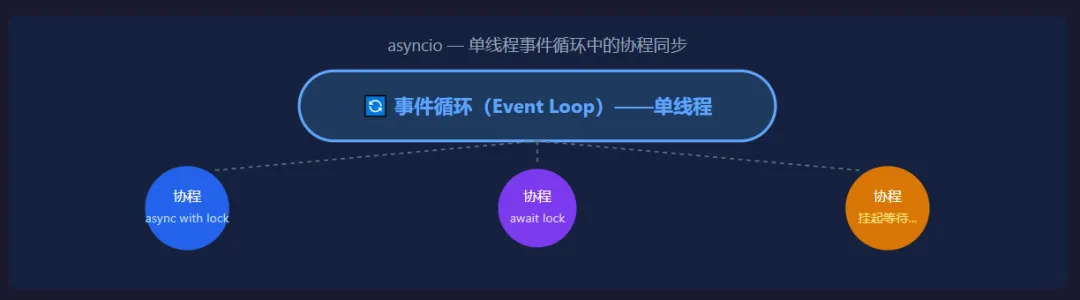
asyncio 锁用于协程之间的同步,必须在 async def 函数内使用 await。它们不能跨线程或跨进程使用。
import asyncio# 对应关系(asyncio 是 awaitable 版本):# threading.Lock → asyncio.Lock# threading.RLock → (asyncio 无 RLock,不需要:单线程事件循环天然不重入死锁)# threading.Semaphore → asyncio.Semaphore# threading.Event → asyncio.Event# threading.Condition → asyncio.Condition# threading.Barrier → asyncio.Barrier(3.9+)# 无对应 → asyncio.BoundedSemaphore
4.1 asyncio.Lock
import asynciolock = asyncio.Lock()counter = 0async def increment(): global counter for _ in range(1000): async with lock: # await lock.acquire() + lock.release() counter += 1async def main(): await asyncio.gather(*[increment() for _ in range(10)]) print(counter) # 10000asyncio.run(main())
关键区别:
- async with lock 不会阻塞整个线程,只挂起当前协程
4.2 asyncio.Semaphore(协程并发限制)
import asynciosem = asyncio.Semaphore(5) # 最多 5 个协程并发请求async def fetch(url): async with sem: print(f"请求 {url}(获取信号量)") await asyncio.sleep(1) # 模拟 I/O print(f"请求 {url} 完成(释放信号量)") return f"result of {url}"async def main(): urls = [f"http://example.com/{i}" for i in range(20)] results = await asyncio.gather(*[fetch(url) for url in urls])
这也是最简单的异步限流器。
4.4 为什么 asyncio 没有 RLock
单线程事件循环中,协程之间是协作式切换(遇到 await 才可能切换),不存在同一个协程重入同一把锁的场景。如果需要"协程重入",通常说明设计有问题。
5. 死锁与避免策略
5.1 死锁的四个必要条件
互斥:资源不能被共享使用
持有并等待:持有锁的线程可以等待其他锁
不可抢占:锁只能由持有者释放
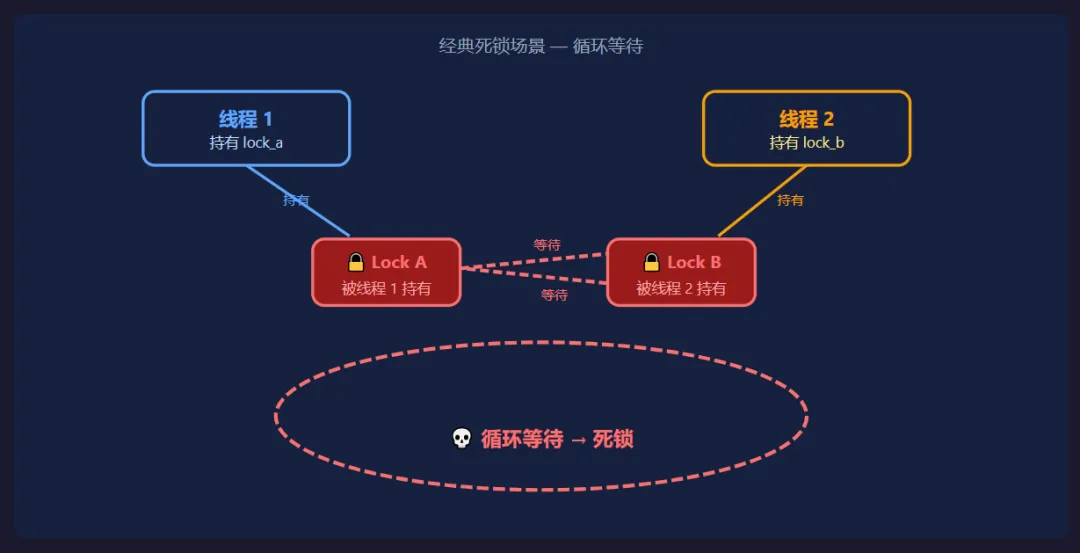
循环等待:线程之间形成锁的环形依赖链
5.2 典型死锁场景
import threadinglock_a = threading.Lock()lock_b = threading.Lock()def thread1(): with lock_a: time.sleep(0.1) # 模拟处理 with lock_b: # 等待 lock_b(被 thread2 持有) print("线程1 获取两把锁")def thread2(): with lock_b: time.sleep(0.1) with lock_a: # 等待 lock_a(被 thread1 持有) print("线程2 获取两把锁")threading.Thread(target=thread1).start()threading.Thread(target=thread2).start()# 两个线程互相等待 → 死锁
5.3 避免策略
① 统一锁的获取顺序(最有效)
# 始终按 lock_a → lock_b 的顺序获取def safe(): with lock_a: with lock_b: do_work()
② 使用超时 + 回退
def try_acquire(): while True: lock_a.acquire() if lock_b.acquire(timeout=0.5): try: do_work() return finally: lock_b.release() lock_a.release() else: lock_a.release() # 回退,避免持有并等待 time.sleep(0.1) # 随机退避更好
③ 使用 RLock 避免重入死锁(只解决重入问题)
④ 减少锁的粒度
# 不好:大锁with big_lock: read_from_db() process() write_to_file()# 更好:锁只保护必要的临界区data = read_from_db()result = process(data)with data_lock: shared_cache.update(result)
⑤ 使用threading.local()消除共享(如果可能)
import threadinglocal_data = threading.local()def worker(): local_data.counter = 0 # 每个线程独立副本,无需锁 for _ inrange(1000): local_data.counter += 1
6. 锁的进阶话题
6.1 GIL(全局解释器锁)详解与实战案例
GIL(Global Interpreter Lock)是CPython 解释器中的一个互斥锁,它保证同一时刻只有一个线程在执行 Python 字节码。
注意:GIL 是 CPython 的实现特性,Jython(Java 实现)和 IronPython(.NET 实现)没有 GIL。
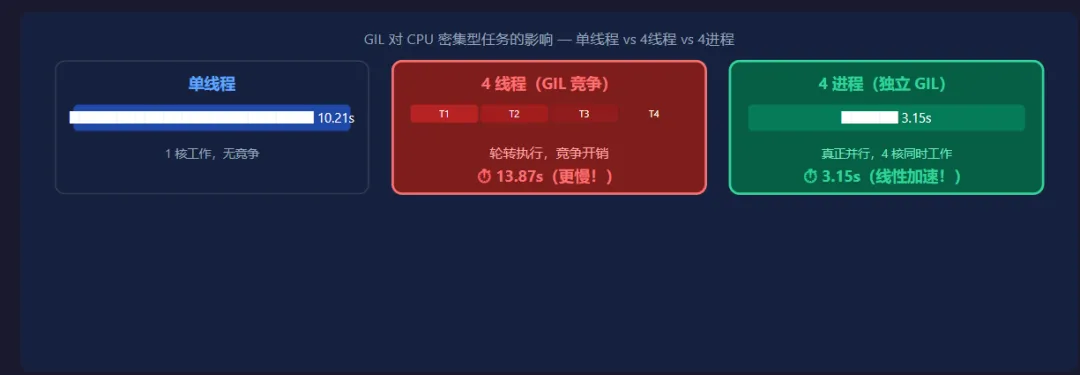
6.1.2 实战案例一:CPU 密集型——为什么多线程反而更慢?
以下是一个完整的对比实验:
import threadingimport multiprocessingimport time# ============================================# 案例:计算 0 到 N 的平方和(纯 CPU 计算)# ============================================def cpu_bound_task(n): ”””纯 CPU 密集型任务:无任何 I/O 操作””” total = 0 for i in range(n): total += i * i return totaldef run_single_thread(n): ”””单线程执行””” start = time.time() cpu_bound_task(n) return time.time() - startdef run_multi_thread(n, num_threads): ”””多线程执行——将任务拆分为多个子任务””” start = time.time() threads = [] chunk = n // num_threads for _ in range(num_threads): t = threading.Thread(target=cpu_bound_task, args=(chunk,)) threads.append(t) t.start() for t in threads: t.join() return time.time() - startdef run_multi_process(n, num_processes): ”””多进程执行””” start = time.time() processes = [] chunk = n // num_processes for _ in range(num_processes): p = multiprocessing.Process(target=cpu_bound_task, args=(chunk,)) processes.append(p) p.start() for p in processes: p.join() return time.time() - startif __name__ == '__main__': N = 50_000_000# 5 千万次循环 t1 = run_single_thread(N * 4) print(f”单线程耗时: {t1:.2f}s”) t2 = run_multi_thread(N * 4, 4) print(f”4 线程耗时: {t2:.2f}s(线程数倍反而更慢)”) t3 = run_multi_process(N * 4, 4) print(f”4 进程耗时: {t3:.2f}s(接近线性加速)”)# ============================================# 实际运行结果示例(4 核 CPU):# 单线程耗时: 10.21s# 4 线程耗时: 13.87s(因为 GIL 竞争,比单线程还慢!)# 4 进程耗时: 3.15s(每个进程有独立 GIL,真正并行)# ============================================
现象分析:
单线程执行流程: [====计算====] → 10.21s4 线程执行流程(受 GIL 限制): 线程1: [算][等][算][等][算][等][算][等] 线程2: [等][算][等][算][等][算][等][算] 线程3: [等][算][等][算][等][算][等][算] 线程4: [等][算][等][算][等][算][等][算] 每个"等"都是 GIL 竞争开销,还有线程切换的上下文成本 → 总耗时 ≈ 单线程 + 线程切换 + GIL 争夺开销4 进程执行流程(独立 GIL): 进程1: [=========计算=========] 进程2: [=========计算=========] 进程3: [=========计算=========] 进程4: [=========计算=========] → 总耗时 ≈ 单线程 / 4(真并行)
6.1.3 实战案例二:I/O 密集型——多线程有效

import threadingimport multiprocessingimport time# ============================================# I/O 密集型任务:模拟网络请求# ============================================def io_bound_task(task_id): """模拟 I/O 操作(sleep 代表等待网络/磁盘)""" time.sleep(1) # 模拟 1 秒 I/O 等待 return f"task {task_id} done"def run_sequential(num_tasks): """串行执行""" start = time.time() for i in range(num_tasks): io_bound_task(i) return time.time() - startdef run_multi_thread(num_tasks): """多线程执行""" start = time.time() threads = [threading.Thread(target=io_bound_task, args=(i,)) for i in range(num_tasks)] for t in threads: t.start() for t in threads: t.join() return time.time() - startdef run_multi_process(num_tasks): """多进程执行""" start = time.time() processes = [multiprocessing.Process(target=io_bound_task, args=(i,)) for i in range(num_tasks)] for p in processes: p.start() for p in processes: p.join() return time.time() - startif __name__ == '__main__': N = 10 t1 = run_sequential(N) print(f"串行执行 {N} 个任务: {t1:.2f}s") t2 = run_multi_thread(N) print(f"多线程执行 {N} 个任务: {t2:.2f}s") t3 = run_multi_process(N) print(f"多进程执行 {N} 个任务: {t3:.2f}s")# ============================================# 实际运行结果:# 串行执行 10 个任务: 10.01s# 多线程执行 10 个任务: 1.01s(近 10 倍提速!)# 多进程执行 10 个任务: 1.52s(有效但进程创建有额外开销)# ============================================
原理:
I/O 密集 - 多线程: 线程1: [算][----等待 I/O----][算] 线程2: [算][----等待 I/O----][算] 线程3: [算][----等待 I/O----][算] 关键:当线程执行 time.sleep() / socket.recv() 等 I/O 操作时, GIL 被自动释放,其他线程可以获取 GIL 继续执行 → I/O 等待期间 CPU 不空闲,多线程非常有效
6.1.4 GIL 释放的时机
GIL 在以下情况下会释放:
| 释放时机 | 说明 |
|---|
| 当前线程执行 I/O 操作 | time.sleep()、socket.recv()、文件读写等 |
| 解释器轮转 | CPython 3.2+ 每执行约 15ms 或一定字节码指令后主动释放 |
| 显式释放 | 在 C 扩展中调用 Py_BEGIN_ALLOW_THREADS |
import sys# 查看 GIL 切换间隔(Python 3.2+)print(sys.getswitchinterval())# 默认 0.005 秒 = 5ms
6.1.5 案例三:GIL 不保证线程安全
import threading# ================================================# 关键误解:GIL 不保证你的代码线程安全!# ================================================counter = 0def flawed_increment(): """ 以为 GIL 保护了 counter += 1 吗? 错!dis 模块揭示真相: """ global counter for _ in range(100_000): counter += 1 # 字节码层面(用 dis.dis(flawed_increment) 查看): # LOAD_GLOBAL counter ← 可能在此被切换 # LOAD_CONST 1 # INPLACE_ADD # STORE_GLOBAL counter ← 可能在此被切换 # 四条指令之间 GIL 可能被释放 → 竞态条件!# 验证:多线程执行 flawed_incrementdef test_flawed(): global counter counter = 0 threads = [threading.Thread(target=flawed_increment) for _ in range(10)] for t in threads: t.start() for t in threads: t.join() print(f"期望 1,000,000,实际 {counter}") # 每次结果不同,如 732491、891023...test_flawed()# ================================================# 正确做法:用自己的锁保护# ================================================lock = threading.Lock()counter2 = 0def safe_increment(): global counter2 for _ in range(100_000): with lock: counter2 += 1def test_safe(): global counter2 counter2 = 0 threads = [threading.Thread(target=safe_increment) for _ in range(10)] for t in threads: t.start() for t in threads: t.join() print(f"期望 1,000,000,实际 {counter2}") # 结果:1,000,000 ✓test_safe()
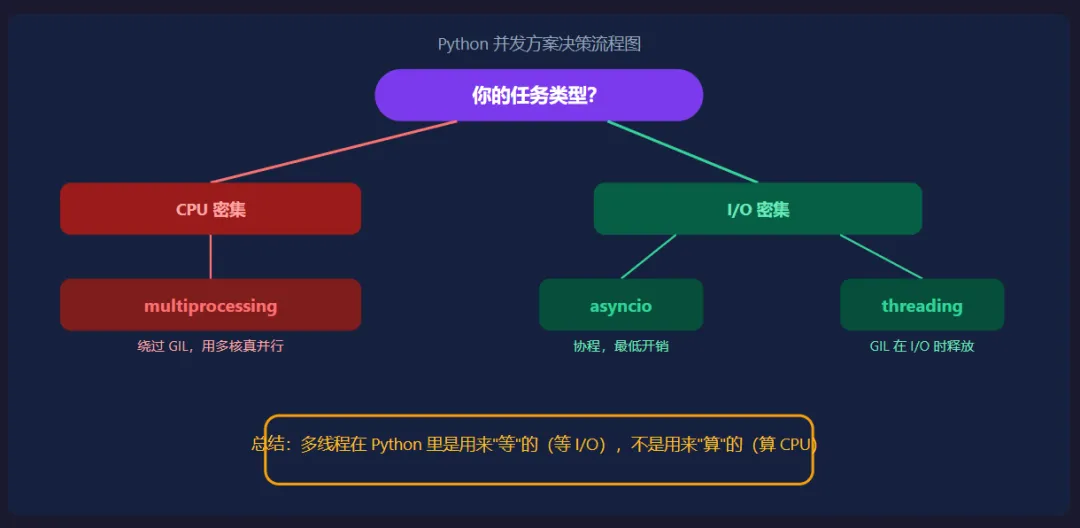
6.1.6 实战决策:什么时候用什么?
你的任务类型? │ ├── CPU 密集(计算、图像处理、加密...) │ └── multiprocessing(绕过 GIL,用多核) │ ├── I/O 密集(网络请求、文件读写、数据库...) │ └── threading 或 asyncio(GIL 会在 I/O 时释放,多线程有效) │ └── 混合型 └── 多进程 + 每进程内用线程池/协程一句话总结: 多线程在 Python 里是用来”等”的(等 I/O),不是用来”算”的(算 CPU)
6.1.7 GIL 的未来
Python 3.13 开始引入了 PEP 703 — 可选 GIL(free-threaded 模式),允许在无 GIL 状态下运行。目前处于实验阶段,是 Python 社区正在推进的重要方向。
| 方面 | GIL(全局解释器锁) | threading.Lock |
|---|
| 级别 | 解释器级别,自动管理 | 用户代码级别,手动管理 |
| 保护对象 | CPython 内部数据结构 | 用户定义的共享变量 |
| 能否释放 | 每执行 N 条字节码或遇到 I/O 自动释放 | 手动 release() |
| 影响 | 同一时刻只有一个线程执行 Python 字节码 | 同一时刻只有一个线程进入临界区 |
关键结论:GIL 不保证你代码的原子性,Python 层面的非原子操作仍然需要 Lock。
# counter += 1 虽然每条指令都持有 GIL,但可能在不同指令之间释放 GIL# 所以仍然需要 threading.Lock
6.2 锁的粒度权衡
细粒度锁优点:并发高细粒度锁缺点:代码复杂、死锁风险高粗粒度锁优点:简单安全粗粒度锁缺点:并发低
建议:先用粗粒度锁保证正确性,profile 后发现瓶颈再细化。
6.3 读写锁(RWLock)
Python 标准库没有内置读写锁,但可以自己实现或用第三方库。读写锁允许多个读者同时访问,写者独占访问。
import threadingclass ReadWriteLock: def __init__(self): self._readers = 0 self._writers = 0 self._condition = threading.Condition() def acquire_read(self): with self._condition: while self._writers > 0: self._condition.wait() self._readers += 1 def release_read(self): with self._condition: self._readers -= 1 if self._readers == 0: self._condition.notify_all() def acquire_write(self): with self._condition: while self._readers > 0 or self._writers > 0: self._condition.wait() self._writers += 1 def release_write(self): with self._condition: self._writers -= 1 self._condition.notify_all() # 上下文管理器支持 def read_lock(self): return _ReadContext(self) def write_lock(self): return _WriteContext(self)class _ReadContext: def __init__(self, rwlock): self._rwlock = rwlock def __enter__(self): self._rwlock.acquire_read() def __exit__(self, *args): self._rwlock.release_read()class _WriteContext: def __init__(self, rwlock): self._rwlock = rwlock def __enter__(self): self._rwlock.acquire_write() def __exit__(self, *args): self._rwlock.release_write()
6.4 无锁编程:使用 queue.Queue
很多时候,用队列代替锁是更优雅的方案:
import threadingimport queueimport time# 而不是用锁保护共享列表q = queue.Queue() # 线程安全,内部已实现必要的锁def producer(): for i in range(10): q.put(i) q.put(None) # 结束信号def consumer(): while True: item = q.get() if item is None: break process(item)
queue.Queue 内部已使用 Condition 实现了线程安全的 put/get,用户无需手动加锁。
7. 速查对照表
| 原语 | threading | multiprocessing | asyncio | 核心用途 |
|---|
| 互斥锁 | Lock | Lock | Lock | 互斥访问临界区 |
| 可重入锁 | RLock | RLock | 无 | 同一线程可重入 |
| 信号量 | Semaphore | Semaphore | Semaphore | 限制并发数量 |
| 有界信号量 | BoundedSemaphore | BoundedSemaphore | BoundedSemaphore | 防 release 溢出 |
| 条件变量 | Condition | Condition | Condition | 生产者-消费者模式 |
| 事件 | Event | Event | Event | 一次性信号通知 |
| 屏障 | Barrier | Barrier | Barrier(3.9+) | 多线程/协程同步点 |
选择决策流程:
是 I/O 密集型 → 是否使用 asyncio? ├─ 是 → asyncio.Lock / Semaphore └─ 否 → threading.Lock / RLock是 CPU 密集型 → multiprocessing.Lock需要限制并发数 → Semaphore / BoundedSemaphore需要线程间通知 → Event(一次性)/ Condition(反复使用)需要阶段同步 → Barrier需要支持重入 → RLock需要读写分离 → 自定义 RWLock 或第三方库只需简单互斥 → Lock




 10个月宝宝每天需要喝多少奶粉?