一起学Python第116天:Matplotlib 图像读取与处理——用代码"打开"图片的像素世界
- 2026-10-11 06:30:40
一起学Python第116天:Matplotlib 图像读取与处理——用代码"打开"图片的像素世界二、核心 API:
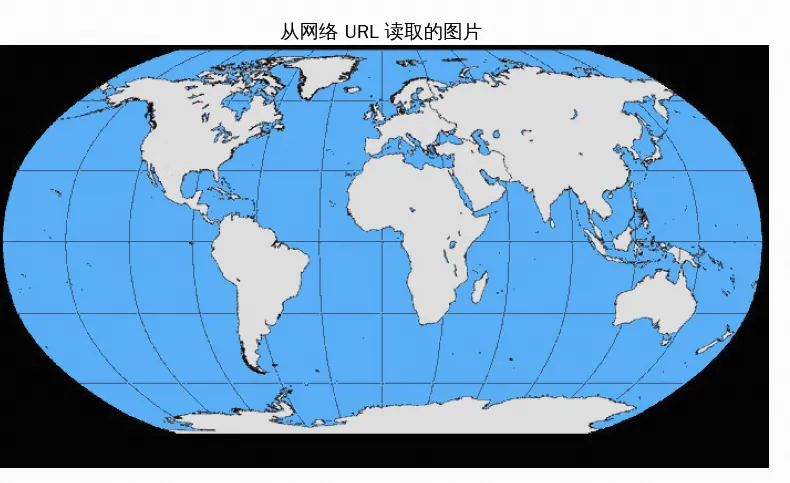
效果:直接从网络加载世界地图,无需本地文件。 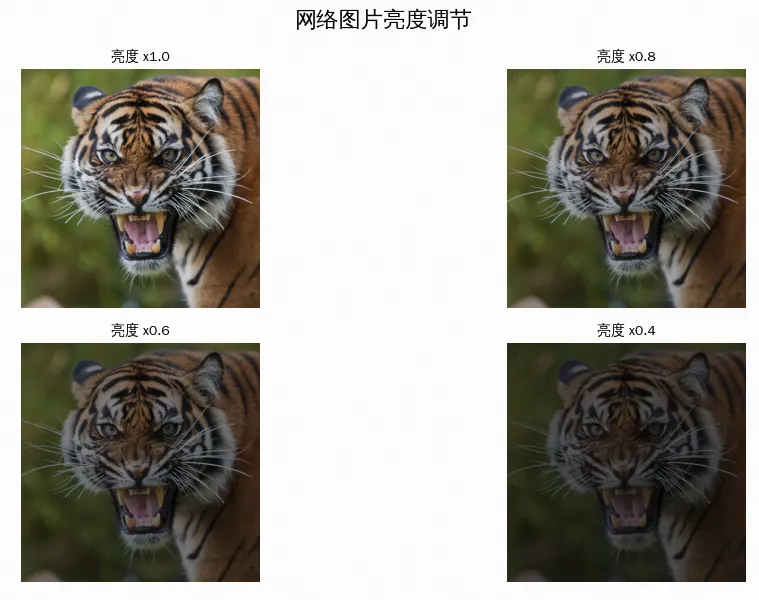
🔥 原理揭秘: 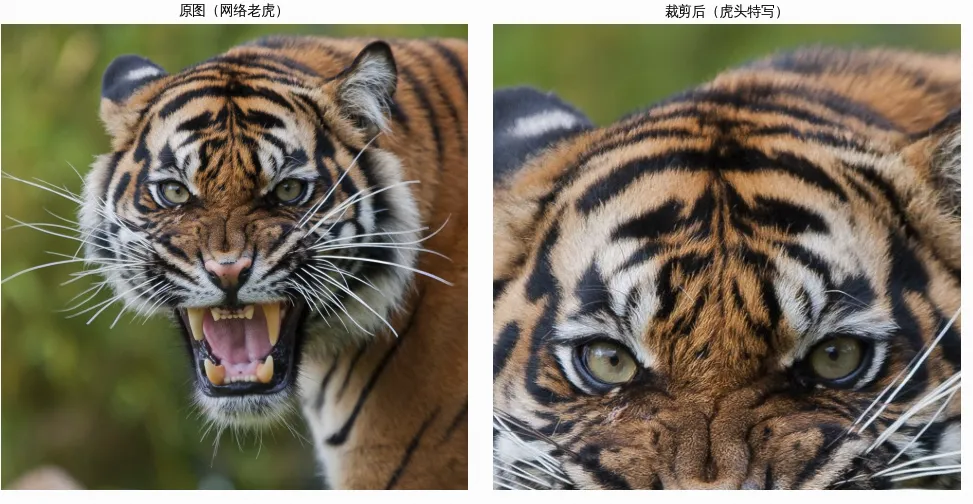
效果:从完整老虎图中裁剪出上半部分,聚焦虎头。 💡 切片记忆法: 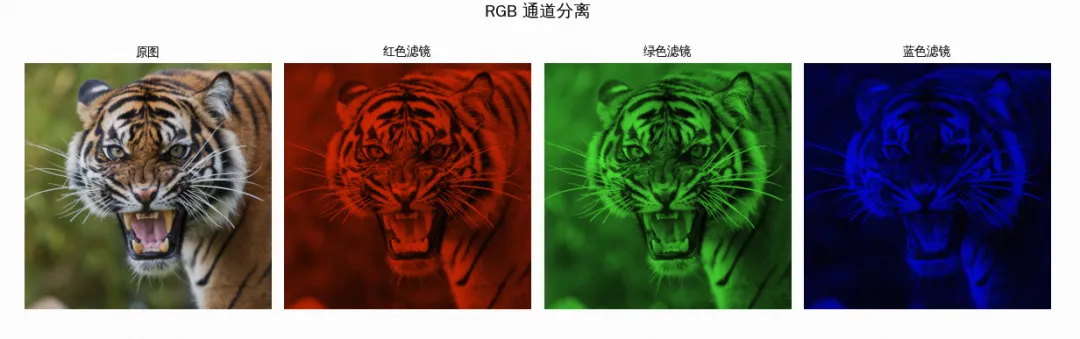
效果:一张老虎图拆成红、绿、蓝三种单色滤镜。 🎨 创意延伸:把 R 通道和 G 通道交换,就能做出"赛博朋克"风格的偏色效果! 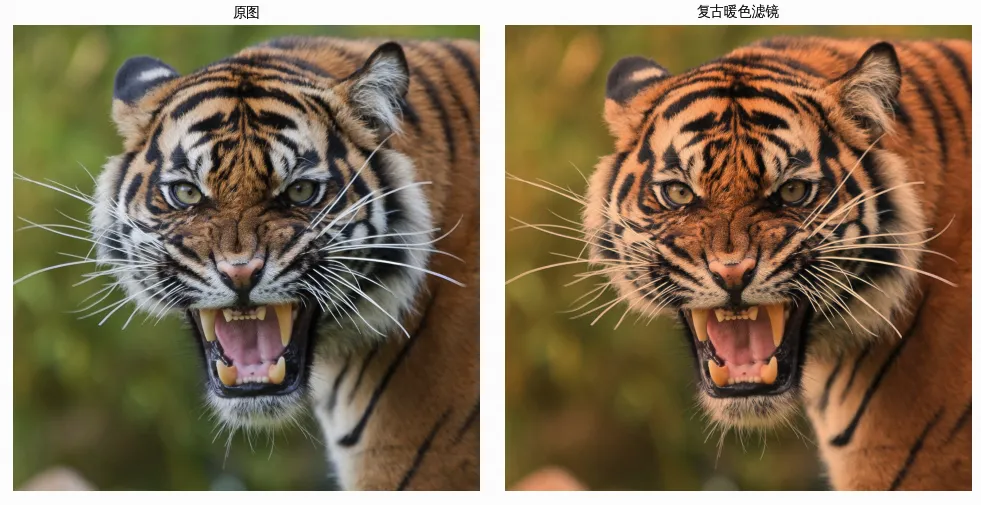
效果:原图偏自然,滤镜后偏暖黄,像老照片的感觉。 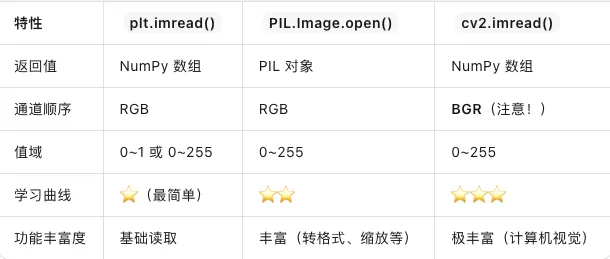
💡 选择建议:快速预览和简单处理用 
🎯 今日金句:imread 打开的不是图片,而是一扇窗——透过像素矩阵的排列组合,你看到的不再是风景,而是可被计算、被理解、被重塑的数据本身。
📅 系列:一起学Python | 难度:⭐⭐⭐
🔗 上期回顾:第115天:imsave 图像保存
一、从"看图"到"懂图":imread() 是什么?
前面我们学了如何画图和存图,但如果手头上已经有一张图片,想用它做数据分析、加滤镜、或者作为图表背景,怎么办?
plt.imread() 就是 Matplotlib 提供的图像读取利器。它能把一张 JPG/PNG/BMP 文件,直接变成 NumPy 数组——从此,图片在你眼里不再是一张图,而是一个可以被计算、被切片、被改造的三维矩阵。
一句话:imread 是图像处理世界的"开门钥匙"。
二、核心 API:imread() 参数解析
matplotlib.pyplot.imread(fname, format=None)fname | 'tiger.jpg' 或绝对路径 | |
format |
返回值:numpy.ndarray,形状为 (height, width, channels)
(H, W)(H, W, 1) | ||
(H, W, 3) | ||
(H, W, 4) |
💡 重要:imread 读取的像素值范围通常是 0~1(浮点)或 0~255(整型),取决于图像格式。建议读取后统一除以 255 进行归一化。
三、从网络URL读取图片:两种方法
plt.imread() 本身不支持直接读取网络URL,但配合 requests 或 urllib 可以轻松实现"下载→读取→显示"一条龙。
方法1:内存方式(推荐,不占用磁盘)
import numpy as npimport matplotlib.pyplot as pltfrom PIL import Imagefrom io import BytesIOimport requests# 网络图片地址url = "https://static.jyshare.com/images/demo/map.jpeg"# 下载到内存response = requests.get(url, timeout=10)img = np.array(Image.open(BytesIO(response.content)))plt.imshow(img)plt.axis('off')plt.show()
方法2:本地方式(先下载再读取)
import urllib.requesturl = "https://static.jyshare.com/images/demo/map.jpeg"local_path = "map.jpg"urllib.request.urlretrieve(url, local_path)img = plt.imread(local_path)
💡 推荐:数据分析用内存方式(方法一);需要留档用本地方式(方法二)。
四、从入门到精通:5个实战示例
示例 1:基础读取与显示
import numpy as npimport matplotlib.pyplot as pltimport matplotlib.font_manager as fmimport osfrom PIL import Imagefrom io import BytesIOimport requests# ================= 1. 字体加载(解决报错的核心) =================font_path = "simhei.ttf"if not os.path.exists(font_path):font_path = "/usr/share/fonts/truetype/wqy/wqy-zenhei.ttc"prop = fm.FontProperties(fname=font_path)plt.rcParams['axes.unicode_minus'] = False# ================= 2. 从网络 URL 读取图片 =================url = "https://static.jyshare.com/images/demo/map.jpeg" # 示例图片地址# 下载图片到内存response = requests.get(url, timeout=10)response.raise_for_status() # 如果下载失败会报错# 用 PIL 打开内存中的图片,再转换为 NumPy 数组img = np.array(Image.open(BytesIO(response.content)))print(f"图像形状: {img.shape}")print(f"像素值范围: {img.min()} ~ {img.max()}")# ================= 3. 显示图片 =================plt.figure(figsize=(10, 6))plt.imshow(img)plt.title('从网络 URL 读取的图片', fontproperties=prop, fontsize=14)plt.axis('off')plt.show()
示例 2:图像变暗——数组的"乘法魔法"
# 从网络读取老虎图片url = "https://static.jyshare.com/images/mix/tiger.jpeg"response = requests.get(url, timeout=10)img_array = np.array(Image.open(BytesIO(response.content)))# 归一化到 0~1tiger = img_array / 255.0plt.figure(figsize=(12, 6))# 绘制 4 张不同亮度的图for i in range(4):plt.subplot(2, 2, i + 1)factor = 1.0 - 0.2 * i # 1.0, 0.8, 0.6, 0.4plt.imshow(tiger * factor)plt.title(f'亮度 x{factor:.1f}', fontproperties=prop)plt.axis('off')plt.suptitle('网络图片亮度调节', fontproperties=prop, fontsize=16)plt.tight_layout()plt.show()
效果:老虎图片从正常亮度逐步变暗,像拉上了窗帘。
img * 0.5 就是把每个像素的 R、G、B 值都减半,画面自然就暗了。这就是图像处理的本质——数组运算。示例 3:图像裁剪——NumPy 切片大法
url = "https://static.jyshare.com/images/mix/tiger.jpeg"response = requests.get(url, timeout=10)tiger = np.array(Image.open(BytesIO(response.content))) / 255.0plt.figure(figsize=(10, 5))# 原图plt.subplot(1, 2, 1)plt.imshow(tiger)plt.title('原图(网络老虎)', fontproperties=prop)plt.axis('off')# 裁剪:取局部区域# 语法:img[行起始:行结束, 列起始:列结束, 通道]h, w = tiger.shape[:2]cropped = tiger[:h//2, w//4:w*3//4, :]plt.subplot(1, 2, 2)plt.imshow(cropped)plt.title('裁剪后(虎头特写)', fontproperties=prop)plt.axis('off')plt.tight_layout()plt.show()
img[y_start:y_end, x_start:x_end, :],先 Y 后 X,最后通道。示例 4:通道分离——提取单色与滤镜效果
url = "https://static.jyshare.com/images/mix/tiger.jpeg"response = requests.get(url, timeout=10)tiger = np.array(Image.open(BytesIO(response.content))) / 255.0plt.figure(figsize=(12, 4))# 原图plt.subplot(1, 4, 1)plt.imshow(tiger)plt.title('原图', fontproperties=prop)plt.axis('off')# 只保留红色通道(R)red_tiger = tiger.copy()red_tiger[:, :, [1, 2]] = 0plt.subplot(1, 4, 2)plt.imshow(red_tiger)plt.title('红色滤镜', fontproperties=prop)plt.axis('off')# 只保留绿色通道(G)green_tiger = tiger.copy()green_tiger[:, :, [0, 2]] = 0plt.subplot(1, 4, 3)plt.imshow(green_tiger)plt.title('绿色滤镜', fontproperties=prop)plt.axis('off')# 只保留蓝色通道(B)blue_tiger = tiger.copy()blue_tiger[:, :, [0, 1]] = 0plt.subplot(1, 4, 4)plt.imshow(blue_tiger)plt.title('蓝色滤镜', fontproperties=prop)plt.axis('off')plt.suptitle('RGB 通道分离', fontproperties=prop, fontsize=14)plt.tight_layout()plt.show()
示例 5:综合实战——制作"复古暖色"滤镜
url = "https://static.jyshare.com/images/mix/tiger.jpeg"response = requests.get(url, timeout=10)img = np.array(Image.open(BytesIO(response.content))) / 255.0# 复古滤镜:增强红色和黄色,压暗蓝色vintage = img.copy()vintage[:, :, 0] = np.clip(vintage[:, :, 0] * 1.2, 0, 1) # 红色增强20%vintage[:, :, 1] = np.clip(vintage[:, :, 1] * 0.9, 0, 1) # 绿色减弱10%vintage[:, :, 2] = np.clip(vintage[:, :, 2] * 0.7, 0, 1) # 蓝色减弱30%plt.figure(figsize=(10, 5))plt.subplot(1, 2, 1)plt.imshow(img)plt.title('原图', fontproperties=prop)plt.axis('off')plt.subplot(1, 2, 2)plt.imshow(vintage)plt.title('复古暖色滤镜', fontproperties=prop)plt.axis('off')plt.tight_layout()plt.show()# 保存处理后的图像plt.imsave('vintage_tiger.png', vintage)print("✅ 复古滤镜图像已保存:vintage_tiger.png")
五、imread() 与 PIL、OpenCV 的对比
plt.imread();复杂图像处理用 PIL;计算机视觉项目用 OpenCV。六、避坑指南
七、参数速查卡
# 从网络URL读取(内存方式)import requestsfrom PIL import Imagefrom io import BytesIOurl = "https://example.com/image.jpg"response = requests.get(url, timeout=10)img = np.array(Image.open(BytesIO(response.content)))# 图像信息print(img.shape) # (高, 宽, 通道)print(img.dtype) # 数据类型# 归一化img = img / 255.0# 裁剪crop = img[50:150, 100:300, :]# 变暗dark = img * 0.5# 单通道red = img.copy()red[:, :, [1, 2]] = 0# 显示并隐藏坐标轴plt.imshow(img)plt.axis('off')plt.show()
总结
今天我们掌握了 Matplotlib 图像读取与处理的核心技能:
✅
plt.imread()—— 读取本地图像为 NumPy 数组✅
requests + PIL—— 从网络URL直接读取图片(无需下载到本地)✅ 数组形状 ——
(H, W, 3)代表高、宽、RGB三通道✅ 归一化 —— 统一值域到 0~1,避免运算溢出
✅ 数组运算 ——
* factor调亮度,切片[:,:,:]做裁剪✅ 通道操作 —— 置零特定通道,实现单色滤镜
✅ 与
imsave()配合 —— 读取→处理→保存,完整图像处理链路
关键记忆:在 Python 里,图像就是数组;会玩 NumPy,就会玩图像。
本文来自网友投稿或网络内容,如有侵犯您的权益请联系我们删除,联系邮箱:596563534@qq.com 。
