python-docx 简介
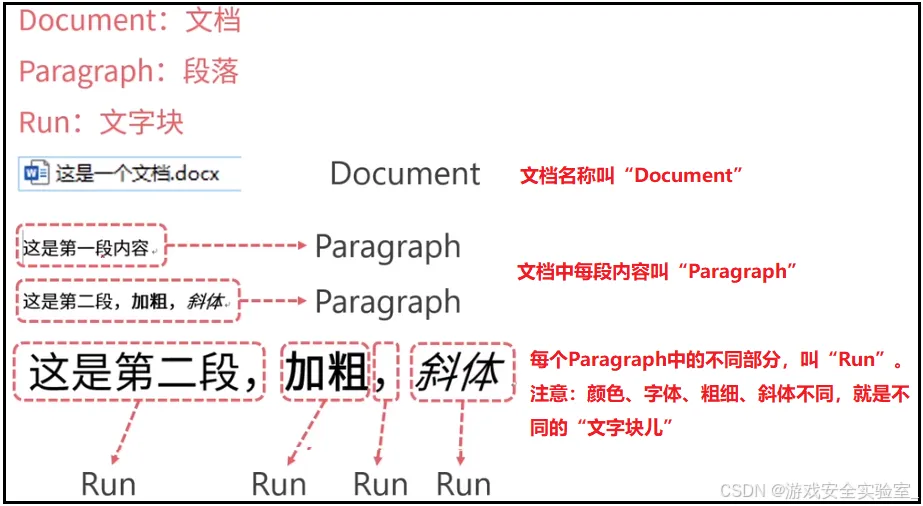
python-docx 是 Python 操作 Word 文档最常用的库。它的处理方式是面向对象的,会把 Word 文档中的各种元素都看作对象:
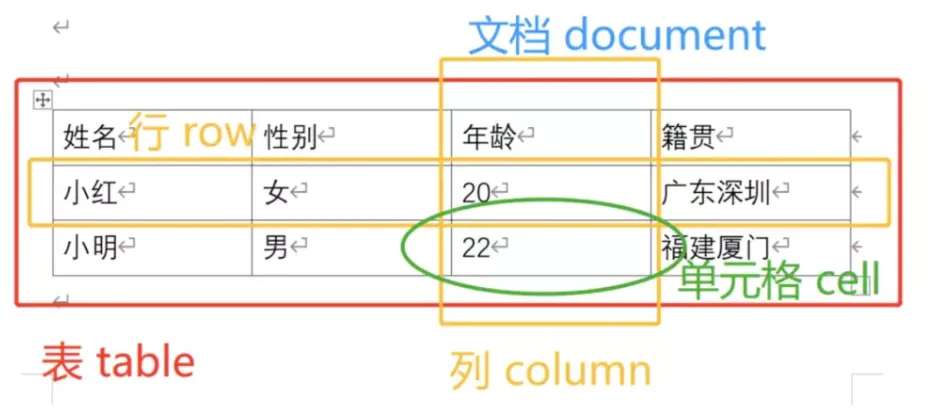
这三级结构是最基础的概念。如果文档中有表格,结构会稍微复杂一点:
表格可以看成 Document → Table → Row/Column → Cell 这样的四级结构,跟 Excel 很像。
安装 python-docx
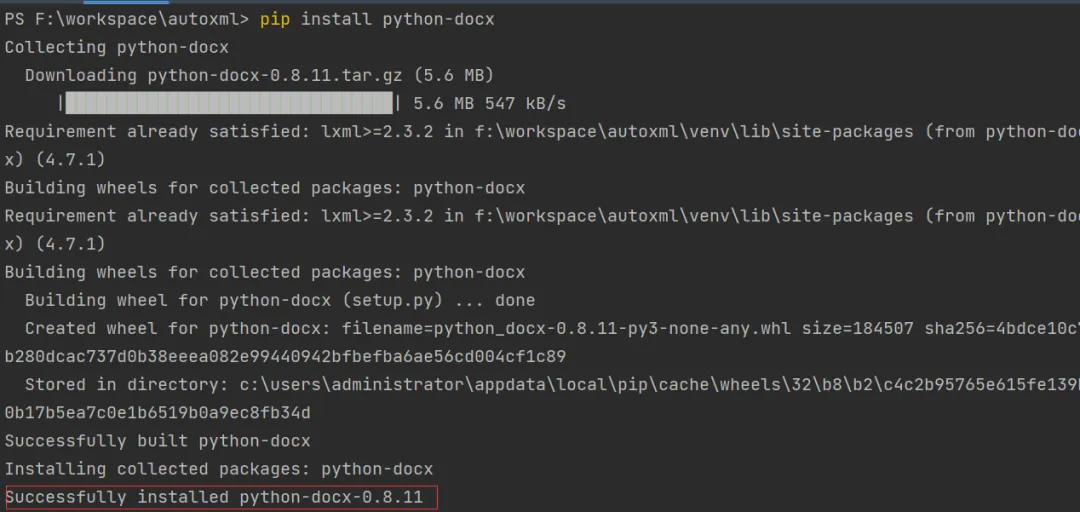
在 PyCharm 的终端里输入:
pip install python-docx
看到 Successfully installed 就表示安装成功了。
课程准备
下载课程资源文件:[点击下载 word.zip]
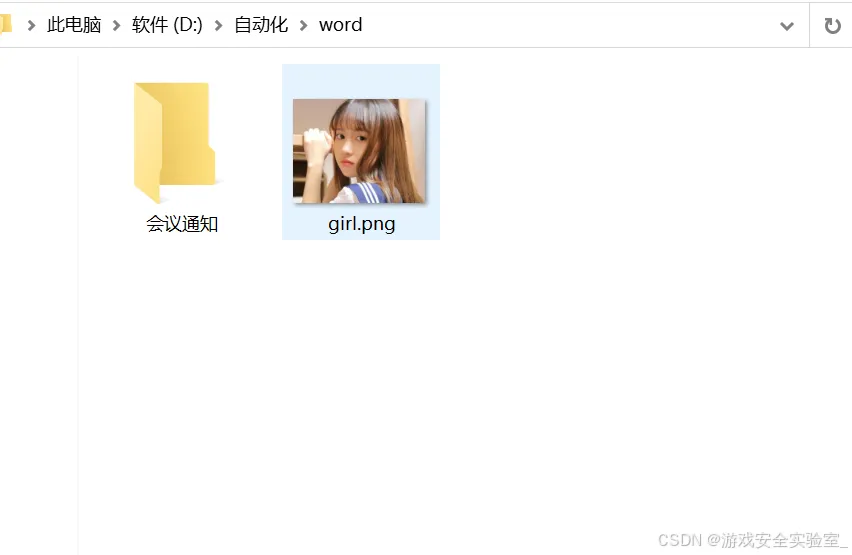
解压后放到 D:\自动化\word 目录下,结构如下:
提前准备好文件夹,方便后面跟着练习。
新建与保存 Word 文档
from docx import Document # 创建一个空文档 document = Document() # 保存到指定路径 document.save(r'D:\自动化\word\道德经.docx')
运行后,在 D:\自动化\word 目录下就会多出一个 道德经.docx 文件。因为是空文档,打开里面是空白的。
注意:安装的是 python-docx,但导入时用 import docx。
写入 Word 文档
下面这段代码演示了往 Word 里写各种内容:
from docx import Documentfrom docx.shared import Inches, Cm # 英寸和厘米单位# 打开刚才创建的文档file_path = r'D:\自动化\word\道德经.docx'document = Document(file_path)# 添加文档标题(level=0 是文档标题)document.add_heading('道德经', 0)# 添加段落p = document.add_paragraph('道可道,非常道;名可名,非常名。')# 在同一段落里追加不同格式的文字p.add_run('无名,天地之始,').bold = True # 粗体p.add_run('有名,') # 默认格式p.add_run('万物之母。').italic = True # 斜体# 添加一级标题document.add_heading('故常无欲,', level=1)# 添加带样式的段落document.add_paragraph('以观其妙,', style='Intense Quote')# 添加项目符号列表document.add_paragraph('常有欲,以观其徼。', style='List Bullet')# 添加编号列表document.add_paragraph('此两者,同出而异名,同谓之玄,玄之又玄,众妙之门。', style='List Number')document.add_paragraph('所以说,学Python,学得妙。', style='List Number')# 添加图片(三种方式)img_path = r'D:\自动化\word\girl.png'document.add_picture(img_path) # 原图大小document.add_picture(img_path, width=Inches(1.25)) # 指定宽度document.add_picture(img_path, width=Cm(5), height=Cm(5)) # 指定宽高# 准备表格数据records = ( (1, '李白', '诗仙'), (2, '杜甫', '诗圣'), (3, '白居易', '香山居士, 与元稹并称元白, 与刘禹锡合称刘白'))# 添加表格(1行3列,带网格样式)table = document.add_table(rows=1, cols=3, style='Table Grid')# 填充表头hdr_cells = table.rows[0].cellshdr_cells[0].text = '序号'hdr_cells[1].text = '姓名'hdr_cells[2].text = '描述'# 动态添加数据行for id, name, desc in records: row_cells = table.add_row().cells row_cells[0].text = str(id) row_cells[1].text = name row_cells[2].text = desc# 再添加一个表格(另一种填充方式)document.add_paragraph('再添加一个表格')records2 = [ ["姓名", "性别", "家庭地址"], ["貂蝉", "女", "河北省"], ["杨贵妃", "女", "贵州省"], ["西施", "女", "山东省"]]# 创建4行3列的表格table2 = document.add_table(rows=4, cols=3, style='Light List Accent 5')# 用双重循环填充for 行索引 in range(4): cells = table2.rows[行索引].cells for 列索引 in range(3): cells[列索引].text = str(records2[行索引][列索引])# 添加分页符document.add_page_break()# 保存文档document.save(file_path)
写入操作知识点总结
打开/创建文档
# 创建空文档document = Document()# 打开已有文档document = Document('exist.docx')
添加标题
# level 1-9 对应 标题1-标题9document.add_heading('一级标题', level=1)
添加段落
# 普通段落p = document.add_paragraph('正文内容')# 带样式的段落document.add_paragraph('引用内容', style='Intense Quote')document.add_paragraph('项目符号', style='List Bullet')document.add_paragraph('编号列表', style='List Number')
在段落中添加文字块
p = document.add_paragraph('开头文字')p.add_run('粗体文字').bold = Truep.add_run('斜体文字').italic = Truep.add_run('普通文字')
添加图片
# 原图大小document.add_picture('girl.png')# 指定宽度document.add_picture('girl.png', width=Inches(1.25))# 指定宽高document.add_picture('girl.png', width=Cm(5), height=Cm(5))
添加表格
# 创建表格table = document.add_table(rows=4, cols=3)# 带样式的表格table = document.add_table(rows=4, cols=3, style='Table Grid')
常用表格样式:
Normal TableTable GridLight Shading Accent 1-6Light List Accent 1-6Light Grid Accent 1-6
添加分页符
document.add_page_break()
读取 Word 文档
from docx import Documentdoc = Document(r'D:\自动化\word\道德经.docx')# 读取所有段落文字print("=== 所有段落内容 ===")for p in doc.paragraphs: print(p.text)# 读取指定段落的文字块print("\n=== 第2段的文字块 ===")for run in doc.paragraphs[1].runs: print(run.text)# 读取所有表格print("\n=== 所有表格内容 ===")for 表格 in doc.tables: for 行 in 表格.rows: row_data = [] for 单元格 in 行.cells: row_data.append(单元格.text) print(row_data)# 另存为新文档doc.save(r'D:\自动化\word\另存为新文档.docx')
注意:
doc.paragraphs段落.runsdoc.tables
实战一:提取 Word 数据到 Excel
需求描述
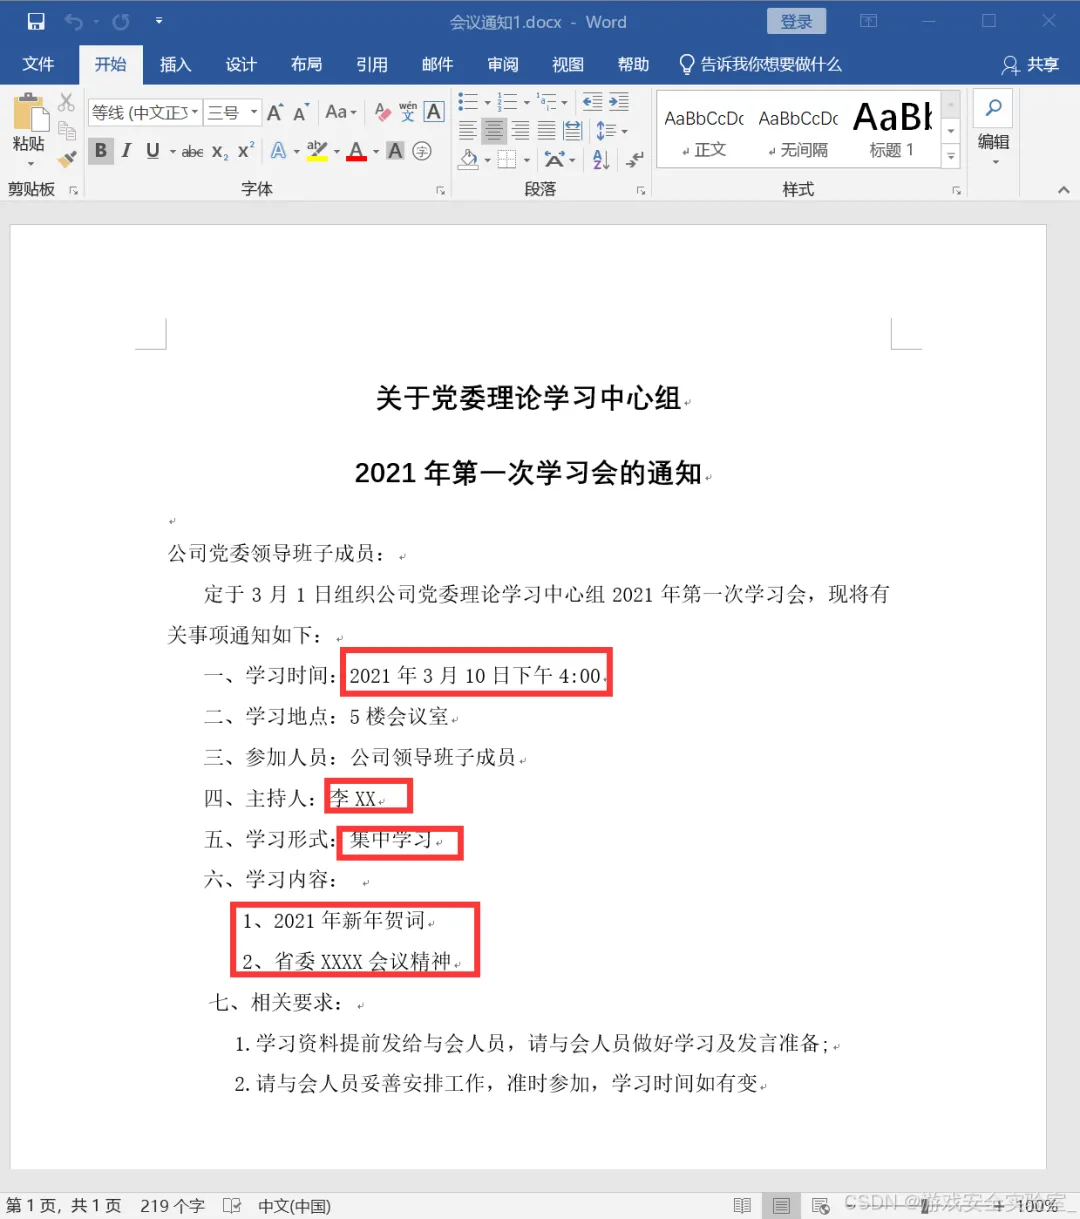
有一个文件夹里有很多会议通知 Word 文件,格式都一样。需要提取里面的学习时间、学习内容、学习形式、主持人,汇总到 Excel 中。
Word 文件格式:
目标 Excel 格式:
代码实现
自动化操作 PDF
用到的库
Python 操作 PDF 主要用两个库:
安装命令:
pip install PyPDF2 pip install pdfplumber
拆分 PDF
from docx import Documentfrom openpyxl import load_workbookimport globdef 提取数据汇总(file_dir): """从Word会议通知中提取数据汇总到Excel""" # 打开Excel模板 template = file_dir + r'\汇总模板.xlsx' workbook = load_workbook(template) sheet = workbook.active number = 1 # 序号计数 # 获取所有docx文件 docFiles = glob.glob(file_dir + r'\*.docx') for file in docFiles: doc = Document(file) contentList = [] # 学习内容列表 studyTime = '' # 学习时间 studyType = '' # 学习形式 host = '' # 主持人 # 遍历所有段落,提取信息 for paragraph in doc.paragraphs: text = paragraph.text # 提取学习时间 if '学习时间:' in text: studyTime = text.split('学习时间:')[1] # 提取主持人 elif '主持人:' in text: host = text.split('主持人:')[1] # 提取学习形式 elif '学习形式:' in text: studyType = text.split('学习形式:')[1] # 提取学习内容(以数字+顿号开头) elif len(text) >= 2 and text[0].isdigit() and text[1] == '、': contentList.append(text) # 合并学习内容 content = ' '.join(contentList) # 写入Excel sheet.append([number, studyTime, content, studyType, host]) number += 1 # 保存汇总结果 workbook.save(file_dir + r'\会议汇总.xlsx') print(f"✅ 汇总完成!共处理 {number-1} 个文件")if __name__ == '__main__': 提取数据汇总(r'D:\自动化\word\会议通知')
把一个大 PDF 拆成多个小 PDF:
import osfrom PyPDF2 import PdfFileReader, PdfFileWriterpdf_path = r"D:\自动化\pdf\二期第1讲.pdf"out_dir = r"D:\自动化\pdf\拆分"# 创建输出目录if not os.path.exists(out_dir): os.makedirs(out_dir)# 读取PDFpdf_reader = PdfFileReader(pdf_path)# 获取总页数pageCount = pdf_reader.getNumPages()print(f"总页数: {pageCount}")# 每页拆成一个PDFfor page in range(pageCount): pdf_writer = PdfFileWriter() pdf_writer.addPage(pdf_reader.getPage(page)) out_path = os.path.join(out_dir, f"page_{page+1}.pdf") with open(out_path, "wb") as out: pdf_writer.write(out) print(f"已保存: page_{page+1}.pdf")print("✅ 拆分完成!")
合并 PDF
把多个小 PDF 合并成一个大 PDF:
from PyPDF2 import PdfFileReader, PdfFileWriterimport ospdf_dir = r"D:\自动化\pdf\拆分"out_path = r"D:\自动化\pdf\merge.pdf"# 获取所有PDF文件并排序pdfList = sorted([f for f in os.listdir(pdf_dir) if f.endswith('.pdf')])pdf_writer = PdfFileWriter()for pdf_name in pdfList: path = os.path.join(pdf_dir, pdf_name) pdf_reader = PdfFileReader(path) # 把所有页都加到writer里 for page in range(pdf_reader.getNumPages()): pdf_writer.addPage(pdf_reader.getPage(page)) print(f"已添加: {pdf_name}")# 保存合并后的文件with open(out_path, "wb") as out: pdf_writer.write(out)print(f"✅ 合并完成!保存至: {out_path}")
提取文字内容
import pdfplumberpdf_path = r"D:\自动化\pdf\道德经.pdf"with pdfplumber.open(pdf_path) as pdf: # 读取所有页的内容 for i, page in enumerate(pdf.pages): text = page.extract_text() print(f"\n=== 第 {i+1} 页 ===") print(text) # 只读第一页 # page = pdf.pages[0] # print(page.extract_text())
提取表格内容
import pdfplumberpdf_path = r"D:\自动化\pdf\道德经.pdf"with pdfplumber.open(pdf_path) as pdf: page = pdf.pages[1] # 获取第2页 # 提取第一个表格 table = page.extract_table() print("第一个表格:") for row in table: print(row) # 提取所有表格 tables = page.extract_tables() print(f"\n共找到 {len(tables)} 个表格")
注意:提取的表格可能有 None 值,使用时需要清洗数据。
PDF 加密
给 PDF 添加密码:
from PyPDF2 import PdfFileReader, PdfFileWriterpdf_path = r"D:\自动化\pdf\道德经.pdf"save_path = r"D:\自动化\pdf\加密后.pdf"pdf_reader = PdfFileReader(pdf_path)pdf_writer = PdfFileWriter()# 复制所有页for page in range(pdf_reader.getNumPages()): pdf_writer.addPage(pdf_reader.getPage(page))# 设置密码pdf_writer.encrypt("youbafu")# 保存with open(save_path, "wb") as out: pdf_writer.write(out)print("✅ 加密完成!密码: youbafu")
PDF 解密
移除 PDF 密码:
from PyPDF2 import PdfFileReader, PdfFileWriterpdf_path = r"D:\自动化\pdf\加密后.pdf"save_path = r"D:\自动化\pdf\解密后.pdf"pdf_reader = PdfFileReader(pdf_path)# 用密码解密pdf_reader.decrypt('youbafu')# 复制所有页pdf_writer = PdfFileWriter()for page in range(pdf_reader.getNumPages()): pdf_writer.addPage(pdf_reader.getPage(page))# 保存with open(save_path, "wb") as out: pdf_writer.write(out)print("✅ 解密完成!")
实战二:拆分 PDF 文件(进阶版)
WPS 等软件拆分 PDF 经常要收费,我们自己写代码实现这个功能。
下面的代码可以按指定页数间隔拆分 PDF:
import osfrom PyPDF2 import PdfFileWriter, PdfFileReaderdef 拆分PDF(file_name, file_path, save_dir, step=3): """ 拆分PDF为多个小文件 参数: file_name: 拆分后的文件名前缀 file_path: 原PDF路径 save_dir: 保存目录 step: 每多少页拆成一个文件(默认3页) """ # 创建保存目录 if not os.path.exists(save_dir): os.mkdir(save_dir) if step < 1: print("拆分间隔不能小于1") return # 读取PDF pdf_reader = PdfFileReader(file_path) pageCount = pdf_reader.getNumPages() print(f"原文件共 {pageCount} 页,每 {step} 页拆分为一个文件\n") # 按step间隔拆分 for page in range(0, pageCount, step): pdf_writer = PdfFileWriter() # 添加step页到writer for index in range(page, page + step): if index < pageCount: pdf_writer.addPage(pdf_reader.getPage(index)) # 保存 part_num = int(page / step) + 1 child_name = f'{file_name}_{part_num}.pdf' save_path = os.path.join(save_dir, child_name) with open(save_path, "wb") as out: pdf_writer.write(out) print(f"已保存: {child_name} (第{page+1}-{min(page+step, pageCount)}页)") print(f"\n✅ 拆分完成!共生成 {int((pageCount-1)/step)+1} 个文件") print(f"保存路径: {save_dir}")if __name__ == '__main__': 拆分PDF( '拆分PDF', r'D:\自动化\pdf\二期第1讲.pdf', r'D:\自动化\pdf\拆分2', step=4 )
文档总结
一、核心内容回顾
1. python-docx 操作 Word
文档结构:
Document(文档) └── Paragraph(段落) └── Run(文字块) └── Table(表格) └── Row(行) └── Cell(单元格)
常用操作:
| |
|---|
| Document() |
| Document('文件.docx') |
| add_heading('标题', level=1) |
| add_paragraph('内容') |
| paragraph.add_run('文字') |
| add_picture('图片.png', width=Cm(5)) |
| add_table(rows=3, cols=3) |
| add_page_break() |
| save('文件.docx') |
2. PDF 操作
PyPDF2:
PdfFileReader()PdfFileWriter()addPage()encrypt()decrypt()
pdfplumber:
extract_text()extract_table()extract_tables()
二、实际应用场景
- 批量生成合同/报告
- 数据汇总
- PDF 处理
- 报表导出
- 文档批量处理
三、学习建议
- 多动手
- 整理成函数
- 注意路径:Windows 路径用原始字符串
r'路径' 避免转义问题 - 异常处理:实际使用时加上 try-except,防止文件不存在等问题
- 结合使用:Word + Excel + PDF 结合使用,解决复杂办公需求