自己动手C语言编写Linux内核模块,原来只需要写这2个模版文件~也不是很复杂啊!
- 2026-09-05 00:35:06
「从今天起,好好学习,天天向上」
每天一分钟,积少成多,从C语言修炼成长为计算机高手。
「纯干货系列,不玩虚的,纸上学来终觉浅,自己动手干才是王道!」
【~~小白一名,如有错漏,请各位包涵,偶将虚心学习~~】
字数 2512,阅读大约需 13 分钟
C语言编写内核模块
C语言程序和标准库为什么能够读写文件、屏幕输入输出、创建进程、信号处理等,这些都是依赖内核提供的功能。
Linux提供扩展方式,允许C语言编写定制的内核模块。
学了这么久C语言,来试试吧! ~
关于内核
内核模块提供最基础最重要的功能,Linux内核模块使用C语言编写。自己编写内核模块,可以增强或魔改内核功能。
• 系统调用:增加系统调用,需要重新编译内核,这个影响较大,一般不需要。 • 内核模块:例如文件系统、网络协议、设备驱动等,增强内核功能;另外还可以公开内核模块部分函数供内核使用。
用户态程序访问内核模块方式:
• 系统调用:最常用,其实C语言标准库也大量使用操作系统调用。 • 设备文件:用于操作物理设备或者虚拟设备。 • proc文件系统:可以访问内核模块数据。
总之一句话,增强内核功能,要么直接修改内核源码(包括增加系统调用)编译安装内核使用;要么利用内核模块机制(包括驱动),定制内核模块供程序使用。
查看系统调用
我的环境是MAC电脑和Ubuntu ARM64虚拟机,其他Linux发行版和环境应该类似。
# 查看Linux内核信息~$ uname -aLinux ccoder-VMware20-1 6.14.0-36-generic #36~24.04.1-Ubuntu SMP PREEMPT_DYNAMIC Wed Oct 15 15:22:32 UTC 2 aarch64 aarch64 aarch64 GNU/Linux~$ lsb_release -aNo LSB modules are available.Distributor ID: UbuntuDescription: Ubuntu 24.04.3 LTSRelease: 24.04Codename: noble# 查看当前内核提供的系统调用# 不同内核版本和CPU架构提供的方式可能有所不同# 这里使用一个查看工具非常方便~$ sudo apt install auditd# 查看所有系统调用~$ ausyscall --dumpUsing aarch64 syscall table:0 io_setup1 io_destroy2 io_submit3 io_cancel4 io_getevents5 setxattr......444 landlock_create_ruleset445 landlock_add_rule446 landlock_restrict_self447 memfd_secret448 process_mrelease449 futex_waitv450 set_mempolicy_home_node451 cachestat从输出可以看出来有,当前该内核版本有452个系统系统调用。
查看模块
# 查看当前已加载的内核模块~$ sudo lsmod | wc -l61# 查看模块详细信息# 例如查看IPv4包过滤模块$ modinfo ip_tables# 查看模块依赖~$ modprobe --show-depends ip_tablesinsmod /lib/modules/6.14.0-36-generic/kernel/net/netfilter/x_tables.ko.zstinsmod /lib/modules/6.14.0-36-generic/kernel/net/ipv4/netfilter/ip_tables.ko.zst# 查看内核所有模块文件位置~$ ls /lib/modules/6.14.0-36-generic/kernel/arch crypto fs lib net sound zfsblock drivers kernel mm samples ubuntu安装内核源码
1. 查看下当前内核对应的安装包信息
# 查看当前内核版本对应的已安装deb包~$ dpkg --list | grep linux-imageii linux-image-6.14.0-36-generic 6.14.0-36.36~24.04.1 arm64 Signed kernel image generic# 更精确查看~$ dpkg -l "linux-image-$(uname -r)"Desired=Unknown/Install/Remove/Purge/Hold| Status=Not/Inst/Conf-files/Unpacked/halF-conf/Half-inst/trig-aWait/Trig-pend|/ Err?=(none)/Reinst-required (Status,Err: uppercase=bad)||/ Name Version Architecture Description+++-=============================-====================-============-===========>ii linux-image-6.14.0-36-generic 6.14.0-36.36~24.04.1 arm64 Signed kern>2. 查看下当前内核对应的内核源码包版本
# Build-Using指向实际的源码包# source指向的实际源码签名包名称和版本信息~$ apt info linux-image-6.14.0-36-genericPackage: linux-image-6.14.0-36-genericVersion: 6.14.0-36.36~24.04.1Built-Using: linux-hwe-6.14 (= 6.14.0-36.36~24.04.1)Status: install ok installedPriority: optionalSection: kernelSource: linux-signed-hwe-6.14......3. 下载当前源码或安装源码
默认情况下,发行版Ubuntu只安装了头文件,没有安装源码。源码可以下载到指定目录查看,也可以安装。
# 开启软件源里面允许下载源码# Types里面添加deb-src源~$ sudo vi /etc/apt/sources.list.d/ubuntu.sourcesTypes: deb deb-srcURIs: http://ports.ubuntu.com/ubuntu-ports/Suites: noble noble-updates noble-backportsComponents: main restricted universe multiverseSigned-By: /usr/share/keyrings/ubuntu-archive-keyring.gpgTypes: deb deb-srcURIs: http://ports.ubuntu.com/ubuntu-ports/Suites: noble-securityComponents: main restricted universe multiverseSigned-By: /usr/share/keyrings/ubuntu-archive-keyring.gpg~$ sudo apt update下载到指定目录,例如当前用户目录,这样可以自行查看。
~$ cd ~~$ pwd/home/ccoder# 这一步其实去下载linux-signed-hwe-6.14# 这个不是源码包,只是签名包信息,很小~$ sudo apt source linux-image-$(uname -r)# 实际源码包下载,一般有200-300MB~$ sudo apt source linux-hwe-6.14# arm64版本从内核6.11开始也存在和x86_64对应的系统调用表文件# 不同架构源码目录可能不一样~$ cd linux-signed-hwe-6.14-6.14.0/linux-hwe-6.14-6.14.0/arch/arm64/tools~$ ll syscall_64.tbl~$ ll syscall_64.tbllrwxrwxrwx 1 root root 28 Mar 24 2025 syscall_64.tbl -> ../../../scripts/syscall.tbl也可以按照操作系统的目录。
# 默认操作系统只安装了内核的头文件~$ cd /usr/src/linux-headers-$(uname -r)~$ pwd/usr/src/linux-headers-6.14.0-36-generic~$ lsarch Documentation init Kconfig mm samples toolsblock drivers io_uring kernel Module.symvers scripts ubuntucerts fs ipc lib net security usrcrypto include Kbuild Makefile rust sound virt自己动手写一个Hello内核模块
这个实验,就是从零开始用C语言写一个内核模块,这个内核模块很简单,就是调用的时候打印内核日志hello。
环境:
• Ubuntu 2404 ARM • make • gcc • 开发工具:vscode
文件目录结构如下:
1. 创建模块工程目录
~$ mkdir hello-module~$ lshello-module~$ cd hello-module/2. 编写hello.c内核模块文件
内核模块文件编写遵循接口规范,下面就是最简单的模板。
#include <linux/module.h>#include <linux/kernel.h>#include <linux/init.h>// 内核加载时初始化执行一次static int __init hello_init(void){ printk(KERN_INFO "Hello, Linux Hello Kernel!\n"); printk(KERN_INFO "Hello Module loaded successfully.\n"); return 0;}// 内核卸载时执行一次static void __exit hello_exit(void){ printk(KERN_INFO "Goodbye, Linux Hello Kernel!\n"); printk(KERN_INFO "Hello Module removed.\n");}module_init(hello_init);module_exit(hello_exit);MODULE_LICENSE("GPL");MODULE_AUTHOR("一只爱学C的喵");MODULE_DESCRIPTION("A simple Hello World kernel module");MODULE_VERSION("1.0");3. 编写Makefile文件
内核编译无法使用普通C语言GCC和标准库编译,需要依赖内核源码自带构建系统。
当前目录下新建文件Makefile:
obj-m += hello.oall: make -C /lib/modules/$(shell uname -r)/build M=$(PWD) modulesclean: make -C /lib/modules/$(shell uname -r)/build M=$(PWD) clean4. 编译
Ubuntu发行版默认已自带内核头文件和构建系统目录,查看目录是否存在,如果不存在可以安装。
~$ uname -r6.14.0-36-generic~$ apt list | grep linux-headers-6.14.0-36-genericlinux-headers-6.14.0-36-generic/now 6.14.0-36.36~24.04.1 arm64 [installed,local]# 该目录就是内核构建目录,其实是一个符号链接~$ ll /lib/modules/$(uname -r)/buildlrwxrwxrwx 1 root root 40 Oct 15 2025 /lib/modules/6.14.0-36-generic/build -> /usr/src/linux-headers-6.14.0-36-generic/~$ ll /usr/src/linux-headers-6.14.0-36-generic/total 2572.....drwxr-xr-x 4 root root 4096 Nov 25 2025 include/-rw-r--r-- 1 root root 70638 Oct 15 2025 Makefile......编译执行以及输出如下:
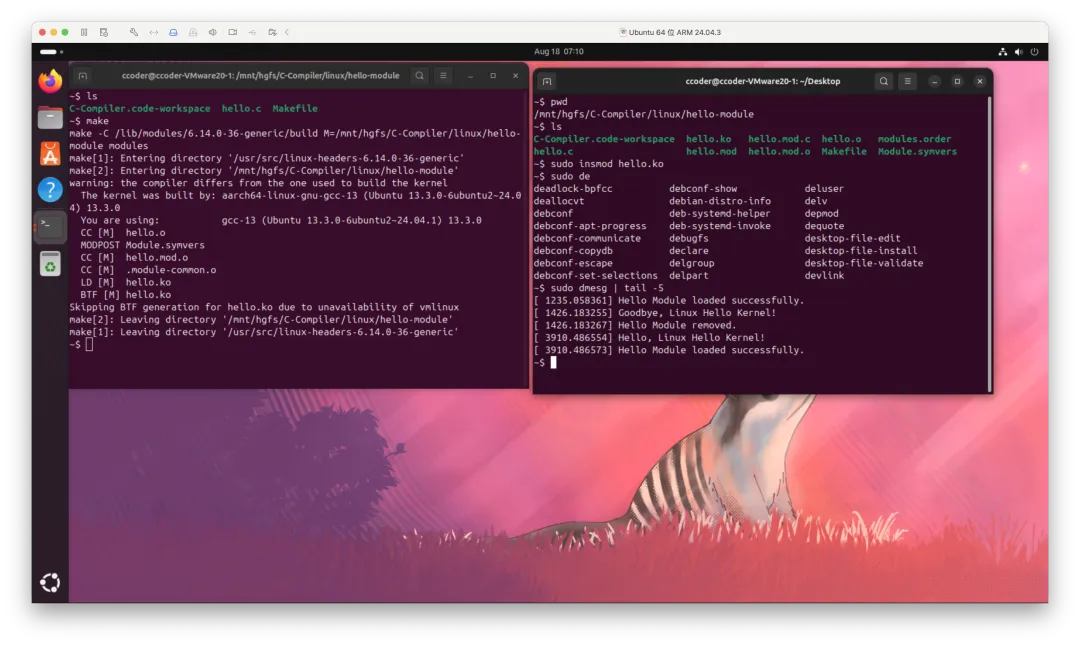
~$ make make -C /lib/modules/6.14.0-36-generic/build M=/mnt/hgfs/C-Compiler/linux/hello-module modulesmake[1]: Entering directory '/usr/src/linux-headers-6.14.0-36-generic'make[2]: Entering directory '/mnt/hgfs/C-Compiler/linux/hello-module'warning: the compiler differs from the one used to build the kernel The kernel was built by: aarch64-linux-gnu-gcc-13 (Ubuntu 13.3.0-6ubuntu2~24.04) 13.3.0 You are using: gcc-13 (Ubuntu 13.3.0-6ubuntu2~24.04.1) 13.3.0 CC [M] hello.o MODPOST Module.symvers CC [M] hello.mod.o CC [M] .module-common.o LD [M] hello.ko BTF [M] hello.koSkipping BTF generation for hello.ko due to unavailability of vmlinuxmake[2]: Leaving directory '/mnt/hgfs/C-Compiler/linux/hello-module'make[1]: Leaving directory '/usr/src/linux-headers-6.14.0-36-generic'编译完成以后,项目目录生成以下文件:
~$ pwd/mnt/hgfs/C-Compiler/linux/hello-module~$ tree .├── C-Compiler.code-workspace├── hello.c├── hello.ko├── hello.mod├── hello.mod.c├── hello.mod.o├── hello.o├── Makefile├── modules.order└── Module.symvers1 directory, 10 files5. 安装模块
安装完成以后,可以查看内核日志,发现模块安装成功。
~$ pwd/mnt/hgfs/C-Compiler/linux/hello-module~$ sudo insmod hello.ko ~$ sudo lsmod | grep hellohello 12288 0~$ dmesg | taildmesg: read kernel buffer failed: Operation not permitted~$ sudo dmesg | tail[ 1235.056572] hello: loading out-of-tree module taints kernel.[ 1235.056612] hello: module verification failed: signature and/or required key missing - tainting kernel[ 1235.058354] Hello, Linux Hello Kernel![ 1235.058361] Hello Module loaded successfully.6. 卸载模块和清理
~$ sudo rmmod hello~$ sudo dmesg | tail -5[ 1235.056612] hello: module verification failed: signature and/or required key missing - tainting kernel[ 1235.058354] Hello, Linux Hello Kernel![ 1235.058361] Hello Module loaded successfully.[ 1426.183255] Goodbye, Linux Hello Kernel![ 1426.183267] Hello Module removed.几个关键问题
内核模块编译和一般C语言编译有什么不同?
操作系统程序运行空间严格区分用户态和内核态,内核模块是运行在内核态,普通的C语言程序是用户态。
普通C语言程序有main函数,可以使用用户态标准库,动态链接或静态链接后运行,直接使用GCC或编写Makefile后编译运行。
内核模块必须遵循内核模块编写规范,没有main函数,编译必须使用内核构建系统,不能使用任何用户态标准库,只能使用内核提供的函数。
内核文件格式.ko和普通对象文件.o文件格式有区别吗?
.ko 和 .o 都是 ELF(Executable and Linkable Format)格式,但是具体格式内容和用途有区别,无法通用.
• ko:kernel object, o: Object file • ELF格式类型相同 • .o是对象文件不能直接运行,需要用户程序链接以后运行. • .ko是内核对象文件,支持insmod命令安装;加载由内核动态链接运行. • .o文件内容是机器码和符号表; .ko同样包括这些内容,还增加了模块必要的信息.
.ko 本质上也是一个 .o(都是 ET_REL 类型),但多了内核模块所需的元数据,能被 insmod 识别并加载到内核中运行。
内核构建系统是如何工作的
我们编写Makefile内核编译脚本必须遵照一定要求,因为它最终是被内核构建系统读取,融入到整体的构建系统中。
obj-m += hello.oobj-m是内核顶层的Makefile文件预定义好的目标变量,表示要编译成可加载模块(.ko),这里我们把自己编写的hello模块也追加到模块列表里面。
make -C /lib/modules/$(shell uname -r)/build M=$(PWD) modules-C选项表示切换到内核源码目录执行make, M告诉内核模块代码位置, modules最终要编译成内核模块。
可以这么理解:自己的编写的内核模块Makefile文件只是一个子文件或小片段,最终是要被在内核源码树的顶层 Makefile和核心构建系统中定义和处理的。
如何编写普通的C语言程序去调用内核模块功能?
自定义内核模块,最终是为了提供内核功能给用户态的C语言程序使用。这个问题同样有趣,涉及到用户态和内核态数据通信,也就是说无法直接在内核模块定义个函数直接将返回值给用户态程序。
内核提供了好几种方式,通过/proc, sysfs, mmap, ioctl等多种方式,可以实现,这些后续再给大家分享。
大家赶紧试试吧。
---------- End ----------
【特别声明:本公众号文章均为作者原创或授权发布,部分内容和图片来源于网络,请放心食用,观点仅供学习参考,水平有限如有错漏,请海涵~~】
「喜欢C请 点赞 点击右下角 在看
 」
」
随机文章
-
 10个月宝宝每天需要喝多少奶粉?
- 把这48页啃透,你的Python就比牛来还牛了!
- Linux运维常见故障排查与修复大全️
- 别瞎学python!零基础拒绝碎片化入门,一次性啃完核心语法
- Linux Kernel eBPF验证器负偏移绕过导致本地提权漏洞深度分析
- 为什么我学Python时不知道这个手册?
- Python + 比兔代理数据采集实战:socks5h 网关模式 20 行代理层、50 页真实采集与可视化全流程
- Linux 忘记密码怎么办:从原理到实战
- 禁止摆烂,20天速成的Python课程,无偿分享
- Linux基础命令进阶:截取、归档压缩、过滤与统计详解
- Python爬虫全套实战|32个案例七天吃透,附源码