从零搭建手机远程控制系统:用 Python + WebSocket 实现跨网络实时操控
- 2026-09-10 04:41:06
从零搭建手机远程控制系统:用 Python + WebSocket 实现跨网络实时操控
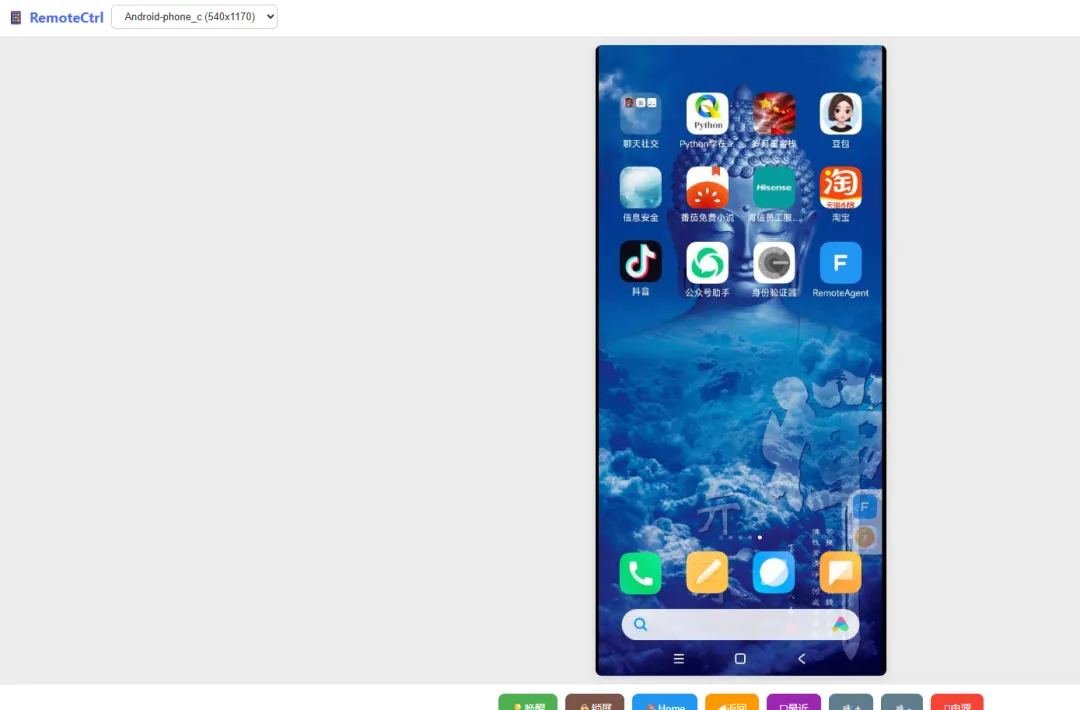
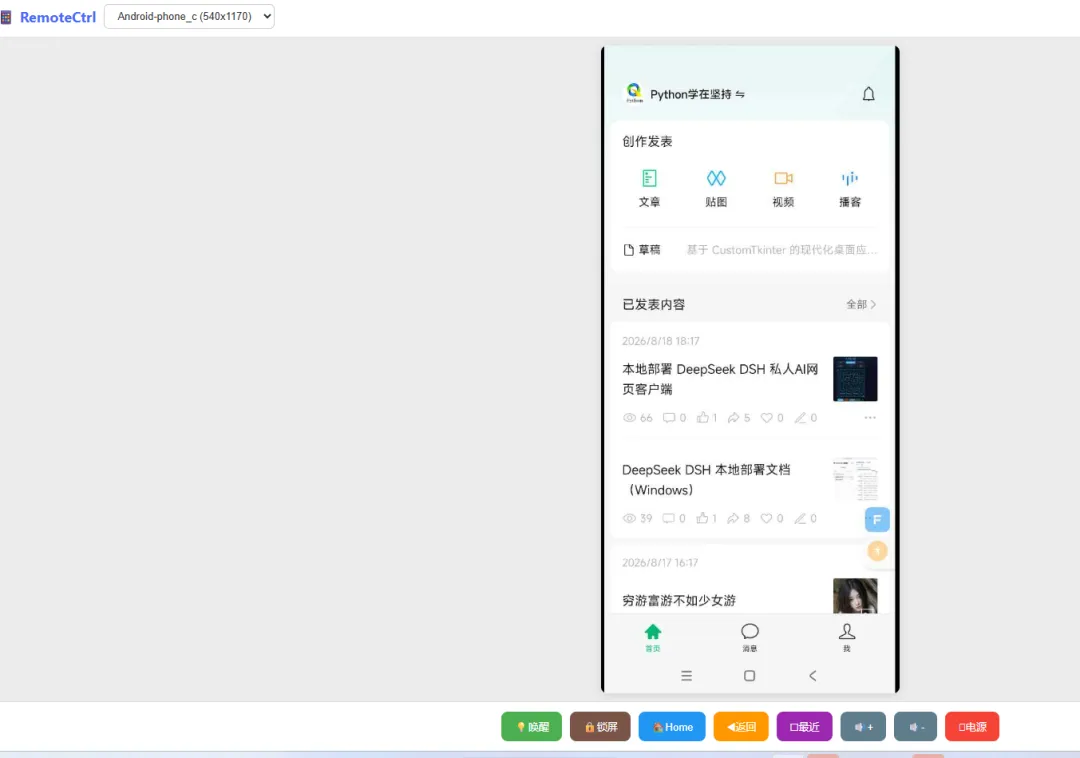
用一台手机通过浏览器远程控制另一台手机,实时画面传输 + 触摸映射,全程只需 Python 和一台云服务器。
前言
你有没有想过:出门在外,想操作家里的另一台手机?或者帮家人远程解决手机问题?
市面上的远程控制方案(TeamViewer、向日葵等)要么收费,要么需要 root 权限,要么依赖特定厂商的生态。
今天我们来实现一个纯 Python 的手机远程控制系统,架构简洁、代码开源、部署方便。整个系统只有三个角色:
手机A(控制端):打开浏览器就能用 服务器B(中转):一台云服务器跑 Python 服务 手机C(被控端):安装 Termux 运行 Agent
整体架构
┌──────────────┐ ┌──────────────┐ ┌──────────────┐│ 手机A │ │ 服务器B │ │ 手机C ││ (浏览器) │◄──────► │ (Flask + │◄──────► │ (Termux + ││ │ WebSocket│ SocketIO) │ WebSocket│ Agent) ││ 实时画面显示 │ │ 指令中转 │ │ 截屏推流 ││ 触摸/按键操作 │ │ 设备管理 │ │ 执行指令 │└──────────────┘ └──────────────┘ └──────────────┘数据流:
手机C 持续截屏 → 压缩为 JPEG → Base64 编码 → 通过 WebSocket 推送到服务器B 服务器B 将画面帧转发给正在观看该设备的手机A 手机A 上的触摸操作 → 转换为坐标指令 → 发送到服务器B → 转发给手机C 手机C 接收指令 → 通过 ADB input命令执行对应操作
技术选型
screencap | ||
input 命令 | ||
核心模块详解
一、服务器端(server.py)
服务器是整个系统的核心枢纽,承担三个职责:
设备管理 — 维护在线设备列表,处理上下线 画面中转 — 将被控端推送的帧转发给观看者 指令转发 — 将控制端发出的操作转发给目标设备
1.1 设备注册与管理
devices = {} # 全局设备表@sio.on('register_device')defon_register(data): device_id = data.get('device_id', 'unknown') device_name = data.get('name', device_id) devices[device_id] = {'sid': request.sid, # Socket.IO 会话ID,用于定向推送'name': device_name,'last_seen': time.time(),'resolution': data.get('resolution', '1080x2340') } broadcast_device_list() # 通知所有客户端更新列表每个设备连接后通过 register_device 事件注册自己。服务器记录其 sid(会话ID),后续通过这个 sid 精确地向目标设备推送指令。
1.2 画面帧转发(Room 机制)
@sio.on('screen_frame')defon_screen_frame(data): device_id = data.get('device_id') frame = data.get('frame')if frame: emit('frame', {'device_id': device_id, 'frame': frame}, room=f'view_{device_id}', include_self=False)这里用了 Socket.IO 的 Room 概念。当控制端选择查看某设备时,会加入 view_{device_id} 房间。服务器收到帧数据后,只向该房间内的成员广播,避免无用流量。
1.3 控制指令转发
@sio.on('control')defon_control(data): device_id = data.get('device_id')if device_id in devices: target_sid = devices[device_id]['sid'] emit('execute', data, room=target_sid)else: emit('error', {'msg': f'设备 {device_id} 不在线'})控制指令直接通过设备的 sid 定向发送,确保只有目标设备收到。
二、前端控制页面(control.html)
前端是一个纯 HTML5 单页应用,用 Canvas 渲染画面,用触摸事件捕获操作。
2.1 画面渲染
socket.on('frame', (data) => {const img = new Image(); img.onload = () => { canvas.width = img.width; canvas.height = img.height; ctx.drawImage(img, 0, 0); }; img.src = 'data:image/jpeg;base64,' + data.frame;// FPS 统计...});每收到一帧就创建一个 Image 对象,加载完成后绘制到 Canvas。这种方式简单可靠,兼容性好。
2.2 触摸手势识别
前端实现了完整的手势识别系统:
functionhandleTouchEnd(e) {const duration = Date.now() - touchStartTime;if (hasMoved) {// 移动距离 > 20px → 滑动 socket.emit('control', {action: 'swipe',x1: touchStartPos.x, y1: touchStartPos.y,x2: endPos.x, y2: endPos.y,duration: Math.max(duration, 200) }); } elseif (duration > 500) {// 按住超过 500ms → 长按 socket.emit('control', { action: 'long_press', x, y, duration }); } else {// 300ms 内两次点击 → 双击,否则 → 单击// (使用延时器区分单击和双击) }}手势识别逻辑:
2.3 坐标映射
functiongetPos(e) {const rect = canvas.getBoundingClientRect();return {x: Math.round((clientX - rect.left) / rect.width * deviceResolution.w),y: Math.round((clientY - rect.top) / rect.height * deviceResolution.h) };}将 Canvas 上的像素坐标按比例映射到手机的实际分辨率坐标。这样无论浏览器窗口多大,点击位置都能准确对应到手机屏幕上。
三、被控端 Agent(agent.py)
Agent 运行在手机C的 Termux 中,是整个系统的"手脚"。
3.1 屏幕捕获与推流
defcapture_screen():# 调用 Android 的 screencap 命令 result = subprocess.run(['screencap', '-p'], capture_output=True, timeout=5)# 用 Pillow 缩放 + 压缩 img = Image.open(io.BytesIO(result.stdout)) img = img.resize((SCREEN_WIDTH, SCREEN_HEIGHT), Image.LANCZOS) buffer = io.BytesIO() img.save(buffer, format='JPEG', quality=SCREEN_QUALITY, optimize=True)return base64.b64encode(buffer.getvalue()).decode('utf-8')截屏流程:screencap 获取原始 PNG → Pillow 缩放到指定尺寸 → 压缩为低质量 JPEG → Base64 编码。
通过调整 SCREEN_WIDTH、SCREEN_HEIGHT 和 SCREEN_QUALITY,可以在画质和传输速度之间取得平衡。
3.2 控制指令执行
@sio.on('execute')defon_execute(data): action = data.get('action', '')if action == 'tap': run_cmd(f"input tap {data['x']}{data['y']}")elif action == 'swipe': run_cmd(f"input swipe {x1}{y1}{x2}{y2}{duration}")elif action == 'long_press':# 用原地 swipe 模拟长按 run_cmd(f"input swipe {x}{y}{x}{y}{duration}")elif action == 'key': keycode = KEY_MAP.get(key, '0') run_cmd(f"input keyevent {keycode}")所有操作最终都通过 Android 的 input 命令实现。值得注意的是长按的实现方式——用起点和终点相同的 swipe 命令来模拟,这是 Android 命令行工具的一个经典技巧。
3.3 连接保活
defheartbeat_loop():whileTrue:if sio.connected: sio.emit('heartbeat', {'device_id': DEVICE_ID}) time.sleep(HEARTBEAT_INTERVAL)定时心跳 + Socket.IO 自动重连机制,确保网络波动后能自动恢复连接。
部署指南
服务器B 部署
# 安装依赖pip3 install flask==2.0.3 flask-socketio==5.0.1 eventlet==0.33.0 pillow==8.4.0 Werkzeug==2.0.3# 启动(后台运行)nohup python3 server.py > server.log 2>&1 &记得开放服务器 80 端口。
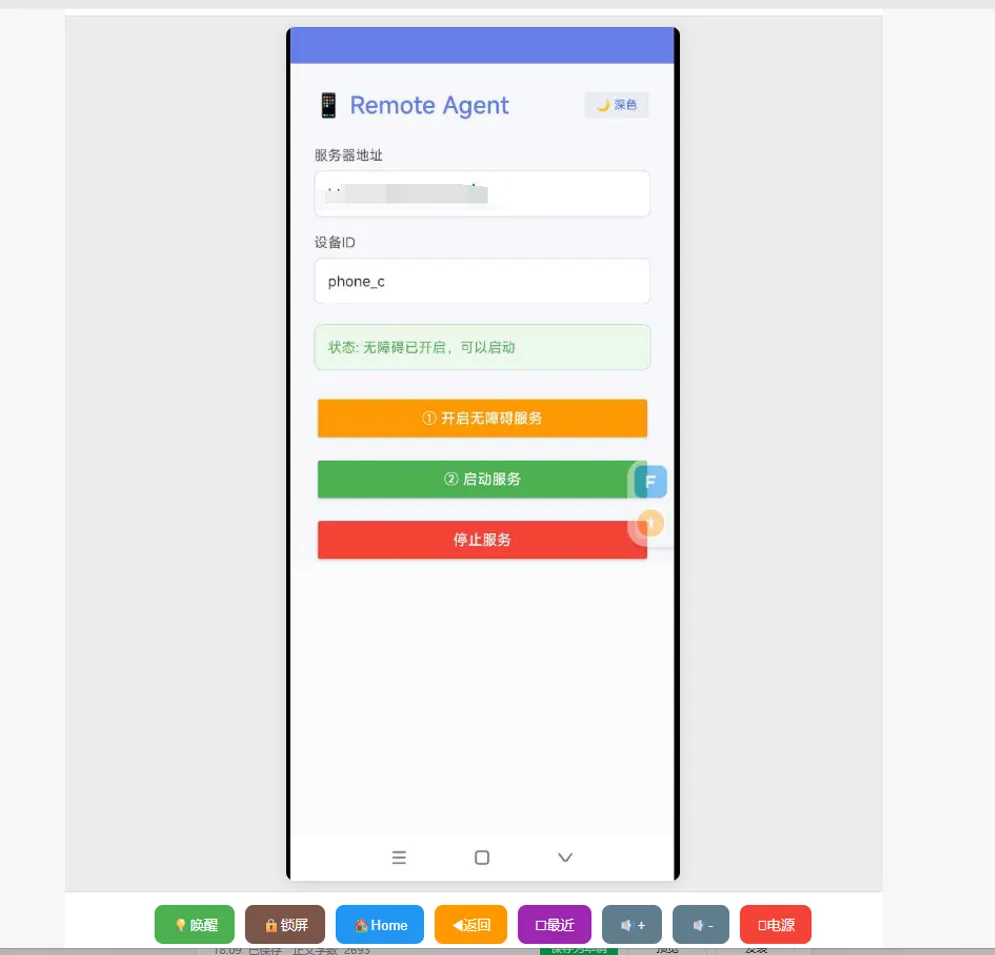
手机C 配置
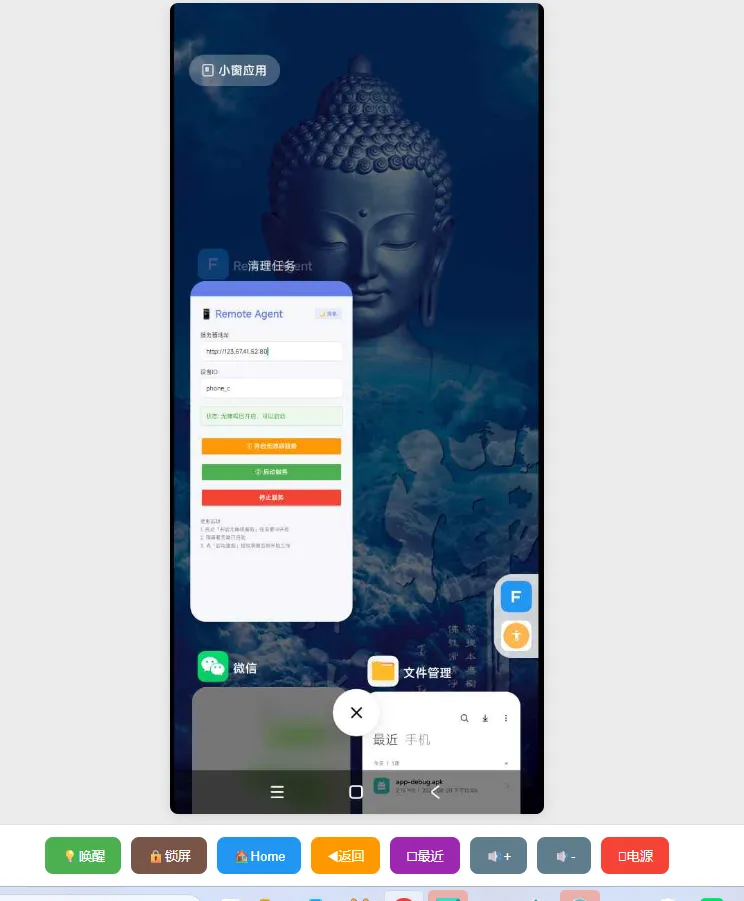
安装 Termux(从 F-Droid 下载) 开启开发者选项 → 无线调试 在 Termux 中配对并连接 ADB:
adb pair localhost:配对端口 配对码adb connect localhost:调试端口修改 agent.py中的SERVER_URL后运行
手机A 使用
浏览器打开 http://服务器IP:80,选择设备即可开始控制。
性能调优参考
安全注意事项
修改 SECRET_KEY为随机字符串生产环境加 Token 认证 配置 HTTPS(nginx 反向代理 + Let's Encrypt) 限制可连接的 IP 范围 仅在合法授权的设备上使用
总结
这个项目用不到 500 行代码实现了一个完整的远程控制系统。核心思路就是:
截屏推流代替复杂的视频编码方案 WebSocket 保证低延迟双向通信 ADB input 命令实现免 root 的触控模拟 Room 机制精准路由,避免无效广播
当然,它也有局限性:帧率受限于截屏速度和网络带宽、没有音频传输、安全性需要额外加固。但作为学习项目和轻量级工具,已经足够实用。
完整代码
server/server.py
from flask import Flask, render_template, requestfrom flask_socketio import SocketIO, emit, join_room, leave_roomimport timeimport jsonimport osapp = Flask(__name__, template_folder='templates')app.config['SECRET_KEY'] = 'change-this-to-random-string'sio = SocketIO(app, cors_allowed_origins="*", max_http_buffer_size=5 * 1024 * 1024)devices = {}@sio.on('register_device')defon_register(data): device_id = data.get('device_id', 'unknown') device_name = data.get('name', device_id) devices[device_id] = {'sid': request.sid,'name': device_name,'last_seen': time.time(),'resolution': data.get('resolution', '1080x2340') } print(f"[+] 设备上线: {device_name} ({device_id})") broadcast_device_list()@sio.on('disconnect')defon_disconnect():for did, info in list(devices.items()):if info['sid'] == request.sid: print(f"[-] 设备离线: {info['name']} ({did})")del devices[did] broadcast_device_list()break@sio.on('heartbeat')defon_heartbeat(data): device_id = data.get('device_id')if device_id in devices: devices[device_id]['last_seen'] = time.time()defbroadcast_device_list(): device_list = []for did, info in devices.items(): device_list.append({'id': did,'name': info['name'],'resolution': info['resolution'] }) sio.emit('device_list', device_list)@sio.on('screen_frame')defon_screen_frame(data): device_id = data.get('device_id') frame = data.get('frame')if frame: emit('frame', {'device_id': device_id, 'frame': frame}, room=f'view_{device_id}', include_self=False)@sio.on('control')defon_control(data): device_id = data.get('device_id')if device_id in devices: target_sid = devices[device_id]['sid'] emit('execute', data, room=target_sid)else: emit('error', {'msg': f'设备 {device_id} 不在线'})@sio.on('join_view')defon_join_view(data): device_id = data.get('device_id') join_room(f'view_{device_id}')@sio.on('leave_view')defon_leave_view(data): device_id = data.get('device_id') leave_room(f'view_{device_id}')@sio.on('get_devices')defon_get_devices(): device_list = []for did, info in devices.items(): device_list.append({'id': did,'name': info['name'],'resolution': info['resolution'] }) emit('device_list', device_list)@app.route('/')defindex():return render_template('control.html')@app.route('/health')defhealth():return json.dumps({'status': 'ok','devices_online': len(devices),'uptime': time.time() })if __name__ == '__main__': print("=" * 50) print(" 远程控制中转服务器 已启动") print("=" * 50) sio.run(app, host='0.0.0.0', port=80)server/templates/control.html
<!DOCTYPE html><htmllang="zh-CN"><head><metacharset="UTF-8"><metaname="viewport"content="width=device-width, initial-scale=1.0, user-scalable=no"><title>远程控制</title><style> * { margin: 0; padding: 0; box-sizing: border-box; }body {background: #f5f5f5;color: #333;font-family: -apple-system, BlinkMacSystemFont, 'Segoe UI', Roboto, sans-serif;height: 100vh;display: flex;flex-direction: column;overflow: hidden; }.header {padding: 10px15px;background: #fff;display: flex;justify-content: space-between;align-items: center;border-bottom: 1px solid #e0e0e0;box-shadow: 01px3pxrgba(0,0,0,0.08); }.header-left { display: flex; align-items: center; gap: 10px; }.logo { font-size: 18px; font-weight: bold; color: #4a6cf7; }.device-selector {padding: 6px12px;border-radius: 6px;background: #fff;color: #333;border: 1px solid #ccc;font-size: 13px; }.status-bar { display: flex; align-items: center; gap: 10px; }.status {font-size: 12px;padding: 3px8px;border-radius: 10px;background: #eee; }.status.online { color: #2e7d32; border: 1px solid #4caf50; background: #e8f5e9; }.status.offline { color: #c62828; border: 1px solid #ef5350; background: #ffebee; }.fps { font-size: 12px; color: #888; }.screen-container {flex: 1;display: flex;justify-content: center;align-items: center;padding: 10px;position: relative;overflow: hidden;background: #ececec; }#screen {max-width: 100%;max-height: 100%;border-radius: 8px;box-shadow: 02px12pxrgba(0,0,0,0.12);touch-action: none;cursor: crosshair;background: #fff; }.no-device {position: absolute;color: #999;font-size: 16px;text-align: center; }.no-device.icon { font-size: 48px; margin-bottom: 10px; }.controls {padding: 12px15px;background: #fff;border-top: 1px solid #e0e0e0;box-shadow: 0 -1px3pxrgba(0,0,0,0.05); }.control-row {display: flex;justify-content: center;gap: 10px;flex-wrap: wrap; }.btn {padding: 10px16px;border: none;border-radius: 8px;font-size: 13px;cursor: pointer;transition: transform 0.1s, opacity 0.1s;display: flex;align-items: center;gap: 4px; }.btn:active { transform: scale(0.92); opacity: 0.8; }.btn-wake { background: #4caf50; color: #fff; }.btn-home { background: #2196f3; color: #fff; }.btn-back { background: #ff9800; color: #fff; }.btn-recent { background: #9c27b0; color: #fff; }.btn-power { background: #f44336; color: #fff; }.btn-vol { background: #607d8b; color: #fff; }.btn-lock { background: #795548; color: #fff; }.touch-indicator {position: absolute;width: 30px;height: 30px;border-radius: 50%;border: 2px solid rgba(74, 108, 247, 0.8);background: rgba(74, 108, 247, 0.15);pointer-events: none;transform: translate(-50%, -50%);animation: ripple 0.5s ease-out;display: none; }@keyframes ripple {from { transform: translate(-50%, -50%) scale(0.5); opacity: 1; }to { transform: translate(-50%, -50%) scale(2); opacity: 0; } }</style></head><body><divclass="header"><divclass="header-left"><spanclass="logo">📱 RemoteCtrl</span><selectid="deviceSelect"class="device-selector"><optionvalue="">-- 选择设备 --</option></select></div><divclass="status-bar"><spanid="fps"class="fps"></span><spanid="status"class="status offline">未连接</span></div></div><divclass="screen-container"><canvasid="screen"width="540"height="1170"></canvas><divid="noDevice"class="no-device"><divclass="icon">📲</div><div>等待设备连接...</div><divstyle="font-size:12px;color:#aaa;margin-top:5px;">请在手机上启动Agent</div></div><divid="touchIndicator"class="touch-indicator"></div></div><divclass="controls"><divclass="control-row"><buttonclass="btn btn-wake"onclick="sendKey('WAKEUP')">💡唤醒</button><buttonclass="btn btn-lock"onclick="sendKey('SLEEP')">🔒锁屏</button><buttonclass="btn btn-home"onclick="sendKey('HOME')">🏠Home</button><buttonclass="btn btn-back"onclick="sendKey('BACK')">◀返回</button><buttonclass="btn btn-recent"onclick="sendKey('RECENT')">☐最近</button><buttonclass="btn btn-vol"onclick="sendKey('VOLUME_UP')">🔊+</button><buttonclass="btn btn-vol"onclick="sendKey('VOLUME_DOWN')">🔉-</button><buttonclass="btn btn-power"onclick="sendKey('POWER')">⏻电源</button></div></div><scriptsrc="https://cdn.socket.io/4.7.2/socket.io.min.js"></script><script>const socket = io(window.location.origin);const canvas = document.getElementById('screen');const ctx = canvas.getContext('2d');const deviceSelect = document.getElementById('deviceSelect');const statusEl = document.getElementById('status');const fpsEl = document.getElementById('fps');const noDeviceEl = document.getElementById('noDevice');const touchIndicator = document.getElementById('touchIndicator');let currentDevice = '';let frameCount = 0;let lastFpsTime = Date.now();let deviceResolution = { w: 1080, h: 2340 }; socket.on('connect', () => { statusEl.textContent = '已连接'; statusEl.className = 'status online'; socket.emit('get_devices'); }); socket.on('disconnect', () => { statusEl.textContent = '已断开'; statusEl.className = 'status offline'; }); socket.on('device_list', (devices) => {const current = deviceSelect.value; deviceSelect.innerHTML = '<option value="">-- 选择设备 --</option>'; devices.forEach(d => {const opt = document.createElement('option'); opt.value = d.id || d; opt.textContent = d.name ? `${d.name} (${d.resolution})` : d; deviceSelect.appendChild(opt); });if (current) deviceSelect.value = current;if (devices.length === 1 && !currentDevice) { deviceSelect.value = devices[0].id || devices[0]; deviceSelect.dispatchEvent(new Event('change')); } }); deviceSelect.addEventListener('change', () => {if (currentDevice) socket.emit('leave_view', { device_id: currentDevice }); currentDevice = deviceSelect.value;if (currentDevice) { socket.emit('join_view', { device_id: currentDevice }); noDeviceEl.style.display = 'none'; } else { noDeviceEl.style.display = 'block'; } }); socket.on('frame', (data) => {const img = new Image(); img.onload = () => { canvas.width = img.width; canvas.height = img.height; ctx.drawImage(img, 0, 0); noDeviceEl.style.display = 'none'; }; img.src = 'data:image/jpeg;base64,' + data.frame; frameCount++;const now = Date.now();if (now - lastFpsTime >= 1000) { fpsEl.textContent = frameCount + ' fps'; frameCount = 0; lastFpsTime = now; } });let touching = false;let touchStartPos = null;let touchStartTime = 0;let lastTapTime = 0;let lastTapPos = null;let doubleTapTimer = null;let hasMoved = false;functiongetPos(e) {const rect = canvas.getBoundingClientRect();const clientX = e.clientX !== undefined ? e.clientX : e.touches[0].clientX;const clientY = e.clientY !== undefined ? e.clientY : e.touches[0].clientY;return {x: Math.round((clientX - rect.left) / rect.width * deviceResolution.w),y: Math.round((clientY - rect.top) / rect.height * deviceResolution.h),screenX: clientX,screenY: clientY }; }functionshowTouchFeedback(x, y) { touchIndicator.style.left = x + 'px'; touchIndicator.style.top = y + 'px'; touchIndicator.style.display = 'block'; setTimeout(() => { touchIndicator.style.display = 'none'; }, 500); }functionhandleTouchStart(e) { e.preventDefault();if (!currentDevice) return; touching = true; hasMoved = false; touchStartPos = getPos(e); touchStartTime = Date.now(); }functionhandleTouchMove(e) { e.preventDefault();if (!touching || !currentDevice) return;const pos = getPos(e);const dx = Math.abs(pos.x - touchStartPos.x);const dy = Math.abs(pos.y - touchStartPos.y);if (dx > 20 || dy > 20) hasMoved = true; }functionhandleTouchEnd(e) { e.preventDefault();if (!touching || !currentDevice) return; touching = false;const endPos = e.changedTouches ? getPos({ clientX: e.changedTouches[0].clientX, clientY: e.changedTouches[0].clientY }) : getPos(e);const duration = Date.now() - touchStartTime;if (hasMoved) { socket.emit('control', {device_id: currentDevice, action: 'swipe',x1: touchStartPos.x, y1: touchStartPos.y,x2: endPos.x, y2: endPos.y,duration: Math.max(duration, 200) }); showTouchFeedback(endPos.screenX, endPos.screenY); } elseif (duration > 500) { socket.emit('control', {device_id: currentDevice, action: 'long_press',x: touchStartPos.x, y: touchStartPos.y, duration: duration }); showTouchFeedback(touchStartPos.screenX, touchStartPos.screenY); } else {const now = Date.now();if (lastTapPos && now - lastTapTime < 300 && Math.abs(touchStartPos.x - lastTapPos.x) < 80 && Math.abs(touchStartPos.y - lastTapPos.y) < 80) { clearTimeout(doubleTapTimer); socket.emit('control', {device_id: currentDevice, action: 'double_tap',x: touchStartPos.x, y: touchStartPos.y }); lastTapTime = 0; lastTapPos = null; showTouchFeedback(touchStartPos.screenX, touchStartPos.screenY); } else { lastTapTime = now; lastTapPos = { x: touchStartPos.x, y: touchStartPos.y };const tapPos = { ...touchStartPos }; doubleTapTimer = setTimeout(() => { socket.emit('control', {device_id: currentDevice, action: 'tap',x: tapPos.x, y: tapPos.y }); }, 300); showTouchFeedback(touchStartPos.screenX, touchStartPos.screenY); } } } canvas.addEventListener('touchstart', handleTouchStart, { passive: false }); canvas.addEventListener('touchmove', handleTouchMove, { passive: false }); canvas.addEventListener('touchend', handleTouchEnd, { passive: false }); canvas.addEventListener('mousedown', handleTouchStart); canvas.addEventListener('mousemove', handleTouchMove); canvas.addEventListener('mouseup', handleTouchEnd);functionsendKey(key) {if (!currentDevice) { alert('请先选择设备'); return; } socket.emit('control', { device_id: currentDevice, action: 'key', key: key }); }document.addEventListener('keydown', (e) => {if (!currentDevice) return;switch (e.key) {case'Escape': sendKey('BACK'); break;case'Home': sendKey('HOME'); break;case'h': if (e.ctrlKey) sendKey('HOME'); break; } });</script></body></html>agent/agent.py
"""手机C - 被控端 Agent在 Termux 中运行,负责:1. 屏幕截图并推流到服务器B2. 接收服务器B转发的控制指令并执行(点击、滑动、按键等)依赖安装(Termux中): pkg update -y pkg install python -y pip install python-socketio[client] websocket-client pillow使用前提: - 手机需开启「开发者选项」→「无线调试」 - 在 Termux 中通过 ADB 自连获取 shell 权限(见 README)启动方式: python agent.py"""import socketioimport subprocessimport base64import timeimport threadingimport ioimport osimport sys# ==================== 配置项 ====================SERVER_URL = "http://你的服务器IP:80"# 修改为服务器B的地址DEVICE_ID = "phone_c"# 设备唯一标识DEVICE_NAME = "我的手机C"# 设备显示名称SCREEN_FPS = 5# 推流帧率(建议3-8,取决于网络)SCREEN_QUALITY = 40# JPEG质量(1-100,越低越快传输)SCREEN_WIDTH = 540# 缩放后宽度(降低可提升帧率)SCREEN_HEIGHT = 1170# 缩放后高度DEVICE_RESOLUTION = "1080x2340"# 设备实际分辨率HEARTBEAT_INTERVAL = 10# 心跳间隔(秒)# ================================================# SocketIO 客户端sio = socketio.Client( reconnection=True, reconnection_delay=3, reconnection_delay_max=30)# 触摸状态_touch_start = {'x': 0, 'y': 0, 'time': 0}# ==================== 屏幕捕获 ====================defcapture_screen():""" 截取屏幕,返回 base64 编码的 JPEG 图片 使用 screencap 命令(需要 shell 权限) """try:# screencap -p 输出 PNG 格式到 stdout result = subprocess.run( ['screencap', '-p'], capture_output=True, timeout=5 )if result.returncode != 0ornot result.stdout:returnNone# 用 Pillow 转为压缩的 JPEGfrom PIL import Image img = Image.open(io.BytesIO(result.stdout))# 缩放以减少数据量 img = img.resize((SCREEN_WIDTH, SCREEN_HEIGHT), Image.LANCZOS) buffer = io.BytesIO() img.save(buffer, format='JPEG', quality=SCREEN_QUALITY, optimize=True)return base64.b64encode(buffer.getvalue()).decode('utf-8')except subprocess.TimeoutExpired: print("[!] 截屏超时")returnNoneexcept Exception as e: print(f"[!] 截屏异常: {e}")returnNonedefscreen_stream_loop():"""持续截屏并推送到服务器""" interval = 1.0 / SCREEN_FPS fail_count = 0whileTrue:try:if sio.connected: frame = capture_screen()if frame: sio.emit('screen_frame', {'device_id': DEVICE_ID,'frame': frame }) fail_count = 0else: fail_count += 1if fail_count >= 10: print("[!] 连续截屏失败,检查权限") time.sleep(5) fail_count = 0except Exception as e: print(f"[!] 推流异常: {e}") time.sleep(1) time.sleep(interval)# ==================== 心跳保活 ====================defheartbeat_loop():"""定时发送心跳"""whileTrue:if sio.connected:try: sio.emit('heartbeat', {'device_id': DEVICE_ID})except:pass time.sleep(HEARTBEAT_INTERVAL)# ==================== 控制指令执行 ====================# Android KeyEvent 码映射KEY_MAP = {'HOME': '3','BACK': '4','CALL': '5','END_CALL': '6','VOLUME_UP': '24','VOLUME_DOWN': '25','POWER': '26','CAMERA': '27','MENU': '82','RECENT': '187','WAKEUP': '224','SLEEP': '223','ENTER': '66','DELETE': '67','TAB': '61','SPACE': '62','DPAD_UP': '19','DPAD_DOWN': '20','DPAD_LEFT': '21','DPAD_RIGHT': '22','MUTE': '164','NOTIFICATION': '83','BRIGHTNESS_UP': '221','BRIGHTNESS_DOWN': '220',}defrun_cmd(cmd):"""执行 shell 命令"""try: subprocess.run(cmd, shell=True, timeout=10, capture_output=True, text=True)except subprocess.TimeoutExpired: print(f"[!] 命令超时: {cmd}")except Exception as e: print(f"[!] 命令执行失败: {cmd} | {e}")@sio.on('execute')defon_execute(data):"""接收并执行来自服务器的控制指令""" action = data.get('action', '') print(f"[>] 收到指令: {action}")try:if action == 'tap':# 单击 x, y = data['x'], data['y'] run_cmd(f"input tap {x}{y}")elif action == 'double_tap':# 双击 x, y = data['x'], data['y'] run_cmd(f"input tap {x}{y}") time.sleep(0.08) # 间隔80ms run_cmd(f"input tap {x}{y}")elif action == 'long_press':# 长按(利用 swipe 原地不动来模拟) x, y = data['x'], data['y'] duration = data.get('duration', 800) run_cmd(f"input swipe {x}{y}{x}{y}{duration}")elif action == 'swipe':# 滑动 x1, y1 = data['x1'], data['y1'] x2, y2 = data['x2'], data['y2'] duration = data.get('duration', 300) run_cmd(f"input swipe {x1}{y1}{x2}{y2}{duration}")elif action == 'key':# 按键 key = data.get('key', '') keycode = KEY_MAP.get(key, '0')if keycode != '0': run_cmd(f"input keyevent {keycode}")else: print(f"[!] 未知按键: {key}")elif action == 'text':# 输入文字(仅支持英文和数字) text = data.get('text', '').replace(' ', '%s')if text: run_cmd(f"input text '{text}'")elif action == 'open_app':# 启动应用(通过包名) package = data.get('package', '')if package: run_cmd(f"monkey -p {package} -c android.intent.category.LAUNCHER 1")elif action == 'shell':# 执行任意 shell 命令(谨慎使用) cmd = data.get('cmd', '')if cmd: result = subprocess.run(cmd, shell=True, timeout=10, capture_output=True, text=True)# 回传执行结果 sio.emit('shell_result', {'device_id': DEVICE_ID,'cmd': cmd,'stdout': result.stdout[:2000],'stderr': result.stderr[:500] })else: print(f"[?] 未知指令: {action}")except Exception as e: print(f"[!] 执行异常: {action} | {e}")# ==================== 连接事件 ====================@sio.eventdefconnect(): print(f"[+] 已连接服务器: {SERVER_URL}") sio.emit('register_device', {'device_id': DEVICE_ID,'name': DEVICE_NAME,'resolution': DEVICE_RESOLUTION })@sio.eventdefdisconnect(): print("[-] 与服务器断开,将自动重连...")@sio.eventdefconnect_error(data): print(f"[!] 连接失败: {data}")# ==================== 主程序入口 ====================defmain(): print("=" * 60) print(" 📱 被控端 Agent") print(f" 设备ID: {DEVICE_ID}") print(f" 设备名称: {DEVICE_NAME}") print(f" 服务器: {SERVER_URL}") print(f" 帧率: {SCREEN_FPS} fps") print(f" 画质: {SCREEN_QUALITY}%") print(f" 分辨率: {SCREEN_WIDTH}x{SCREEN_HEIGHT} (推流)") print("=" * 60)# 测试截屏权限 print("[*] 测试截屏权限...") test = capture_screen()if test: print(f"[✓] 截屏正常 (帧大小: {len(test)//1024}KB)")else: print("[✗] 截屏失败!请确认:") print(" 1. 已开启开发者选项") print(" 2. 已通过 ADB 获取 shell 权限") print(" 3. 尝试: adb shell screencap -p /sdcard/test.png") print(" 继续运行(可能只有控制功能)...")# 启动截屏推流线程 stream_thread = threading.Thread(target=screen_stream_loop, daemon=True) stream_thread.start() print("[*] 屏幕推流线程已启动")# 启动心跳线程 hb_thread = threading.Thread(target=heartbeat_loop, daemon=True) hb_thread.start() print("[*] 心跳线程已启动")# 连接服务器(自动重连) print(f"[*] 正在连接服务器 {SERVER_URL} ...")whileTrue:try: sio.connect(SERVER_URL, wait_timeout=15) sio.wait()except KeyboardInterrupt: print("\n[*] 用户中断,退出") sio.disconnect() sys.exit(0)except Exception as e: print(f"[!] 连接异常: {e},5秒后重试...") time.sleep(5)if __name__ == '__main__': main()server/requirements.txt
flask==2.0.3flask-socketio==5.0.1eventlet==0.33.0pillow==8.4.0Werkzeug==2.0.3agent/setup_adb.sh
#!/data/data/com.termux/files/usr/bin/bash# ============================================================# 手机C - Termux 环境初始化脚本# 在 Termux 中运行此脚本完成环境配置# ============================================================echo"=============================="echo" 手机C 环境初始化"echo"=============================="# 1. 更新包管理器echo"[1/5] 更新包管理器..."pkg update -y# 2. 安装基础依赖echo"[2/5] 安装 Python 和工具..."pkg install python android-tools -y# 3. 安装 Python 依赖echo"[3/5] 安装 Python 库..."pip install python-socketio[client] websocket-client pillow# 4. 配置 ADB 自连(关键步骤)echo"[4/5] 配置 ADB..."echo""echo"============================================"echo" 重要:请按以下步骤操作"echo"============================================"echo""echo" 1. 打开手机「设置」→「开发者选项」"echo" 2. 开启「无线调试」"echo" 3. 点击「使用配对码配对设备」"echo" 4. 记下显示的:配对码 和 端口号"echo""read -p " 请输入配对端口号: " PAIR_PORTread -p " 请输入配对码: " PAIR_CODEecho" 正在配对..."adb pair localhost:$PAIR_PORT$PAIR_CODEecho""echo" 现在需要连接 ADB"echo" 在「无线调试」页面查看端口号(不是配对端口)"echo""read -p " 请输入无线调试端口号: " DEBUG_PORTadb connect localhost:$DEBUG_PORT# 验证连接echo""echo"[5/5] 验证 ADB 连接..."adb devicesecho""echo" 测试截屏..."adb shell screencap -p /sdcard/test_screen.pngif [ $? -eq 0 ]; thenecho" ✅ 截屏测试成功!" adb shell rm /sdcard/test_screen.pngelseecho" ❌ 截屏失败,请检查ADB连接"fiecho""echo"=============================="echo" 初始化完成!"echo" 运行 Agent: python agent.py"echo"=============================="