跟海叔一起学QUIC-[02]-linux环境安装xquic和lsquic
- 2026-07-04 06:49:16
跟海叔一起学QUIC-[02]-linux环境安装xquic和lsquic上一节我们初步了解了QUIC的架构和基本功能点跟海叔一起学习QUIC-[01]-QUIC是干啥滴,本节我们在linux环境中搭建QUIC开源库验证初步功能(能启动就是胜利 ),从github中搜索了几个开源的quic实现,选了3个c/c++语言开发的试水:alibaba/xquic, 开发语言:c
 litespeedtech/lsquic,开发语言: c microsoft/msquic,开发语言:c++ 因为c++的代码和编译相对复杂,且微软的东东对环境依赖特别多,所以在linux环境下先尝试了前2个,msquic准备在技能提升后再在windows环境下验证。
1,alibaba/xquic 官方文档 xquic安装编译过程相对顺利,验证环境如下:主机:阿里云2core4gblinux-centos7.9,内核-3.10.0/gcc-4.8.5/cmake-4.2依赖的主要三方库及版本:babassl-8.3/libevent-2.0.21-4.el7.x86_64/perl-5.38.2安装完毕后测试过程如下: (1).mini_server&mini_client wireshark分析tcpdump抓包: 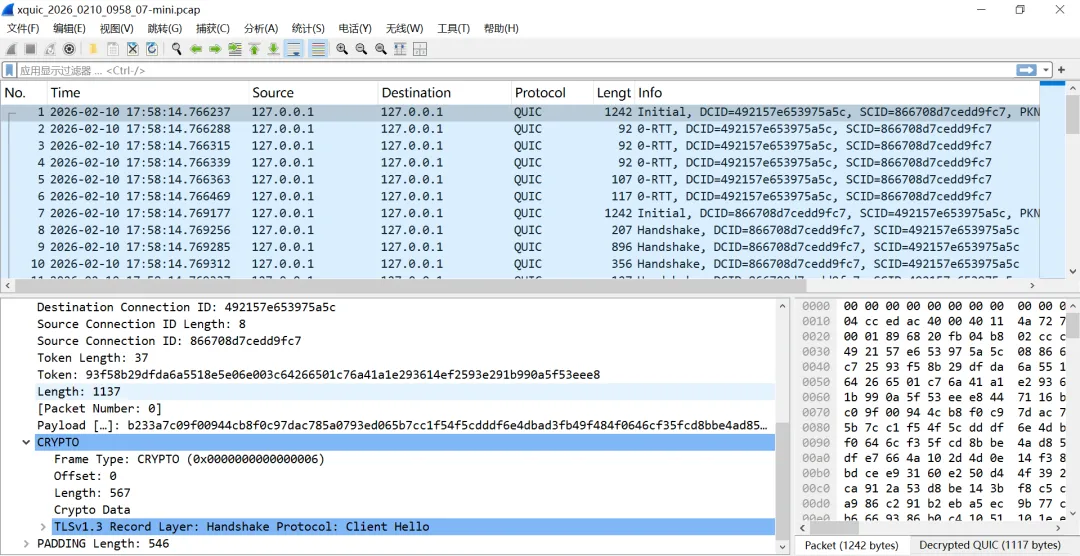
(2). test_client&test_server wireshark分析tcpdump抓包: 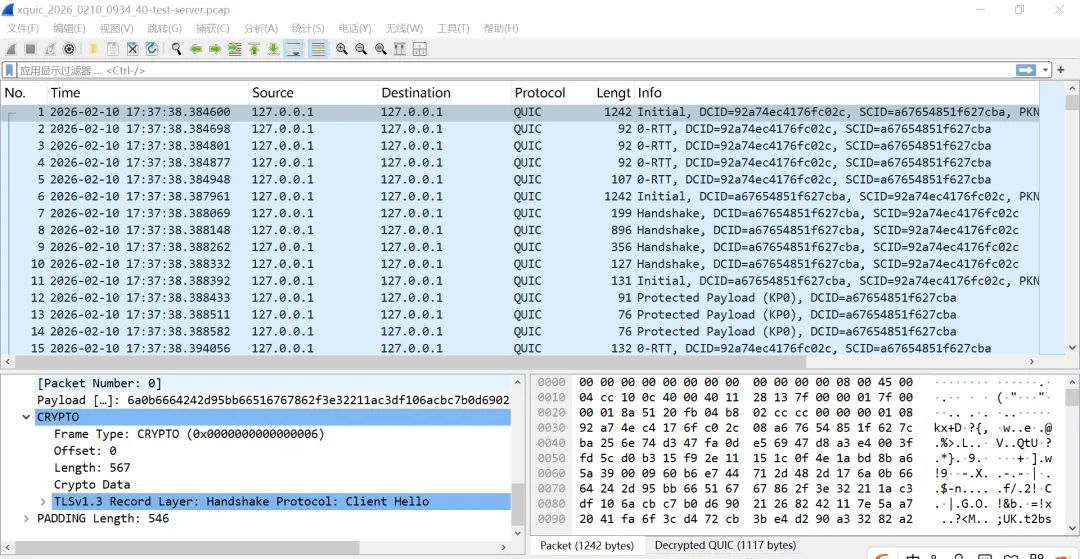
2,litespeedtech/lsquic 官方文档 周末折腾了2天终于搞定,过程有点曲折。。。因为阿里云环境是centos7.x,cmake,gcc/g++版本太低,而lsquic需要gcc-11+所以火山云搞了另外一台2core4gb,花我99米(本来就不富裕啊 ),验证环境如下:
 主机-火山云2core4gbLinux-9,内核-5.14.0gcc-11.5/cmake-3.29.2依赖的主要三方库及版本:libevent-2.1.12-8.el9.x86_64/go-1.25.5 boringssl (git很坎坷,换了好几个源都不行,而且不能用wget) zlib-1.3.1(有点坑,默认安装为动态库,但 lsquic 编译链接时需要静态的libz.a) 测试过程: (1)echo_server & echo_client
echo_client输出: 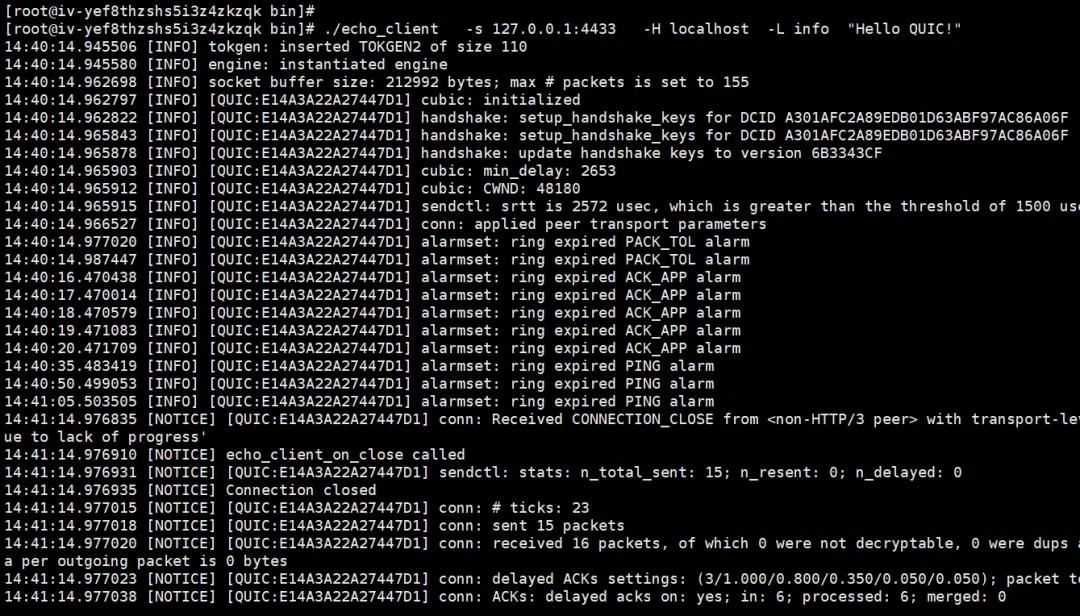
echo_server输出: 
wireshark分析tcpdump抓包: 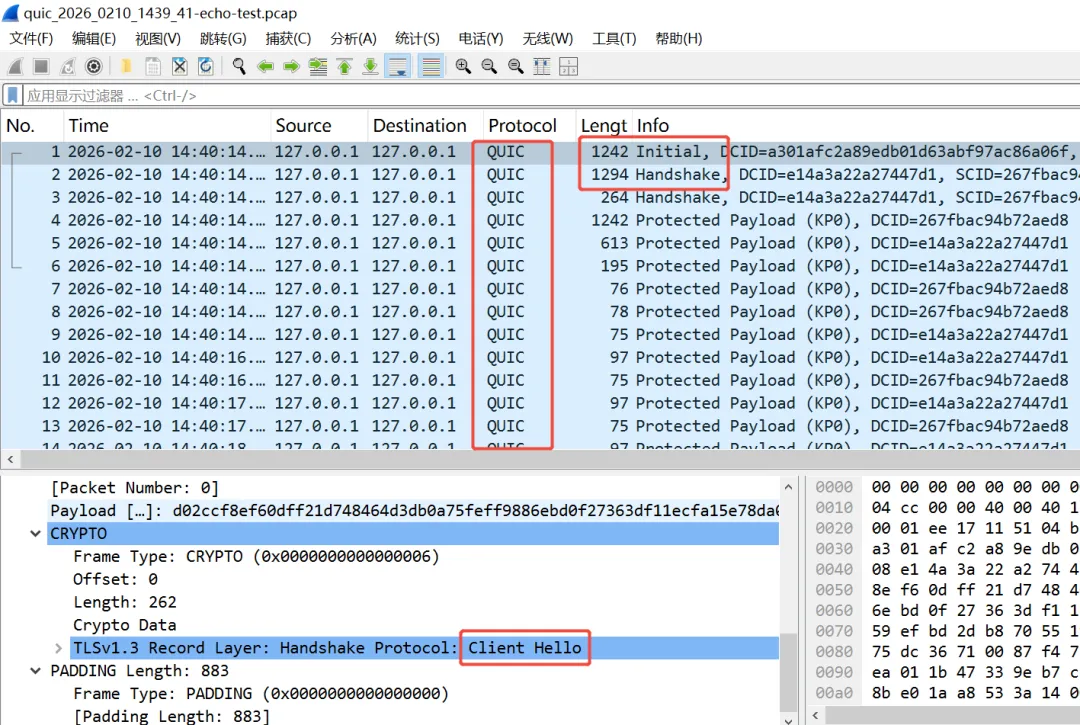
(2)http_client http_client输出: 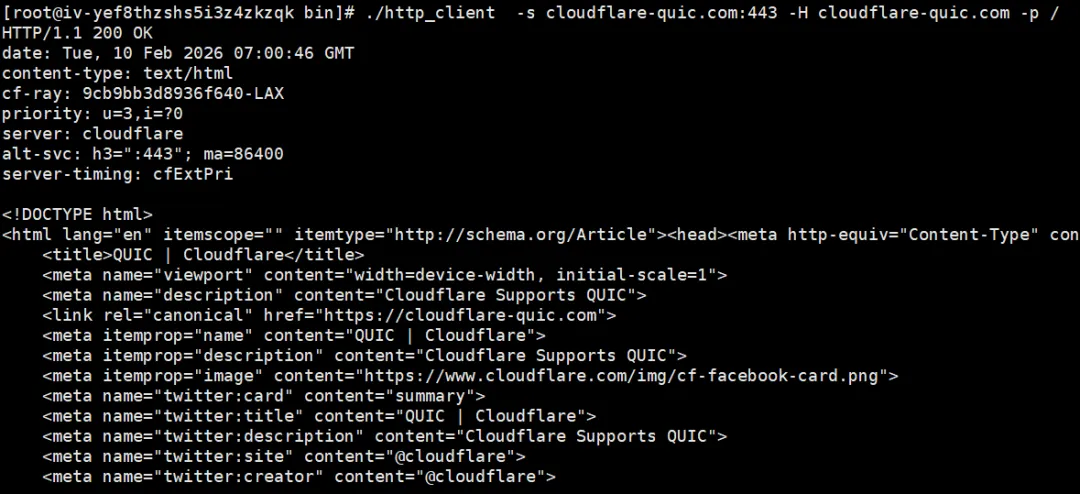
wireshark分析tcpdump抓包: 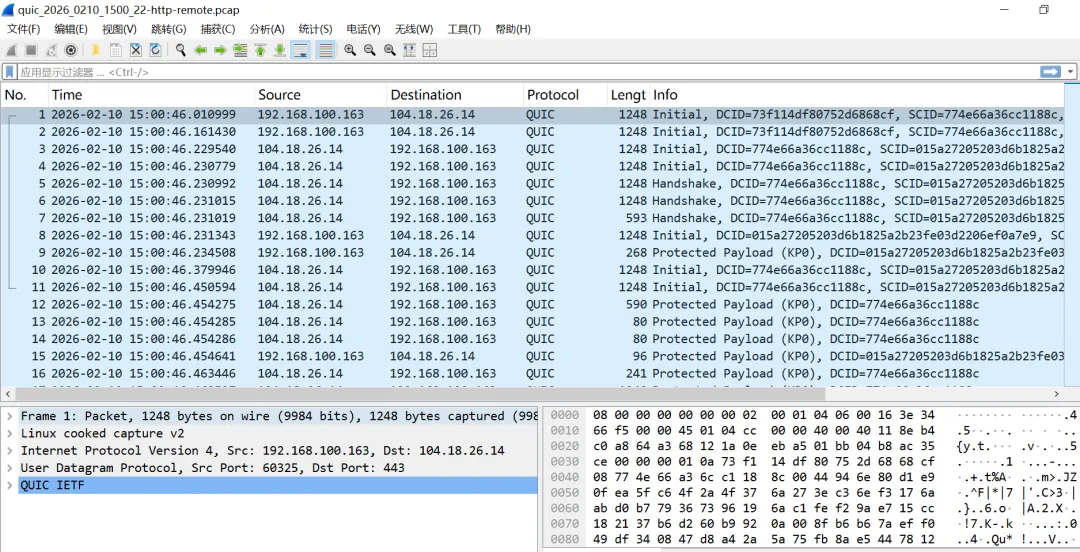
后面这2个quic环境我会交叉使用并不断验证一些功能。美中不足,无论是xquic和lsquic测试过程中都不能产生类似chrome运行时的tls SSLKEYLOGFILE文件,这样wireshark解包时就会出现大量的 或 问了豆包需要在代码中增加文件输出,我继续研究一下并在后续的章节中show出来! 本欲枝头凝艳骨,奈何吹落北风中。残红碾作尘泥底,犹有清芬透晚晴。


明天再摸鱼一天就放假了,假期里准备出2篇:http2 vs quic握手信息和quic消息帧结构,提前祝大家春节快乐
),从github中搜索了几个开源的quic实现,选了3个c/c++语言开发的试水:alibaba/xquic, 开发语言:chttps://github.com/alibaba/xquichttps://github.com/litespeedtech/lsquichttps://github.com/microsoft/msquichttps://doc.xquic.org.cn/en/tutorials/getting_started.html#cd /root/xquic/build#产生测试server.key/server.crtkeyfile=server.keycertfile=server.crtopenssl req -newkey rsa:2048 -x509 -nodes -keyout "$keyfile" -new -out "$certfile" -subj /CN=test.xquic.com
#cd /root/xquic/build/mini./mini_server[stats] create ipv4 socket fd: 9 success, bind socket to ip: 127.0.0.1, port: 8443[stats] xqc_mini_svr_h3_conn_create_notify[stats] xqc_mini_svr_h3_request_create_notify success[stats] read h3 request finish.[stats] xqc_h3_request_send_headers success[reports] xqc_mini_svr_send_body success, size:2048[stats] xqc_mini_svr_h3_request_close_notify success, cwnd_blocked:0[stats] xqc_mini_svr_h3_conn_close_notify success^C
#cd /root/xquic/build/mini./mini_client[stats] init socket succesfully[stats] init xquic connection success[stats] xqc_mini_cli_h3_request_send success[stats] start save_tp_cb[stats] start save_session_cb.[stats] start save_session_cb.[receive report] content-type = text/plain[report] xqc_h3_request_recv_body size 2048, fin:1[stats] read h3 request finish.[stats] xqc_mini_cli_h3_request_close_notify success, cwnd_blocked:0[stats] xqc_mini_cli_h3_conn_close_notify success
#cd /root/xquic/build/tests./test_server -a 0.0.0.0 -p 8443 -eoption addr :0.0.0.0option port :8443option echo :oncongestion control flags: 0/root/xquic/tests/test_server.c:1719 (xqc_server_accept)-- server_accept user_conn: 0x29bf850user_conn:0x29bf850 , scid:92a74ec4176fc02c, msg_type:0, msg_len:567/root/xquic/tests/test_server.c:916 (xqc_server_h3_conn_create_notify)user_conn:0x29d65b0 , scid:92a74ec4176fc02c, msg_type:1, msg_len:123/root/xquic/tests/test_server.c:979 (xqc_server_h3_conn_handshake_finished)0rtt_flag:2h3_datagram_mss:0/root/xquic/tests/test_server.c:1302 (xqc_server_request_create_notify):method = POST:scheme = https:path = /path/resourcehost = test.xquic.comcontent-type = text/plaincontent-length = 1048576xqc_h3_request_send_headers success size=8/root/xquic/tests/test_server.c:1326 (xqc_server_request_close_notify)/root/xquic/tests/test_server.c:949 (xqc_server_h3_conn_close_notify)send_count:906, lost_count:0, tlp_count:0, recv_count:954, srtt:11764 early_data_flag:2, conn_err:0, ack_info:#951-937#0-0#0-0#v0429, conn_info:0/0/0/a/0,1,1,1,0,0,0,0,0,13,1,985,954,954,1048639,0,1048644,i32,4,28,37,4,949,253,0,4,28,37,4,950,255,0,4,24,33,40000,951,1999,0,4,17,40000,981,1999,4,1200,80,979,253,4,451,80,980,253,0-2,0-2,0-0,0-0,0-0,0-11,0-1088005,0-1115938,0-906,0-954,0-0,0-0,0-0,0-0,0-0,0-0,0-0,0-0, alpn:h3[h3-dgram]|recv_dgram_bytes:0|sent_dgram_bytes:0|lost_dgram_bytes:0|lost_cnt:0|
#cd /root/xquic/build/tests./test_client -a 127.0.0.1 -p 8443 -Eoption addr :127.0.0.1option port :8443option echo check :onread token size 37congestion control flags: 0conn type: 0/root/xquic/tests/test_client.c:1823 (xqc_client_h3_conn_create_notify)xqc_h3_conn_is_ready_to_send_early_data:1[h3-dgram]|prepare_dgram_user_data|xqc_h3_request_send_headers success size=39save_tp_cb use server domain as the key. h3[0]/root/xquic/tests/test_client.c:1881 (xqc_client_h3_conn_handshake_finished)0rtt_flag:2====>DCID:92a74ec4176fc02c====>SCID:a67654851f627cbarequest write notify!:0xqc_client_save_token use client ip as the key. h3[0]save_session_cb use server domain as the key. h3[0]save_session_cb use server domain as the key. h3[0]/root/xquic/tests/test_client.c:1928 (xqc_client_h3_conn_ping_acked_notify)====>no ping_id/root/xquic/tests/test_client.c:1928 (xqc_client_h3_conn_ping_acked_notify)====>ping_id:1:method = POST:scheme = https:path = /path/resource:status = 200host = test.xquic.comcontent-type = text/plain>>>>>>>> request time cost:255027 us, speed:65786 Kbit/s>>>>>>>> send_body_size:1048576, recv_body_size:1048576test_result_speed: 65786 Kbit/s. request_cnt: 1.retx:0, sent:916, max_pto:0[rr_benchmark]|request_time:255027|request_size:1048576|response_size:1048576|/root/xquic/tests/test_client.c:2980 (xqc_client_request_close_notify)send_body_size:1048576, recv_body_size:1048576, send_header_size:103, recv_header_size:92, recv_fin:1, err:0, mp_state:0, cellular_send_weight:0.00, cellular_recv_weight:0.00, stream_info:(1,0,0/0/0/a/0,1048622,1048591,158,0,16)#0-916-890-1077769-1048591-11497-2retx:0, sent:916, max_pto:0>>>>>>>> pass:1xqc_client_timeout_callback | conn_closeconn closing: 0/root/xquic/tests/test_client.c:1843 (xqc_client_h3_conn_close_notify)conn errno:256should_clear_0rtt_ticket, conn_err:256, clear_0rtt_ticket:0send_count:932, lost_count:0, tlp_count:0, recv_count:985, srtt:11497 early_data_flag:2, conn_err:0, mp_state:0, ack_info:#981-10#0-0#0-0#v0429, alpn:h3, conn_info:0/0/0/a/0,1,1,1,0,0,0,0,0,64,8,954,985,985,1077809,0,1048639,i32,4,24,33,40000,981,2001,0,4,1207,1216,80,979,255,0,4,458,467,80,980,255,0,4,21,4,949,248,4,21,4,950,256,4,17,40000,951,2001,0-2,0-2,0-0,0-0,0-0,0-11,0-1115938,0-1088005,0-932,0-985,0-0,0-0,0-0,0-0,0-0,0-0,0-0,0-0[h3-dgram]|recv_dgram_bytes:0|sent_dgram_bytes:0|lost_dgram_bytes:0|lost_cnt:0|
https://lsquic.readthedocs.io/en/latest/gettingstarted.html##失败:git clone https://boringssl.googlesource.com/boringssl#失败:git clone https://github.com/google/boringssl.git#wget下来不能用:wget https://boringssl.googlesource.com/boringssl/+archive/refs/heads/master.zip -O boringssl-master.zip#因为必须要git对这个的分支:git checkout 9fc1c33e9c21439ce5f87855a6591a9324e569fd#搞了1晚上终于在gitee上找了1个能用滴git clone https://gitee.com/wu_baihui/boringssl
#yum install zlib-devel 默认安装动态库#yum install -y zlib-static 这样也会失败#必须wget手动安装为静态库wget https://zlib.net/zlib-1.3.1.tar.gz
#cd /root/lsquic/bin#1,产生1个测试的key和certopenssl req -x509 -newkey rsa:2048 -keyout privkey.pem -out fullchain.pem -days 365 -nodes -subj "/CN=localhost"#2,启动linux本地抓包tcpdump -i lo udp port 4433 -s0 -G 300 -w /tmp/quic_%Y_%m%d_%H%M_%S.pcap#3,启动echo_server./echo_server -c localhost,fullchain.pem,privkey.pem -s 0.0.0.0:4433 -L info#4,启动echo——client./echo_client -s 127.0.0.1:4433 -H localhost -L info "Hello QUIC!"
#cd /root/lsquic/bin#1,启动linux any抓包tcpdump -i any udp port 443 -s0 -G 300 -w /tmp/quic_%Y_%m%d_%H%M_%S.pcap#2,启动http_client./http_client -s cloudflare-quic.com:443 -H cloudflare-quic.com -p /
[Failed to create decryption context: Secrets are not available]Protected Payload (KP0)
本文来自网友投稿或网络内容,如有侵犯您的权益请联系我们删除,联系邮箱:wyl860211@qq.com 。
随机文章
-
 10个月宝宝每天需要喝多少奶粉?
- Python数据清洗及预处理大法
- 数据分析 | 28 Python控制结构:如果说数据是血肉,那么控制流就是程序的灵魂
- Linux dnsmasq教程
- 有了这本速查手册,Linux 命令快速上手
- XFS 在 Linux 7.0 中引入自我修复功能 ��️
- 【科研应用】基于ArcGIS Pro、Python、USLE、INVEST模型等多技术融合的生态系统服务构建生态安全格局
- Karpathy 200行纯Python实现GPT2直观理解大语言模型核心原理
- 从零到一:用Python+PyQt5打造你的全能视频播放器,AVI格式无压力!
- 春招_python基础_p13_顺序结构
- 一千多个Python日常开发常用第三方库清单教程和代码示例总结
