前段时间测试的 k8s-1.35.x 部署web 管理平台版本不支持,最高只支持1.33.x版本,今天重新部署一套k8s-1.33.10版本 支持kuboard V3版本。部署文档放在wps共享下:【金山文档 | WPS云文档】 Rocky linux 10.1下kubeadm安装高可用k8s 1.33.x 集群运行时走docker+kuboard web管理平台 https://www.kdocs.cn/l/cucYT9LhSTL61.安装和配置
步骤1:安装服务器环境准备
主机名称 | IP地址 | CPU | 内存+系统盘 |
k8s-master01 | 192.168.31.100 | vcpu:4核心 | 4G+40G |
k8s-master02 | 192.168.31.101 | vcpu:4核心 | 4G+40G |
k8s-master03 | 192.168.31.102 | vcpu:4核心 | 4G+40G |
k8s-node01 | 192.168.31.103 | vcpu:4核心 | 4G+40G |
k8s-node02 | 192.168.31.104 | vcpu:4核心 | 4G+40G |
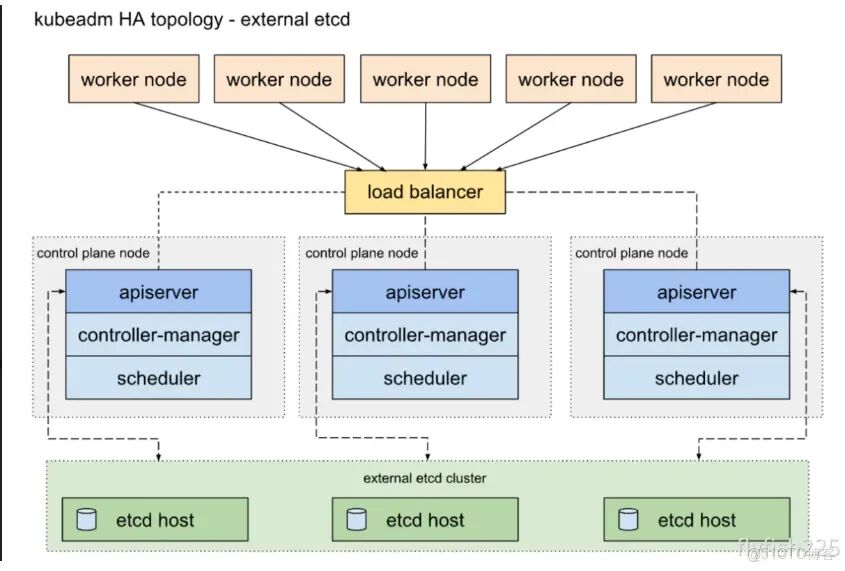
kubeadmin HA + EXTERNAL ETCD 部署架构
步骤2:关闭防火墙-关闭selinux(所有节点)
systemctl disable --now firewalld setenforce 0sed -i 's#SELINUX=enforcing#SELINUX=disabled#g' /etc/sysconfig/selinuxsed -i 's#SELINUX=enforcing#SELINUX=disabled#g' /etc/selinux/config
步骤3:设置主机名 所有节点分别设置主机名
hostnamectl set-hostname k8s-master01hostnamectl set-hostname k8s-master02hostnamectl set-hostname k8s-master03hostnamectl set-hostname k8s-node01hostnamectl set-hostname k8s-node02
步骤4:设置主机域名解析
echo '192.168.31.100 k8s-master01192.168.31.101 k8s-master02192.168.31.102 k8s-master03192.168.31.200 master-lb 192.168.31.103 k8s-node01192.168.31.104 k8s-node02 ' >> /etc/hosts
步骤5:修改Rocky Linux10.1yum源-所有节点
修改Rocky10.1源为阿里源sed -e 's|^mirrorlist=|#mirrorlist=|g' \ -e 's|^#baseurl=http://dl.rockylinux.org/$contentdir|baseurl=https://mirrors.aliyun.com/rockylinux|g' \ -i.bak \ /etc/yum.repos.d/Rocky-*.repoyum clean alldnf makecache
步骤6:时间同步-所有节点
yum install chrony -y (Rocky 默认已经安装)vim /etc/chrony.conf-----------------------server ntp.aliyun.com iburststratumweight 0driftfile /var/lib/chrony/driftrtcsyncmakestep 10 3bindcmdaddress 127.0.0.1bindcmdaddress ::1keyfile /etc/chrony.keyscommandkey 1generatecommandkeylogchange 0.5logdir /var/log/chrony-----------------------------ln -sf /usr/share/zoneinfo/Asia/Shanghai /etc/localtimeecho 'Asia/Shanghai' > /etc/timezone#启动系统服务chronyd,并设为开机自启chkconfig chronyd on#重启校时服务systemctl restart chronyd#开机自启systemctl enable chronyd#重启校时服务chronyc sources -v#查看时间datetimedatectl------查看2个yes,表示同步成功
步骤7:关闭swap-所有节点
swapoff -a# 永久禁用,注释/etc/fstab中的swap行sed -i.bak '/swap/s/^/#/' /etc/fstab
步骤8:安装依赖包-所有节点
yum install ipvsadm ipset sysstat conntrack libseccomp -yyum -y install wget jq psmisc vim net-tools nfs-utils socat telnet device-mapper-persistent-data lvm2 git network-scripts tar curl -yyum install -y conntrack ipvsadm ipset jq iptables curl sysstat libseccomp wget vim net-tools git tar
步骤9:开启ipvs转发-所有节点
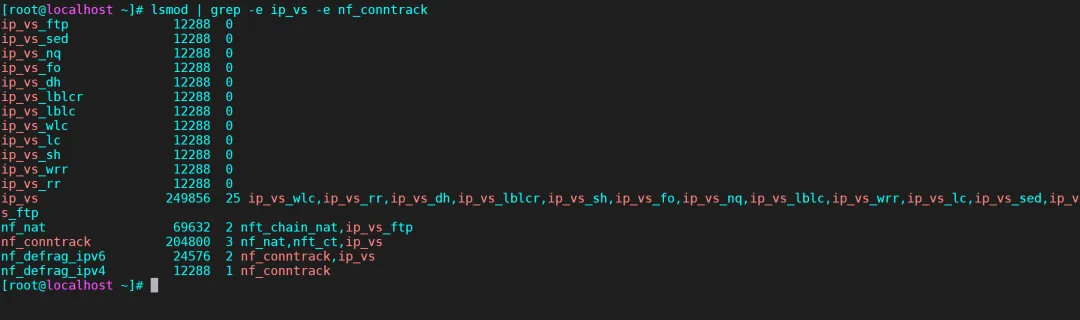
dnf install -y ipvsadm ipset sysstat conntrack libseccomp 上面已经安装 可以忽略重新安装也会自动跳过modprobe ip_vsmodprobe ip_vs_rrmodprobe ip_vs_wrrmodprobe ip_vs_shmodprobe nf_conntrack————————————————cat > /etc/modules-load.d/ipvs.conf <<EOFip_vsip_vs_lcip_vs_wlcip_vs_rrip_vs_wrrip_vs_lblcip_vs_lblcrip_vs_dhip_vs_ship_vs_foip_vs_nqip_vs_sedip_vs_ftpip_vs_shnf_conntrackip_tablesip_setxt_setipt_setipt_rpfilteript_REJECTipipEOF#设置开机自启动systemctl enable --now systemd-modules-load.service# 重启服务systemctl restart systemd-modules-load.service# 查看到以下内容lsmod | grep -e ip_vs -e nf_conntrack
## 执行以下命令,到5台机器上,不然初始化k8s集群的时候会报错echo 'net.ipv4.ip_forward=1' | sudo tee -a /etc/sysctl.confsudo sysctl -psudo service network restart
步骤10:修改内核参数--所有节点
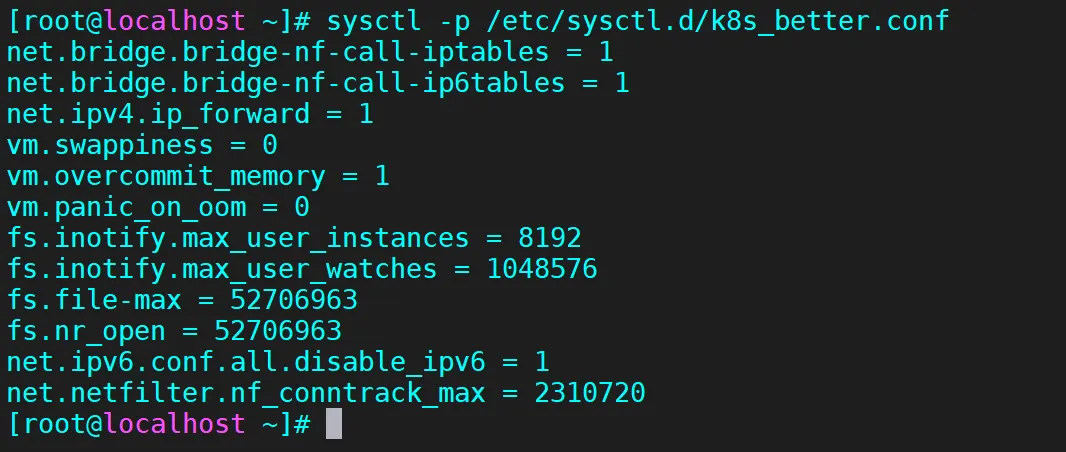
cat > /etc/sysctl.d/k8s_better.conf << EOFnet.bridge.bridge-nf-call-iptables=1net.bridge.bridge-nf-call-ip6tables=1net.ipv4.ip_forward=1vm.swappiness=0vm.overcommit_memory=1vm.panic_on_oom=0fs.inotify.max_user_instances=8192fs.inotify.max_user_watches=1048576fs.file-max=52706963fs.nr_open=52706963net.ipv6.conf.all.disable_ipv6=1net.netfilter.nf_conntrack_max=2310720EOFmodprobe br_netfilterlsmod |grep conntrackmodprobe ip_conntracksysctl -p /etc/sysctl.d/k8s_better.conf
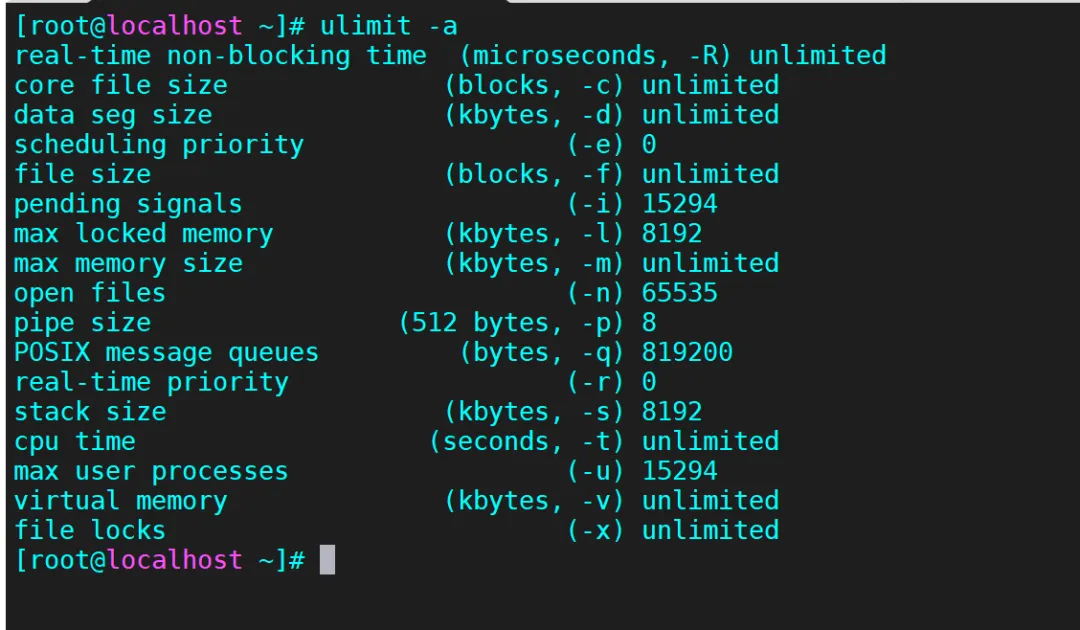
步骤11:句柄数最大-所有节点
# 配置系统句柄数ulimit -SHn 65535cat >> /etc/security/limits.conf <<EOF* soft nofile 655360* hard nofile 131072* soft nproc 655350* hard nproc 655350* seft memlock unlimited* hard memlock unlimiteddEOF# 查看修改结果ulimit -a
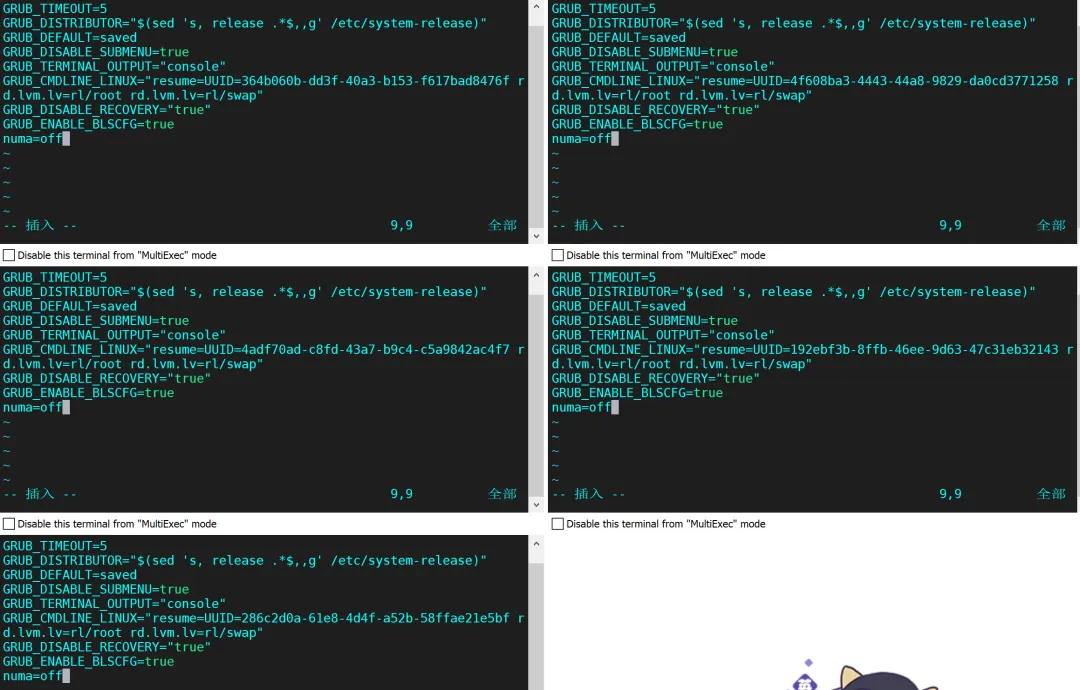
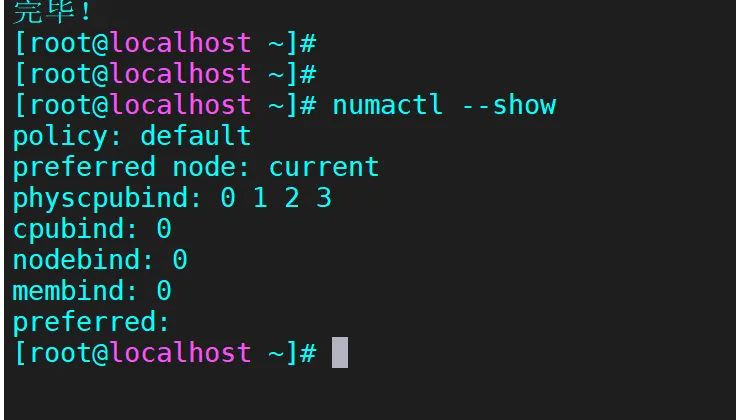
步骤12:资源实现最大--所有节点
vim /etc/default/grub添加 numa=off查看sudo yum install numactl -ynumactl --show
步骤13:升级系统内核(可以不用做-如果使用其他版本的Linux 内核版本较低的需要升级)
## 升级系统内核rpm --import https://www.elrepo.org/RPM-GPG-KEY-elrepo.orgyum install https://www.elrepo.org/elrepo-release-10.el10.elrepo.noarch.rpm -y## 修改为阿里云 镜像源mv /etc/yum.repos.d/elrepo.repo /etc/yum.repos.d/elrepo.repo.bak vim /etc/yum.repos.d/elrepo.repo ----[elrepo-kernel]name=elrepoyumbaseurl=https://mirrors.aliyun.com/elrepo/kernel/el10/x86_64/enable=1gpgcheck=0----## 查看最新版本内核版本yum --disablerepo="*" --enablerepo="elrepo-kernel" list "kernel*"## 安装5.4版本内核yum --enablerepo=elrepo-kernel install kernel-lt## 使用序号为0的内核,序号0是前面查出来的可用内核编号grub2-set-default 0## 生成 grub 配置文件并重启grub2-mkconfig -o /boot/grub2/grub.cfg## 重启系统reboot## 查看最新系统内核版本uname -r---
步骤14:配置免密登录 在master01上操作
ssh-keygen -t rsa # 一路回车for i in k8s-master01 k8s-master02 k8s-master03 k8s-node01 k8s-node02; do ssh-copy-id -i .ssh/id_rsa.pub $i; done
3、安装docker【所有节点安装】(安装之前建议重启下所有节点系统)
步骤1:二进制安装28.1.1.tgz-所有节点
# 下载二进制安装包【阿里】wget https://mirrors.aliyun.com/docker-ce/linux/static/stable/x86_64/docker-28.1.1.tgz【清华】wget https://mirrors.tuna.tsinghua.edu.cn/docker-ce/linux/static/stable/x86_64/docker-28.1.1.tgz#解压tar zxvf docker-*.tgz #拷贝二进制文件cp docker/* /usr/bin/
步骤2:创建containerd的service文件-所有节点
cat >/etc/systemd/system/containerd.service <<EOF[Unit]Description=containerd container runtimeDocumentation=https://containerd.ioAfter=network.target local-fs.target[Service]ExecStartPre=-/sbin/modprobe overlayExecStart=/usr/bin/containerdType=notifyDelegate=yesKillMode=processRestart=alwaysRestartSec=5LimitNPROC=infinityLimitCORE=infinityLimitNOFILE=1048576TasksMax=infinityOOMScoreAdjust=-999[Install]WantedBy=multi-user.targetEOF# 设置开机启动systemctl enable --now containerd.service
步骤3:准备docker的service文件-所有节点
cat > /etc/systemd/system/docker.service <<EOF[Unit]Description=Docker Application Container EngineDocumentation=https://docs.docker.comAfter=network-online.target firewalld.service containerd.serviceWants=network-online.targetRequires=docker.socket containerd.service[Service]Type=notifyExecStart=/usr/bin/dockerd -H fd:// --containerd=/run/containerd/containerd.sockExecReload=/bin/kill -s HUP $MAINPIDTimeoutSec=0RestartSec=2Restart=alwaysStartLimitBurst=3StartLimitInterval=60sLimitNOFILE=infinityLimitNPROC=infinityLimitCORE=infinityTasksMax=infinityDelegate=yesKillMode=processOOMScoreAdjust=-500[Install]WantedBy=multi-user.targetEOF
步骤4:准备docker的socket文件-所有节点
cat > /etc/systemd/system/docker.socket <<EOF[Unit]Description=Docker Socket for the API[Socket]ListenStream=/var/run/docker.sockSocketMode=0660SocketUser=rootSocketGroup=docker[Install]WantedBy=sockets.targetEOF# 创建docker组groupadd docker# 启动dockersystemctl enable --now docker.socket && systemctl enable --now docker.service# 验证docker版本docker -vdocker info
以上说明docker安装成功
步骤5:配置镜像加速-所有节点
mkdir -p /etc/dockercat > /etc/docker/daemon.json << EOF { "exec-opts": ["native.cgroupdriver=systemd"], "registry-mirrors": [ "https://docker.1panel.live", "https://hub.mirrorify.net", "https://docker.m.daocloud.io", "https://registry.dockermirror.com", "https://docker.aityp.com/", "https://docker.anyhub.us.kg", "https://dockerhub.icu", "https://docker.awsl9527.cn" ], "insecure-registries":["http://192.168.31.104"], "max-concurrent-downloads": 10, "log-driver": "json-file", "log-level": "warn", "log-opts": { "max-size": "10m", "max-file": "3" }, "data-root": "/var/lib/docker"}EOF# 重启dockersystemctl restart docker# 下载镜像测试下docker pull busybox
步骤6:安装cri-dockerd 垫片-所有节点
# 下载cri-dockerwget https://github.com/Mirantis/cri-dockerd/releases/download/v0.3.17/cri-dockerd-0.3.17.amd64.tgz# 解压cri-dockertar -zxvf cri-dockerd-0.3.17.amd64.tgzcp cri-dockerd/cri-dockerd /usr/bin/chmod +x /usr/bin/cri-dockerd
# 写入启动配置文件cat > /usr/lib/systemd/system/cri-docker.service <<EOF[Unit]Description=CRI Interface for Docker Application Container EngineDocumentation=https://docs.mirantis.comAfter=network-online.target firewalld.service docker.serviceWants=network-online.targetRequires=cri-docker.socket[Service]Type=notifyExecStart=/usr/bin/cri-dockerd --network-plugin=cni --pod-infra-container-image=registry.aliyuncs.com/google_containers/pause:3.10ExecReload=/bin/kill -s HUP $MAINPIDTimeoutSec=0RestartSec=2Restart=alwaysStartLimitBurst=3StartLimitInterval=60sLimitNOFILE=infinityLimitNPROC=infinityLimitCORE=infinity TasksMax=infinityDelegate=yesKillMode=process[Install]WantedBy=multi-user.targetEOF
# 写入socket配置文件cat > /usr/lib/systemd/system/cri-docker.socket <<EOF[Unit]Description=CRI Docker Socket for the APIPartOf=cri-docker.service[Socket]ListenStream=%t/cri-dockerd.sockSocketMode=0660SocketUser=rootSocketGroup=docker[Install]WantedBy=sockets.targetEOF# 进行启动cri-dockersystemctl daemon-reload ; systemctl enable cri-docker --now# 检查状态systemctl is-active cri-docker
4、负载均衡高可用安装
步骤1.安装keepalived 与 haproxy
在master机器配置: k8s-master01 02 03上都安装# 安装 keepalived haproxyyum -y install keepalived haproxy
步骤2.写入配置文件(3台master节点略有不同)
在k8s-master1上配置 keepalived.conf 文件----cat >/etc/keepalived/keepalived.conf<<EOF! Configuration File for keepalivedglobal_defs { router_id LVS_DEVEL script_user root enable_script_security}vrrp_script chk_apiserver { script "/etc/keepalived/check_apiserver.sh" interval 5 weight -5 fall 2 rise 1}vrrp_instance VI_1 { state MASTER interface ens160 # 注意网卡名 mcast_src_ip 192.168.31.100 # 注意主机IP virtual_router_id 71 #注意识别ID号为71 priority 100 #权重 100% advert_int 2 authentication { auth_type PASS auth_pass K8SHA_KA_AUTH } virtual_ipaddress { 192.168.31.200 # 注意负载均衡的网络IP地址 } track_script { chk_apiserver } }EOF# 启动服务,并设置开机自启service keepalived start && systemctl enable keepalived# 查看进程是否启动ps -ef |grep keepalived
配置master02上的 keepalived.conf 文件----cat >/etc/keepalived/keepalived.conf<<EOF! Configuration File for keepalivedglobal_defs { router_id LVS_DEVEL script_user root enable_script_security}vrrp_script chk_apiserver { script "/etc/keepalived/check_apiserver.sh" interval 5 weight -5 fall 2 rise 1}vrrp_instance VI_1 { state MASTER interface ens160 # 注意网卡名 mcast_src_ip 192.168.31.101 # 注意主机IP virtual_router_id 71 # 注意识别ID号为71 priority 90 #权重 90% advert_int 2 authentication { auth_type PASS auth_pass K8SHA_KA_AUTH } virtual_ipaddress { 192.168.31.200 # 注意负载均衡的网络IP地址 } track_script { chk_apiserver } }EOF# 启动服务,并设置开机启动service keepalived start && systemctl enable keepalived# 查看进程是否启动ps -ef |grep keepalived
配置master03上 的 keepalived.conf 文件---cat >/etc/keepalived/keepalived.conf<<EOF! Configuration File for keepalivedglobal_defs { router_id LVS_DEVEL script_user root enable_script_security}vrrp_script chk_apiserver { script "/etc/keepalived/check_apiserver.sh" interval 5 weight -5 fall 2 rise 1}vrrp_instance VI_1 { state MASTER interface ens160 # 注意网卡名 mcast_src_ip 192.168.31.102 # 注意主机IP virtual_router_id 71 # 注意识别ID号为71 priority 80 #权重 80% advert_int 2 authentication { auth_type PASS auth_pass K8SHA_KA_AUTH } virtual_ipaddress { 192.168.31.200 # 注意负载均衡的网络IP地址 } track_script { chk_apiserver } }EOF# 启动服务,并设置开机启动service keepalived start && systemctl enable keepalived# 查看进程是否启动ps -ef |grep keepalived
步骤3、配置健康检查脚本-3台master节点上同样配置
###为 3台master节点分别配置健康检查脚本---cat > /etc/keepalived/check_apiserver.sh <<"EOF" #!/bin/bash err=0 for k in $(seq 1 3) do check_code=$(pgrep haproxy) if [[ $check_code == "" ]]; then err=$(expr $err + 1) sleep 1 continue else err=0 break fi done if [[ $err != "0" ]]; then echo "systemctl stop keepalived" /usr/bin/systemctl stop keepalived exit 1 else exit 0 fiEOF
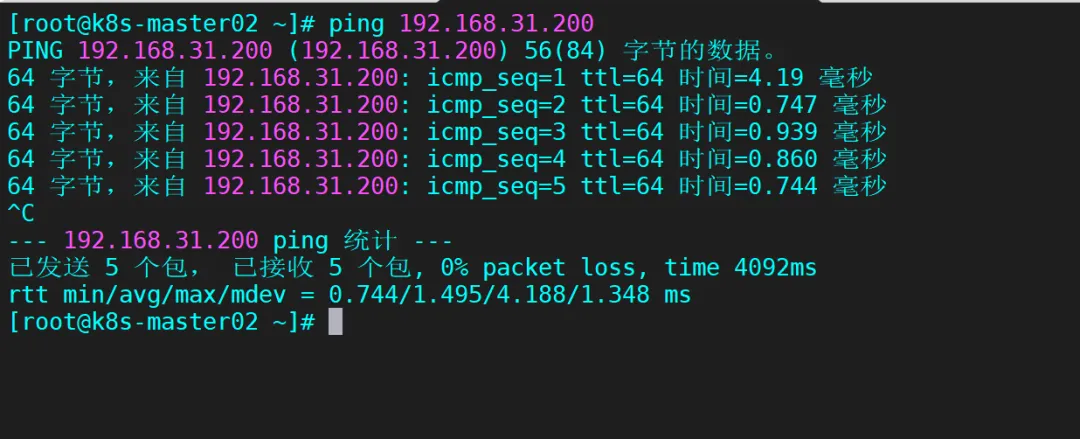
VIP IP 生成成功 测试下是否能ping 通
步骤4 配置haproxy-3台master节点一样配置
修改 /etc/sysctl.conf配置文件【3台master机器都要配置下】vim /etc/sysctl.conf---net.ipv4.ip_nonlocal_bind=1---刷新配置sysctl -p
3个master机器全部进行以下配置,并启动cd /etc/haproxy/mv haproxy.cfg haproxy.cfg.bakcat > /etc/haproxy/haproxy.cfg << EOFglobal maxconn 2000 ulimit-n 16384 log 127.0.0.1 local0 err stats timeout 30sdefaults log global mode http option httplog timeout connect 5000 timeout client 50000 timeout server 50000 timeout http-request 15s timeout http-keep-alive 15sfrontend monitor-in bind *:33305 mode http option httplog monitor-uri /monitorfrontend k8s-master bind 192.168.31.200:16443 #负载IP地址要写对 mode tcp option tcplog tcp-request inspect-delay 5s default_backend k8s-mastersbackend k8s-masters mode tcp option tcplog option tcp-check balance roundrobin default-server inter 10s downinter 5s rise 2 fall 2 slowstart 60s maxconn 250 maxqueue 256 weight 100 server lyc-80-71 192.168.31.100:6443 check #注意修改 server lyc-80-72 192.168.31.101:6443 check #注意修改 server lyc-80-73 192.168.31.102:6443 check #注意修改 EOF#启动并设置为开机自启service haproxy start && systemctl enable haproxy#查看haproxy启动状态service haproxy status#查看进程ps -ef |grep haproxy#查看负载IPnetstat -nultp |grep 16443
5、安装K8s
步骤1 、配置k8syum源-所有节点
###使用阿里云k8s源###cat <<EOF | tee /etc/yum.repos.d/kubernetes.repo[kubernetes]name=Kubernetesbaseurl=https://mirrors.aliyun.com/kubernetes-new/core/stable/v1.33/rpm/enabled=1gpgcheck=1gpgkey=https://mirrors.aliyun.com/kubernetes-new/core/stable/v1.33/rpm/repodata/repomd.xml.keyEOF#更新源数据yum clean all && yum makecache
步骤2、安装k8s1.33.10-所有节点
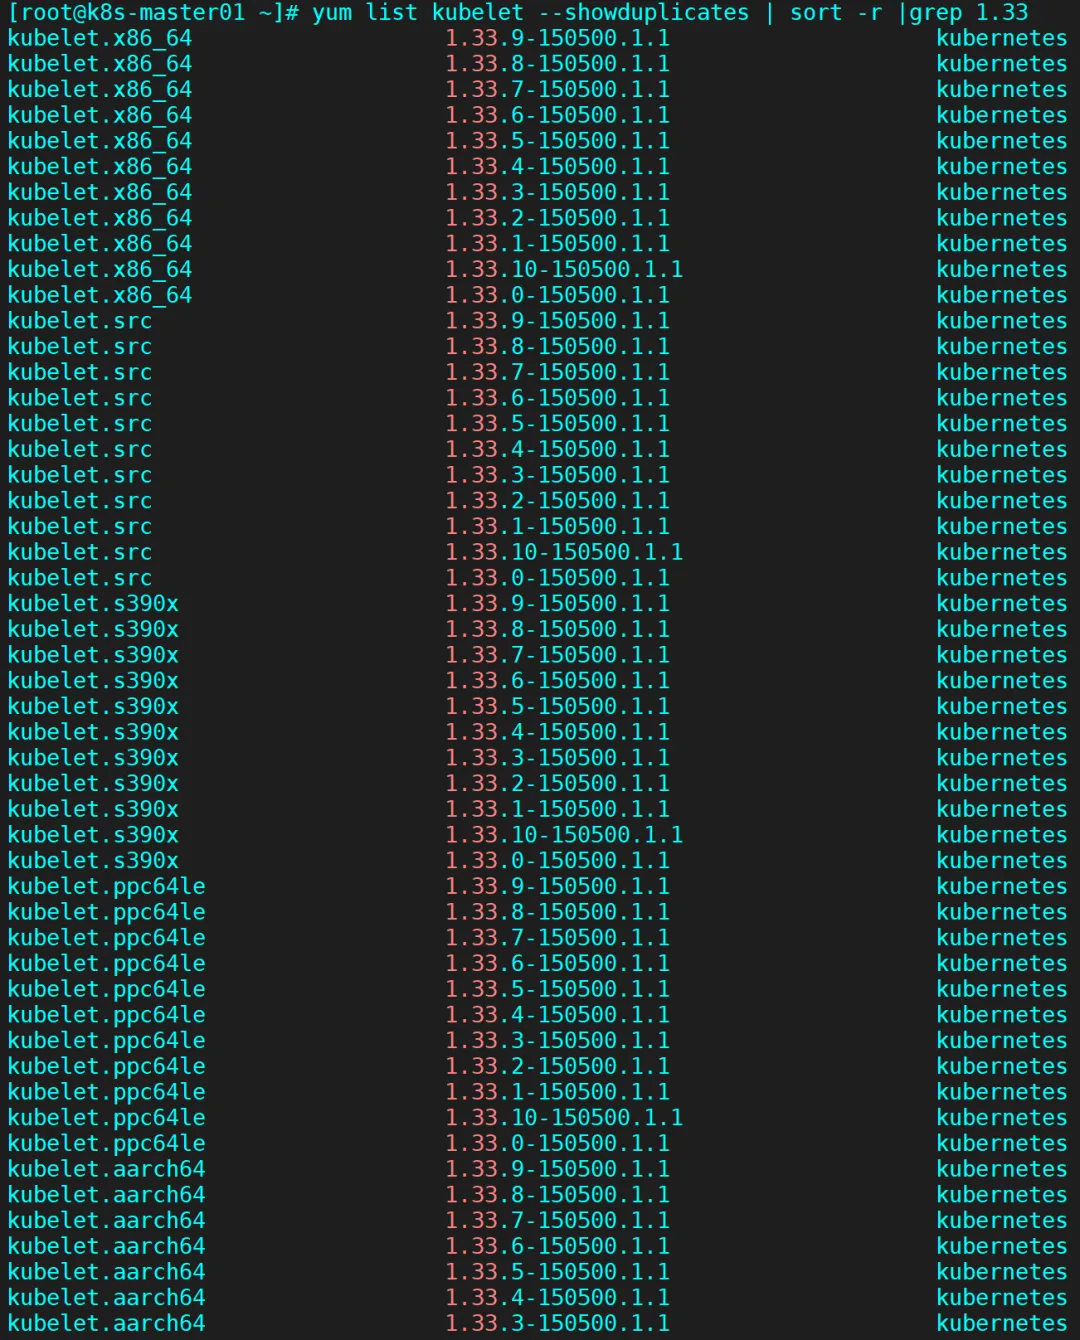
查看所有的可用版本yum list kubelet --showduplicates | sort -r |grep 1.33---kubelet.x86_64 1.33.1-150500.1.1 kuberneteskubelet.x86_64 1.33.0-150500.1.1 kuberneteskubelet.src 1.33.1-150500.1.1 kuberneteskubelet.src 1.33.0-150500.1.1 kuberneteskubelet.s390x 1.33.1-150500.1.1 kuberneteskubelet.s390x 1.33.0-150500.1.1 kuberneteskubelet.ppc64le 1.33.1-150500.1.1 kuberneteskubelet.ppc64le 1.33.0-150500.1.1 kuberneteskubelet.aarch64 1.33.1-150500.1.1 kuberneteskubelet.aarch64 1.33.0-150500.1.1 kubernetes安装最新版本1.33.10yum -y install kubeadm kubelet kubectl核对下载的版本rpm -qa |grep kubelet 【扩展---->>>>若安装指定版本】yum -y install kubelet-1.35.1-0 kubeadm-1.33.1-0 kubectl-1.33.1-0
步骤3、设置kubelet-所有节点
vim /etc/sysconfig/kubelet---KUBELET_EXTRA_ARGS="--cgroup-driver=systemd"# 核对下刚添加的配置cat /etc/sysconfig/kubelet# 设置kubelet为开机自启动即可,# 由于没有生成配置文件,集群初始化后自动启动systemctl enable kubelet
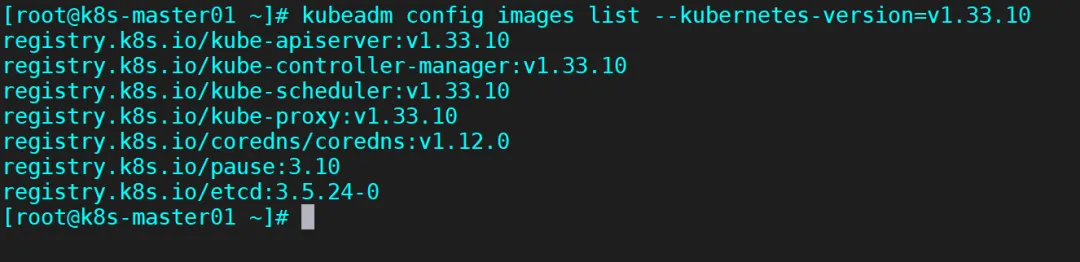
步骤4、准备docker镜像-所有节点全部拉取镜像
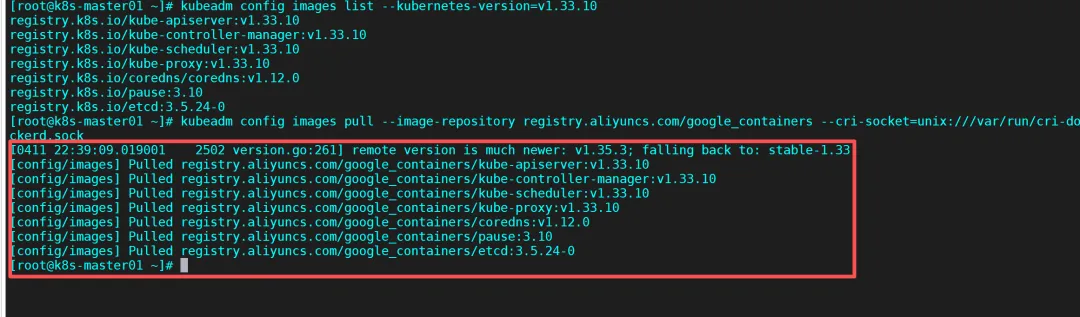
# 准备k8s 1.33.10镜像kubeadm config images list --kubernetes-version=v1.33.10---registry.k8s.io/kube-apiserver:v1.33.10registry.k8s.io/kube-controller-manager:v1.33.10registry.k8s.io/kube-scheduler:v1.33.10registry.k8s.io/kube-proxy:v1.33.10registry.k8s.io/coredns/coredns:v1.12.0registry.k8s.io/pause:3.10registry.k8s.io/etcd:3.5.24-0
# 直接使用阿里官方给的命令,批量下载需要的docker镜像kubeadm config images pull --image-repository registry.aliyuncs.com/google_containers --cri-socket=unix:///var/run/cri-dockerd.sock----拉取的镜像明细如下[config/images] Pulled registry.aliyuncs.com/google_containers/kube-apiserver:v1.33.10[config/images] Pulled registry.aliyuncs.com/google_containers/kube-controller-manager:v1.33.10[config/images] Pulled registry.aliyuncs.com/google_containers/kube-scheduler:v1.33.10[config/images] Pulled registry.aliyuncs.com/google_containers/kube-proxy:v1.33.10[config/images] Pulled registry.aliyuncs.com/google_containers/coredns:v1.12.0[config/images] Pulled registry.aliyuncs.com/google_containers/pause:3.10[config/images] Pulled registry.aliyuncs.com/google_containers/etcd:3.5.24-0查看拉取的镜像明细docker images
步骤5、初始化集群-在master01节点上操作
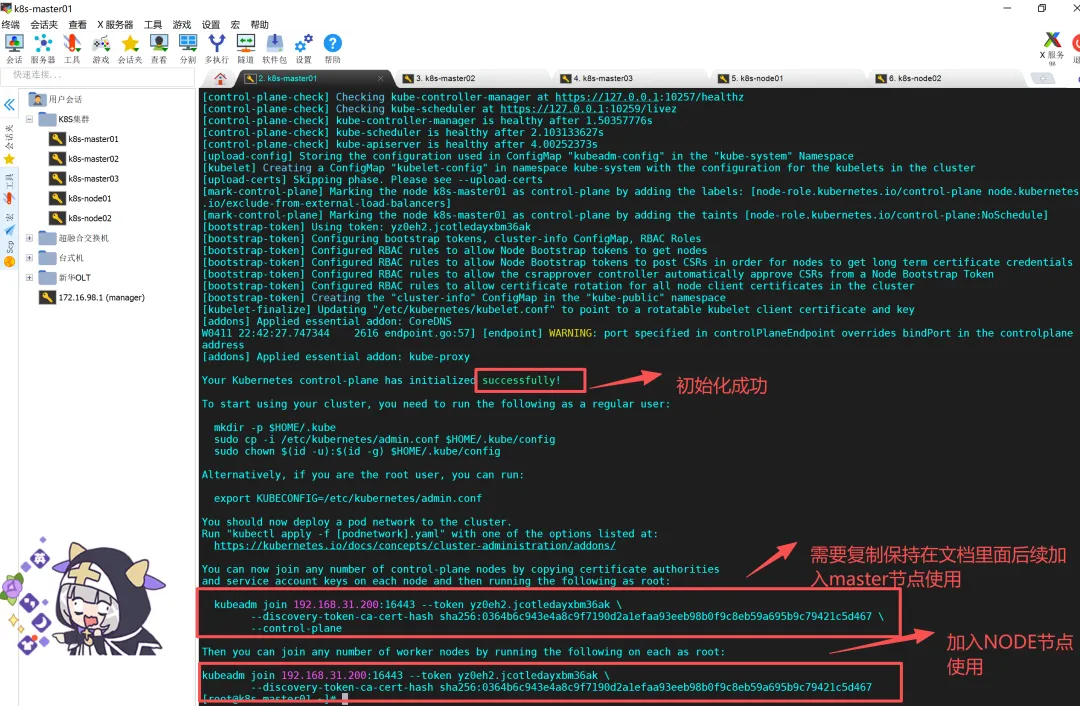
在master01机器上执行初始化命令vim kubeinit.sh----kubeadm init --control-plane-endpoint=192.168.31.200:16443 --image-repository registry.aliyuncs.com/google_containers --kubernetes-version v1.33.10 --service-cidr=10.96.0.0/16 --pod-network-cidr=10.244.0.0/16 --cri-socket unix://var/run/cri-dockerd.sock------执行安装. ./kubeinit.sh命令解析:--apiserver-advertise-address 集群通告地址--image-repository 由于默认拉取镜像地址k8s.gcr.io国内无法访问,这里指定阿里云镜像仓库地址--kubernetes-version K8s版本,与上面安装的一致--service-cidr 集群内部虚拟网络,Pod统一访问入口--pod-network-cidr Pod网络,,与下面部署的CNI网络组件yaml中保持一致
步骤6、主节点master01上执行提示语句
# master01节点准备kubelet配置文件mkdir -p $HOME/.kubesudo cp -i /etc/kubernetes/admin.conf $HOME/.kube/configsudo chown $(id -u):$(id -g) $HOME/.kube/configexport KUBECONFIG=/etc/kubernetes/admin.conf
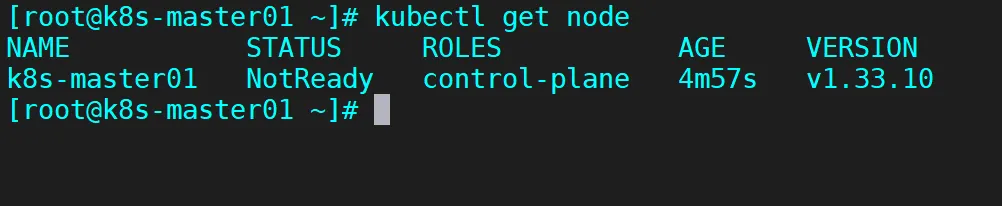
查看目前k8s节点状态
kubectl get node
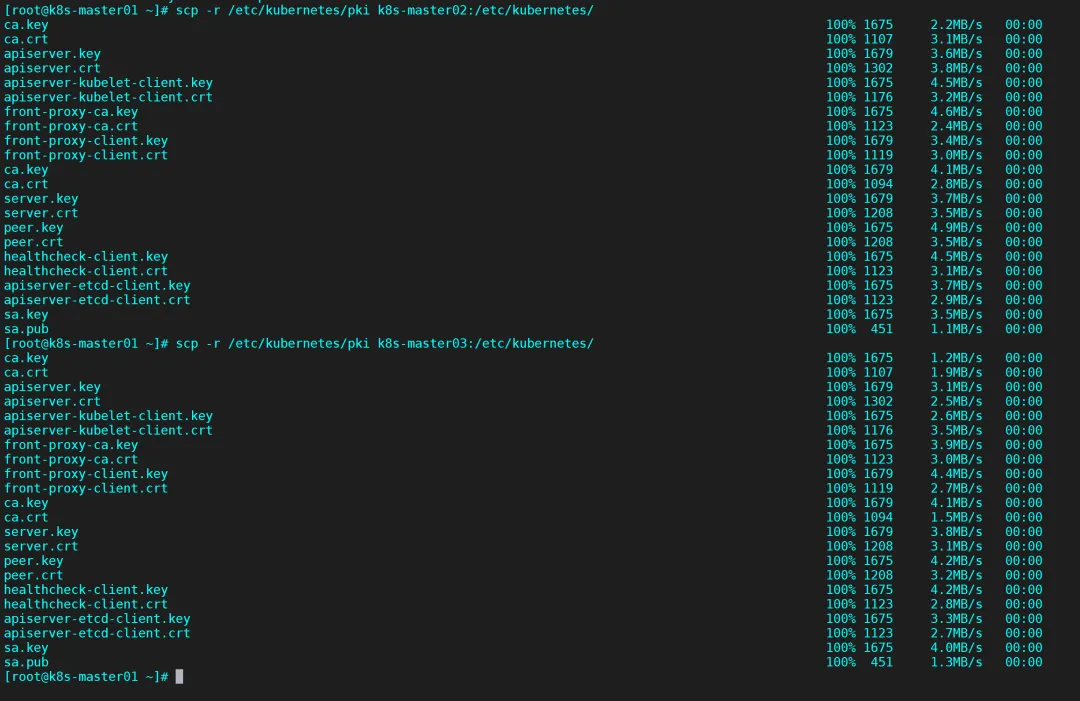
步骤7、其他master节点 加入集群
## 在master02 master03上 做完必须操作之后 在加入集群# master01上 同步 key 到 master02 master03上scp -r /etc/kubernetes/pki k8s-master02:/etc/kubernetes/scp -r /etc/kubernetes/pki k8s-master03:/etc/kubernetes/
步骤8、删除不需要的证书-在master02 03上操作
可以把不需要的证书删除掉,cd /etc/kubernetes/pki/rm -rf apiserver* rm -rf etcd/peer.*rm -rf etcd/server.*
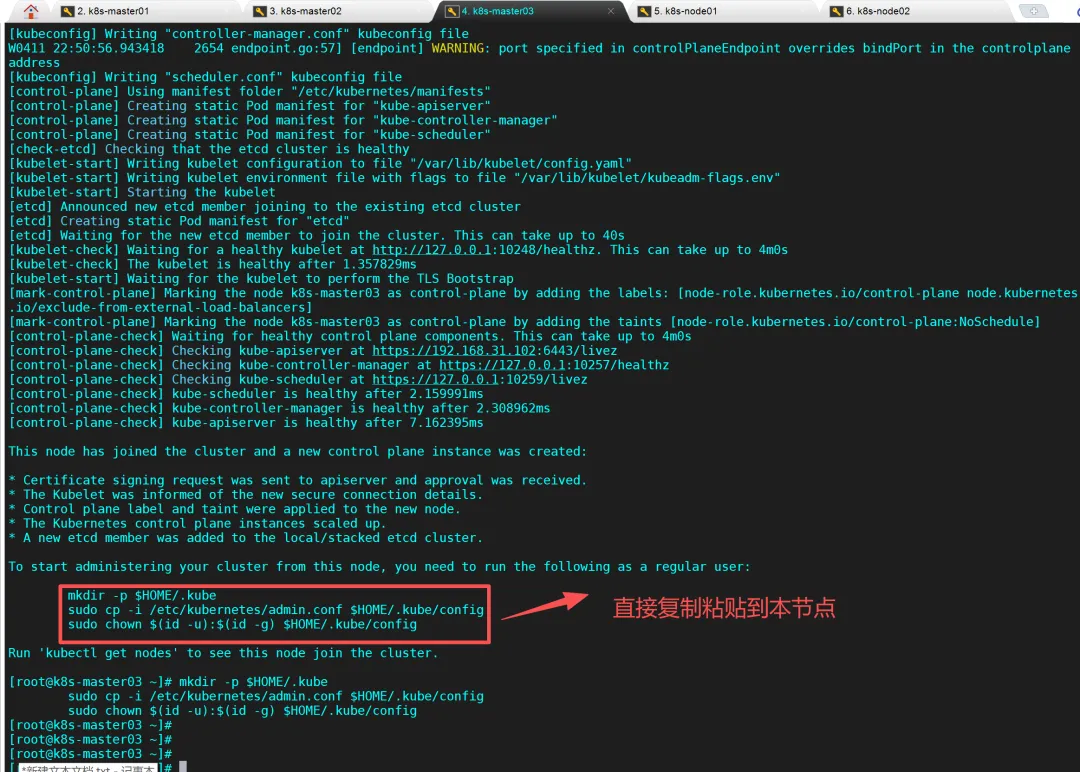
步骤9、加入master02/03节点(注意下面的token和hash值是在master01上初始化生成的,先复制保存下来)
【master02节点】kubeadm join 192.168.31.200:16443 --token yz0eh2.jcotledayxbm36ak \ --discovery-token-ca-cert-hash sha256:0364b6c943e4a8c9f7190d2a1efaa93eeb98b0f9c8eb59a695b9c79421c5d467 \ --control-plane --cri-socket unix:///var/run/cri-dockerd.sockmkdir -p $HOME/.kubesudo cp -i /etc/kubernetes/admin.conf $HOME/.kube/configsudo chown $(id -u):$(id -g) $HOME/.kube/config---------------------------------------------------------------【master03节点】kubeadm join 192.168.31.200:16443 --token yz0eh2.jcotledayxbm36ak \ --discovery-token-ca-cert-hash sha256:0364b6c943e4a8c9f7190d2a1efaa93eeb98b0f9c8eb59a695b9c79421c5d467 \ --control-plane --cri-socket unix:///var/run/cri-dockerd.sockmkdir -p $HOME/.kubesudo cp -i /etc/kubernetes/admin.conf $HOME/.kube/configsudo chown $(id -u):$(id -g) $HOME/.kube/config
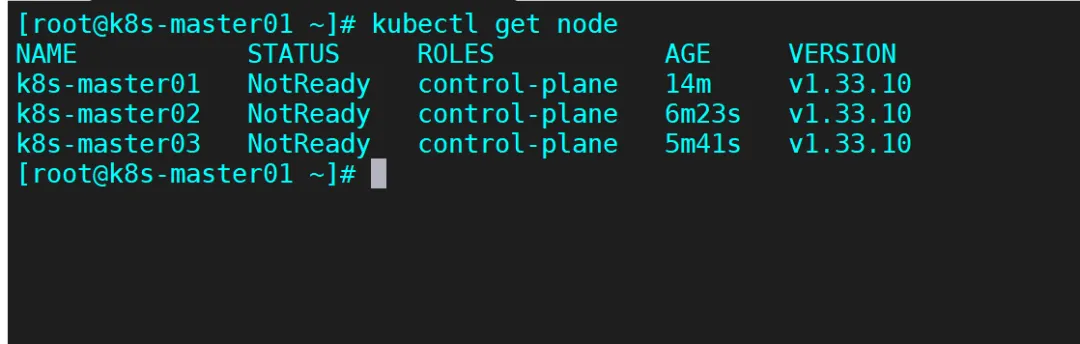
此时在master01节点再次查看k8s集群信息
输入命令:kubectl get node
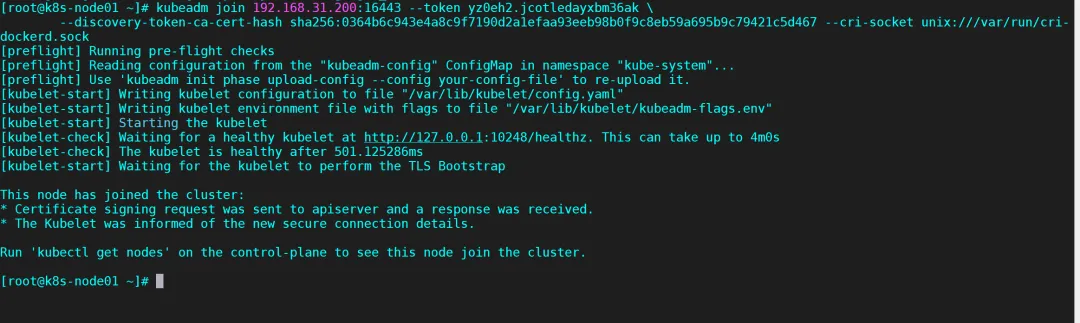
步骤10、k8s-node01/02节点加入集群(注意下面的token和hash值是在master01上初始化生成的,先复制保存下来)
【k8s-node01机器】kubeadm join 192.168.31.200:16443 --token yz0eh2.jcotledayxbm36ak \ --discovery-token-ca-cert-hash sha256:0364b6c943e4a8c9f7190d2a1efaa93eeb98b0f9c8eb59a695b9c79421c5d467 --cri-socket unix:///var/run/cri-dockerd.sock--------------------------------------------------【k8s-node02机器】kubeadm join 192.168.31.200:16443 --token yz0eh2.jcotledayxbm36ak \ --discovery-token-ca-cert-hash sha256:0364b6c943e4a8c9f7190d2a1efaa93eeb98b0f9c8eb59a695b9c79421c5d467 --cri-socket unix:///var/run/cri-dockerd.sock
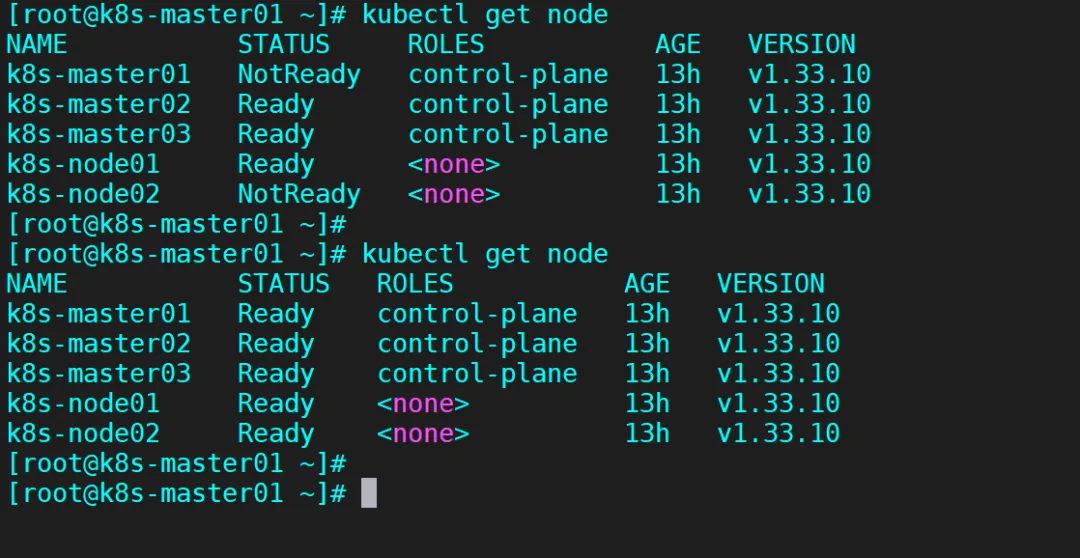
步骤11、查看集群状态-k8s-mster01上
运行命令 kubectl get node 3台控制节点加入成功 状态NotReady 是因为还没有安装calico网络插件
安装网络插件calico
下载Calico配置文件 只需要在master01上操作
wget --no-check-certificate https://raw.githubusercontent.com/projectcalico/calico/v3.28.0/manifests/calico.yaml
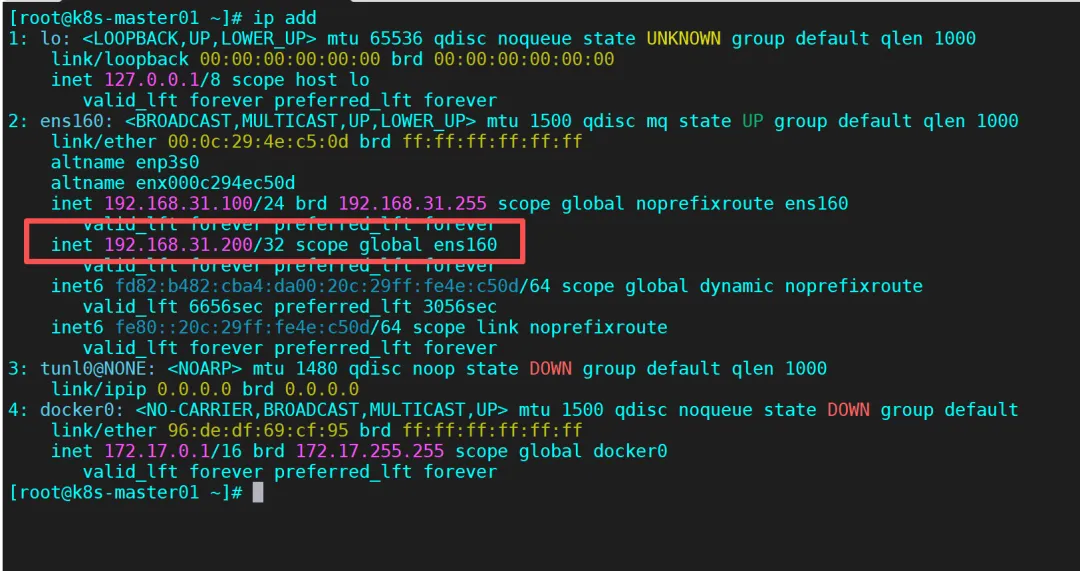
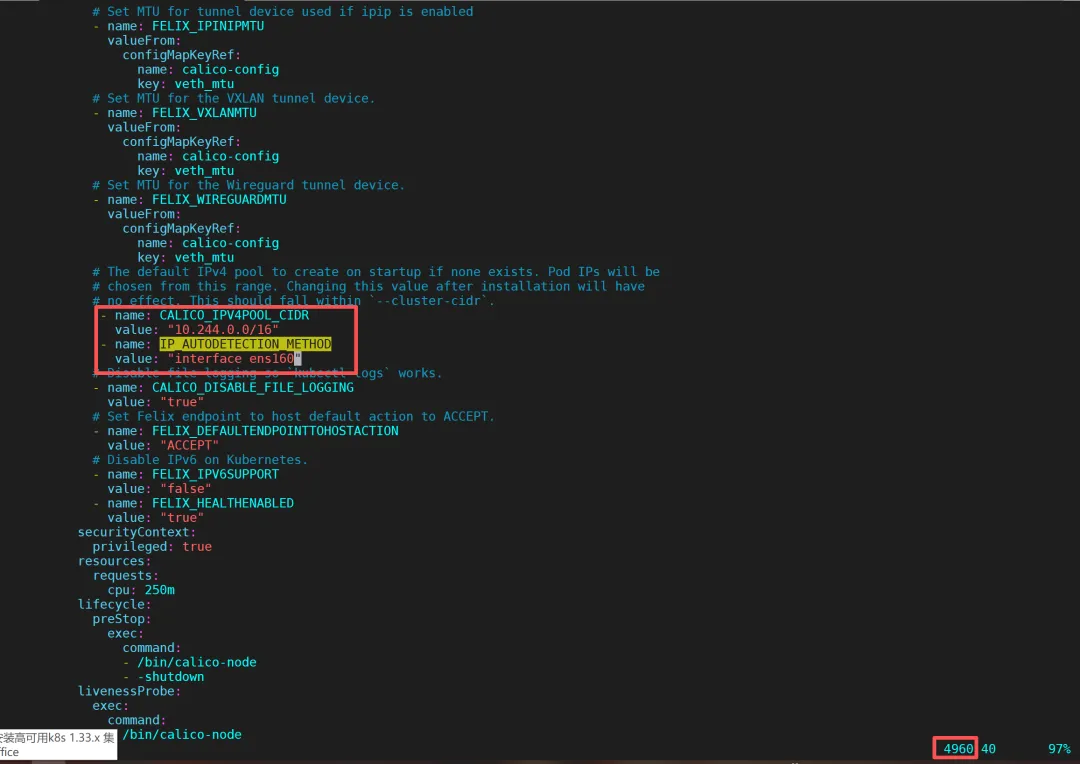
编辑配置文件 在4960 行出修改配置文件如下图:注意网卡名称为自己 机器的网卡名称
步骤2:部署calico网络-k8s-master01节点
查看所需镜像cat calico.yaml | grep image执行部署kubectl apply -f calico.yaml也可以将镜像提前拉取下来(可选)docker pull calico/cni:v3.28.0docker pull calico/node:v3.28.0docker pull calico/kube-controllers:v3.28.0-------------------
等待几分钟后 再看 各节点是否Ready
kubectl get nodes -o wide
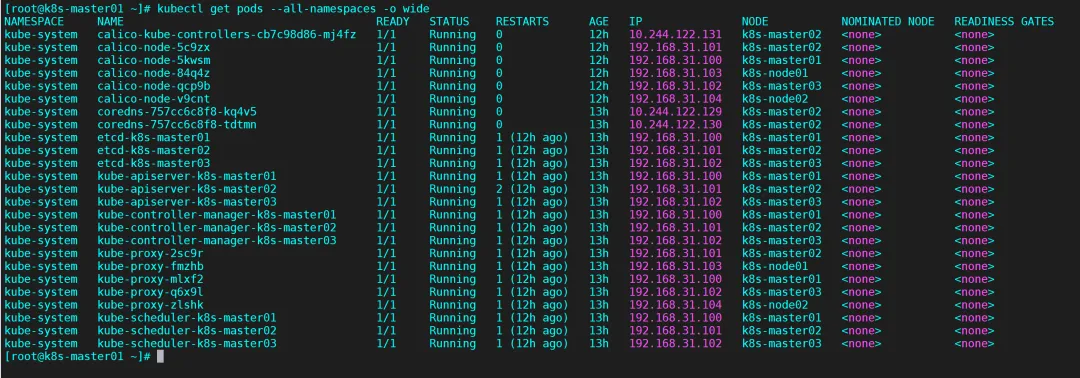
kubectl get pods --all-namespaces -o wide
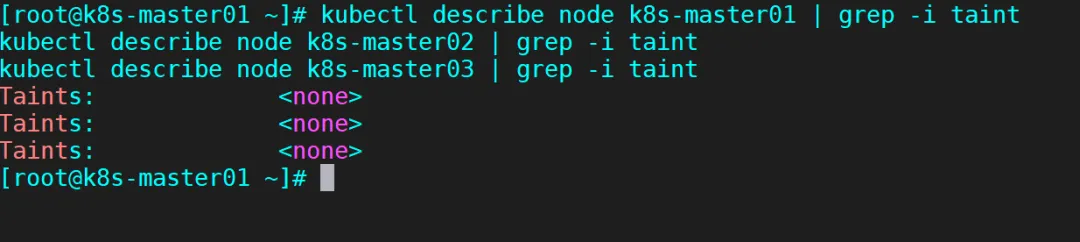
步骤3:主节点去污-master01上执行
kubectl describe node k8s-master01 | grep -i taintkubectl describe node k8s-master02 | grep -i taintkubectl describe node k8s-master03 | grep -i taint【拿掉污点】kubectl taint node k8s-master01 node-role.kubernetes.io/control-plane:NoSchedule-kubectl taint node k8s-master02 node-role.kubernetes.io/control-plane:NoSchedule-kubectl taint node k8s-master03 node-role.kubernetes.io/control-plane:NoSchedule-再次查看调度状态为:调度kubectl describe node k8s-master01 | grep -i taintkubectl describe node k8s-master02 | grep -i taintkubectl describe node k8s-master03 | grep -i taint-----------------------------------
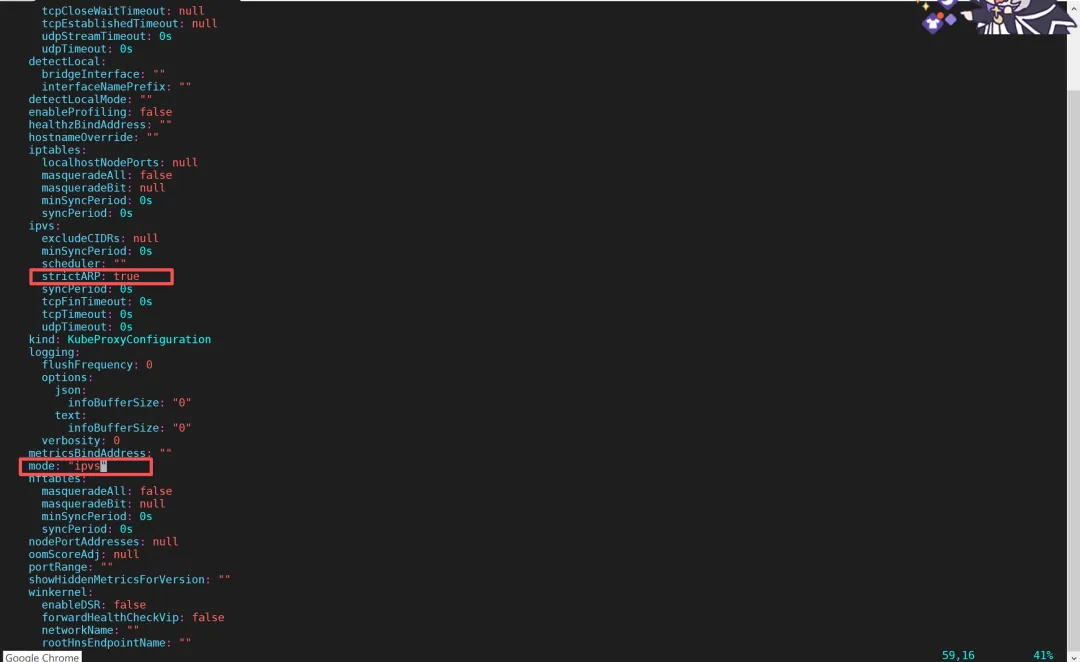
【主节点master01 02 03开启ipvs模式) 在k8s-master01上操作kubectl edit configmap kube-proxy -n kube-system---strictARP: truemode: "ipvs"---重启kube-proxykubectl rollout restart ds kube-proxy -n kube-systemkubectl get pod -n kube-system -o wide
步骤4:安装metrics-server服务-master01上
cat > ./components.yaml << EapiVersion: v1kind: ServiceAccountmetadata: labels: k8s-app: metrics-server name: metrics-server namespace: kube-system---apiVersion: rbac.authorization.k8s.io/v1kind: ClusterRolemetadata: labels: k8s-app: metrics-server rbac.authorization.k8s.io/aggregate-to-admin: "true" rbac.authorization.k8s.io/aggregate-to-edit: "true" rbac.authorization.k8s.io/aggregate-to-view: "true" name: system:aggregated-metrics-readerrules:- apiGroups: - metrics.k8s.io resources: - pods - nodes verbs: - get - list - watch---apiVersion: rbac.authorization.k8s.io/v1kind: ClusterRolemetadata: labels: k8s-app: metrics-server name: system:metrics-serverrules:- apiGroups: - "" resources: - nodes/metrics verbs: - get- apiGroups: - "" resources: - pods - nodes verbs: - get - list - watch---apiVersion: rbac.authorization.k8s.io/v1kind: RoleBindingmetadata: labels: k8s-app: metrics-server name: metrics-server-auth-reader namespace: kube-systemroleRef: apiGroup: rbac.authorization.k8s.io kind: Role name: extension-apiserver-authentication-readersubjects:- kind: ServiceAccount name: metrics-server namespace: kube-system---apiVersion: rbac.authorization.k8s.io/v1kind: ClusterRoleBindingmetadata: labels: k8s-app: metrics-server name: metrics-server:system:auth-delegatorroleRef: apiGroup: rbac.authorization.k8s.io kind: ClusterRole name: system:auth-delegatorsubjects:- kind: ServiceAccount name: metrics-server namespace: kube-system---apiVersion: rbac.authorization.k8s.io/v1kind: ClusterRoleBindingmetadata: labels: k8s-app: metrics-server name: system:metrics-serverroleRef: apiGroup: rbac.authorization.k8s.io kind: ClusterRole name: system:metrics-serversubjects:- kind: ServiceAccount name: metrics-server namespace: kube-system---apiVersion: v1kind: Servicemetadata: labels: k8s-app: metrics-server name: metrics-server namespace: kube-systemspec: ports: - appProtocol: https name: https port: 443 protocol: TCP targetPort: https selector: k8s-app: metrics-server---apiVersion: apps/v1kind: Deploymentmetadata: labels: k8s-app: metrics-server name: metrics-server namespace: kube-systemspec: selector: matchLabels: k8s-app: metrics-server strategy: rollingUpdate: maxUnavailable: 0 template: metadata: labels: k8s-app: metrics-server spec: containers: - args: - --cert-dir=/tmp - --secure-port=4443 - --kubelet-preferred-address-types=InternalIP,ExternalIP,Hostname - --kubelet-use-node-status-port - --metric-resolution=15s - --kubelet-insecure-tls - --requestheader-client-ca-file=/etc/kubernetes/pki/front-proxy-ca.crt - --requestheader-username-headers=X-Remote-User - --requestheader-group-headers=X-Remote-Group - --requestheader-extra-headers-prefix=X-Remote-Extra- image: registry.k8s.io/metrics-server/metrics-server:v0.8.0 imagePullPolicy: IfNotPresent livenessProbe: failureThreshold: 3 httpGet: path: /livez port: https scheme: HTTPS periodSeconds: 10 name: metrics-server ports: - containerPort: 10250 name: https protocol: TCP readinessProbe: failureThreshold: 3 httpGet: path: /readyz port: https scheme: HTTPS initialDelaySeconds: 20 periodSeconds: 10 resources: requests: cpu: 100m memory: 200Mi securityContext: allowPrivilegeEscalation: false capabilities: drop: - ALL readOnlyRootFilesystem: true runAsNonRoot: true runAsUser: 1000 seccompProfile: type: RuntimeDefault volumeMounts: - mountPath: /tmp name: tmp-dir - mountPath: /etc/kubernetes/pki name: k8s-certs nodeSelector: kubernetes.io/os: linux priorityClassName: system-cluster-critical serviceAccountName: metrics-server volumes: - emptyDir: {} name: tmp-dir - hostPath: path: /etc/kubernetes/pki name: k8s-certs---apiVersion: apiregistration.k8s.io/v1kind: APIServicemetadata: labels: k8s-app: metrics-server name: v1beta1.metrics.k8s.iospec: group: metrics.k8s.io groupPriorityMinimum: 100 insecureSkipTLSVerify: true service: name: metrics-server namespace: kube-system version: v1beta1 versionPriority: 100E安装kubectl create -f components.yaml
如下修改
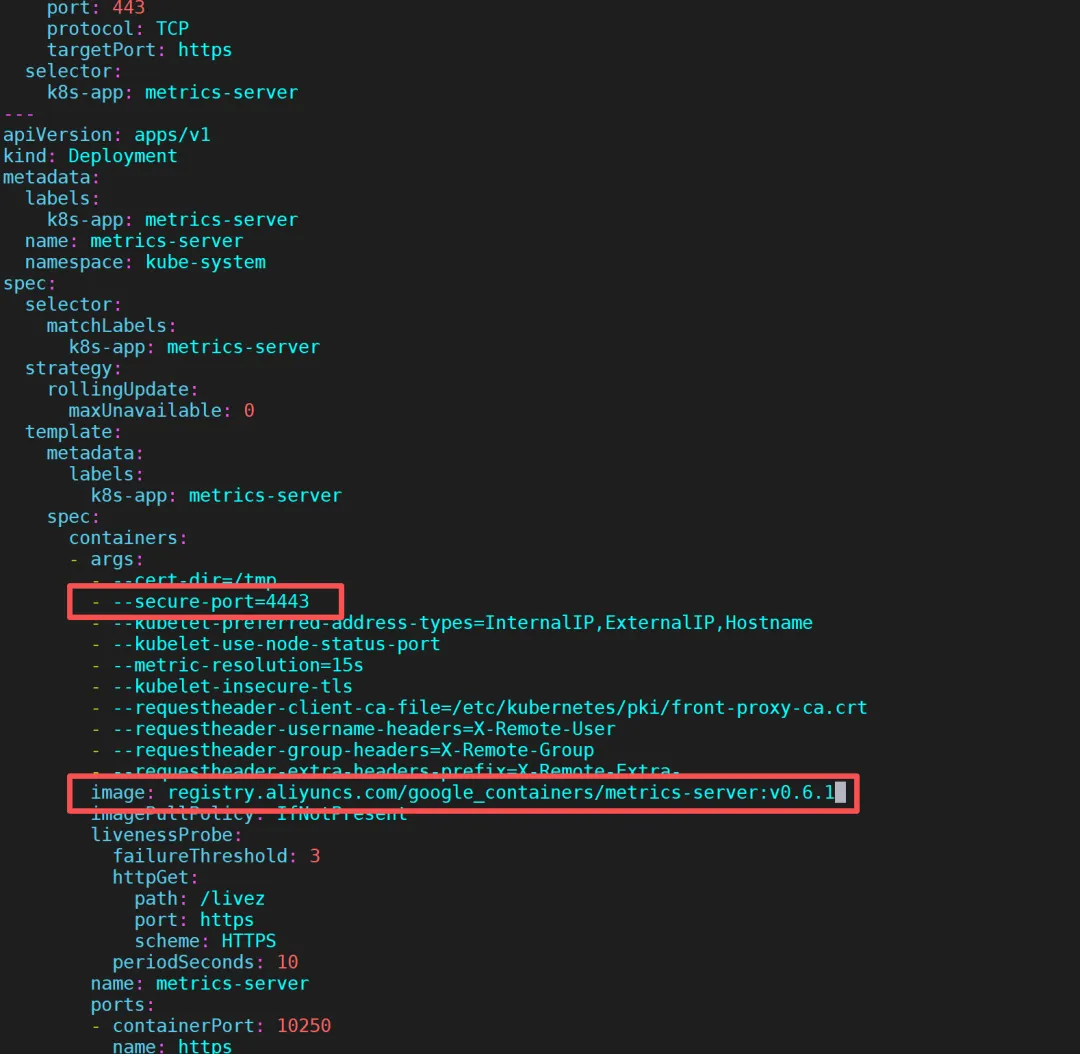
metrics-server主要是采集k8s集群资源信息的vim components.yaml--------------------注意注意以下内容135 - --cert-dir=/tmp136 - --secure-port=4443137 - --kubelet-preferred-address-types=InternalIP138 - --kubelet-use-node-status-port139 - --metric-resolution=15s140 - --kubelet-insecure-tls141 image: registry.aliyuncs.com/google_containers/metrics-server:v0.6.1142 imagePullPolicy: IfNotPresent-------------------执行安装kubectl apply -f components.yaml查看pod
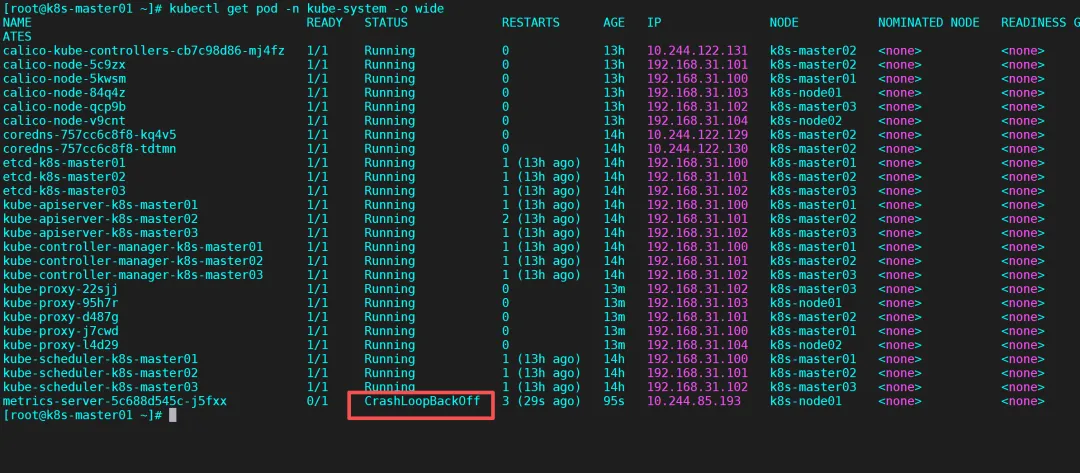
需要再等会,起来running后就可以了
步骤5:安装dashboard控制面板
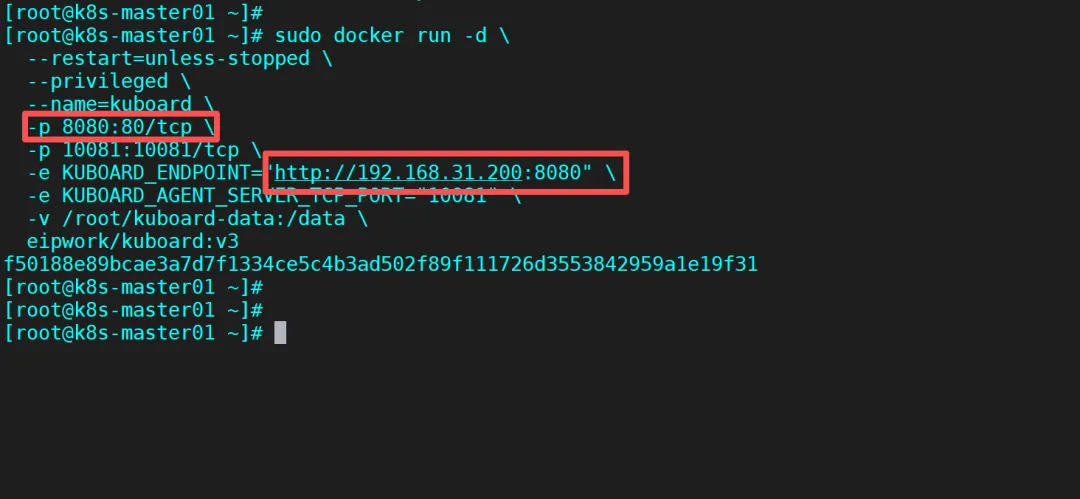
sudo docker run -d \ --restart=unless-stopped \ --privileged \ --name=kuboard \ -p 8080:80/tcp \ -p 10081:10081/tcp \ -e KUBOARD_ENDPOINT="http://192.168.31.200:8080" \ -e KUBOARD_AGENT_SERVER_TCP_PORT="10081" \ -v /root/kuboard-data:/data \ eipwork/kuboard:v3
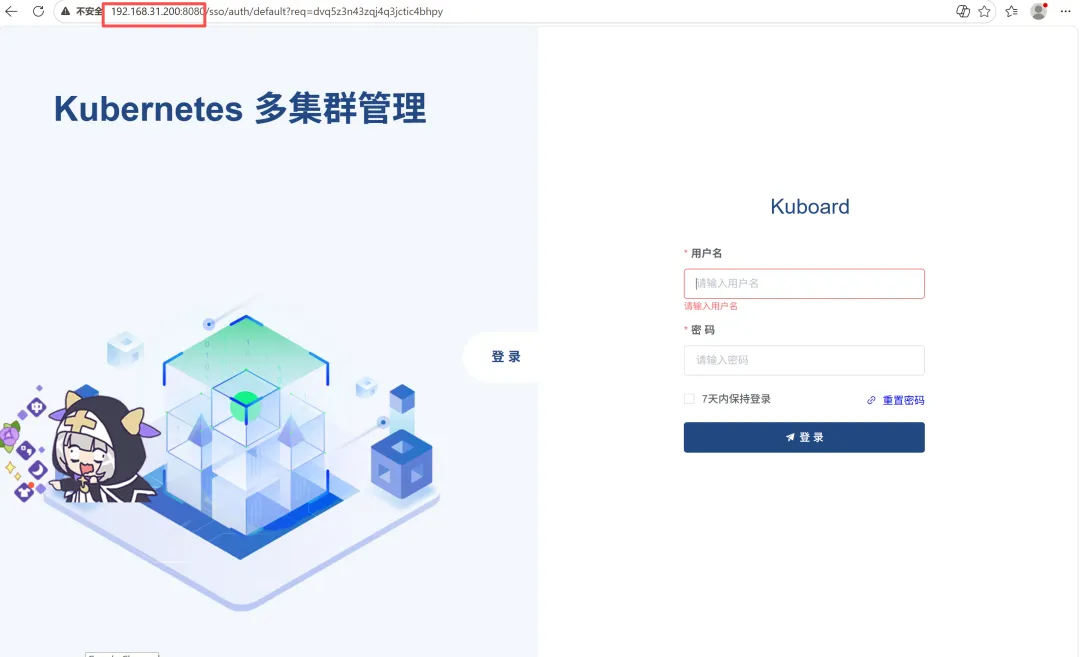
http://192.168.31.200:8080
用户名: admin
密码: Kuboard123
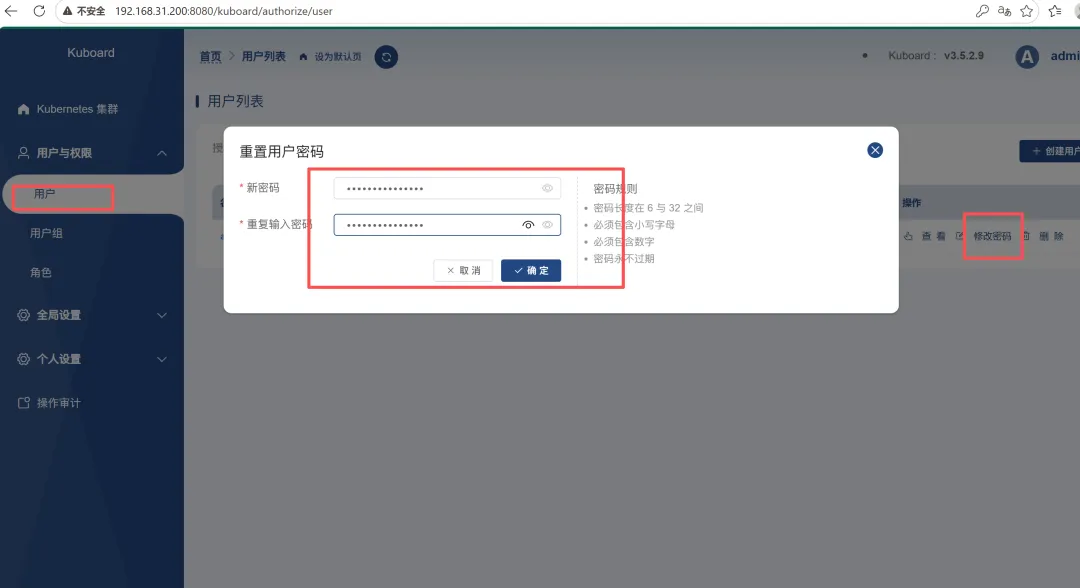
登录控制台 。可以自由发挥 做个性化设置
先修改管理员密码
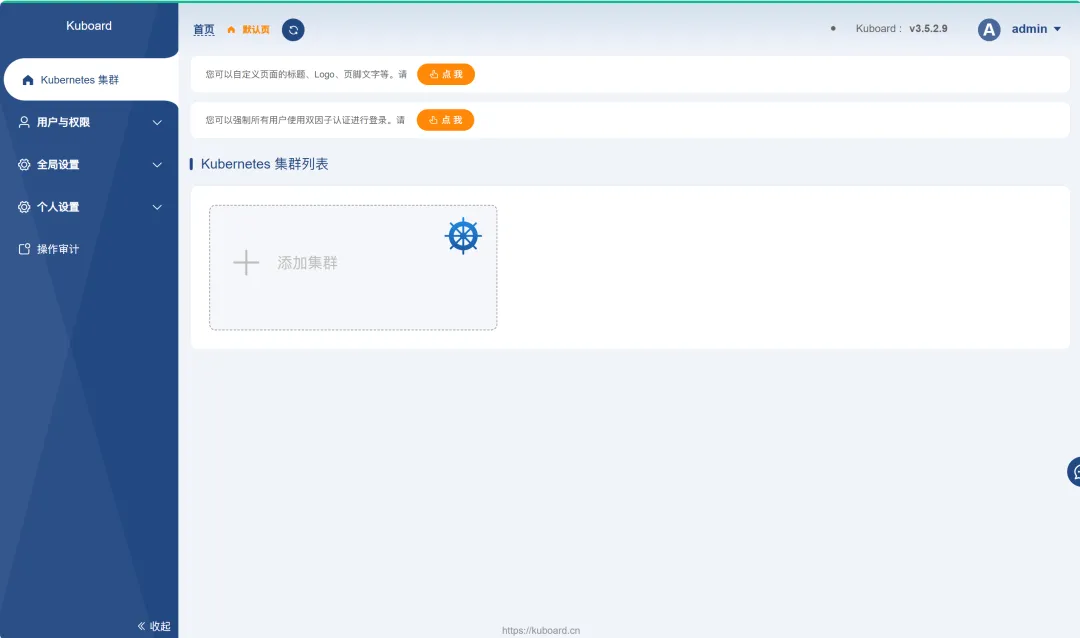
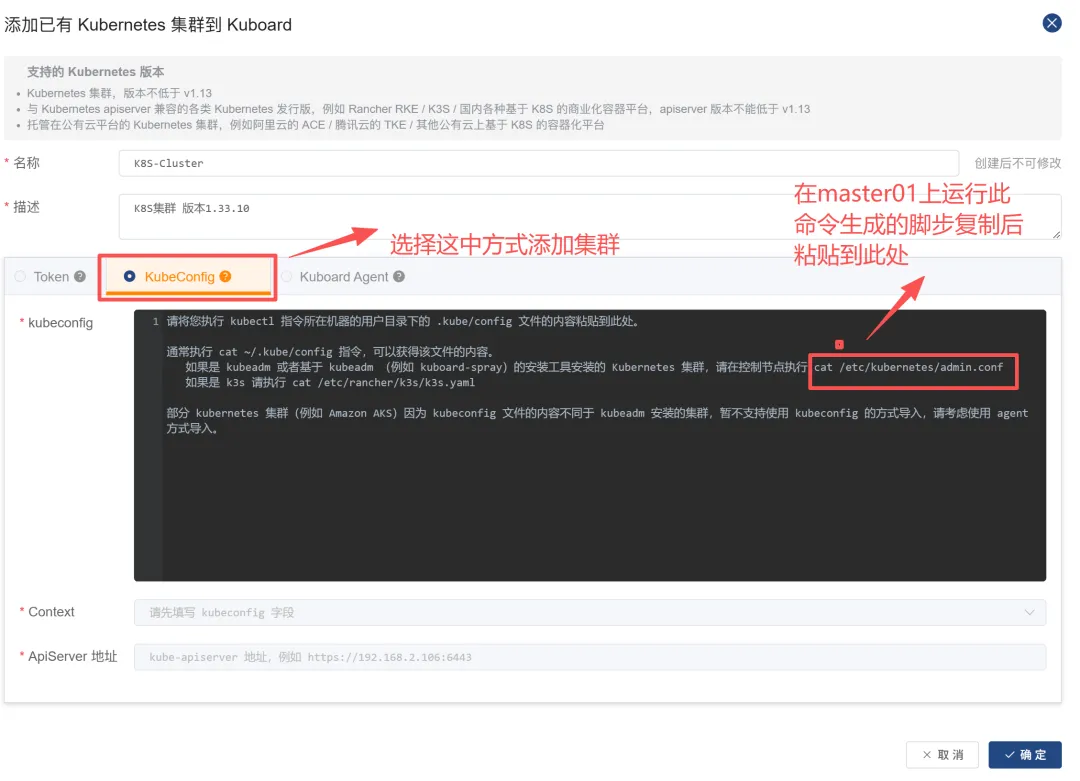
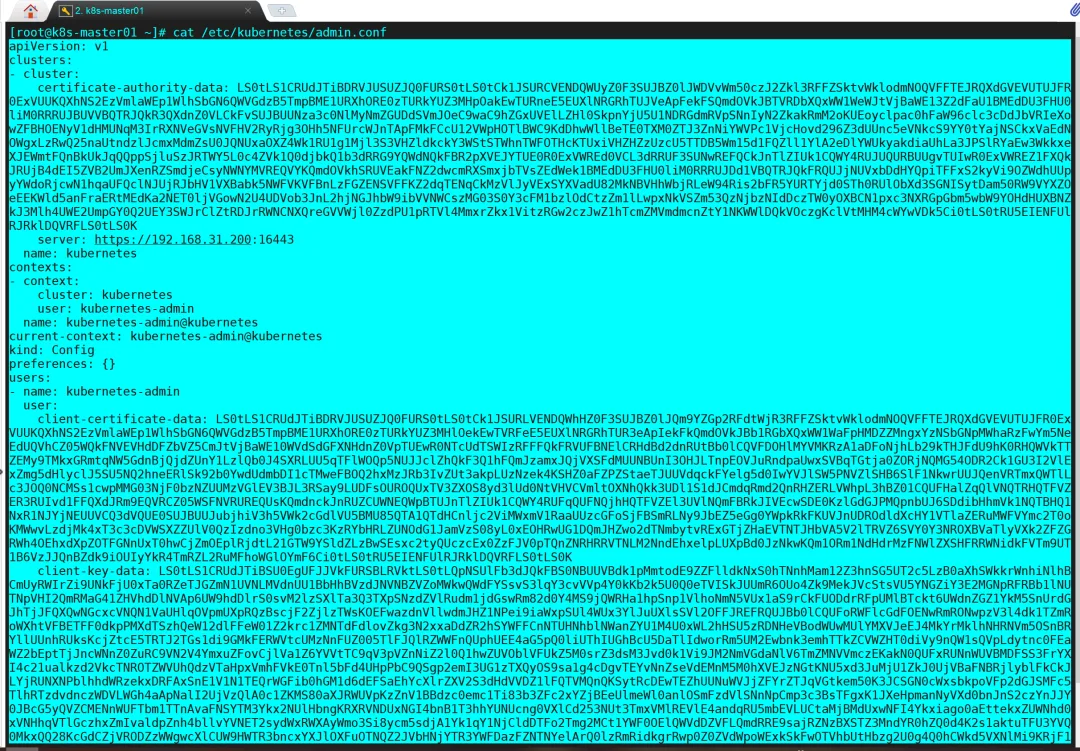
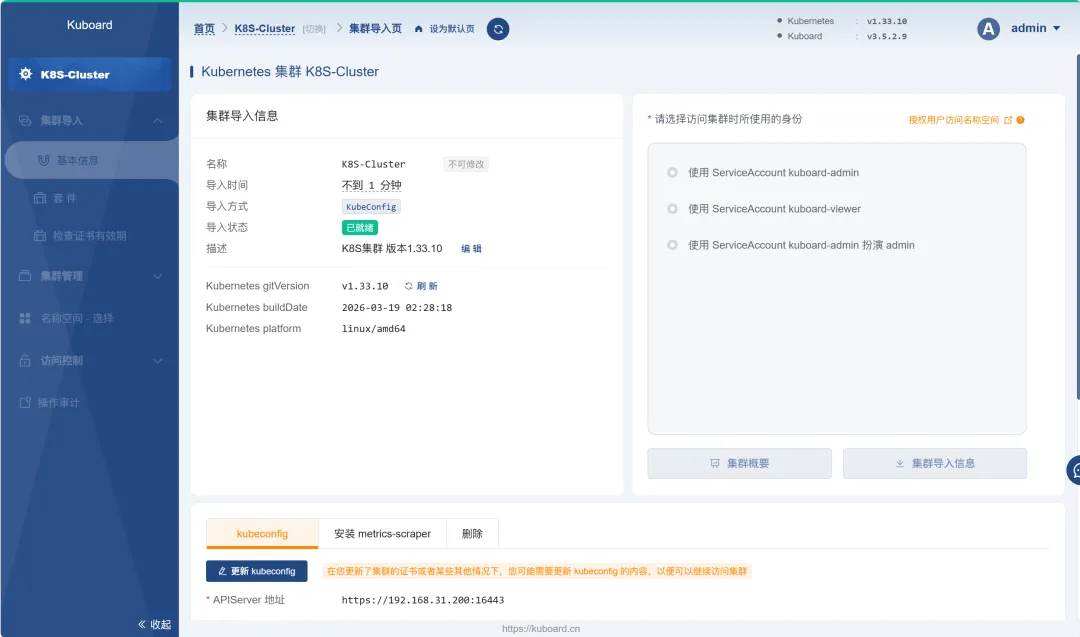
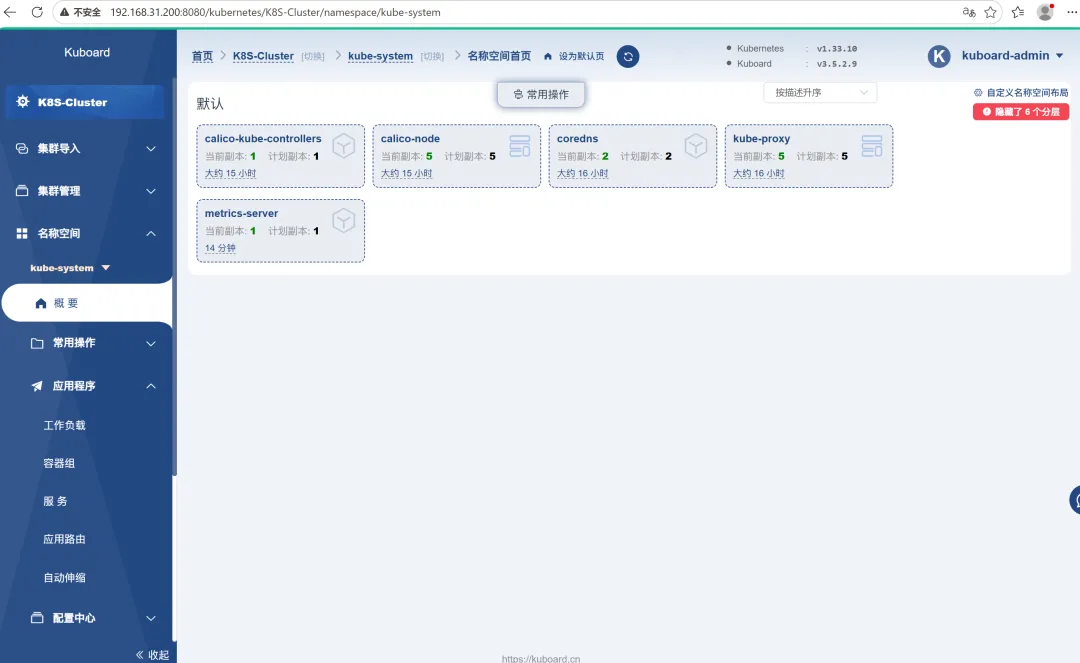
步骤6:添加集群
点击 “确定”后 集群添加成功
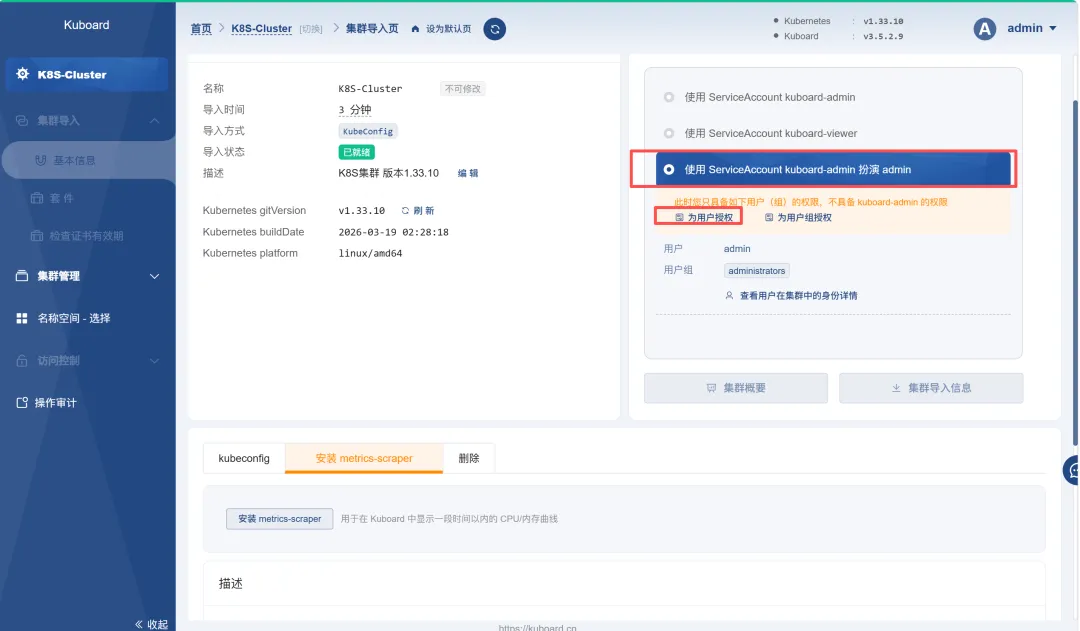
选择为用户授权 自己喜欢
步骤7:安装 metrics-server
wget https://github.com/kubernetes-sigs/metrics-server/releases/latest/download/components.yaml
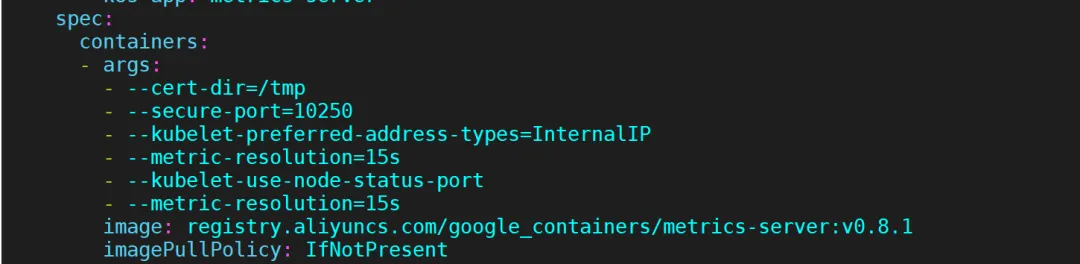
编辑YAML文件 需要修改成如下内容--其他保持不动
spec: containers: - args: - --cert-dir=/tmp - --secure-port=10250 - --kubelet-preferred-address-types=InternalIP - --metric-resolution=15s - --kubelet-use-node-status-port - --metric-resolution=15s image: registry.aliyuncs.com/google_containers/metrics-server:v0.8.1 imagePullPolicy: IfNotPresent
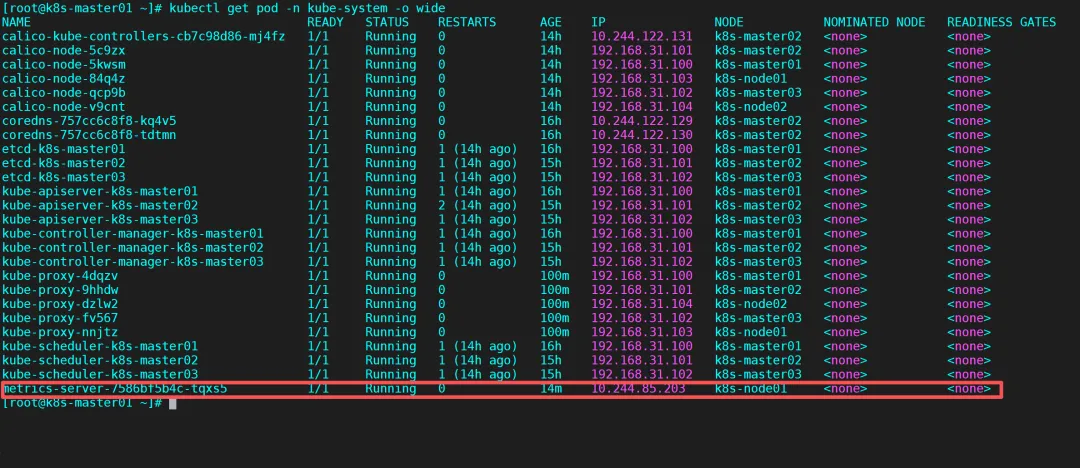
#安装kubectl apply -f components.yaml#查看PODkubectl get pod -n kube-system -o wide
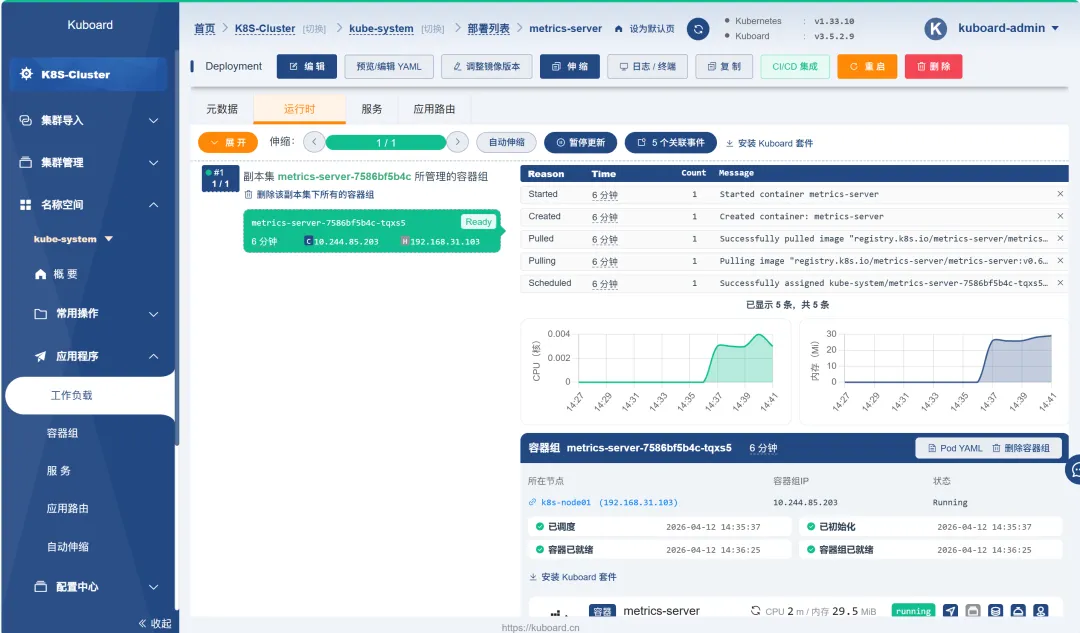
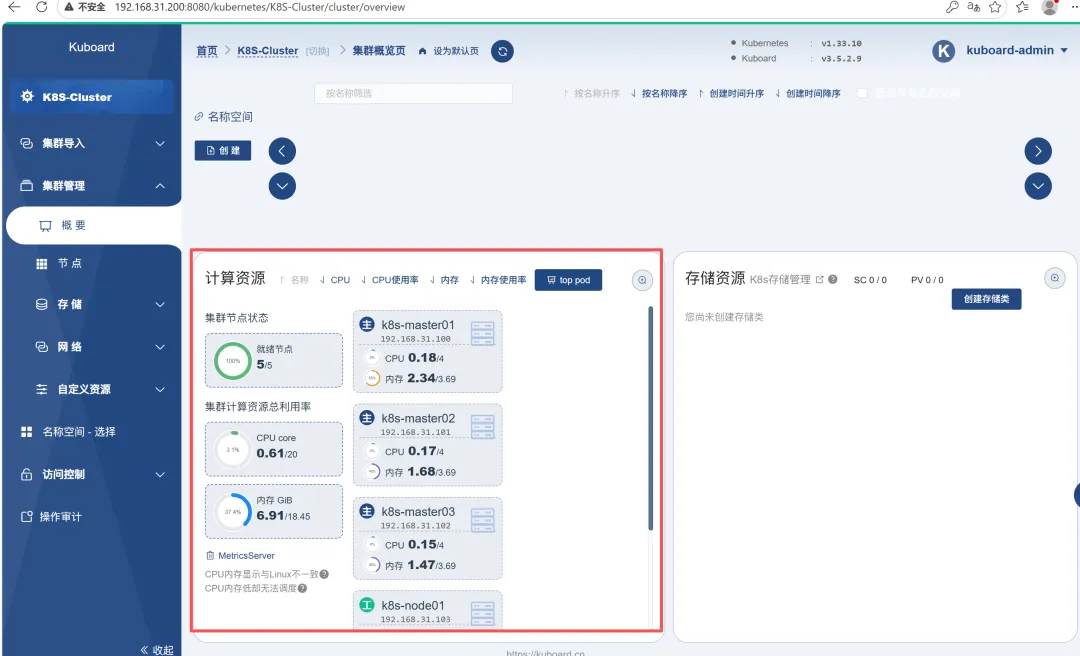
在管理界面能看到POD 运行状态
metrics-server 运行正常后 就可以看到各节点的资源使用情况了
步骤8:测试集群 部署一个Tomcat:
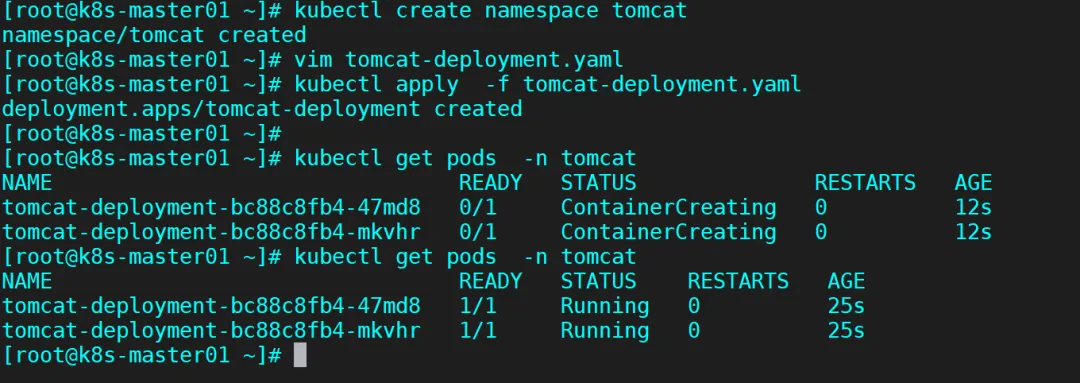
创建一个命名空间 为Tomcatkubectl create namespace tomcat
接下来创建资源控制器deployment
- vim tomcat-deployment.yaml
# 指定Kubernetes API版本,Deployment资源属于apps/v1版本apiVersion: apps/v1# 定义资源类型为Deployment,用于管理Pod的部署和更新kind: Deployment# 元数据部分,定义Deployment的名称和命名空间metadata: # Deployment的名称,在命名空间内唯一标识此部署 name: tomcat-deployment # 指定部署所在的命名空间,命名空间用于资源隔离 namespace: tomcat# Deployment的规格定义spec: # 指定需要运行的Pod副本数量,这里设置为2个实例 replicas: 2 # 标签选择器,用于识别和管理由该Deployment创建的Pod selector: matchLabels: # 匹配具有app=tomcat标签的Pod app: tomcat # Pod模板定义,用于创建新的Pod template: # Pod的元数据 metadata: # 为Pod设置标签,这些标签会被selector.matchLabels使用 labels: app: tomcat # Pod的规格定义 spec: # 容器列表,定义在Pod中运行的容器 containers: # 第一个容器定义 - name: tomcat # 使用的容器镜像,这里是华为云SWR仓库中的Tomcat 8.5版本镜像 image: swr.cn-north-4.myhuaweicloud.com/ddn-k8s/docker.io/tomcat:8.5-jdk8 # 容器端口配置 ports: # 端口定义 - name: http # 端口名称,可用于服务发现和监控 containerPort: 8090 # 容器内部暴露的端口号,Tomcat默认使用8080端口 # 添加资源请求和限制 resources: requests: memory: "512Mi" # 容器启动时请求的内存资源 cpu: "250m" # 容器启动时请求的CPU资源(250 milliCPU) limits: memory: "1024Mi" # 容器最大可使用的内存 cpu: "500m" # 容器最大可使用的CPU(500 milliCPU)
运行命令安装 Tomcatkubectl apply -f tomcat-deployment.yamlkubectl get pods -n tomcat # -n 指定命名空间,单独-A会得到全部的pod。
接下来我们再来创建service
apiVersion: v1kind: Servicemetadata: name: tomcat-service namespace: tomcatspec: selector: app: tomcat ports: - name: http targetPort: 8080 port: 8090 nodePort: 30090 type: NodePort
#查看启动的servicekubectl get service -n tomcat
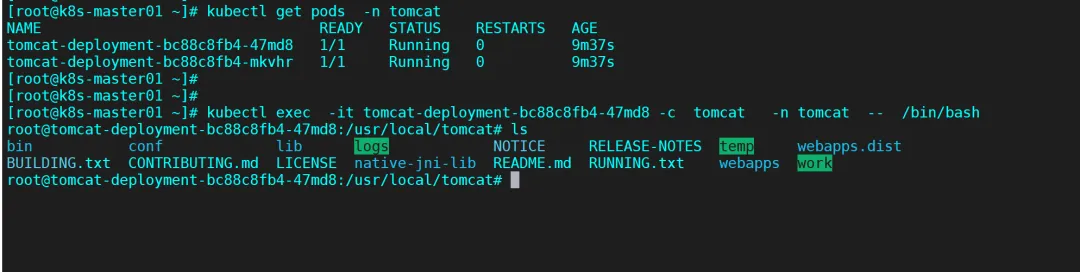
进入容器
#注意容器名称换成自己的kubectl exec -it tomcat-deployment-7f56bbf454-hfqqn -c tomcat -n tomcat -- /bin/bash
复制目录进webapps
cp -R webapps.dist/* webapps/
查看pod跑在哪个节点上


 10个月宝宝每天需要喝多少奶粉?
