Python开源网格工具 | PyPI自动化部署 | V1.1.1支持Pip install
- 2026-06-26 22:14:18
PyMeshGen 是一款开源的 Python 非结构网格生成工具,专注于为 CFD/FEA 提供易用的二维网格生成解决方案。本文将详细介绍 PyMeshGen 的多种打包方式和安装方法,帮助用户快速部署和使用。
一、引言
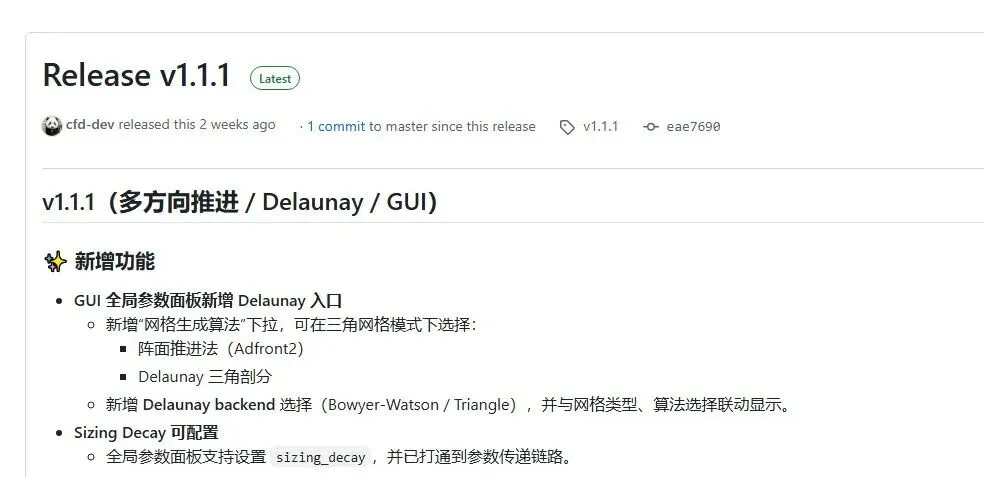
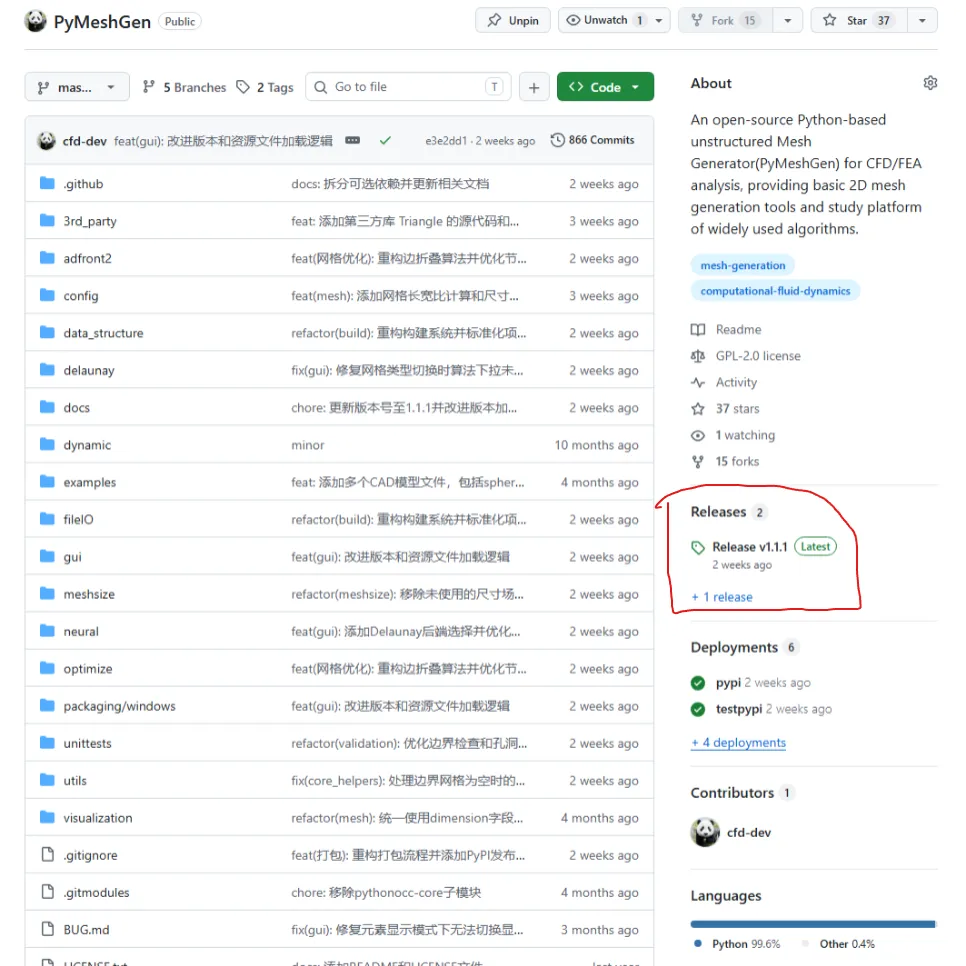
PyMeshGen 自开源以来,已收到37Star和15fork,受到了从业者和算法研究者的关注。作为一款基于 Python 的网格生成工具,PyMeshGen V1.1.1提供了多种安装和打包方式,以满足不同用户的需求:
PyPI 安装:最推荐的安装方式,一条命令即可完成 本地开发安装:适合参与项目开发的贡献者 Windows 可执行文件:无需 Python 环境的独立桌面应用 源码构建:适合需要自定义构建的高级用户
本文将逐一介绍这些打包和安装方法的原理、步骤和最佳实践。
二、PyPI 安装(推荐)
2.1 为什么选择 PyPI
PyPI(Python Package Index)是 Python 官方的软件包仓库。通过 PyPI 安装 PyMeshGen 具有以下优势:
简单快捷:一条命令完成安装和依赖管理 自动更新:随时可以通过 pip install --upgrade获取最新版本依赖自动解析:pip 自动安装所有必需的依赖包 跨平台支持:支持 Windows、Linux、macOS
2.2 核心安装
pip install pymeshgen这条命令会安装 PyMeshGen 的核心功能,包括:
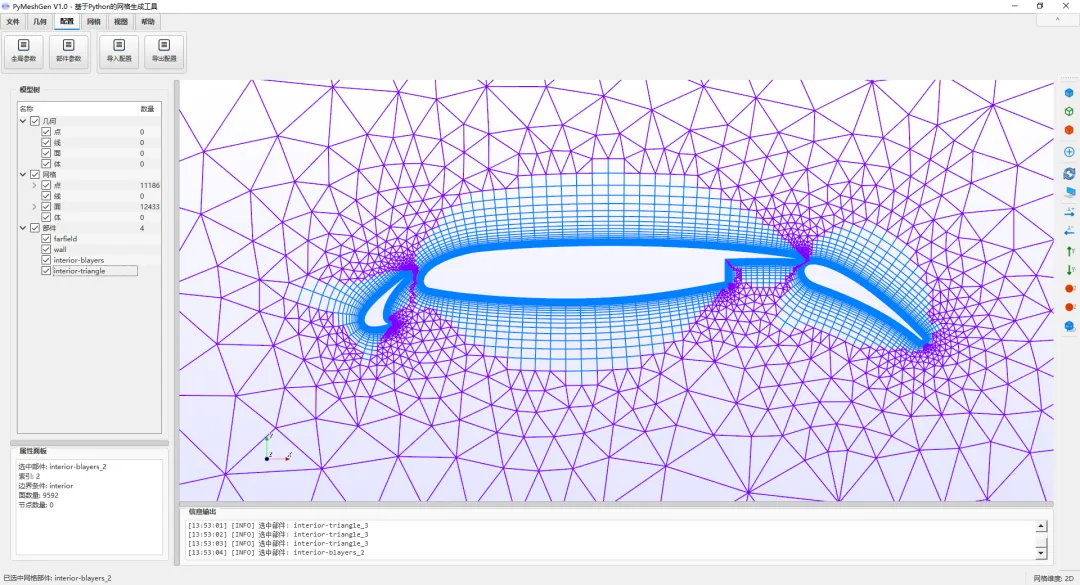
二维阵面推进法(Advancing Front)网格生成 边界层生成技术(Advancing Layer) 四叉树背景网格尺寸控制 Delaunay 三角剖分(Bowyer-Watson 和 Triangle 后端) Fluent .cas格式导入VTK 和 STL 导入导出 PyQt5 图形用户界面
2.3 可选功能安装
PyMeshGen 提供了两个可选的 extra 包,用于支持高级功能:
机器学习/神经网络平滑:
pip install "pymeshgen[ml]"安装内容包括:
torch:PyTorch 深度学习框架torch-geometric:图神经网络库stable-baselines3:强化学习框架trimesh:三维网格处理库
几何导入导出(OpenCASCADE):
pip install "pymeshgen[occ]"安装内容包括:
pythonocc-core:OpenCASCADE 的 Python 绑定,支持 STEP、IGES 等 CAD 格式
完整安装:
pip install "pymeshgen[full]"一次性安装所有可选依赖。
2.4 安装验证
安装完成后,可以通过以下命令验证:
# 检查版本pip show pymeshgen# 命令行入口pymeshgen --version# GUI 入口pymeshgen-gui2.5 快速使用
命令行模式:
pymeshgen --case".\config\30p30n.json"GUI 模式:
pymeshgen-guiPython 库调用:
from data_structure.parameters import Parametersfrom PyMeshGen import PyMeshGenparams = Parameters("FROM_CASE_JSON", r".\config\30p30n.json")mesh = PyMeshGen(params)三、本地开发安装
3.1 克隆仓库
git clone https://github.com/cfd-dev/PyMeshGen.gitcd PyMeshGen3.2 初始化子模块
PyMeshGen 依赖 meshio 作为子模块:
git submodule update --init --recursive3.3 安装依赖
核心依赖:
pip install -r requirements.txt可选依赖:
pip install -r requirements-optional.txt3.4 可编辑安装
pip install -e .-e 参数表示"editable"模式,修改源码后无需重新安装即可生效,非常适合开发调试。
3.5 运行测试
cd unittestspython run_tests.pypython run_quick_tests.py四、Python 包构建与发布
4.1 构建系统
PyMeshGen 采用现代化的 pyproject.toml 构建系统,基于 setuptools 后端:
[build-system]requires = ["setuptools>=77", "wheel"]build-backend = "setuptools.build_meta"构建配置要点:
requires-python | >=3.8 |
license | GPL-2.0-or-later |
dynamic | |
packages.find |
4.2 本地构建
# 安装构建工具python -m pip install --upgrade build twine# 构建源码包和 wheelpython -m build# 检查构建产物python -m twine check dist/*构建产物:
dist/pymeshgen-<version>.tar.gz | ||
dist/pymeshgen-<version>-py3-none-any.whl |
4.3 版本号管理
PyMeshGen 的版本号来源于项目根目录的 VERSION 文件:
1.1.1发布新版本前,需要更新此文件:
# 更新版本号echo"1.2.0" > VERSION# 提交更改git add VERSIONgit commit -m "Bump version to 1.2.0"4.4 入口点配置
pyproject.toml 中定义了三个入口点:
[project.scripts]pymeshgen = "PyMeshGen:PyMeshGen"pymeshgen-mixed = "PyMeshGen:PyMeshGen_mixed"[project.gui-scripts]pymeshgen-gui = "start_gui:main"pymeshgen:命令行网格生成入口pymeshgen-mixed:混合网格生成入口pymeshgen-gui:GUI 启动入口(Windows 下不显示控制台窗口)
4.5 包内容配置
包含的包:
[tool.setuptools.packages.find]include = [ "adfront2*", "data_structure*", "delaunay*", "fileIO*", "gui*", "meshsize*", "optimize*", "utils*", "visualization*",]排除的目录:
exclude = [ "unittests*", "backup*", "build*", "dist*", "examples*", "temp_docs*",]包数据文件:
[tool.setuptools.package-data]"*" = ["*.txt", "*.md", "*.json", "*.cas"]确保配置文件、文档和示例网格文件都被包含在分发包中。
五、GitHub Actions 自动发布
5.1 CI/CD 工作流
PyMeshGen 配置了两条 GitHub Actions 工作流:
持续集成(python-package.yml):
每次 push 或 pull request 时触发 在多个 Python 版本上测试构建 确保代码质量和构建可用性
发布到 PyPI(publish-pypi.yml):
手动触发或 GitHub Release 时触发 自动构建并发布到 TestPyPI 或 PyPI
5.2 发布流程
步骤 1:更新版本号
echo"1.1.2" > VERSIONgit add VERSIONgit commit -m "Bump version to 1.1.2"步骤 2:创建 Git 标签
git tag v1.1.2git push origin master --tags步骤 3:创建 GitHub Release
在 GitHub 仓库页面创建 Release,关联标签 v1.1.2。
步骤 4:自动发布
GitHub Actions 自动执行:
检出代码 初始化子模块 安装构建工具 构建 sdist 和 wheel 检查构建产物 发布到 PyPI
5.3 手动发布到 TestPyPI
对于测试目的,可以手动触发工作流:
进入 GitHub Actions → "Publish Python package" 选择 Run workflow选择 repository = testpypi点击运行
5.4 Trusted Publisher 配置
PyPI 发布使用 Trusted Publisher(OIDC)机制,无需手动配置 API token:
cfd-dev | |
PyMeshGen | |
publish-pypi.yml | |
testpypipypi |
六、Windows 可执行文件打包
6.1 打包概述
虽然 PyPI 是主要的分发方式,但 PyMeshGen 也提供了 Windows 可执行文件打包方案,适用于:
没有 Python 环境的用户 需要独立桌面应用的场景 企业内部部署
6.2 打包工具链
Windows 打包依赖以下工具:
打包脚本位于 packaging/windows/ 目录:
packaging/windows/├── build_app.py # 主打包脚本├── build.bat # Windows 批处理入口├── PyMeshGen.spec # PyInstaller 配置└── PyMeshGen.iss # Inno Setup 安装包配置6.3 打包步骤
方式一:使用 Python 脚本
# 仅打包可执行文件python packaging\windows\build_app.py# 完整打包(exe + ZIP + 安装包)python packaging\windows\build_app.py --all方式二:使用批处理
packaging\windows\build.bat6.4 打包产物
PyMeshGen.exe | dist/ | |
PyMeshGen-v*.zip | releases/ | |
PyMeshGen-Setup-*.exe | installer/ |
6.5 PyInstaller 配置要点
PyMeshGen.spec 文件的关键配置:
# 隐藏导入hiddenimports=['PyQt5','vtk','numpy',# ... 其他依赖]# 数据文件datas=[ ('config/', 'config/'), ('VERSION', '.'),# ... 其他资源]6.6 Inno Setup 安装包
PyMeshGen.iss 定义了安装包的:
安装路径选择 开始菜单快捷方式 桌面快捷方式 卸载程序
七、依赖管理
7.1 核心依赖
PyMeshGen 的核心依赖包括:
numpy | |
scipy | |
PyQt5 | |
vtk | |
meshio |
7.2 可选依赖
pythonocc-core | pip install pymeshgen[occ] | |
torch | pip install pymeshgen[ml] | |
torch-geometric | pip install pymeshgen[ml] | |
stable-baselines3 | pip install pymeshgen[ml] | |
trimesh | pip install pymeshgen[ml] |
7.3 pythonocc-core 安装建议
pythonocc-core 在某些平台上通过 pip 安装可能遇到困难,推荐使用 conda:
conda install -c conda-forge pythonocc-core八、常见问题与解决方案
8.1 安装问题
问题 1:pip 安装速度慢
# 使用国内镜像源pip install pymeshgen -i https://pypi.tuna.tsinghua.edu.cn/simple问题 2:依赖冲突
# 创建虚拟环境python -m venv pymeshgen_envpymeshgen_env\Scripts\activate # Windowssource pymeshgen_env/bin/activate # Linux/macOSpip install pymeshgen8.2 运行问题
问题 3:GUI 无法启动
# 检查 PyQt5 是否正确安装pip show PyQt5# 重新安装pip install --force-reinstall PyQt5问题 4:VTK 渲染问题
# 检查 VTK 版本pip show vtk# 确保 VTK 版本与 PyQt5 兼容pip install vtk==9.2.68.3 构建问题
问题 5:构建失败
# 确保子模块已初始化git submodule update --init --recursive# 清理后重新构建rm -rf dist/ build/ *.egg-infopython -m build九、版本历史
v1.1.x 系列
未来规划
支持更多网格格式导入导出 增强三维网格生成能力 优化神经网络平滑模块 提供更多预训练模型
十、总结
PyMeshGen 提供了完善的打包和安装体系:
PyPI 安装:最推荐的方式,一条命令完成 本地开发:适合贡献者和研究者 Windows 打包:适合无 Python 环境的用户 自动化发布:GitHub Actions 确保发布流程的可靠性
👇点击左下方“阅读原文”访问项目!
全文结束,感谢观看,创作不易。
😁😁
欢迎关注、留言、点赞、分享、推荐!
👇👇
【往期回顾】
随机文章
-
 10个月宝宝每天需要喝多少奶粉?
- PHP 8.4 新特性深度拆解:非对称可见性——属性“读”与“写”的权限分离艺术
- Linux系统启动盘制作工具有哪些?2026最全汇总附教程
- python最基础的课,自学两个小时
- Linux 又曝高危 0day:一条命令即可提权到 root
- linux mkdir命令分享
- 真实案例|红蓝对抗现场:Linux 远程关闭 history 命令,竟不是黑客攻击?
- 读懂linux核心哲学:万物皆文件,到底是什么神仙逻辑
- Linux文件处理三剑客(运维高手必备)
- PHP高性能Webman框架FFmpeg实现实时视频流HLS
- AI开发Python实战系列第4期 | 如何开发PPT批量转PDF工具
