环境规划
squid服务器
系统及内核:CentOS7.9 squid软件版本:squid4.15 内存:4G以上 硬盘容量:2T以上 ip地址:192.168.30.219
web服务器
安装http服务并创建测试页面 ip地址:192.168.30.118 软件版本:apache2.4.67
客户测试机:
安装浏览器 ip地址:192.168.30.116
squid安装
安装前置依赖
yum install -y gcc gcc-c++ gcc-gnat libgcc libgcc.i686 glibc-devel bison flex texinfo
编译安装
解压
cd /usr/local/squidtar -xzvf squid-4.15.tar.gz -C /usr/src/cd /usr/src/squid-4.15/
预编译
./configure \--prefix=/usr/local/squid \--sysconfdir=/etc \--enable-arp-acl \--enable-linux-netfilter \--enable-linux-tproxy \--enable-async-io=100 \--enable-err-language="Simplify_Chinese" \--enable-underscore \--enable-poll \--enable-gnuregex
选项说明: –sysconfdir=/etc #单独将配置文件修改到其他目录 –enable-arp-acl #可以在规则中设置通过客户端MAC进行管理,防止IP欺骗 –enable-linux-netfilter #使用内核过滤 –enable-linux-tproxy #支持透明代理(这个很重要,否则后面透明代理无法实现) –enable-async-io=100 #异步IO,提升存储性能 –enable-err-language=“Simplify_Chinese” #错误信息的显示语言 –enable-underscore #允许URL中有下划线 –enable-poll #使用Poll()模式,提升性能 –enable-gnuregex #使用GNU正则表达式 编译安装 make -j nproc && make install ; echo 1" instart)netstat -natp | grep squid &> /dev/nullif [ CMDfi;;stop)kill -9 `expr $(cat $PID) + 2`;;status)[ -f ? -eq 0 ]thennetstat -natp | grep squidelseecho "squid is not running"fi;;restart)0 start &> /dev/nullecho "正在启动 squid...";;reload)CMD -k parse;;*)echo "用法:$0{start|stop|status|reload|check|restart}";;esac
chmod +x /etc/init.d/squid #添加执行权限chkconfig --add squid #使用 chkconfig 管理chkconfig --level 35 squid on #设置开机启动
接着我们根据以上的前置步骤继续部署传统代理服务器
构建传统代理服务器
服务器说明
主机 IP地址 主要服务器 centos-squid 192.168.30.219 squid服务 centod-apache 192.168.30.118 httpd服务 windows10 192.168.30.116 客户机
设置配置文件
修改配置文件,在配置传统代理时,需要添加 http_access allow all 访问策略,允许 任意客户机使用代理。除此以外还要设置 reply_body_max_size 项,其他参数保持默认:
http_access allow all #允许任意客户机使用代理http_port 3128 #使用 3128 端口cache_mem 64 MB #指定缓存功能所使用的内存空间大小,便于保持访问较频繁的 WEB对象,容量最好为 4 的倍数,单位为 MB,建议设为物理内存的 1/4reply_body_max_size 10 MB #允许用户下载的最大文件大小,以字节为单位。默认设置 0 表示不进行限制maximum_object_size 4096 KB #允许保存到缓存空间的最大对象大小,以 KB 为单位,超过大小限制的文件将不被缓存,而是直接转发给用户
整理好的配置文件全文如下,直接复制即可使用(注意在ACL规则中修改自己需要放行或者禁止的网段):
#======================#基础信息#======================visible_hostname squid#======================#监听端口(传统代理)#======================http_port 3128#======================#ACL 定义#======================acl SSL_ports port 443acl Safe_ports port 80 443 21 70 210 1025-65535acl CONNECT method CONNECTacl localnet src 10.0.0.0/8acl localnet src 172.16.0.0/12acl localnet src 192.168.0.0/16#======================#访问控制(非常重要)#======================http_access deny !Safe_portshttp_access deny CONNECT !SSL_portshttp_access allow localhosthttp_access allow localnethttp_access deny all#======================#缓存设置#======================cache_mem 64 MBmaximum_object_size 4096 KBminimum_object_size 0 KBcache_dir ufs /usr/local/squid/var/cache/squid 100 16 256reply_body_max_size 10 MB#======================#刷新策略#======================refresh_pattern ^ftp: 1440 20% 10080refresh_pattern ^gopher: 1440 0% 1440refresh_pattern -i (/cgi-bin/|\?) 0 0% 0refresh_pattern . 0 20% 4320#======================#日志#======================access_log /usr/local/squid/var/logs/access.logcache_log /usr/local/squid/var/logs/cache.logpid_filename /usr/local/squid/var/run/squid.pid#======================#管理接口#======================http_access allow localhost managerhttp_access deny manager#======================#崩溃目录#======================coredump_dir /usr/local/squid/var/cache/squid
http服务器
http服务器使用我们之前搭建的lamp即可,或者在另一台机器上简单部署一个nginx或者apache也可以:
yum -y install nginxnginxps aux | grep nginx
http 服务器默认首页配置
配置 Nginx 的默认首页
vim /usr/share/nginx/html/index.htmlcat /usr/share/nginx/html/index.html<!DOCTYPE HTMLPUBLIC"-//W3C//DTD HTML 4.01 Transitional//EN"><html><head><title>Welcome to CentOS</title><metacharset="UTF-8" /></head><body><h1> test 测试 squid </h1><h2> test </h2><h3> test </h3><h4> test </h4></body></html>
测试
以下使用之前的LAMP架构做测试 http服务器IP为192.168.30.118 在edge或chrome浏览器中打开代理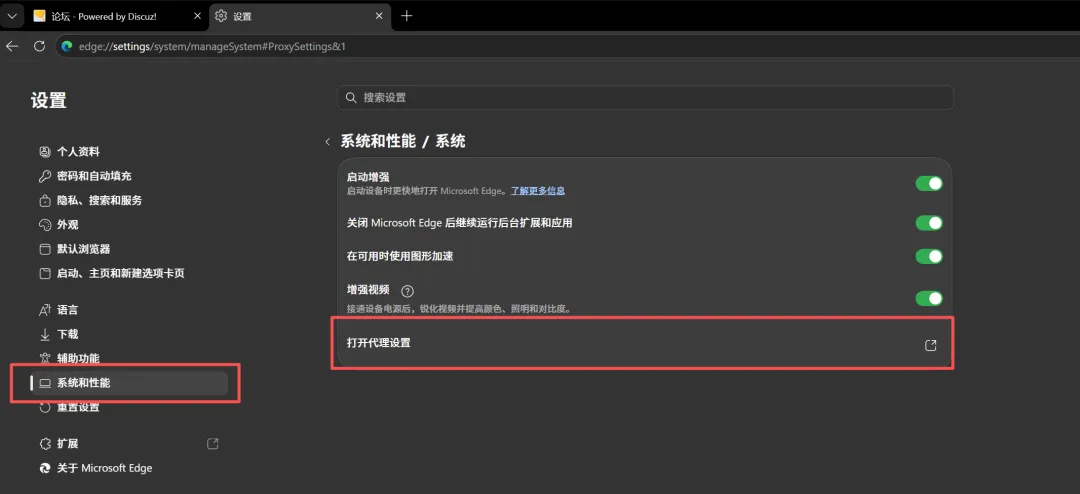
 在浏览器中访问http服务器IP
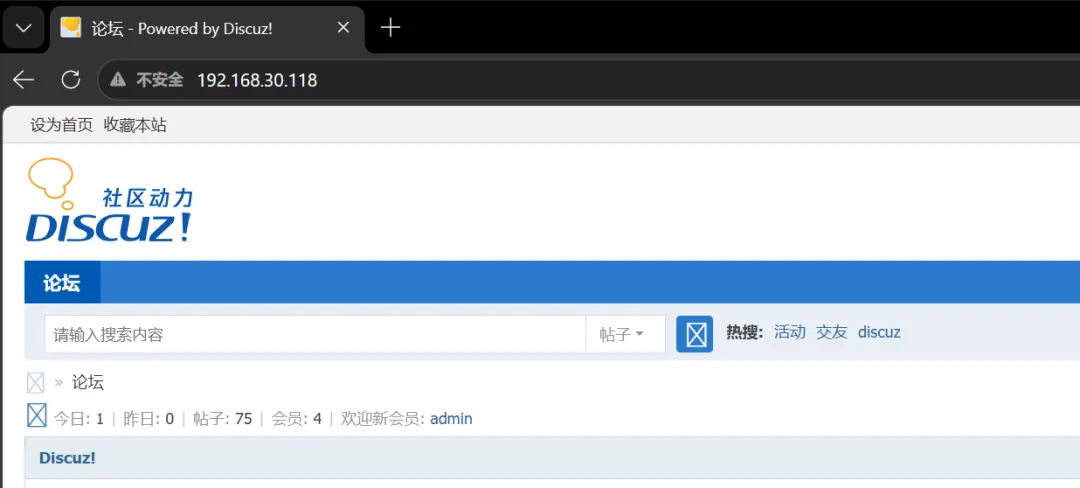
查看日志
然后查看http服务器的日志记录和squid服务器的日志记录 squid服务器日志如下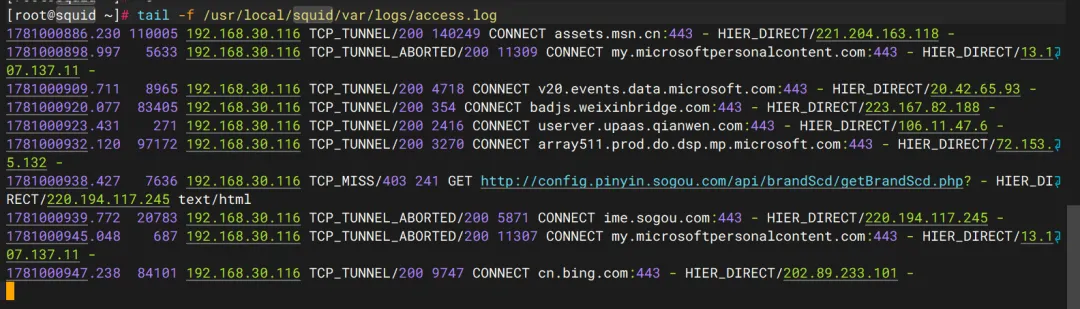 http服务器日志如下
 10个月宝宝每天需要喝多少奶粉?
