内存管理与优化:深入Python内存机制
- 2026-09-09 09:17:47
来源:网络
作者:Python进阶者
关键词:Python内存管理, 垃圾回收, 内存优化, 引用计数, 内存泄漏, 性能分析
开头引言:
大家好,我是Python进阶者。在Python的世界里,内存管理就像一位默默无闻的后台工作者——你很少直接与它打交道,但它却对你的程序性能有着至关重要的影响。今天,我们将深入Python的内存管理机制,从垃圾回收原理到内存优化技巧,帮助你理解并掌控Python的内存使用,写出更加高效、稳定的程序!
一、Python内存管理基础
1.1 内存分配机制
import sysimport osdefmemory_allocation_demo():"""演示Python内存分配"""# 查看对象内存占用 objects = [42, # 整数"Hello, World!", # 字符串 [1, 2, 3, 4, 5], # 列表 {"key": "value"}, # 字典 (1, 2, 3), # 元组 {1, 2, 3} # 集合 ]print("=== 对象内存占用分析 ===")for obj in objects: size = sys.getsizeof(obj)print(f"{type(obj).__name__:10}{str(obj):20} -> {size:4} bytes")# 查看内存块信息print(f"\n=== 内存分配信息 ===")print(f"内存页大小: {os.sysconf('SC_PAGESIZE')} bytes")# 使用id()查看对象内存地址 a = [1, 2, 3] b = [1, 2, 3]print(f"列表a地址: {id(a):#x}")print(f"列表b地址: {id(b):#x}")print(f"地址差异: {abs(id(a) - id(b))} bytes")# 运行示例memory_allocation_demo()
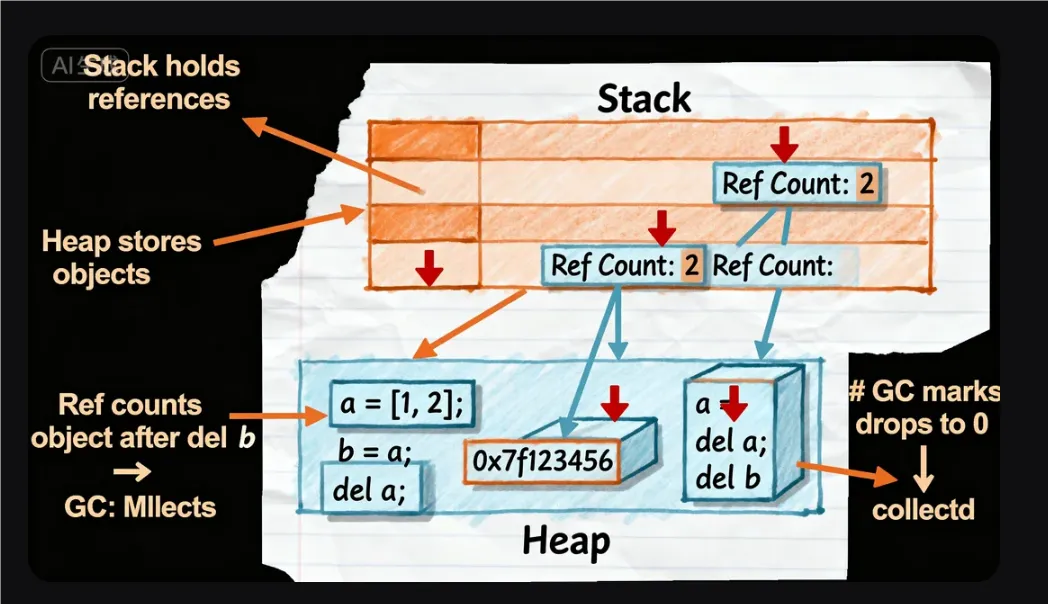
1.2 引用计数机制
import ctypesdefreference_count_demo():"""演示引用计数机制"""# 获取引用计数函数defget_ref_count(obj):return ctypes.c_long.from_address(id(obj)).value# 创建对象 my_list = [1, 2, 3]print(f"初始引用计数: {get_ref_count(my_list)}")# 增加引用 another_ref = my_listprint(f"增加引用后: {get_ref_count(my_list)}")# 函数参数传递(临时引用)defuse_list(lst):print(f"函数内引用计数: {get_ref_count(lst)}")returnlen(lst) use_list(my_list)print(f"函数返回后: {get_ref_count(my_list)}")# 减少引用del another_refprint(f"删除引用后: {get_ref_count(my_list)}")# 最后删除del my_list# 对象现在应该被回收# 运行示例reference_count_demo()
二、垃圾回收机制深度解析
2.1 引用计数 vs 垃圾回收
import gcimport weakrefdefgc_mechanism_demo():"""演示垃圾回收机制"""# 启用调试 gc.set_debug(gc.DEBUG_STATS | gc.DEBUG_COLLECTABLE)classNode:def__init__(self, name):self.name = nameself.next = Nonedef__repr__(self):returnf"Node({self.name})"def__del__(self):print(f"删除 {self.name}")# 创建循环引用print("=== 创建循环引用 ===") node1 = Node("A") node2 = Node("B") node1.next = node2 node2.next = node1 # 循环引用!print(f"节点1引用计数: {sys.getrefcount(node1)}")print(f"节点2引用计数: {sys.getrefcount(node2)}")# 删除显式引用print("\n=== 删除显式引用 ===")del node1del node2# 手动触发垃圾回收print("\n=== 触发垃圾回收 ===") collected = gc.collect()print(f"回收对象数量: {collected}")# 使用弱引用避免循环引用问题print("\n=== 使用弱引用 ===") node3 = Node("C") node4 = Node("D") node3.next = weakref.ref(node4) # 弱引用 node4.next = weakref.ref(node3) # 弱引用del node3del node4 gc.collect()# 运行示例gc_mechanism_demo()
2.2 分代垃圾回收
defgenerational_gc_demo():"""演示分代垃圾回收"""# 获取GC统计信息defprint_gc_stats(): stats = gc.get_stats()print("=== GC统计 ===")for gen, data inenumerate(stats):print(f"代{gen}: 收集{data['collections']}次, "f"存活对象{data['collected']}, "f"未回收{data['uncollectable']}")# 设置GC参数print("当前GC阈值:", gc.get_threshold()) gc.set_threshold(700, 10, 10) # 设置各代阈值print("新GC阈值:", gc.get_threshold())# 创建大量对象来触发GCprint("\n=== 创建对象触发GC ===") objects = []for i inrange(1000): obj = {"id": i, "data": "x" * 100} objects.append(obj)if i % 100 == 0: print_gc_stats()# 手动触发各代GCprint("\n=== 手动触发GC ===")for gen inrange(3): collected = gc.collect(gen)print(f"代{gen} GC回收: {collected}个对象") print_gc_stats()# 运行示例generational_gc_demo()
三、内存分析工具与技术
3.1 使用memory_profiler
# 安装: pip install memory_profilerfrom memory_profiler import profile@profiledefmemory_intensive_function():"""内存密集型函数示例"""# 创建大型数据结构 big_list = []for i inrange(10000): big_list.append({"id": i, "data": "x" * 100})# 处理数据 results = []for item in big_list: processed = process_item(item) results.append(processed)# 清理del big_listreturn resultsdefprocess_item(item):"""处理单个项目"""return {"processed_id": item["id"], "length": len(item["data"])}# 运行分析if __name__ == "__main__": memory_intensive_function()
3.2 使用tracemalloc分析内存使用
import tracemallocimport randomdeftracemalloc_demo():"""使用tracemalloc分析内存"""# 开始跟踪内存分配 tracemalloc.start()# 创建一些对象defcreate_objects(): lists = []for i inrange(100): lst = [random.random() for _ inrange(1000)] lists.append(lst)return lists# 记录快照1 snapshot1 = tracemalloc.take_snapshot()# 创建对象 objects = create_objects()# 记录快照2 snapshot2 = tracemalloc.take_snapshot()# 分析内存差异 top_stats = snapshot2.compare_to(snapshot1, 'lineno')print("=== 内存分配Top 10 ===")for stat in top_stats[:10]:print(f"{stat.traceback}: {stat.size / 1024:.1f} KB")# 按文件分组统计print("\n=== 按文件分组 ===")for stat in snapshot2.statistics('filename')[:5]:print(f"{stat.filename}: {stat.size / 1024:.1f} KB")# 停止跟踪 tracemalloc.stop()# 运行示例tracemalloc_demo()
3.3 使用objgraph可视化对象引用
# 安装: pip install objgraphimport objgraphdefobjgraph_demo():"""使用objgraph分析对象引用"""# 创建一些复杂的数据结构classTreeNode:def__init__(self, value):self.value = valueself.children = []defadd_child(self, child):self.children.append(child)# 创建树结构 root = TreeNode("root")for i inrange(5): child = TreeNode(f"child{i}") root.add_child(child)for j inrange(3): grandchild = TreeNode(f"grandchild{i}-{j}") child.add_child(grandchild)# 显示最常见类型print("=== 最常见类型 ===") objgraph.show_most_common_types(limit=10)# 显示增长最快的类型print("\n=== 增长最快的类型 ===") objgraph.show_growth(limit=5)# 生成引用图(需要graphviz)# objgraph.show_refs([root], filename='refs.png')# 查找循环引用print("\n=== 检查循环引用 ===") cycles = objgraph.find_backref_chain( root, lambda x: isinstance(x, TreeNode) )print(f"找到引用链: {len(cycles)}个节点")# 统计对象数量 count = objgraph.count('TreeNode')print(f"TreeNode实例数量: {count}")# 运行示例objgraph_demo()
四、内存优化技巧
4.1 使用slots减少内存占用
defslots_memory_demo():"""演示__slots__的内存优化效果"""classRegularClass:def__init__(self, x, y, z):self.x = xself.y = yself.z = zclassSlotsClass: __slots__ = ['x', 'y', 'z']def__init__(self, x, y, z):self.x = xself.y = yself.z = z# 创建大量对象对比内存使用 regular_objs = [RegularClass(i, i+1, i+2) for i inrange(10000)] slots_objs = [SlotsClass(i, i+1, i+2) for i inrange(10000)] regular_memory = sum(sys.getsizeof(obj) for obj in regular_objs) slots_memory = sum(sys.getsizeof(obj) for obj in slots_objs)print("=== __slots__内存优化 ===")print(f"普通对象总内存: {regular_memory / 1024:.1f} KB")print(f"Slots对象总内存: {slots_memory / 1024:.1f} KB")print(f"内存节省: {(regular_memory - slots_memory) / regular_memory * 100:.1f}%")# 单个对象内存对比 regular_obj = RegularClass(1, 2, 3) slots_obj = SlotsClass(1, 2, 3)print(f"\n单个普通对象: {sys.getsizeof(regular_obj)} bytes")print(f"单个Slots对象: {sys.getsizeof(slots_obj)} bytes")# 运行示例slots_memory_demo()
4.2 使用生成器减少内存占用
defgenerator_memory_demo():"""演示生成器的内存优势"""import tracemallocdefread_file_traditional(filename):"""传统方式:一次性读取"""withopen(filename, 'r') as f: lines = f.readlines() # 所有行加载到内存return [line.strip() for line in lines]defread_file_generator(filename):"""生成器方式:逐行读取"""withopen(filename, 'r') as f:for line in f:yield line.strip()# 创建测试文件 test_filename = "large_file.txt"withopen(test_filename, 'w') as f:for i inrange(10000): f.write(f"这是第{i}行数据,包含一些文本内容用于测试内存使用\n")# 测试内存使用 tracemalloc.start()# 传统方式 snapshot1 = tracemalloc.take_snapshot() data1 = read_file_traditional(test_filename) snapshot2 = tracemalloc.take_snapshot() traditional_memory = snapshot2.compare_to(snapshot1, 'lineno')[0].size# 生成器方式 snapshot3 = tracemalloc.take_snapshot() data2 = read_file_generator(test_filename) snapshot4 = tracemalloc.take_snapshot() generator_memory = snapshot4.compare_to(snapshot3, 'lineno')[0].size tracemalloc.stop()print("=== 生成器内存优化 ===")print(f"传统方式内存: {traditional_memory / 1024:.1f} KB")print(f"生成器方式内存: {generator_memory / 1024:.1f} KB")print(f"内存节省: {(traditional_memory - generator_memory) / traditional_memory * 100:.1f}%")# 清理import os os.remove(test_filename)# 运行示例generator_memory_demo()
4.3 使用数组和结构体优化数据存储
defarray_memory_demo():"""演示数组的内存优化"""import arrayimport numpy as np# 创建大量数值数据 data_size = 100000# 使用列表 list_data = [float(i) for i inrange(data_size)] list_memory = sys.getsizeof(list_data)# 使用array array_data = array.array('d', [float(i) for i inrange(data_size)]) array_memory = sys.getsizeof(array_data)# 使用numpy数组 numpy_data = np.arange(data_size, dtype=np.float64) numpy_memory = numpy_data.nbytes # 实际数据内存print("=== 数值数据存储优化 ===")print(f"列表内存: {list_memory / 1024:.1f} KB")print(f"数组内存: {array_memory / 1024:.1f} KB")print(f"NumPy内存: {numpy_memory / 1024:.1f} KB")# 计算内存节省比例 list_saving = (list_memory - array_memory) / list_memory * 100 numpy_saving = (list_memory - numpy_memory) / list_memory * 100print(f"数组节省: {list_saving:.1f}%")print(f"NumPy节省: {numpy_saving:.1f}%")# 性能测试import timeitdeflist_sum():returnsum(list_data)defarray_sum():returnsum(array_data)defnumpy_sum():return np.sum(numpy_data) list_time = timeit.timeit(list_sum, number=100) array_time = timeit.timeit(array_sum, number=100) numpy_time = timeit.timeit(numpy_sum, number=100)print(f"\n列表求和时间: {list_time:.3f}s")print(f"数组求和时间: {array_time:.3f}s")print(f"NumPy求和时间: {numpy_time:.3f}s")# 运行示例array_memory_demo()
五、内存泄漏检测与预防
5.1 常见内存泄漏模式
defmemory_leak_patterns():"""演示常见内存泄漏模式"""# 1. 循环引用(已由GC处理,但可能延迟)classLeakyNode:def__init__(self, name):self.name = nameself.ref = None node1 = LeakyNode("A") node2 = LeakyNode("B") node1.ref = node2 node2.ref = node1 # 循环引用# 2. 全局变量累积 global_cache = []defleaky_function():"""泄漏函数:向全局列表添加数据""" data = "x" * 1000 global_cache.append(data) # 数据永远不会被释放returnlen(global_cache)# 3. 未关闭的资源defleaky_file_handles():"""泄漏文件句柄"""for i inrange(100): f = open(f"temp_{i}.txt", "w") # 忘记关闭! f.write("data")# 应该使用 with open() 或者手动关闭# 4. 缓存无限增长from functools import lru_cache @lru_cache(maxsize=None) # 无大小限制的缓存!defunlimited_cache(n):return n * n# 测试泄漏print("创建潜在内存泄漏...")for i inrange(100): leaky_function() unlimited_cache(i)print("完成。检查内存使用情况。")# 运行示例memory_leak_patterns()
5.2 内存泄漏检测工具
defdetect_memory_leaks():"""内存泄漏检测示例"""import gcfrom collections import defaultdictclassLeakDetector:def__init__(self):self.snapshot = Noneself.object_counts = defaultdict(int)deftake_snapshot(self):"""获取当前对象快照"""self.snapshot = {}for obj in gc.get_objects(): obj_type = type(obj).__name__self.snapshot[id(obj)] = obj_typeself.object_counts[obj_type] += 1deffind_leaks(self):"""查找可能的内存泄漏"""print("=== 对象类型统计 ===")for obj_type, count insorted(self.object_counts.items(), key=lambda x: x[1], reverse=True)[:10]:print(f"{obj_type}: {count}")# 查找增长最快的对象类型 current_counts = defaultdict(int)for obj in gc.get_objects(): obj_type = type(obj).__name__ current_counts[obj_type] += 1print("\n=== 对象增长情况 ===")for obj_type in current_counts: growth = current_counts[obj_type] - self.object_counts.get(obj_type, 0)if growth > 10: # 显著增长print(f"{obj_type} 增长了 {growth} 个实例")# 使用泄漏检测器 detector = LeakDetector() detector.take_snapshot()# 创建一些对象 leaked_objects = []for i inrange(1000): leaked_objects.append({"id": i, "data": "x" * 100})# 检查泄漏 detector.find_leaks()# 清理(避免实际泄漏)del leaked_objects gc.collect()# 运行示例detect_memory_leaks()
六、高级内存管理技巧
6.1 使用内存视图和缓冲区
defmemory_view_demo():"""演示内存视图的使用"""# 创建大型数组import array large_array = array.array('d', [i * 0.1for i inrange(1000000)])# 创建内存视图(零拷贝) memory_view = memoryview(large_array)print("=== 内存视图演示 ===")print(f"数组大小: {sys.getsizeof(large_array) / 1024 / 1024:.2f} MB")print(f"内存视图大小: {sys.getsizeof(memory_view)} bytes") # 很小!# 切片操作(零拷贝) slice_view = memory_view[10000:20000]print(f"切片视图大小: {sys.getsizeof(slice_view)} bytes")print(f"切片数据长度: {len(slice_view)}")# 修改数据(原始数组也会被修改) slice_view[0] = 999.9print(f"原始数组第一个元素: {large_array[10000]}")# 性能对比import timeitdefdirect_access():returnsum(large_array)defview_access():returnsum(memory_view) direct_time = timeit.timeit(direct_access, number=10) view_time = timeit.timeit(view_access, number=10)print(f"\n直接访问时间: {direct_time:.3f}s")print(f"视图访问时间: {view_time:.3f}s")# 运行示例memory_view_demo()
6.2 自定义内存分配器
defcustom_allocator_demo():"""演示自定义内存分配策略"""from functools import lru_cacheimport weakrefclassObjectPool:"""对象池:重用对象减少内存分配"""def__init__(self, max_size=1000):self.max_size = max_sizeself._pool = []self._active = weakref.WeakSet()defacquire(self, *args, **kwargs):"""获取对象"""ifself._pool: obj = self._pool.pop() obj.__init__(*args, **kwargs) # 重新初始化else: obj = self._create_object(*args, **kwargs)self._active.add(obj)return objdefrelease(self, obj):"""释放对象回池"""iflen(self._pool) < self.max_size:self._pool.append(obj)self._active.discard(obj)def_create_object(self, *args, **kwargs):"""创建新对象(子类重写)"""returnobject()defget_stats(self):return {'pool_size': len(self._pool),'active_count': len(self._active) }# 使用对象池classExpensiveObject:def__init__(self, value=0):self.value = valueself.data = [0] * 1000# 占用大量内存defreset(self):self.value = 0self.data = [0] * 1000classExpensiveObjectPool(ObjectPool):def_create_object(self, value=0):return ExpensiveObject(value)# 测试对象池 pool = ExpensiveObjectPool(max_size=5)print("=== 对象池性能测试 ===")# 不使用对象池defwithout_pool(): objects = []for i inrange(100): obj = ExpensiveObject(i) objects.append(obj)return objects# 使用对象池defwith_pool(): objects = []for i inrange(100): obj = pool.acquire(i) objects.append(obj)# 模拟使用后释放for obj in objects: pool.release(obj)return objects# 内存使用对比 tracemalloc.start() snapshot1 = tracemalloc.take_snapshot() result1 = without_pool() snapshot2 = tracemalloc.take_snapshot() snapshot3 = tracemalloc.take_snapshot() result2 = with_pool() snapshot4 = tracemalloc.take_snapshot() tracemalloc.stop() without_memory = snapshot2.compare_to(snapshot1, 'lineno')[0].size with_memory = snapshot4.compare_to(snapshot3, 'lineno')[0].sizeprint(f"无对象池内存: {without_memory / 1024:.1f} KB")print(f"使用对象池内存: {with_memory / 1024:.1f} KB")print(f"内存节省: {(without_memory - with_memory) / without_memory * 100:.1f}%")print(f"对象池状态: {pool.get_stats()}")# 运行示例custom_allocator_demo()
七、实际应用案例
7.1 大数据处理内存优化
defbig_data_processing():"""大数据处理的内存优化示例"""import pandas as pdimport numpy as np# 生成测试数据print("生成测试数据...") data_size = 1000000 data = {'id': range(data_size),'value1': np.random.randn(data_size),'value2': np.random.randint(0, 100, data_size),'category': np.random.choice(['A', 'B', 'C', 'D'], data_size) }# 创建DataFrame df = pd.DataFrame(data)print(f"原始DataFrame内存: {df.memory_usage(deep=True).sum() / 1024 / 1024:.2f} MB")# 内存优化技巧print("\n=== 内存优化技巧 ===")# 1. 使用合适的数据类型 df['id'] = df['id'].astype('int32') df['value2'] = df['value2'].astype('int8') df['category'] = df['category'].astype('category')print(f"优化后内存: {df.memory_usage(deep=True).sum() / 1024 / 1024:.2f} MB")# 2. 使用分块处理defprocess_in_chunks(df, chunk_size=10000):"""分块处理大数据""" results = []for start inrange(0, len(df), chunk_size): chunk = df.iloc[start:start + chunk_size]# 处理分块 chunk_result = chunk.groupby('category')['value1'].mean() results.append(chunk_result)# 及时释放内存del chunkreturn pd.concat(results)# 3. 使用迭代器defprocess_with_iterator(df):"""使用迭代器处理"""for index, row in df.iterrows():if index % 10000 == 0:# 处理逻辑passreturnTrue# 性能测试import time start = time.time() result = process_in_chunks(df) chunk_time = time.time() - startprint(f"分块处理时间: {chunk_time:.2f}s")print(f"处理结果: {result}")# 运行示例big_data_processing()
7.2 Web应用内存管理
defweb_app_memory_management():"""Web应用内存管理示例"""from flask import Flask, request, jsonifyimport threadingimport time app = Flask(__name__)# 全局缓存(需要谨慎管理) request_cache = {} cache_lock = threading.Lock() @app.route('/api/data')defget_data():"""获取数据接口""" key = request.args.get('key')# 检查缓存with cache_lock:if key in request_cache: cached_data, timestamp = request_cache[key]# 检查缓存过期(30秒)if time.time() - timestamp < 30:return jsonify({'data': cached_data, 'cached': True})# 模拟数据库查询 data = query_database(key)# 更新缓存with cache_lock: request_cache[key] = (data, time.time())# 缓存清理(防止无限增长)iflen(request_cache) > 1000:# LRU缓存清理 oldest_key = min(request_cache.items(), key=lambda x: x[1][1])[0]del request_cache[oldest_key]return jsonify({'data': data, 'cached': False})defquery_database(key):"""模拟数据库查询""" time.sleep(0.1) # 模拟查询延迟returnf"数据_{key}"# 内存监控线程defmemory_monitor():"""内存监控线程"""whileTrue: memory_usage = get_memory_usage()if memory_usage > 100 * 1024 * 1024: # 100MB阈值print(f"警告:内存使用过高: {memory_usage / 1024 / 1024:.1f} MB")# 清理缓存with cache_lock: request_cache.clear() time.sleep(60) # 每分钟检查一次defget_memory_usage():"""获取当前进程内存使用"""import psutil process = psutil.Process()return process.memory_info().rss# 启动监控线程 monitor_thread = threading.Thread(target=memory_monitor, daemon=True) monitor_thread.start()print("Web应用启动(内存监控已启用)...")# 实际部署时运行: app.run()# 模拟运行web_app_memory_management()
八、内存优化检查清单
8.1 开发阶段检查项
✅ 是否使用合适的数据结构?
✅ 是否有不必要的对象创建?
✅ 是否及时释放大对象?
✅ 是否避免循环引用?
✅ 是否使用生成器处理大数据?
8.2 生产环境检查项
✅ 是否有内存泄漏监控?
✅ 是否设置内存使用上限?
✅ 是否有缓存清理策略?
✅ 是否记录内存使用日志?
✅ 是否有内存溢出处理机制?
九、总结:内存管理最佳实践
场景 | 推荐方案 | 效果 |
|---|---|---|
大量小对象 | slots | 减少内存开销 |
数值计算 | NumPy/数组 | 高效存储计算 |
大数据处理 | 生成器/分块 | 控制内存使用 |
缓存管理 | LRU缓存/弱引用 | 防止无限增长 |
资源管理 | 上下文管理器 | 确保及时释放 |
黄金法则:
🟢 测量:先分析再优化
🟡 选择:合适的数据结构
🔴 监控:持续关注内存使用

长按或扫描下方二维码,免费获取 Python公开课和大佬打包整理的几百G的学习资料,内容包含但不限于Python电子书、教程、项目接单、源码等等
▲扫描二维码-免费领取

推荐阅读
点击 阅读原文了解更多
随机文章
-
 10个月宝宝每天需要喝多少奶粉?
- AI-Python机器学习与深度学习:CNN/Transformer/扩散模型、SHAP可解释及Hermes智能体自动化
- 【Linux RHEL 7】Linux RHEL 7超高速下载Linux实体设计安装教程指南
- 一个破简历模板卖299?我写了50行Python,现在躺着收钱
- 【Linux Deepin 15.7】Linux Deepin 15.7超高速下载Linux实体设计安装教程指南
- 【python3.7.0setup】python3.7.0setup详细激活版安装教程,新手也能跟着装上
- 80个Python数据分析常用库,入门必备
- 自学Python的八个宝藏APP,建议收藏
- 30天学会Python!这个GitHub 68k+ Star的开源项目,让你从零基础到实战高手
- Linux嵌入式USB转以太网网口适配流程|绿联CH397A网卡适配+踩坑排查实录
- Linux常用命令总结,建议收藏!