Python项目90:人物的社交网络分析示例(NetworkX+Matplotlib)
- 2026-08-26 02:57:40


Python,速成心法
敲代码,查资料,问Ai
练习,探索,总结,优化

★★★★★博文创作不易,我的博文不需要打赏,也不需要知识付费,可以白嫖学习编程小技巧。使用代码的过程中,如有疑问的地方,欢迎大家指正留言交流。喜欢的老铁可以多多点赞+收藏分享+置顶,小红牛在此表示感谢。★★★★★
------★Python练手项目源码★------
Python项目89:NetworkX最短路径规划(城市交通)
Python项目88:文件备份与压缩系统2.0(tkinter+shutil+zipfile)
Python项目86:增强版画板2.0(tk.Canvas)
Python项目81:Excel工作表批量重命名工具1.0(tkinter+openpyxl)
Python项目78:学生成绩分析系统(Tkinter+SQLite3)
Python项目77:模拟炒股训练系统3.0(Mplfinance+tkinter)
Python项目76:员工排班表系统1.0(tkinter+sqlite3+tkcalendar)
Python项目74:多线程数据可视化工具2.0(tkinter+matplotlib+mplcursors)
Python项目73:自动化文件备份系统1.0(tkinter)
Python项目源码71:药品管理系统1.0(tkinter+sqlite3)
Python项目源码69:Excel数据筛选器1.0(tkinter+sqlite3+pandas)
Python项目源码63:病历管理系统1.0(tkinter+sqlite3+matplotlib)
Python源码62:酒店住房管理系统1.0(tkinter+sqlite3)
Python项目源码57:数据格式转换工具1.0(csv+json+excel+sqlite3)
Python项目源码56:食堂饭卡管理系统1.0(tkinter+splite3)
Python项目源码54:员工信息管理系统2.0(tkinter+sqlite3)
Python项目源码52:模拟银行卡系统1.0(账户管理、存款、取款、转账和交易记录查询)
Python项目源码50:理发店会员管理系统1.0(tkinter+sqlite3)
Python项目源码48:正则表达式调试工具3.0(tkinter+re+requests)
Python项目源码44:图书管理系统1.0(tkinter+sqlite3)
Python项目源码42:仓库商品管理系统1.0(tkinter+sqlite3+Excel)
Python项目源码40:字符串处理工具(tkinter+入门练习)
Python项目源码39:学生积分管理系统1.0(命令行界面+Json)
Python项目源码35:音乐播放器2.0(Tkinter+mutagen)
Python项目源码33:待办事项列表应用2.0(命令行界面+Json+类)
Python项目32:订单销售额管理系统1.0(Tkinter+CSV)
Python项目源码29:学生缴费管理系统(Tkinter+CSV)
Python项目28:设计日志管理系统2.0(Tkinter+Json)
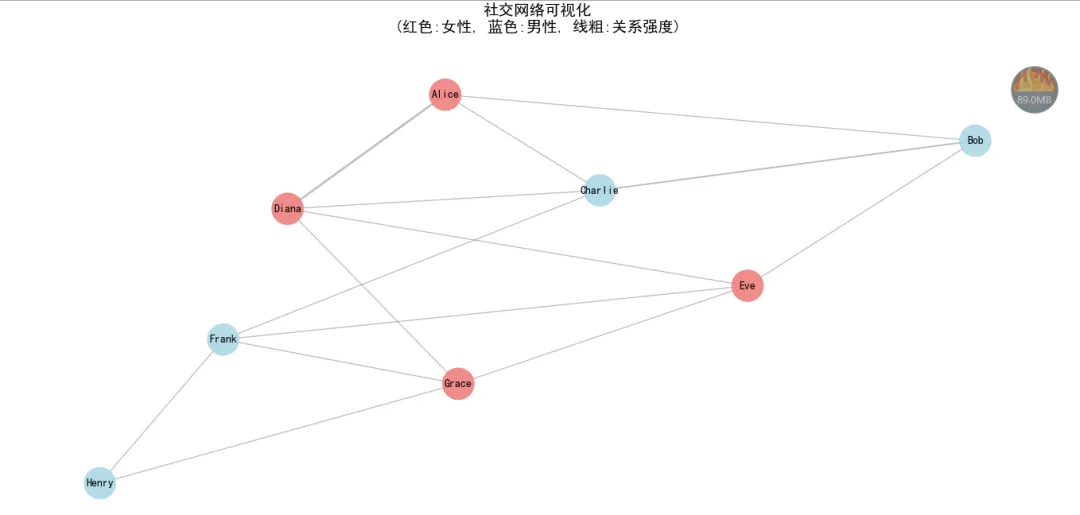
↓ 完整源码如下 ↓
# -*- coding: utf-8 -*-# @Author : 小红牛# 微信公众号:wdPythonimport networkx as nximport matplotlib.pyplot as pltfrom matplotlib.colors import ListedColormapimport numpy as np# 设置中文字体,解决中文显示问题plt.rcParams['font.sans-serif'] = ['SimHei', 'Microsoft YaHei', 'DejaVu Sans']plt.rcParams['axes.unicode_minus'] = False# 创建社交网络图G = nx.Graph()# 添加节点(用户)users = [{"id": 1, "name": "Alice", "age": 25, "gender": "F"},{"id": 2, "name": "Bob", "age": 30, "gender": "M"},{"id": 3, "name": "Charlie", "age": 35, "gender": "M"},{"id": 4, "name": "Diana", "age": 28, "gender": "F"},{"id": 5, "name": "Eve", "age": 32, "gender": "F"},{"id": 6, "name": "Frank", "age": 40, "gender": "M"},{"id": 7, "name": "Grace", "age": 27, "gender": "F"},{"id": 8, "name": "Henry", "age": 45, "gender": "M"}]# 添加带属性的节点for user in users:G.add_node(user["id"], **user)# 添加边(好友关系)friendships = [(1, 2), (1, 3), (1, 4), (2, 3), (2, 5),(3, 4), (3, 6), (4, 5), (4, 7), (5, 6),(5, 7), (6, 7), (6, 8), (7, 8),# 加强某些关系(权重)(1, 4, {"weight": 2.0}), # Alice和Diana更亲密(2, 3, {"weight": 1.5}), # Bob和Charlie更亲密]for edge in friendships:if len(edge) == 2:G.add_edge(edge[0], edge[1], weight=1.0)else:G.add_edge(edge[0], edge[1], **edge[2])def analyze_social_network(G):"""分析社交网络"""print("=== 社交网络分析 ===")# 基本统计print(f"1. 网络规模:")print(f" 节点数: {G.number_of_nodes()}")print(f" 边数: {G.number_of_edges()}")print(f" 网络密度: {nx.density(G):.3f}")# 度中心性print(f"\n2. 度中心性(好友数最多的用户):")degrees = dict(G.degree())for node_id, degree in sorted(degrees.items(), key=lambda x: x[1], reverse=True)[:3]:name = G.nodes[node_id]["name"]print(f" {name} (ID:{node_id}): {degree} 个好友")# 紧密中心性print(f"\n3. 紧密中心性(信息传递最快的用户):")closeness = nx.closeness_centrality(G)for node_id, score in sorted(closeness.items(), key=lambda x: x[1], reverse=True)[:3]:name = G.nodes[node_id]["name"]print(f" {name}: {score:.3f}")# 中介中心性print(f"\n4. 中介中心性(关键枢纽用户):")betweenness = nx.betweenness_centrality(G)for node_id, score in sorted(betweenness.items(), key=lambda x: x[1], reverse=True)[:3]:name = G.nodes[node_id]["name"]print(f" {name}: {score:.3f}")# 社区检测print(f"\n5. 社区检测(使用Louvain算法):")try:import community as community_louvainpartition = community_louvain.best_partition(G)communities = {}for node, comm_id in partition.items():communities.setdefault(comm_id, []).append(G.nodes[node]["name"])for comm_id, members in communities.items():print(f" 社区 {comm_id}: {', '.join(members)}")except ImportError:print(" 请安装python-louvain包: pip install python-louvain")# 查找影响力大的用户(PageRank)print(f"\n6. PageRank(用户影响力排名):")pagerank = nx.pagerank(G, weight='weight')for node_id, score in sorted(pagerank.items(), key=lambda x: x[1], reverse=True):name = G.nodes[node_id]["name"]print(f" {name}: {score:.4f}")# 查找关键路径print(f"\n7. 网络中的关键路径:")all_pairs_shortest = dict(nx.all_pairs_shortest_path_length(G))max_distance = 0critical_pair = Nonefor source in G.nodes():for target in G.nodes():if source < target:distance = all_pairs_shortest[source][target]if distance > max_distance:max_distance = distancecritical_pair = (source, target)if critical_pair:name1 = G.nodes[critical_pair[0]]["name"]name2 = G.nodes[critical_pair[1]]["name"]print(f" 最长路径: {name1} ↔ {name2} (距离: {max_distance})")# 查找三角形关系print(f"\n8. 三角形关系(共同好友圈):")triangles = nx.triangles(G)for node_id, count in sorted(triangles.items(), key=lambda x: x[1], reverse=True):if count > 0:name = G.nodes[node_id]["name"]print(f" {name} 参与了 {count} 个三角形关系")def visualize_network(G):"""可视化网络"""plt.figure(figsize=(12, 8))# 使用Spring布局pos = nx.spring_layout(G, k=1, iterations=50, seed=42)# 按性别设置节点颜色node_colors = []for node in G.nodes():gender = G.nodes[node]["gender"]node_colors.append('lightcoral' if gender == 'F' else 'lightblue')# 按权重设置边宽度edge_weights = [G[u][v].get('weight', 1.0) for u, v in G.edges()]# 绘制网络nx.draw_networkx_nodes(G, pos, node_size=800,node_color=node_colors, alpha=0.9)nx.draw_networkx_edges(G, pos, width=edge_weights,alpha=0.5, edge_color='gray')nx.draw_networkx_labels(G, pos,labels={n: G.nodes[n]["name"] for n in G.nodes()},font_size=10, font_weight='bold')# 添加标题plt.title("社交网络可视化\n(红色:女性, 蓝色:男性, 线粗:关系强度)",fontsize=14, pad=20)plt.axis('off')plt.tight_layout()# 保存图片plt.savefig('social_network.png', dpi=150, bbox_inches='tight')plt.show()# 执行分析analyze_social_network(G)visualize_network(G)
完毕!!感谢您的收看
------★★历史博文集合★★------