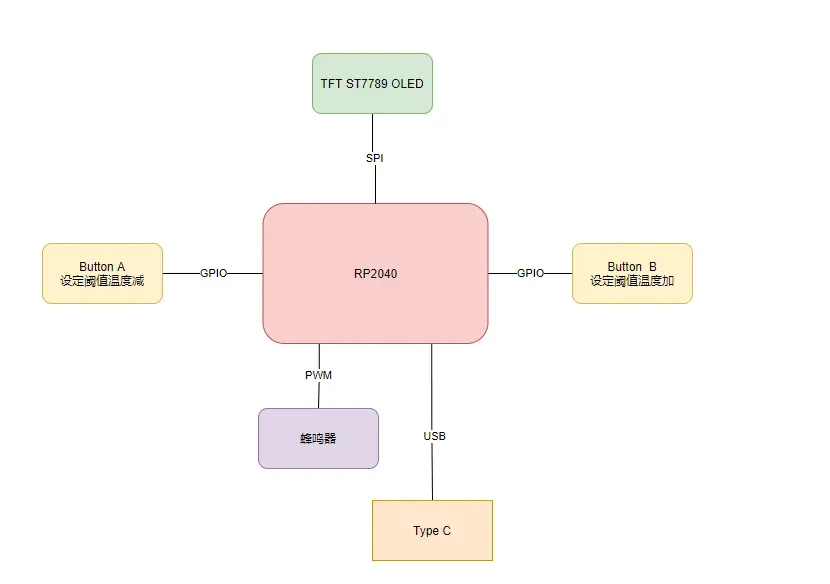
温度计早已不再只是简单的数值显示。在本项目中,我们基于 RP2040 嵌入式系统学习平台,通过 MicroPython 编程,结合 ST7789 SPI 彩屏、按键、蜂鸣器,制作了一个具备图形化界面和超温报警功能的“智能温度计”。当温度超过设定阈值时,蜂鸣器会鸣响并在屏幕上实时以红色提示,低于阈值则恢复绿色显示,直观而生动。这个项目不仅让你掌握 按键去抖与事件回调、ADC温度采集、PWM 蜂鸣器驱动、ST7789图形界面绘制等关键技能,还能锻炼完整的嵌入式系统设计思路。1)按键A\B设置报警温度增加 、减少;
2)ST7789 SPI显示屏进行温度显示,界面交互;
3)蜂鸣器,通过PWM进行驱动报警。
使用micropython 编程环境,通过ST7789 自绘制界面,然后通过RP2040 ADC读取内部温度,并实时显示。
按键驱动调用了笛子老师的基础库。
import timefrom machine import Pinclass button: def __init__(self, pin, callback=None, trigger=Pin.IRQ_RISING, min_ago=200): #print("button init") self.callback = callback self.min_ago = min_ago self._next_call = time.ticks_add(time.ticks_ms(), self.min_ago) self.pin = Pin(pin, Pin.IN, Pin.PULL_UP) self.pin.irq(trigger=trigger, handler=self.debounce_handler) self._is_pressed = False def call_callback(self, pin): #print("call_callback") self._is_pressed = True if self.callback is not None: self.callback(pin) def debounce_handler(self, pin): #print("debounce") if time.ticks_diff(time.ticks_ms(), self._next_call) > 0: self._next_call = time.ticks_add(time.ticks_ms(), self.min_ago) self.call_callback(pin) def value(self): p = self._is_pressed self._is_pressed = False return p
主要实现按键的去抖和事件回调:
pin 为gpio pin 定义;
callback为回调函数;
trigger 为触发的边沿 默认为上升沿;
min_ago 为消抖的时间设定;
## 设置阈值set_alarm_temp = 30def BtnACallback(pin): #print("press up") global set_alarm_temp global TEMP_MAX if (set_alarm_temp+1)>TEMP_MAX: set_alarm_temp = TEMP_MAX else: set_alarm_temp +=1 #ber.play()def BtnBCallback(pin): global set_alarm_temp global TEMP_MIN #print("press down") if (set_alarm_temp -1)<TEMP_MIN: set_alarm_temp = 0 else: set_alarm_temp -=1 #ber.stop()BtnUp = button.button(6,BtnACallback,machine.Pin.IRQ_RISING)BtDown = button.button(5,BtnBCallback,machine.Pin.IRQ_RISING)
实例化BtUp BtDown,分别对应硬件的 B A按键button,使用上升沿触发;
当回调函数执行时,对set_alarm_temp (温度阈值进行自加或者自减,并进行边界参数防护);
主循环时,通过采集的芯片内部的温度与set_alarm_temp 进行比较,然后进行相应的操作(报警、正常显示...)
界面显示参考了 breakout_colourlcd240x240 源代码,自己实现了 圆弧的绘制及填充圆弧的实现。
drawCirc_fill 实现绘制实心圆,tft 为实例化st7789的驱动,x,y对应坐标,r为圆的半径,pen为设置的颜色。
drawCirc 实现的是圆弧绘制,这里参数与drawCirc_fill 类似,只是后面的shape_type 不同,shape_type采用的bitmap形式,8bit对应 4个象限(0,45) (45,90) (90,135)(135,180) (180,225) (225,270) (270,315) (315,360) 8个弧形,方便进行后续的温度计顶端及底端的绘制。
def drawCirc_fill(tft,x,y,r,pen): ox =r oy =0 err = -r while ox>=oy: last_oy = oy err +=oy oy+=1 err+=oy tft.hline(x-ox,y+last_oy,ox*2+1,pen) ##3 if last_oy != 0: tft.hline(x-ox,y-last_oy,ox*2+1,pen)##2 if err>=0 and ox!=last_oy: tft.hline(x-last_oy,y+ox,last_oy*2+1,pen)##4 if ox!=0: tft.hline(x-last_oy,y-ox,last_oy*2+1,pen)##1 err -=ox ox -=1 err -=ox#draw1_8 = 1#draw2_8 = 2#draw3_8 = 4#draw4_8 = 8#draw5_8 = 16#draw6_8 = 32#draw7_8 = 64#draw8_8 = 128def drawCirc(tft,x,y,r,color,shape_type=0): x_i =0 y_i = r p = 1-r shape_bin = bin(shape_type) while x_i<y_i: x_i +=1 if p<0: p += 2*x_i+1 else: y_i -=1 p +=2*(x_i-y_i)+1 if shape_type&0x1: tft.pixel(x+y_i,y-x_i,color) if (shape_type>>1)&0x1: tft.pixel(x+x_i,y-y_i,color) if (shape_type>>2)&0x1: tft.pixel(x-x_i,y-y_i,color) if (shape_type>>3)&0x1: tft.pixel(x-y_i,y-x_i,color) if (shape_type>>4)&0x1: tft.pixel(x-y_i,y+x_i,color) if (shape_type>>5)&0x1: tft.pixel(x-x_i,y+y_i,color) if (shape_type>>6)&0x1: tft.pixel(x+x_i,y+y_i,color) if (shape_type>>7)&0x1: tft.pixel(x+y_i,y+x_i,color)
屏幕初始化如下,使用四线spi 驱动。
st7789_res = 0st7789_dc = 1disp_width = 240disp_height = 240spi_sck=machine.Pin(2)spi_tx=machine.Pin(3)spi0=machine.SPI(0,baudrate=4000000, phase=1, polarity=1, sck=spi_sck, mosi=spi_tx)display = st7789.ST7789(spi0, disp_width, disp_width, reset=machine.Pin(st7789_res, machine.Pin.OUT), dc=machine.Pin(st7789_dc, machine.Pin.OUT), xstart=0, ystart=0, rotation=0)
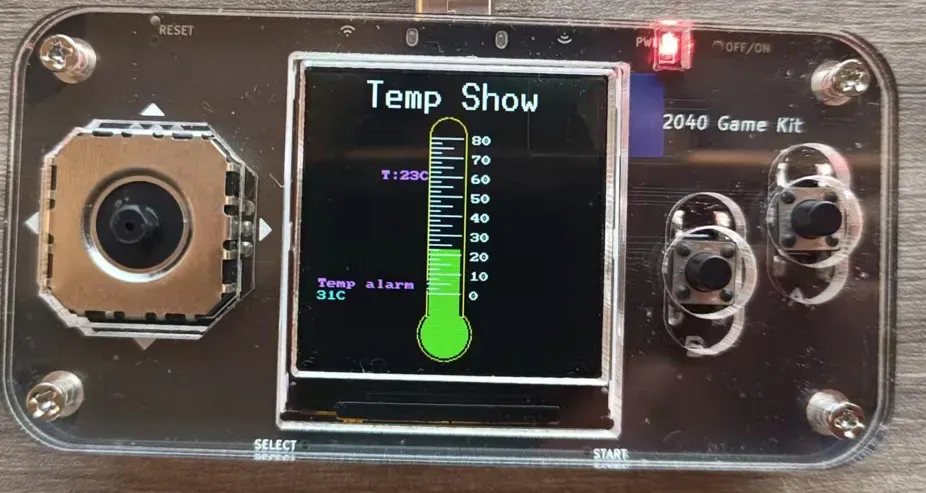
有了上面的函数,然后结合绘制线、长方形、长方形填充实现最终界面如下:
蜂鸣器封装了一个库,实现如下:
主要实现PWM的频率、占空比设置,实际使用中只进行播放和停止。
from machine import Pin,PWMfrom time import sleepclass bzer(): def __init__(self,pin,freq,duty): self.pin = pin self.freq = freq self.pwm = PWM(Pin(pin)) self.pwm.freq(freq) self.pwm.duty_u16(0) self.duty =duty self.play_flag = False def stop(self): self.pwm.duty_u16(0) self.play_flag = False def play(self): self.pwm.duty_u16(self.duty) self.play_flag = True def inv(self): if self.play_flag: stop() else: play() def setDuty(self,duty): self.duty = duty def SetFreq(self,freq): self.freq = freq
实时更新当前温度,并进行阈值温度和当前温度判定,当当前温度小于阈值温度时,如果蜂鸣器在播放则停止播放,使界面变为绿色。当当前温度大于阈值温度时,使蜂鸣器播放,并使界面变为红色。
while True: display.text(font1,"{:.0f}C".format(set_alarm_temp),10,180,st7789.CYAN) reading = sensor_temp.read_u16() * conversion_factor temperature = 27 - (reading - 0.706)/0.001721 if set_alarm_temp>temperature: playColor=st7789.GREEN if ber.play_flag: ber.stop() else : playColor=st7789.RED if not ber.play_flag: ber.play() len = int(int(temperature)*1.6) +18 display.fill_rect(102,52,26,146,st7789.BLACK)#x ,y w ,h display.fill_rect(102,198-len,25,len,playColor) drawCirc_fill(display,115,213,19,playColor) for i in range(0,9): display.hline(100,180-16*i,28,st7789.WHITE) if i!=8: display.hline(100,180-16*i-4,10,st7789.WHITE) display.hline(100,180-16*i-8,20,st7789.WHITE) display.hline(100,180-16*i-12,10,st7789.WHITE) display.text(font1,'T:{:.0f}C'.format(temperature),60,80,st7789.MAGENTA) utime.sleep(0.8)
由于时间有限,屏幕设计的不太合理,更新数据会闪动,后续使用espi tft或 u8g2进行界面设计。此次项目收获很大,感谢老师、同学们的帮助、支持。希望后续多进行此类活动。
学习嵌入式,不仅要掌握语法和编程,更需要有一个合适的平台来承载你的创意。本项目用到的 基于 RP2040 的嵌入式系统学习平台,我们已在 小脚丫step企业店 上架。它不仅适合课堂教学与竞赛训练,也能作为个人学习和项目开发的好伙伴。 淘宝搜索小脚丫 step 企业店,一起动手实现你的第一个“智能仪器”吧!









 10个月宝宝每天需要喝多少奶粉?