你有没有这种时刻——
明明只想“随便刷一下” GitHub,结果一不小心就掉进热榜的兔子洞,半小时没了,项目看了一堆,却啥也没记住。
我也有。
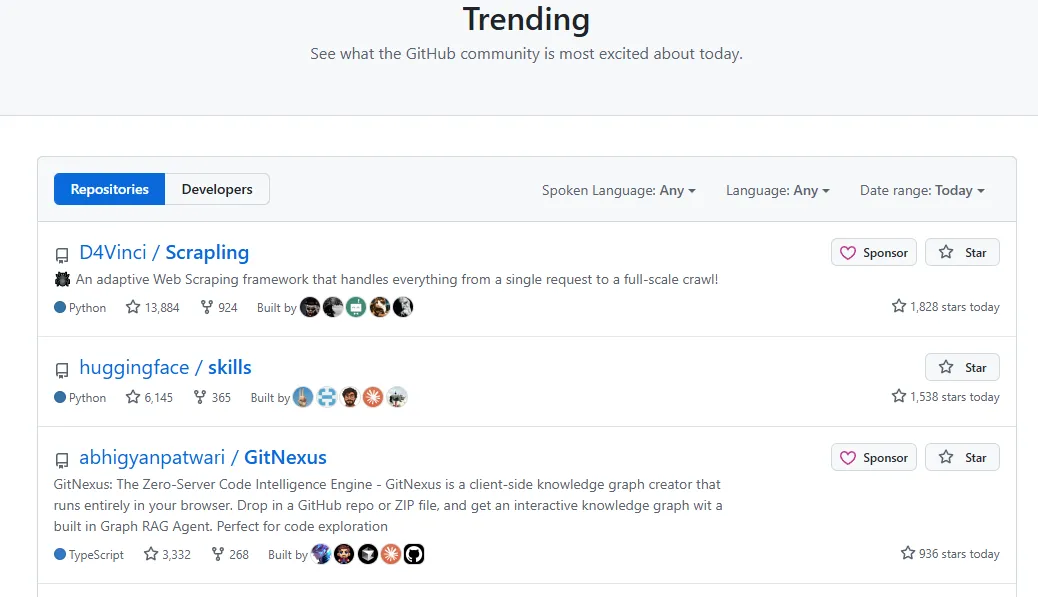
尤其是逛 GitHub 的 Trending 排行榜,简直像技术圈的“瓜田”。今天这个框架爆火,明天那个 AI 项目起飞。但问题来了:
每次都手动打开网页、筛选日榜周榜月榜,不累吗?
于是我想:既然 Obsidian 都成了我的第二大脑,能不能把 GitHub 热榜“请”进来,让它自动更新?
答案是——当然可以。
而且,比你想象的简单。
核心思路:让 Obsidian 自动抓热榜
事情的逻辑其实很清晰:
用 Python 抓取 GitHub Trending 页面
把数据转成 JSON
通过 Templater 在 Obsidian 里执行脚本
写入 frontmatter
说人话版就是:
用 Python 把热榜扒下来 → 丢进笔记 → 自动展示。
一条龙服务,连刷新都帮你做了。
第一步:抓取热榜数据
我们直接请求 GitHub Trending 页面,解析 HTML,提取项目名称、链接、简介、总 Star 和周期内 Star。
代码如下(原汁原味保留):
//pythonimport syssys.stdout.reconfigure(encoding='utf-8')import requestsfrom bs4 importBeautifulSoupimport jsonvalid_periods = {"daily", "weekly", "monthly"}period = "daily" # 默认值iflen(sys.argv) > 1: arg = sys.argv[1].lower()if arg invalid_periods: period = argbase_url = "https://github.com/trending"if period == "daily": url = base_urlelse: url = f"{base_url}?since={period}"headers = {"User-Agent": "Mozilla/5.0"}proxies = {"http": "socks5h://127.0.0.1:7897","https": "socks5h://127.0.0.1:7897"}response = requests.get( url, headers=headers, proxies=proxies, timeout=10)soup = BeautifulSoup(response.text, "html.parser")repos = soup.find_all("article", class_="Box-row")data = []for repo inrepos: title = repo.h2.a.get_text(strip=True) link = "https://github.com" + repo.h2.a["href"] desc_tag = repo.find("p") description = desc_tag.get_text(strip=True) if desc_tag else"No description" star_tag = repo.find("a", href=lambda x: x and x.endswith("/stargazers")) total_stars = star_tag.get_text(strip=True) if star_tag else"0" # 今日 / 本周 / 本月 stars today_stars = 0for span in repo.find_all("span"): text = span.get_text(strip=True)if"stars"in text and "today"intext: today_stars = int(text.replace("stars today", "").replace(",", "").strip())break elif "stars"in text and "week"intext: today_stars = int(text.split()[0].replace(",", ""))break elif "stars"in text and "month"intext: today_stars = int(text.split()[0].replace(",", ""))break repo_info = {"period": period,"name": title,"link": link,"description": description,"total_stars": int(total_stars.replace(',', '').replace(' ', '')),"period_stars": today_stars } data.append(repo_info)json_output = json.dumps(data, ensure_ascii=False, indent=2)print(json_output)
这里有几个关键点简单解释一下:
这一段就是整个系统的“数据源发动机”。
第二步:在 Obsidian 里自动执行
既然 Obsidian 能执行 Python,那就让它自动跑脚本。
通过 Templater + NoteChain 执行 Python,并把结果写进 frontmatter。
核心逻辑也就是用 Node 的 child_process 调 Python。
然后:
跑一次 daily
跑一次 weekly
跑一次 monthly
写入之后,你的笔记 YAML 里就会多出:
这一步完成后,数据已经在你本地了。
以后刷新?
点一下模板按钮就行,或者设计成定时任务。
这感觉就像:
给 Obsidian 装了个“自动情报系统”。
//js //templaterletPYTHON = (await ea.tpl.parse_templater(`PYTHON.EXE`))[0]asyncfunctionselect_outlink_file(cfile,extensions){let files = ea.nc.chain.get_outlinks( cfile,false ).filter(x=>extensions.contains(x.extension));let file = null;if(files.length==1){ file = files[0] }else{ file = await ea.nc.chain.sugguster_note(files); }return file;}let pyfile = awaitselect_outlink_file( tp.config.template_file, ['py'])if(!pyfile){return}let pypath = ea.ns.fsEditor.abspath(pyfile);functionexecAsync(cmd){let exec = require("child_process").exec;returnnewPromise((resolve, reject) => {exec(cmd, (err, stdout, stderr) => {if (err) {reject(err);return; }resolve(stdout); // ✅ 这是字符串 }); });}let stdout = awaitexecAsync(`${PYTHON}${pypath}`);await ea.nc.editor.set_frontmatter( tp.config.template_file,'daily',JSON.parse(stdout))newNotice('日榜数据已更新')stdout = awaitexecAsync(`${PYTHON}${pypath} weekly`);await ea.nc.editor.set_frontmatter( tp.config.template_file,'weekly',JSON.parse(stdout))newNotice('周榜数据已更新')stdout = awaitexecAsync(`${PYTHON}${pypath} monthly`);await ea.nc.editor.set_frontmatter( tp.config.template_file,'monthly',JSON.parse(stdout))newNotice('月榜数据已更新')
第三步:用 Datacore 渲染成表格
数据有了,接下来是展示。
用 Datacore JSX:
//`md## 日榜```datacorejsxlet COLUMNS = [ { id: "name", value: (row) => `[${row['name']}](${row['link']})`}, { id: "daily", value: (row) => row['period_stars'] }, { id: "total", value: (row) => row['total_stars'] }, { id: "description", value: (row) => row['description'] },]let cfile = ea.file.get_tfile(dc.path);let data = ea.nc.editor.get_frontmatter( cfile,'daily',)return function View() { return <dc.Table rows={data} columns={COLUMNS} />;}
简单解释一下:
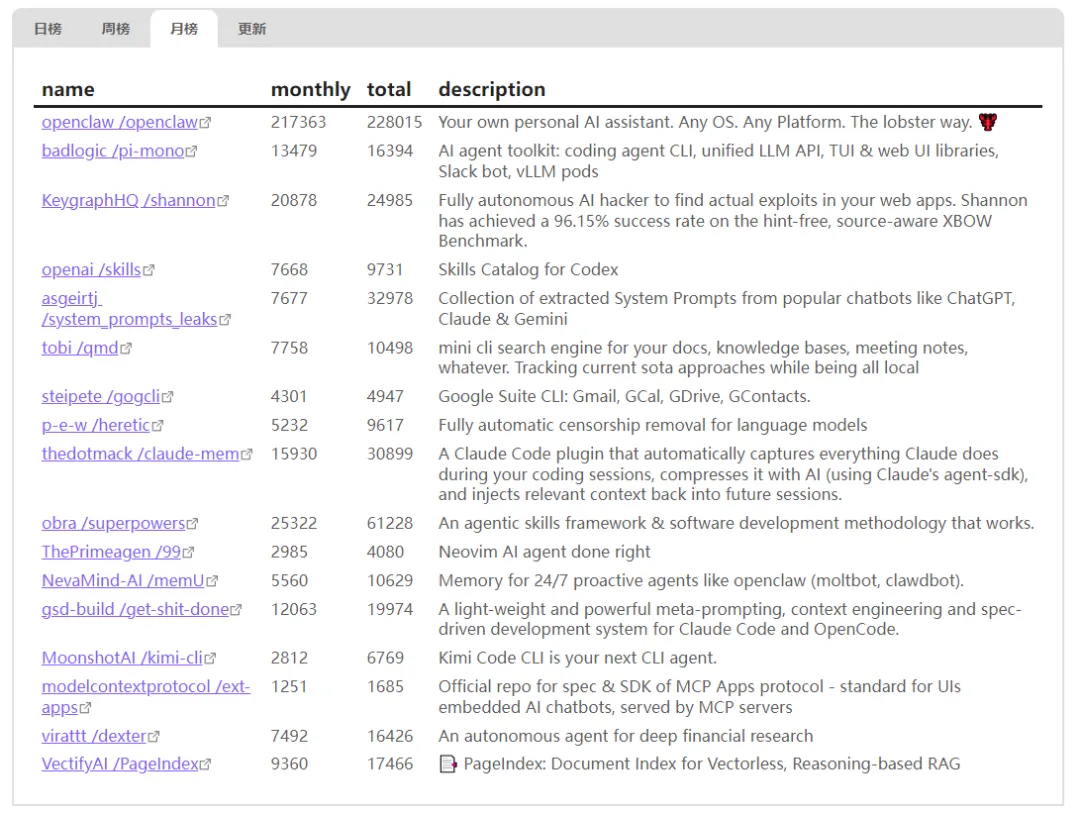
再结合 AnyBlock,可以切换日榜 / 周榜 / 月榜。
整个效果就是——
GitHub 热榜,直接住进你的第二大脑。
再结合 [[AnyBlock]],轻松切换查看不同周期热榜!
五、这件事真正的意义
很多人会说:
“我直接打开网页看不就行了?”
当然可以。
但区别在于——
当热榜出现在你的知识系统里,它就不再只是“刷一刷”。
你可以:
把有意思的项目直接做双链笔记
记录趋势变化
分析某类技术是否持续升温
热榜从“信息流”,变成“知识素材”。
这一步,其实挺关键。


 10个月宝宝每天需要喝多少奶粉?