点击上方“Linux随笔录”,选择“置顶/星标公众号”
- 一、systemd 是什么?
- 二、核心概念速览
- 2.1 Unit(单元)—— systemd 的基本管理单位
- 2.2 systemctl —— 你的主控面板
- 2.3 journalctl —— 统一日志查看器
- 三、上手:管理一个系统服务
- 3.1 查看服务状态
- 3.2 启动、停止、重启
- 3.3 开机自启 / 取消自启
- 3.4 查看日志
- 四、实战:为你的应用编写 Service 文件
- 4.1 创建 service 文件
- 4.2 编写gpio19.service
- 4.3 逐行解释
- 4.4 生效
- 五、常用命令速查表
- 六、性能对比:systemd vs SysVinit
- 总结
适用读者:对 Linux 有基本操作经验(会用终端),但对 systemd 一无所知的开发者 / 运维 / ubuntu系统爱好者。
一、systemd 是什么?
systemd是一个系统和服务管理器,提供以下核心能力:
• 并行启动:通过依赖关系智能排序,加速系统启动
• 服务监控:自动重启崩溃进程,保障服务高可用
• 资源管理:支持CPU、内存等资源的动态分配
• 日志集成:通过journald实现结构化日志收集
为什么你需要了解它?
| |
|---|
| |
| |
| journalctl -u 服务名 |
| systemd-analyze blame |
二、核心概念速览
在动手之前,先搞清楚几个关键词:
2.1 Unit(单元)—— systemd 的基本管理单位
systemd 把所有要管理的东西抽象成 unit,每种 unit 用一个配置文件描述。
| | |
|---|
| Service | .service | ⭐ 最常用。管理一个后台服务(Nginx、MySQL、你的应用) |
| Timer | .timer | |
| Socket | .socket | |
| Mount | .mount | |
| Target | .target | |
| Path | .path | |
你 90% 的时间都在跟 .service 文件打交道。
2.2 systemctl —— 你的主控面板
systemctl 是操控 systemd 的核心命令,记住它就行。
2.3 journalctl —— 统一日志查看器
systemd 自带日志系统 journald,所有服务的 stdout/stderr 都被收集在这里。用 journalctl 查看。
三、上手:管理一个系统服务
先从操作已有服务开始,不写任何配置文件。
3.1 查看服务状态
# 查看 Nginx 的状态
systemctl status nginx

# 查看是否在运行
systemctl is-active nginx      # 输出:active / inactive / failed

# 查看是否开机自启
systemctl is-enabled nginx     # 输出:enabled / disabled
systemctl status 的输出长这样:
● nginx.service - A high performance web server
     Loaded: loaded (/usr/lib/systemd/system/nginx.service; enabled)
     Active: active (running) since Mon 2026-03-23 10:00:00 CST; 8h ago
   Main PID: 1234 (nginx)
      Tasks: 3 (limit: 4915)
     Memory: 8.2M
        CPU: 120ms
     CGroup: /system.slice/nginx.service
             ├─1234 nginx: master process
             └─1235 nginx: worker process
关键看这三行:
Active:当前状态(running / dead / failed)
3.2 启动、停止、重启
systemctl start nginx      # 启动
systemctl stop nginx       # 停止
systemctl restart nginx    # 重启(先停再启)
systemctl reload nginx     # 重载配置(不中断服务,前提是服务支持)
3.3 开机自启 / 取消自启
systemctl enable nginx     # 开机自启
systemctl disable nginx    # 取消开机自启

# 一步到位:立即启动 + 开机自启
systemctl enable --now nginx
3.4 查看日志
# 查看 nginx 的全部日志
journalctl -u nginx

# 只看最近 50 行
journalctl -u nginx -n 50

# 实时跟踪(类似 tail -f)
journalctl -u nginx -f

# 只看本次启动以来的日志
journalctl -u nginx -b

# 按时间过滤
journalctl -u nginx --since "2026-03-23 10:00" --until "2026-03-23 12:00"
四、实战:为你的应用编写 Service 文件
这是最核心的部分。假设你写了一个 gpio19.service 应用,部署在 /usr/local/bin/,入口是 gpio19.sh。
4.1 创建 service 文件
# 文件名格式:xxx.service
# 放在 /etc/systemd/system/ 下(系统级服务)
sudo vim /etc/systemd/system/gpio19.service
4.2 编写gpio19.service
[Unit]
Description=Set GPIO19 high on boot

[Service]
Type=oneshot
ExecStart=/usr/local/bin/gpio19.sh
RemainAfterExit=yes

[Install]
WantedBy=multi-user.target
4.3 逐行解释
[Unit] 段 描述和依赖
[Unit]
Description=Set GPIO19 high on boot   # 服务描述,systemctl status 里能看到
常用依赖关键字:
After=xxx:在 xxx 之后启动(时序关系,不强制依赖)Requires=xxx:强依赖,xxx 挂了我也挂Wants=xxx:弱依赖,xxx 起不来我照样跑
[Service] 段 —— 核心配置
[Service]
Type=oneshot
ExecStart=/usr/local/bin/gpio19.sh
RemainAfterExit=yes
Type 的常用值:
| | |
|---|
simple | | |
forking | ExecStart 会 fork 出子进程然后自己退出 | |
oneshot | | |
notify | | |
ExecStart :
ExecStart=/usr/local/bin/gpio19.sh
指定服务启动时要运行的脚本或命令的完整路径。
gpio19.sh内容
#!/bin/sh

GPIO=19

# Export GPIO if needed
if [ ! -d /sys/class/gpio/gpio$GPIO ]; then
echo$GPIO > /sys/class/gpio/export
    sleep 0.1
fi

# Configure and set value
echo out > /sys/class/gpio/gpio$GPIO/direction
echo 1 > /sys/class/gpio/gpio$GPIO/value
更多实用配置:
[Service]
# 以哪个用户/组运行(默认 root)
User=www-data
Group=www-data

# 环境变量
Environment=NODE_ENV=production
Environment=PORT=3000
# 也可以从文件读取
EnvironmentFile=/opt/myapp/.env

# 标准输出/错误的日志方式
StandardOutput=journal
StandardError=journal

# 安全加固
NoNewPrivileges=true
ProtectSystem=strict
ProtectHome=true
ReadWritePaths=/opt/myapp/data

# 资源限制
MemoryMax=512M
CPUQuota=80%
[Install] 段 —— 开机自启目标
[Install]
WantedBy=multi-user.target            # 多用户模式(相当于以前的运行级别 3)
multi-user.target 是最常见的选择,表示"进入完整多用户环境时启动这个服务"。
4.4 生效
每次修改 service 文件后,必须重载 systemd:
# 重载配置(告诉 systemd "我改了文件")
sudo systemctl daemon-reload

# 启用并立即执行一次
sudo systemctl enable --now gpio19

# 查看状态
sudo systemctl status gpio19
systemctl status 的输出长这样:
gpio19.service - Set GPIO19 high on boot
     Loaded: loaded (/etc/systemd/system/gpio19.service; enabled; vendor preset: enabled)
     Active: active (exited) since Tue 2026-03-24 11:48:39 CST; 2min 43s ago
    Process: 641 ExecStart=/usr/local/bin/gpio19.sh (code=exited, status=0/SUCCESS)
   Main PID: 641 (code=exited, status=0/SUCCESS)
        CPU: 14ms

Mar 24 11:48:38 localhost systemd[1]: Starting Set GPIO19 high on boot...
Mar 24 11:48:39 localhost systemd[1]: Finished Set GPIO19 high on boot.
五、常用命令速查表
# === 服务管理 ===
systemctl start <服务>          # 启动
systemctl stop <服务>           # 停止
systemctl restart <服务>        # 重启
systemctl reload <服务>         # 重载配置
systemctl status <服务>         # 查看状态
systemctl enable <服务>         # 开机自启
systemctl disable <服务>        # 取消自启
systemctl enable --now <服务>   # 启动 + 自启

# === 查看信息 ===
systemctl list-units --type=service          # 列出所有 service
systemctl list-units --type=service --state=running  # 只看运行中的
systemctl list-unit-files --type=service     # 列出所有 service 文件
systemctl is-active <服务>                   # 是否运行中
systemctl is-enabled <服务>                  # 是否开机自启

# === 日志 ===
journalctl -u <服务>             # 查看日志
journalctl -u <服务> -f          # 实时跟踪
journalctl -u <服务> -n 100      # 最近 100 行
journalctl -u <服务> -b          # 本次启动的日志
journalctl --since "1 hour ago"# 按时间过滤

# === 系统分析 ===
systemd-analyze                  # 启动耗时
systemd-analyze blame            # 各服务启动耗时排名
systemd-analyze critical-chain   # 启动关键路径

# === 配置重载 ===
sudo systemctl daemon-reload     # 修改 service 文件后必执行
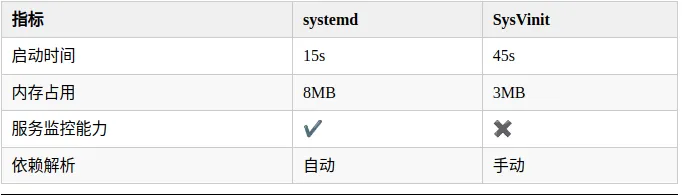
六、性能对比:systemd vs SysVinit
总结
今天是本次分享的systemd 从零开始写service干货,如果对你有帮助的话,那就点赞关注我可以一键三连!欢迎关注公众号[Linux随笔录],不定期分享Linux小知识
 10个月宝宝每天需要喝多少奶粉?
