一、前言
在3D建模、机器人视觉、激光雷达仿真等领域,点云数据的生成与处理是核心任务之一。本文基于Python实现了一个点云模拟工具,通过数学公式计算旋转矩阵,实现点绕任意轴的旋转,并结合Z轴旋转生成动态点云分布。代码具备高度参数化特性,可灵活调整反射镜转速、中空电机转速、点频等参数,生成不同分布的点云数据。该工具不仅可生成点云数据,还支持可视化展示,为相关领域的研究提供了高效工具。
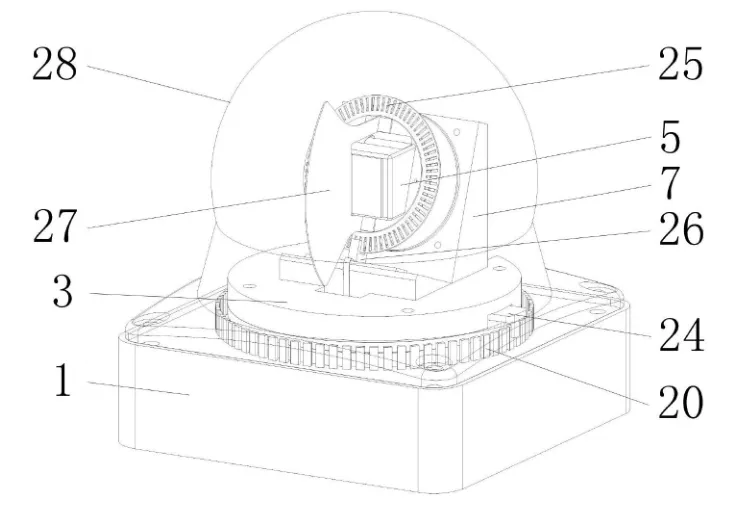
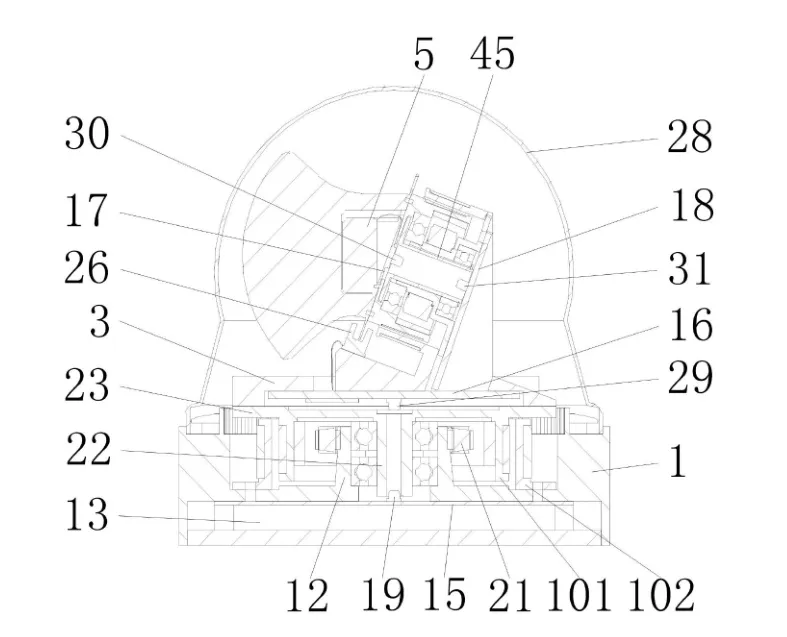
蓝海光电的一款非重复式多线扫描激光雷达的结构如下:(图片来源:CN202410504647.1 一种扫描范围广的雷达装置)
二、扫描原理
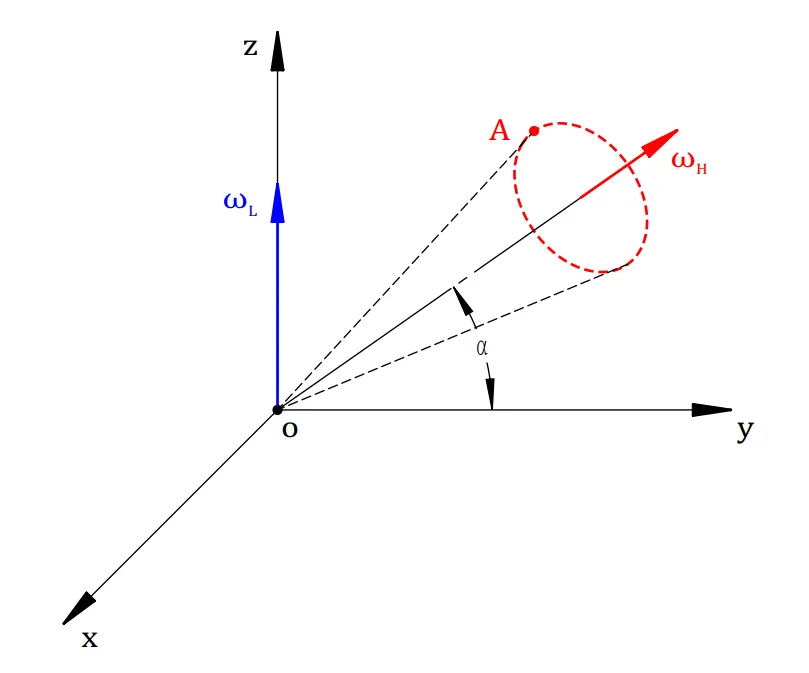
点A坐标为(0,yA,zA),单位向量u=(0,cos α,sin α)位于平面yoz上,并与y轴夹角为α。点A绕单位向量u旋转θ,然后绕z轴逆时针旋转β后得到坐标A'为
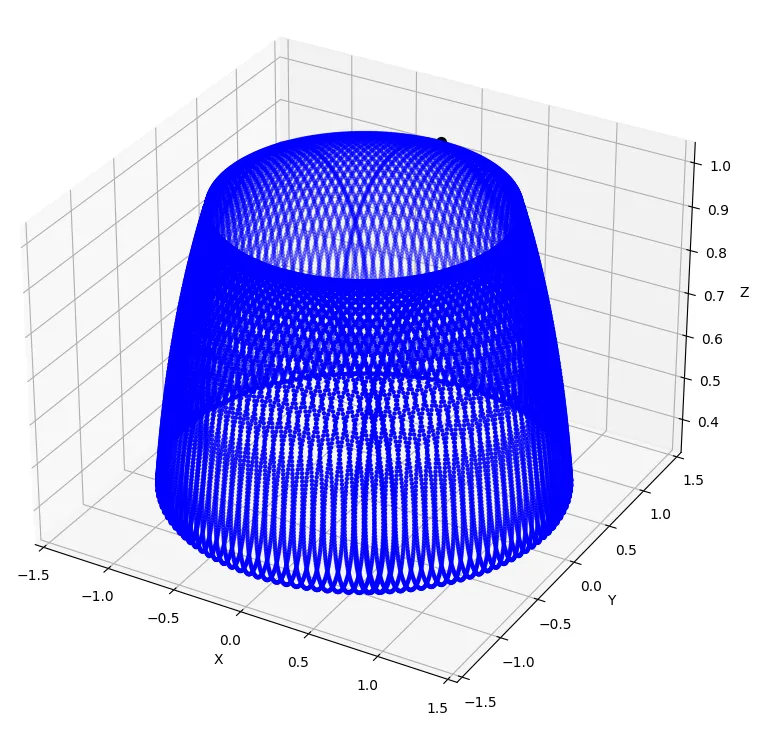
即为点云的扫描轨迹。
三、整体架构流程
代码逻辑分为以下几个核心模块:
1. 旋转函数实现
代码逻辑可分为三个核心模块。旋转函数通过rotate_point_around_axis实现点绕单位向量旋转后的坐标计算,基于罗德里格斯旋转公式构造旋转矩阵,并与绕Z轴的旋转矩阵结合完成复合旋转变换。
2. 点云生成逻辑(main函数)
点云生成由主函数负责,根据反射镜转速、中空电机转速、点频及圈数等输入参数计算转速比与点切分数量,分别生成控制绕轴旋转的theta角度与Z轴旋转的beta角度。通过循环逐点计算旋转后坐标,将结果存储为列表并写入JSON文件。
3. 可视化展示
可视化展示依托Matplotlib的三维绘图功能,对点云分布进行呈现。起点标记为黑色,终点标记为红色,其余点统一标记为蓝色,便于识别扫描轨迹的起止特征。
四、技术细节
1. 旋转矩阵计算
R = np.array([ [cos_theta + ux**2 * (1 - cos_theta), ux*uy*(1 - cos_theta) - uz*sin_theta, ux*uz*(1 - cos_theta) + uy*sin_theta], [uy*ux*(1 - cos_theta) + uz*sin_theta, cos_theta + uy**2 * (1 - cos_theta), uy*uz*(1 - cos_theta) - ux*sin_theta], [uz*ux*(1 - cos_theta) - uy*sin_theta, uz*uy*(1 - cos_theta) + ux*sin_theta, cos_theta + uz**2 * (1 - cos_theta)]])
旋转矩阵R基于罗德里格斯公式计算,用于实现点绕任意单位向量的旋转变换,其元素由旋转角度的三角函数与方向向量分量共同确定。
R_z = np.array([[cos_gamma, -sin_gamma, 0], [sin_gamma, cos_gamma, 0], [0, 0, 1]])
绕Z轴的旋转矩阵R_z由旋转角gamma的正余弦值构成,仅作用于xy平面。
复合旋转通过矩阵乘法np.dot(np.dot(R, point), R_z)完成,先将点绕给定轴旋转,再绕Z轴进行二次旋转。
转速比Rotational_speed_ratio决定theta和beta的分布范围。if Rotational_speed_ratio >= 1: theta = np.linspace(0, 2 * np.pi * Rotational_speed_ratio * turnsNum, int(equal_division)) beta = np.linspace(0, 2 * np.pi * turnsNum, int(equal_division))else: theta = np.linspace(0, 2 * np.pi * turnsNum, int(equal_division)) beta = np.linspace(0, 2 * np.pi / Rotational_speed_ratio * turnsNum, int(equal_division))
with open(f'D:/python_demo/35、3D点云模拟/statics/pacecat_point_cloud_data_{int(Mirror_rotation_speed)}.json', 'w', encoding='utf-8') as json_file: json.dump(all_points, json_file, ensure_ascii=False, indent=4)
使用Matplotlib绘制3D散点图,起点和终点分别用不同颜色标记。ax.scatter(points_array[:, 0], points_array[:, 1], points_array[:, 2], c='b', marker='o', s=5)ax.scatter(all_points[0][0], all_points[0][1], all_points[0][2], color='black', s=50)ax.scatter(all_points[-1][0], all_points[-1][1], all_points[-1][2], color='red', s=50)
五、运行
六、结论
本文通过Python实现了一个灵活的3D点云模拟工具,支持参数化输入和动态点云生成。核心亮点包括:1、使用Rodrigues公式和Z轴旋转矩阵实现复合旋转,计算精确。2、参数化设计支持不同转速比、点频和圈数的组合,生成多样化的点云分布。3、数据存储与可视化功能完善,便于后续分析和应用。该工具可广泛应用于3D建模、机器人视觉、激光雷达仿真等领域,为相关研究提供了高效的技术支持。未来可扩展至半球面点云生成、动态点云渲染等方向,进一步提升工具的实用性和通用性。# -*- coding: utf-8 -*-# @Time : 2025/4/13 8:44import numpy as npimport jsonimport matplotlib.pyplot as plt# 将点绕单位向量旋转,然后绕z轴旋转def rotate_point_around_axis(point, axis, theta, z_beta): """ 将点 point 绕单位向量 axis 旋转角度 theta。 参数: point (numpy.ndarray): 形状为 (3,) 的数组,表示点的坐标。 axis (numpy.ndarray): 形状为 (3,) 的数组,表示旋转轴的单位向量。 theta_degrees (float): 绕单位向量旋转角度(弧度)。 z_beta: 绕z轴旋转角度(弧度)。 返回: numpy.ndarray: 旋转后的点的坐标。 """ # 向量归一化 axis = axis / np.linalg.norm(axis) # 计算旋转矩阵的各个部分 cos_theta = np.cos(theta) sin_theta = np.sin(theta) ux, uy, uz = axis # 或者使用更直接的分量形式计算 R = np.array([ [cos_theta + ux**2 * (1 - cos_theta), ux*uy*(1 - cos_theta) - uz*sin_theta, ux*uz*(1 - cos_theta) + uy*sin_theta], [uy*ux*(1 - cos_theta) + uz*sin_theta, cos_theta + uy**2 * (1 - cos_theta), uy*uz*(1 - cos_theta) - ux*sin_theta], [uz*ux*(1 - cos_theta) - uy*sin_theta, uz*uy*(1 - cos_theta) + ux*sin_theta, cos_theta + uz**2 * (1 - cos_theta)] ]) # 绕z轴旋转 cos_beta = np.cos(z_beta) sin_beta = np.sin(z_beta) R_z = np.array([[cos_beta, -sin_beta, 0], [sin_beta, cos_beta, 0], [0, 0, 1]]) # 将点表示为列向量并应用旋转矩阵,并保留 8 位小数 point_rotated = np.round(np.dot(np.dot(R, point),R_z), 8) return point_rotateddef main(Mirror_rotation_speed, Hollow_motor_speed, point_frequency, times): ''' :Parameter Mirror_rotation_speed:反射镜转速,Hz :Parameter Hollow_motor_speed:中空电机转速,Hz :Parameter point_frequency:点频 :Parameter times:时间,s ''' equal_division = point_frequency * times # 总点数 # 生成theta和gamma的值 theta = np.linspace(0, 2 * np.pi * Mirror_rotation_speed * times, int(equal_division * 1.8)) # 根据设计的垂直视场角为200°,垂直方向的点数按比例增加 gamma = np.linspace(0, 2 * np.pi * Hollow_motor_speed * times, int(equal_division)) # 设点A(0,cosβ,sinβ)位于YOZ平面且与y轴夹角为β point = np.array([0, 0, 100]) # 起始坐标 alpha = 30 # 单位向量的倾斜角度,即收发对所在电机轴线与水平面夹角 axis = np.array([0, np.cos(np.radians(alpha)), np.sin(np.radians(alpha))]) # 单位向量u,旋转轴 # 用于存储所有点坐标 all_points = [] for i in range(int(equal_division)): rotating_point = rotate_point_around_axis(point, axis, theta[i], gamma[i]) # 旋转后的点 all_points.append(list(rotating_point)) # 将 NumPy 数组转换为列表 # print(all_points[-1]) # 将数据写入 JSON 文件 with open(f'D:/python_demo/35、3D点云模拟/statics/pacecat_point_cloud_data_{int(Mirror_rotation_speed)}.json', 'w', encoding='utf-8') as json_file: json.dump(all_points, json_file, ensure_ascii=False, indent=4) print(f"saving pacecat_point_cloud_data_{int(Mirror_rotation_speed)}.json") # 转换为NumPy数组 points_array = np.array(all_points) # 创建3D图形 fig = plt.figure() ax = fig.add_subplot(111, projection='3d') ax.scatter(points_array[:, 0], points_array[:, 1], points_array[:, 2], c='b', marker='o', s=5) # 绘制点 ax.scatter(all_points[0][0], all_points[0][1], all_points[0][2], color='black', s=50) ax.scatter(all_points[-1][0], all_points[-1][1], all_points[-1][2], color='red', s=50) # 设置标签 ax.set_xlabel('X') ax.set_ylabel('Y') ax.set_zlabel('Z') # 显示图形 plt.show()if __name__ == '__main__': main(Mirror_rotation_speed=101, Hollow_motor_speed=16.7, point_frequency=60000, times=1)

 10个月宝宝每天需要喝多少奶粉?