【Python时序预测系列】建立Bi-LSTM模型实现多变量多步时序预测(案例+源码)
- 2026-10-11 07:58:29
【Python时序预测系列】建立Bi-LSTM模型实现多变量多步时序预测(案例+源码)写在前面 

热门原创文章推荐阅读点击标题可跳转 写在后面 
免费电子书籍,带你入门人工智能:
这是我的第465篇原创文章。
『数据杂坛』以Python语言为核心,垂直于数据科学领域,专注于(可戳👉)Python程序设计|数据分析|特征工程|机器学习分类|机器学习回归|深度学习分类|深度学习回归|单变量时序预测|多变量时序预测|语音识别|图像识别|自然语音处理|大语言模型|软件设计开发等技术栈交流学习,涵盖数据挖掘、计算机视觉、自然语言处理等应用领域。(文末有惊喜福利)
一、引言
下面通过一个具体的案例,建立Bi-LSTM(双向LSTM)模型进行多变量输入单变量输出多步时间序列预测,包括模型构建、训练、预测等等。
二、实现过程
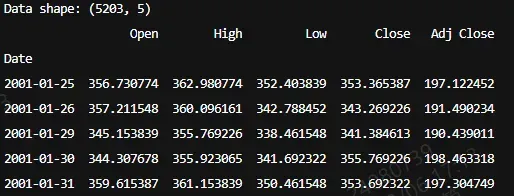
2.1 原始数据集加载
核心代码:
df = pd.read_csv("data.csv",parse_dates=["Date"],index_col=[0],)df = pd.DataFrame(df)var_num = len(df.columns)print(f"Data shape: {df.shape}")print(df.head())
结果:
2.2 数据集划分
核心代码:
test_split = round(len(df) * 0.20)df_for_training = df[:-test_split]df_for_testing = df[-test_split:]print(f"Training samples: {len(df_for_training)}, Testing samples: {len(df_for_testing)}")
结果:
2.3 数据归一化
核心代码:
scaler = MinMaxScaler(feature_range=(0, 1))df_for_training_scaled = scaler.fit_transform(df_for_training)df_for_testing_scaled = scaler.transform(df_for_testing)
2.4 构造时序预测数据集
核心代码:
train_dataset = TimeSeriesDataset(df_for_training_scaled, seq_len=seq_len, pred_len=pred_len)test_dataset = TimeSeriesDataset(df_for_testing_scaled, seq_len=seq_len, pred_len=pred_len)train_loader = DataLoader(train_dataset, batch_size=batch_size, shuffle=True)test_loader = DataLoader(test_dataset, batch_size=batch_size, shuffle=False)
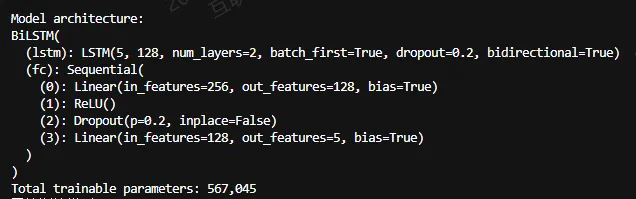
2.5 建立Bi-LSTM模型
核心代码:
class BiLSTM(nn.Module):def __init__(self, input_dim=5, lstm_hidden=128, lstm_layers=2, pred_len=5, dropout=0.2):super().__init__()self.lstm = nn.LSTM(input_size=input_dim,hidden_size=lstm_hidden,num_layers=lstm_layers,batch_first=True,dropout=dropout if lstm_layers > 1 else 0,bidirectional=True,)self.fc = nn.Sequential(nn.Linear(lstm_hidden * 2, lstm_hidden),nn.ReLU(),nn.Dropout(dropout),nn.Linear(lstm_hidden, pred_len),)self.pred_len = pred_lendef forward(self, x):lstm_out, (hidden, cell) = self.lstm(x)last_hidden = lstm_out[:, -1, :]out = self.fc(last_hidden)return out.unsqueeze(-1)
模型结构:
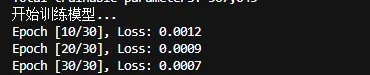
2.6 模型训练
核心代码:
def train_model(model, dataloader, num_epochs=50, learning_rate=1e-3, device="cpu"):optimizer = torch.optim.Adam(model.parameters(), lr=learning_rate)criterion = nn.MSELoss()model.train()loss_history = []for epoch in range(num_epochs):epoch_losses = []for batch_data, batch_targets in dataloader:batch_data = batch_data.to(device)batch_targets = batch_targets.to(device)optimizer.zero_grad()outputs = model(batch_data)loss = criterion(outputs, batch_targets)loss.backward()optimizer.step()epoch_losses.append(loss.item())avg_loss = np.mean(epoch_losses)loss_history.append(avg_loss)if (epoch + 1) % 10 == 0:print(f"Epoch [{epoch + 1}/{num_epochs}], Loss: {avg_loss:.4f}")return loss_history
结果:
2.7 模型评测
核心代码:
def evaluate_model(model, dataloader, device="cpu"):model.eval()preds = []trues = []with torch.no_grad():for batch_data, batch_targets in dataloader:batch_data = batch_data.to(device)outputs = model(batch_data)preds.append(outputs.cpu().numpy())trues.append(batch_targets.cpu().numpy())# print(preds.shape)# print(trues.shape)preds = np.concatenate(preds, axis=0).squeeze()trues = np.concatenate(trues, axis=0).squeeze()print(preds.shape)print(trues.shape)return preds, trues
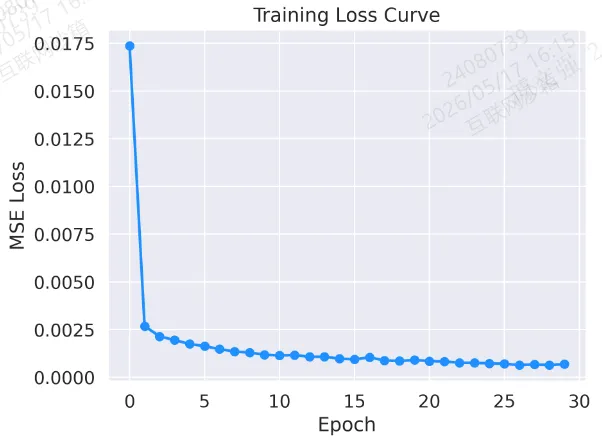
2.8 可视化分析
图 1:训练损失曲线
plt.plot(loss_history, marker='o', color='dodgerblue', linestyle='-', linewidth=2)plt.title("Training Loss Curve")plt.xlabel("Epoch")plt.ylabel("MSE Loss")plt.tight_layout()plt.savefig('output_image1.png', dpi=300, format='png')plt.show()
结果:
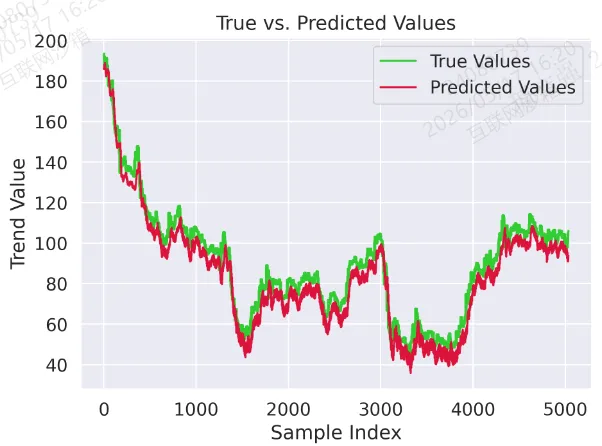
图 2:真实值与预测值对比曲线
plt.plot(trues, label="True Values", color='limegreen')plt.plot(preds, label="Predicted Values", color='crimson')plt.title("True vs. Predicted Values")plt.xlabel("Sample Index")plt.ylabel("Trend Value")plt.legend()plt.tight_layout()plt.savefig('output_image2.png', dpi=300, format='png')plt.show()
结果:
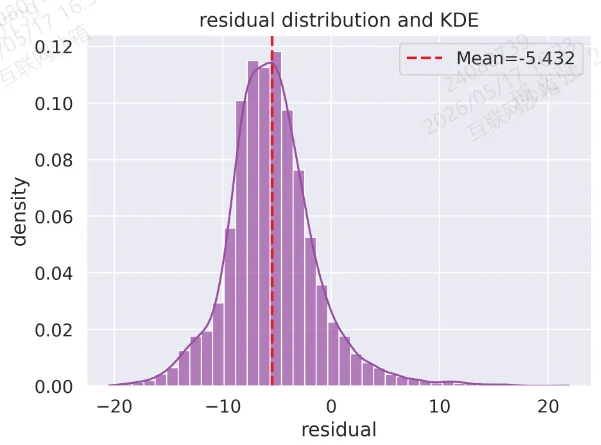
图4:残差分布与 KDE
resid = (preds - trues).reshape(-1)sns.histplot(resid, bins=40, stat="density", color=vivid_colors[3], kde=True, alpha=0.7)plt.axvline(np.mean(resid),color=vivid_colors[0],linestyle="--",linewidth=2,label=f"Mean={np.mean(resid):.3f}",)plt.title("residual distribution and KDE")plt.xlabel("residual")plt.ylabel("density")plt.legend()plt.tight_layout()plt.savefig("output_image4.png", dpi=300, format="png")plt.show()
结果:
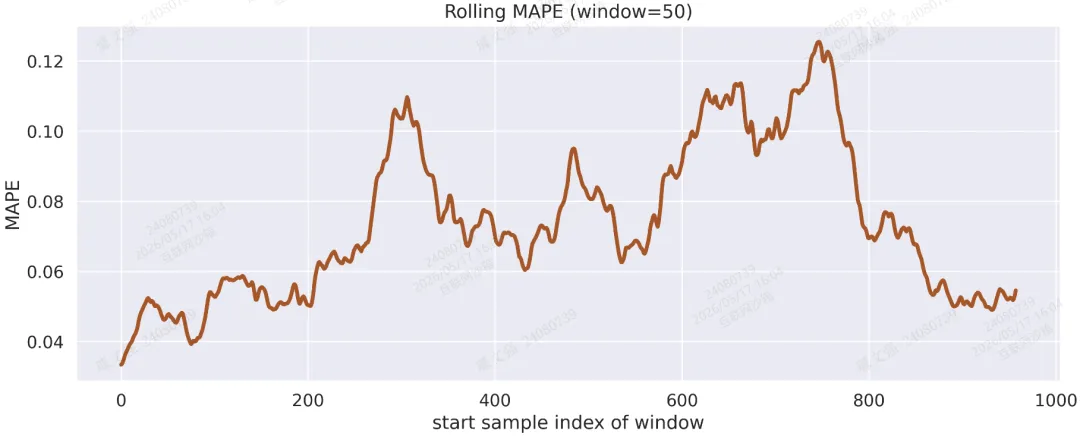
图5:Rolling MAPE(窗口=50 个样本)
win = 50mape_series = np.abs((preds - trues) / (np.abs(trues) + 1e-8)).mean(axis=1)rolling = np.array([mape_series[i : i + win].mean() for i in range(0, len(mape_series) - win + 1)])plt.figure(figsize=(12, 5))plt.plot(rolling, linewidth=3, color=vivid_colors[6])plt.title(f"Rolling MAPE (window={win})")plt.xlabel("start sample index of window")plt.ylabel("MAPE")plt.tight_layout()plt.savefig("output_image5.png", dpi=300, format="png")plt.show()
结果:
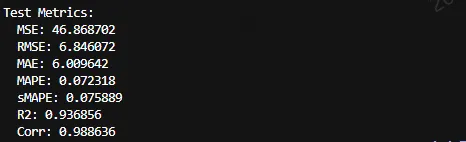
2.9 指标计算
核心代码:
def evaluate_metrics(y_true, y_pred):y_true = y_true.reshape(-1)y_pred = y_pred.reshape(-1)eps = 1e-8mse = np.mean((y_true - y_pred) ** 2)rmse = np.sqrt(mse + eps)mae = np.mean(np.abs(y_true - y_pred))mape = np.mean(np.abs((y_true - y_pred) / (np.abs(y_true) + eps)))smape = np.mean(2 * np.abs(y_true - y_pred) / (np.abs(y_true) + np.abs(y_pred) + eps))# R2ss_res = np.sum((y_true - y_pred) ** 2)ss_tot = np.sum((y_true - np.mean(y_true)) ** 2) + epsr2 = 1 - ss_res / ss_tot# Pearsoncorr = np.corrcoef(y_true, y_pred)[0, 1]return dict(MSE=mse, RMSE=rmse, MAE=mae, MAPE=mape, sMAPE=smape, R2=r2, Corr=corr)
结果:
建立CNN与Transformer融合模型实现单变量时序预测(案例+源码)
建立Transformer-LSTM-TCN-XGBoost融合模型多变量时序预测(源码)
利用SHAP进行特征重要性分析-决策树模型为例(案例+源码)
梯度提升集成:LightGBM与XGBoost组合预测油耗(案例+源码)
一文教你建立随机森林-贝叶斯优化模型预测房价(案例+源码)
建立随机森林模型预测心脏疾病(完整实现过程)
建立CNN模型实现猫狗图像分类(案例+源码)
使用LSTM模型进行文本情感分析(案例+源码)
基于Flask将深度学习模型部署到web应用上(完整案例)
新版Dify 开发自定义工具插件在工作流中直接调用(完整步骤)
作者简介:
读研期间发表6篇SCI数据算法相关论文,目前在某研究院从事数据算法相关研究工作,结合自身科研实践经历不定期持续分享关于Python、数据分析、特征工程、机器学习、深度学习、人工智能系列基础知识与案例。
致力于只做原创,以最简单的方式理解和学习,关注我一起交流成长。
1、关注下方公众号,点击“领资料”即可免费领取电子资料书籍。
2、文章底部点击喜欢作者即可联系作者获取相关数据集和源码。
3、数据算法方向论文指导或就业指导,点击“联系我”添加作者微信直接交流。
4、有商务合作相关意向,点击“联系我”添加作者微信直接交流。
本文来自网友投稿或网络内容,如有侵犯您的权益请联系我们删除,联系邮箱:596563534@qq.com 。
随机文章
-
 10个月宝宝每天需要喝多少奶粉?
- Python新手必练|红军干粮分配(双层循环版,枚举法)
- 嵌入式Linux网络系列-5:Socket 编程与内核数据通路|从用户态到硬件的完整旅程
- 0.1+0.2≠0.3?Python数字运算的6个惊人真相,新手必看!
- 《Python 从入门到精通》056|函数的作用域:局部变量和全局变量别再混了
- Linux 内核三种 I/O Error 详解:从一次 ceph节点瞬间掉盘说起
- 学量化先搭工具链:一份按工作流分层的 Python 路线图
- Python 零基础 100 天 — Day 7 while 循环
- 一图看懂python的lambda函数!
- GESP Python 编程探索之路(二级)2026年5月最新版
- Linux 中非常基础且强大的 cat命令