Tkinter + Python多线程在工业数据采集中的应用
- 2026-06-27 17:49:22
🏭 那台机器,差点把我整崩溃
去年接了个活儿——给一家做注塑件的工厂改造他们的上位机系统。老系统是用VB6写的,界面一动数据就卡,采集频率一高直接假死。厂长跟我说:"小伙子,你要是能让它不卡,奖金翻倍。"
我当时心想,这不就是个多线程的事儿嘛,简单。
然后我就被教育了整整两周。
工业数据采集这个领域,表面上看是"读串口、显示数据、存数据库",实际上坑深得很。Tkinter的主循环是单线程的——这是它的设计哲学,不是bug。你一旦在主线程里做任何耗时操作,界面就冻住了。而工业场景偏偏要求你同时干好几件事:每100ms轮询一次PLC、实时绘制曲线、响应操作员的按钮、还得把数据写进SQLite。这几件事,哪件都不能停,哪件都不能慢。
本文就把我踩过的坑、摸出来的路子,完整说一遍。
🔍 问题根源:为什么Tkinter天生不适合"同时干活"
Tkinter的事件循环(mainloop())本质上是一个单线程的消息泵。它不停地处理事件队列里的消息——鼠标点击、键盘输入、窗口重绘。一旦你在某个回调函数里写了个time.sleep(1),整个界面就会在那一秒内完全失去响应。
很多初学者的第一反应是用after()方法轮询:
python1def poll_data():2 value = read_from_serial() # 假设这个操作需要50ms3update_label(value)4 root.after(100, poll_data)这个方案在数据量小、设备响应快的时候凑合能用。但一旦read_from_serial()因为设备超时或者波特率低而阻塞,你照样卡界面。工业现场设备通信超时是家常便饭,不是偶发情况。
正确的思路只有一个:把一切耗时操作彻底赶出主线程。
🏗️ 架构设计:三层分离,各司其职
我在项目里最终落地的架构,说白了就是三层:
数据采集层跑在独立线程里,只管跟设备通信,不碰任何UI组件。数据处理层负责缓冲、聚合、报警判断。UI展示层只负责从队列里取数据然后渲染,不主动去问设备要数据。
三层之间的通信,全靠queue.Queue。这是Python标准库里线程安全的队列,专门为多线程通信设计的,比自己用锁保护一个列表优雅得多。
1[采集线程] --put()--> [Queue] <--get()-- [UI主线程]2 |3 [after()轮询]这个结构的核心优势:UI线程永远不会因为设备通信而阻塞,采集线程永远不会因为UI渲染而被拖慢。两边完全解耦。
💻 完整实现:从骨架到血肉
下面这套代码是我从实际项目里抽象出来的通用框架,模拟了一个温度/压力双通道采集系统。
第一步:搭建基础框架
python1import tkinter as tk2from tkinter import ttk3import threading4import queue5import time6import random7import collections8from datetime import datetime910# 全局数据队列,采集线程往里塞,UI线程往外取11data_queue = queue.Queue(maxsize=500)1213# 停止信号,用Event比用全局bool变量更优雅14stop_event = threading.Event()maxsize=500这个参数很重要,别忽略。如果UI渲染跟不上采集速度,队列会无限增长,最终吃光内存。设了上限之后,put(block=False)会在队列满时抛出Full异常,你可以选择丢弃旧数据或者报警——这取决于你的业务需求。
第二步:采集线程
python1class DataCollector(threading.Thread):2"""3 工业设备数据采集线程4 实际项目中,这里对接的是pyserial、modbus-tk或者opcua等库5 这里用随机数模拟传感器输出6 """78def __init__(self, data_queue, stop_event, sample_interval=0.1):9super().__init__(daemon=True) # 守护线程,主程序退出时自动结束10 self.data_queue = data_queue11 self.stop_event = stop_event12 self.sample_interval = sample_interval13 self._device_error_count = 01415def _read_device(self):16"""17 模拟设备读取,实际替换为你的通信代码18 注意:这里刻意加了随机延迟,模拟工业现场的通信抖动19 """20# 模拟偶发的通信延迟(工业现场真实存在的情况)21if random.random() < 0.05: # 5%概率出现延迟22 time.sleep(random.uniform(0.05, 0.15))2324return {25'timestamp': datetime.now().strftime('%H:%M:%S.%f')[:-3],26'temperature': round(25.0 + random.gauss(0, 2.5), 2),27'pressure': round(1.013 + random.gauss(0, 0.05), 3),28'status': 'normal' if random.random() > 0.02 else 'alarm'29 }3031def run(self):32while not self.stop_event.is_set():33 loop_start = time.perf_counter()3435try:36 data = self._read_device()37 self._device_error_count = 0 # 成功则清零错误计数3839try:40 self.data_queue.put_nowait(data)41except queue.Full:42# 队列满了——丢弃最老的数据,保留最新的43try:44 self.data_queue.get_nowait()45 self.data_queue.put_nowait(data)46except queue.Empty:47pass4849except Exception as e:50 self._device_error_count += 151if self._device_error_count >= 5:52# 连续5次失败,往队列里放一个错误标记53 error_data = {54'timestamp': datetime.now().strftime('%H:%M:%S.%f')[:-3],55'error': str(e),56'status': 'device_error'57 }58try:59 self.data_queue.put_nowait(error_data)60except queue.Full:61pass6263# 精确控制采样间隔,补偿通信耗时64 elapsed = time.perf_counter() - loop_start65 sleep_time = max(0, self.sample_interval - elapsed)66 time.sleep(sleep_time)这里有个细节值得说一下:time.perf_counter()配合补偿睡眠时间,能让采样间隔尽量稳定。如果你直接time.sleep(0.1),每次通信耗时都会叠加进去,实际采样频率会低于预期。在工业计量场合,这个误差不能忽视。
第三步:UI层——用after()做轮询
python1class IndustrialMonitorApp:23def __init__(self, root):4 self.root = root5 self.root.title("工业数据采集监控系统 v1.0")6 self.root.geometry("800x600")7 self.root.configure(bg='#1e1e2e')89# 用deque存历史数据,maxlen限制内存占用10 self.temp_history = collections.deque(maxlen=100)11 self.pressure_history = collections.deque(maxlen=100)1213 self._build_ui()14 self._start_collector()1516# 启动UI轮询,每50ms检查一次队列17# 注意:这个间隔要比采集间隔短,避免数据积压18 self._poll_queue()1920def _build_ui(self):21# 顶部状态栏22 status_frame = tk.Frame(self.root, bg='#2d2d3f', height=40)23 status_frame.pack(fill='x', padx=5, pady=5)2425 self.status_label = tk.Label(26 status_frame,27 text="● 系统初始化中...",28 bg='#2d2d3f', fg='#888',29 font=('Consolas', 10)30 )31 self.status_label.pack(side='left', padx=10, pady=8)3233 self.time_label = tk.Label(34 status_frame,35 text="--:--:--",36 bg='#2d2d3f', fg='#888',37 font=('Consolas', 10)38 )39 self.time_label.pack(side='right', padx=10, pady=8)4041# 数据展示区42 data_frame = tk.Frame(self.root, bg='#1e1e2e')43 data_frame.pack(fill='x', padx=5, pady=5)4445# 温度卡片46 temp_card = self._make_data_card(data_frame, "温度", "°C", '#ff6b6b')47 temp_card.pack(side='left', fill='both', expand=True, padx=5)48 self.temp_value_label = temp_card.nametowidget(temp_card.winfo_children()[-1].winfo_name())4950# 用更直接的方式持有引用51 self.temp_card_frame = temp_card52 self.pressure_card_frame = self._make_data_card(data_frame, "压力", "MPa", '#4ecdc4')53 self.pressure_card_frame.pack(side='left', fill='both', expand=True, padx=5)5455# 日志区56 log_frame = tk.Frame(self.root, bg='#2d2d3f')57 log_frame.pack(fill='both', expand=True, padx=5, pady=5)5859 tk.Label(log_frame, text="实时数据日志", bg='#2d2d3f', fg='#888',60 font=('微软雅黑', 9)).pack(anchor='w', padx=8, pady=4)6162 self.log_text = tk.Text(63 log_frame,64 bg='#1a1a2e', fg='#00ff88',65 font=('Consolas', 9),66 state='disabled',67 height=1568 )69 scrollbar = ttk.Scrollbar(log_frame, command=self.log_text.yview)70 self.log_text.configure(yscrollcommand=scrollbar.set)7172 self.log_text.pack(side='left', fill='both', expand=True, padx=8, pady=4)73 scrollbar.pack(side='right', fill='y', pady=4)7475# 控制按钮76 btn_frame = tk.Frame(self.root, bg='#1e1e2e')77 btn_frame.pack(fill='x', padx=5, pady=5)7879 self.start_btn = tk.Button(80 btn_frame, text="▶ 开始采集",81 bg='#4ade80', fg='#1e1e2e',82 font=('微软雅黑', 10, 'bold'),83 relief='flat', padx=15, pady=6,84 command=self._start_collector85 )86 self.start_btn.pack(side='left', padx=5)8788 stop_btn = tk.Button(89 btn_frame, text="■ 停止",90 bg='#f87171', fg='white',91 font=('微软雅黑', 10, 'bold'),92 relief='flat', padx=15, pady=6,93 command=self._stop_collector94 )95 stop_btn.pack(side='left', padx=5)9697def _make_data_card(self, parent, title, unit, color):98"""创建数据展示卡片"""99 frame = tk.Frame(parent, bg='#2d2d3f', relief='flat', bd=0)100101 tk.Label(frame, text=title, bg='#2d2d3f', fg='#888',102 font=('微软雅黑', 10)).pack(pady=(12, 0))103104 value_label = tk.Label(105 frame, text="--.-",106 bg='#2d2d3f', fg=color,107 font=('Consolas', 36, 'bold')108 )109 value_label.pack()110111 tk.Label(frame, text=unit, bg='#2d2d3f', fg='#555',112 font=('微软雅黑', 9)).pack(pady=(0, 12))113114# 把value_label作为frame的属性存起来115 frame.value_label = value_label116return frame117118def _start_collector(self):119 stop_event.clear()120 self.collector = DataCollector(data_queue, stop_event, sample_interval=0.1)121 self.collector.start()122 self.status_label.config(text="● 采集运行中", fg='#4ade80')123124def _stop_collector(self):125 stop_event.set()126 self.status_label.config(text="● 已停止", fg='#f87171')127128def _poll_queue(self):129"""130 核心方法:从队列取数据并更新UI131 这个方法永远跑在主线程里,是UI与采集线程之间的唯一桥梁132 """133# 每次最多处理10条数据,避免一次处理太多导致UI卡顿134 processed = 0135while processed < 10:136try:137 data = data_queue.get_nowait()138 self._update_display(data)139 processed += 1140except queue.Empty:141break142143# 无论如何,50ms后再次调度自己144 self.root.after(50, self._poll_queue)145146def _update_display(self, data):147"""更新所有UI组件,只在主线程调用"""148if 'error' in data:149 self._append_log(f"[{data['timestamp']}] ⚠ 设备错误: {data['error']}", 'error')150return151152# 更新数值显示153if 'temperature' in data:154 self.temp_card_frame.value_label.config(text=f"{data['temperature']:.1f}")155 self.pressure_card_frame.value_label.config(text=f"{data['pressure']:.3f}")156157# 更新时间戳158 self.time_label.config(text=data['timestamp'])159160# 报警处理161if data.get('status') == 'alarm':162 self._append_log(163f"[{data['timestamp']}] 🔴 报警 | T={data['temperature']}°C P={data['pressure']}MPa",164'alarm'165 )166167# 存历史(用于后续绘图)168 self.temp_history.append(data.get('temperature', 0))169 self.pressure_history.append(data.get('pressure', 0))170171def _append_log(self, text, level='normal'):172"""向日志区追加文本,自动滚动到底部"""173 color_map = {174'normal': '#00ff88',175'alarm': '#ff6b6b',176'error': '#fbbf24'177 }178 self.log_text.config(state='normal')179 self.log_text.insert('end', text + '\n', level)180 self.log_text.tag_config(level, foreground=color_map.get(level, '#00ff88'))181 self.log_text.see('end') # 自动滚动182 self.log_text.config(state='disabled')183184# 日志条数超过500行就清理,防止内存泄漏185 line_count = int(self.log_text.index('end-1c').split('.')[0])186if line_count > 500:187 self.log_text.config(state='normal')188 self.log_text.delete('1.0', '200.0')189 self.log_text.config(state='disabled')190191192if __name__ == '__main__':193 root = tk.Tk()194 app = IndustrialMonitorApp(root)195 root.protocol("WM_DELETE_WINDOW", lambda: (stop_event.set(), root.destroy()))196 root.mainloop()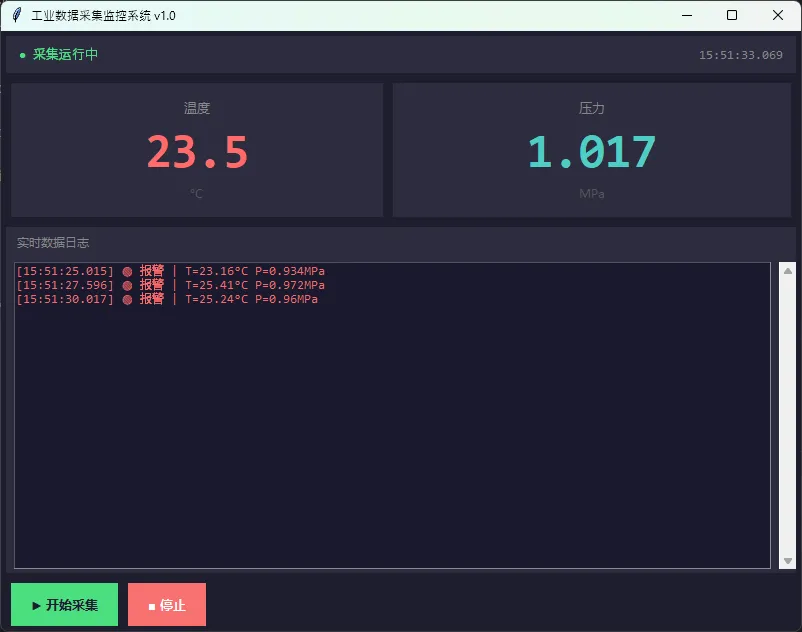
⚠️ 那些让我加班到凌晨的坑
坑一:直接在子线程里操作Tkinter组件。 这是最常见的错误,表现是程序随机崩溃,有时候能跑几分钟,有时候一启动就挂。根本原因是Tkinter不是线程安全的,所有UI操作必须在主线程执行。解决方案就是上面的队列模式——子线程只往队列里放数据,绝不碰任何tk.Label、tk.Text之类的对象。
坑二:忘了把线程设为daemon。 如果不设daemon=True,用户关闭窗口后,采集线程还在后台跑,进程不会真正退出。Windows任务管理器里能看到Python进程还活着,占着串口资源。
坑三:after()的累积漂移。 有些人会在_poll_queue里先处理数据,再调用after(50, self._poll_queue)。这没问题。但如果你在里面做了耗时操作(比如直接在主线程写数据库),实际轮询间隔会越来越长。UI线程里,永远不要做IO操作。
坑四:队列无上限。 我第一版代码没有设maxsize,在一次压测中,模拟设备以1ms间隔发数据,UI只能50ms消费一次,队列在几分钟内膨胀到几十万条记录,内存直接爆掉。设了maxsize之后,用"丢弃旧数据"策略,实时性和稳定性都得到了保障。
🚀 进阶:多设备并发采集
实际工厂里往往不止一台设备。扩展到多设备也很直接——每台设备一个采集线程,共用同一个队列,数据里带上设备ID做区分:
python1class MultiDeviceCollector(threading.Thread):2def __init__(self, device_id, device_config, data_queue, stop_event):3super().__init__(daemon=True, name=f"Collector-{device_id}")4 self.device_id = device_id5 self.config = device_config6 self.data_queue = data_queue7 self.stop_event = stop_event89def run(self):10while not self.stop_event.is_set():11 data = self._read_device()12 data['device_id'] = self.device_id # 打上设备标记13try:14 self.data_queue.put_nowait(data)15except queue.Full:16pass17 time.sleep(self.config.get('interval', 0.1))1819# 启动多个采集线程20devices = [21 {'id': 'PLC_01', 'port': 'COM3', 'interval': 0.1},22 {'id': 'SENSOR_02', 'port': 'COM5', 'interval': 0.5},23 {'id': 'METER_03', 'ip': '192.168.1.100', 'interval': 1.0},24]2526collectors = []27for dev in devices:28 c = MultiDeviceCollector(dev['id'], dev, data_queue, stop_event)29 c.start()30 collectors.append(c)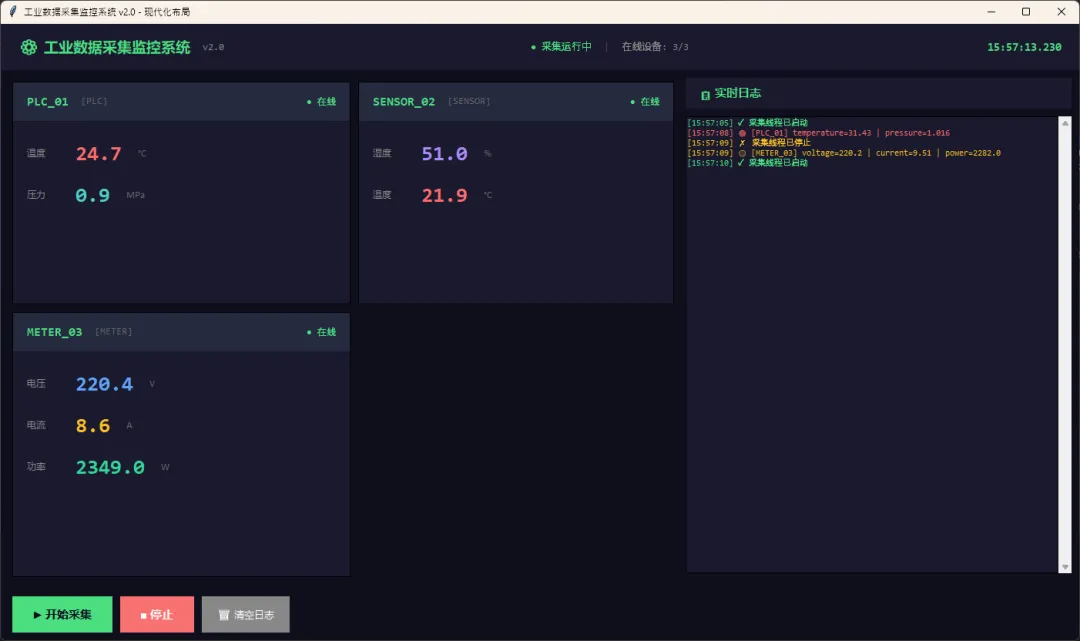
UI层的_poll_queue不需要任何改动,因为所有数据都走同一个队列。这就是解耦架构的好处——扩展设备数量,不需要动UI代码。
📊 性能参考数据
在我的测试环境(Windows 11, i5-10400, Python 3.11)上,这套架构的实测表现:
UI刷新率保持在20Hz(50ms轮询)已经足够流畅,人眼对超过15Hz的刷新率几乎感知不到差异。
🎯 核心要点回顾
这套方案说到底就三条原则:耗时操作离主线程远点,线程间通信用队列不用共享变量,UI轮询用after()不用while True。
工业软件跟互联网软件不一样,稳定性是第一位的。一套在生产线上跑了三个月没崩过的程序,比一套功能花哨但偶尔假死的程序值钱得多。这套架构我在三个实际项目里用过,最长连续运行时间超过72小时,没出过问题。
完整工程代码已在 GitHub 开源,包含串口通信、Modbus RTU对接和SQLite数据存储的完整实现,供学习参考。
欢迎在评论区分享你在工业数据采集项目中遇到的问题,或者你用过的其他多线程方案——这个领域的实践经验,往往比文档有用得多。
随机文章
-
 10个月宝宝每天需要喝多少奶粉?
- 【教学方案】AI支持下的Python数据分析与可视化、人工智能建模及论文撰写
- 在大学里学点Python:基础概念
- 【第40期】21天养成编程习惯:Python刷题第05天
- AI支持下的Python数据分析与可视化、人工智能建模及论文撰写
- FastLLM在Linux上安装与使用指南
- AI驱动蠕虫盗用算力攻击Linux、Windows及物联网设备
- 训练靠 Python,提速靠 Rust,落地靠 Java:聊聊 AI 工程里这三门语言各自的命
- Python专业值得考的6个证书
- Red Hat Linux 7.3 简体中文正式版
- 给大家普及一下,自学Python一个月需要达到的强度...
