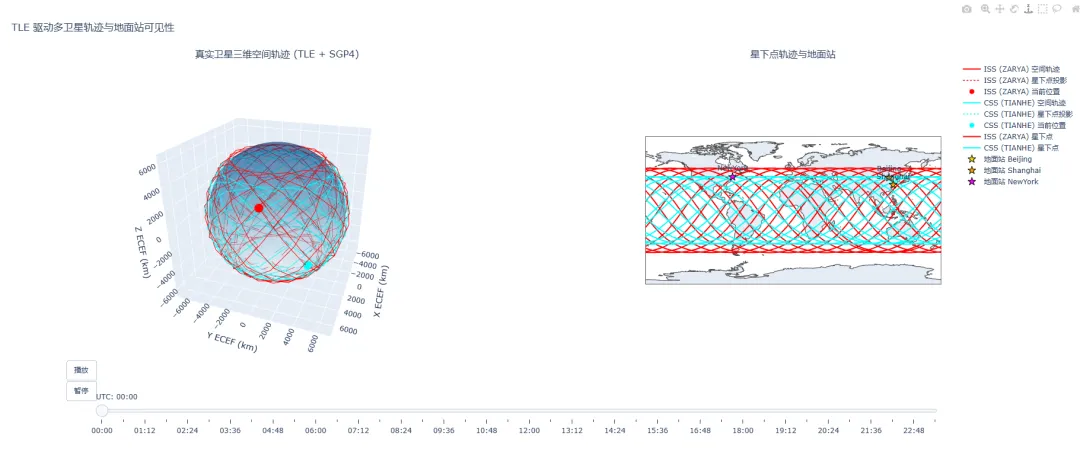
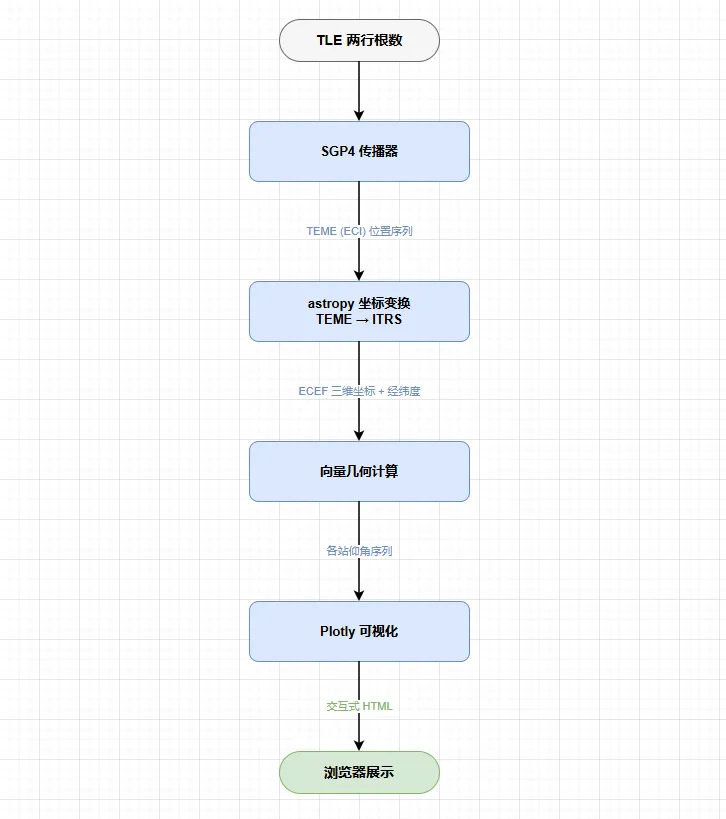
import numpy as npimport pandas as pdfrom datetime import datetime, timedeltafrom astropy.time import Timefrom astropy.coordinates import ( ITRS, TEME, EarthLocation, CartesianRepresentation)import astropy.units as ufrom sgp4.api import Satrec, jdayimport plotly.graph_objects as gofrom plotly.subplots import make_subplots# ==================== 地球定向参数(必须在其他 astropy 导入前配置) ====================from astropy.utils import iersfrom astropy.utils.iers import IERS_Auto, IERS_B# 启用自动下载,保留高精度iers.conf.auto_download = Trueiers.conf.iers_auto_url = 'https://datacenter.iers.org/data/9/finals2000A.all'iers.conf.auto_max_age = 30 # 缓存有效期 30 天# 显式初始化:下载 IERS_A,失败则回退 IERS_Btry: iers.IERS.iers_table = IERS_Auto.open() print('IERS-A 高精度表格已加载')except Exception as e: print(f'IERS-A 下载失败,回退内置 IERS-B: {e}') iers.IERS.iers_table = IERS_B.open()# ==================== 常数 ====================R_EARTH = 6371.0 # kmELEVATION_THRESHOLD = 5.0 # 可视仰角阈值 (°)# ==================== 多地面站定义 ====================stations = { 'Beijing': EarthLocation(lat=39.9 * u.deg, lon=116.4 * u.deg, height=0 * u.m), 'Shanghai': EarthLocation(lat=31.2 * u.deg, lon=121.4 * u.deg, height=0 * u.m), 'NewYork': EarthLocation(lat=40.7 * u.deg, lon=-74.0 * u.deg, height=0 * u.m),}# ==================== TLE 数据(国际空间站 + 示例卫星) ====================# 注意:可替换为最新的 TLE,从 celestrak.org 获取TLE_SETS = [ { 'name': 'ISS (ZARYA)', 'line1': '1 25544U 98067A 24001.50000000 .00001234 00000+0 23456-4 0 9991', 'line2': '2 25544 51.6420 123.4567 0001234 45.6789 314.5678 15.50123456123456', 'color': 'red' }, { 'name': 'CSS (TIANHE)', 'line1': '1 48274U 21035A 24001.50000000 .00000567 00000+0 12345-4 0 9992', 'line2': '2 48274 41.4690 78.1234 0001567 89.1234 270.9876 15.61234567890123', 'color': 'cyan' }]# ==================== SGP4 传播与坐标转换 ====================def tle_to_eci(sat, dt): """通过 SGP4 计算卫星在 dt 时刻的 ECI (TEME) 位置 (km)""" jd, fr = jday(dt.year, dt.month, dt.day, dt.hour, dt.minute, dt.second) error, pos, vel = sat.sgp4(jd, fr) if error != 0: raise RuntimeError(f"SGP4 error at {dt}: {error}") return np.array(pos) # TEME 坐标系def teme_to_itrs(pos_teme, obstime): """TEME -> ITRS (ECEF) 高精度转换""" teme_cart = CartesianRepresentation(pos_teme * u.km) teme = TEME(teme_cart, obstime=obstime) itrs = teme.transform_to(ITRS(obstime=obstime)) return np.array([itrs.x.to(u.km).value, itrs.y.to(u.km).value, itrs.z.to(u.km).value])def compute_elevation(r_ecef, station): """简单向量几何计算仰角(度),无需 astropy 变换链,速度极快""" # 地面站 ECEF 坐标 (km) r_sta = np.array([station.x.to(u.km).value, station.y.to(u.km).value, station.z.to(u.km).value]) # 卫星相对地面站的矢量 d = r_ecef - r_sta # 地面站当地"上"方向(简化为地球球心径向) up = r_sta / np.linalg.norm(r_sta) # 仰角 = 90° − 天顶角 d_norm = np.linalg.norm(d) if d_norm < 1e-6: return 90.0 cos_zenith = np.dot(d / d_norm, up) # clamp 防止浮点溢出 cos_zenith = max(-1.0, min(1.0, cos_zenith)) return 90.0 - np.rad2deg(np.arccos(cos_zenith))# ==================== 时间轴构建 ====================# 传播 24 小时,200 帧start_time = datetime(2023, 12, 1, 0, 0, 0)num_frames = 200duration = timedelta(hours=24)time_steps = [start_time + duration * i / num_frames for i in range(num_frames)]# ==================== 主计算循环 ====================all_sat_data = [] # 存放每颗卫星的完整数组for tle in TLE_SETS: # 初始化 SGP4 卫星对象 sat = Satrec.twoline2rv(tle['line1'], tle['line2']) name = tle['name'] color = tle['color'] # 预分配数组 ecef_arr = np.zeros((num_frames, 3)) lons = np.zeros(num_frames) lats = np.zeros(num_frames) # 为每个地面站存储仰角数组 elevation_dict = {sname: np.zeros(num_frames) for sname in stations} times_out = [] for idx, t in enumerate(time_steps): # SGP4 得到 TEME 位置 pos_teme = tle_to_eci(sat, t) obstime = Time(t) # TEME -> ITRS (ECEF) r_ecef = teme_to_itrs(pos_teme, obstime) ecef_arr[idx] = r_ecef # 经纬度 x, y, z = r_ecef lat = np.rad2deg(np.arctan2(z, np.sqrt(x**2 + y**2))) lon = np.rad2deg(np.arctan2(y, x)) lats[idx] = lat lons[idx] = lon # 所有地面站仰角 for sname, sta in stations.items(): elev = compute_elevation(r_ecef, sta) elevation_dict[sname][idx] = elev times_out.append(t) # 保存这颗卫星的所有数据 sat_data = { 'name': name, 'color': color, 'times': times_out, 'ecef': ecef_arr, 'lons': lons, 'lats': lats, 'elevations': elevation_dict } all_sat_data.append(sat_data) # ---- 输出 CSV(每颗卫星一个文件) ---- df = pd.DataFrame({ 'Time(UTC)': [t.strftime('%Y-%m-%d %H:%M:%S') for t in times_out], 'ECEF_X_km': ecef_arr[:, 0], 'ECEF_Y_km': ecef_arr[:, 1], 'ECEF_Z_km': ecef_arr[:, 2], 'Longitude_deg': lons, 'Latitude_deg': lats }) for sname in stations: df[f'Elevation_{sname}_deg'] = elevation_dict[sname] csv_name = f"{name.replace(' ', '_')}_trajectory.csv" df.to_csv(csv_name, index=False, float_format='%.6f') print(f"已保存 {csv_name} (含{len(stations)}个地面站仰角)")# ==================== 地球网格 ====================def sphere_mesh(radius, steps=60): phi = np.linspace(0, np.pi, steps) theta = np.linspace(0, 2*np.pi, steps) phi, theta = np.meshgrid(phi, theta) x = radius * np.sin(phi) * np.cos(theta) y = radius * np.sin(phi) * np.sin(theta) z = radius * np.cos(phi) return x, y, zx_e, y_e, z_e = sphere_mesh(R_EARTH)# ==================== 构建 Plotly 图形 ====================fig = make_subplots( rows=1, cols=2, specs=[[{'type': 'scatter3d'}, {'type': 'scattergeo'}]], subplot_titles=('真实卫星三维空间轨迹 (TLE + SGP4)', '星下点轨迹与地面站'), column_widths=[0.65, 0.35])# ---- 左图:3D 场景 ----fig.add_trace(go.Surface( x=x_e, y=y_e, z=z_e, colorscale='Blues', opacity=0.4, showscale=False, name='地球'), row=1, col=1)scatter_indices = [] # 记录每颗卫星当前位置 trace 的索引(用于动画更新)for sat_data in all_sat_data: color = sat_data['color'] name = sat_data['name'] # 空间轨迹线 fig.add_trace(go.Scatter3d( x=sat_data['ecef'][:, 0], y=sat_data['ecef'][:, 1], z=sat_data['ecef'][:, 2], mode='lines', line=dict(color=color, width=2), name=f"{name} 空间轨迹" ), row=1, col=1) # 星下点投影线 norms = np.linalg.norm(sat_data['ecef'], axis=1) ground = R_EARTH * sat_data['ecef'] / norms[:, np.newaxis] fig.add_trace(go.Scatter3d( x=ground[:, 0], y=ground[:, 1], z=ground[:, 2], mode='lines', line=dict(color=color, width=1.5, dash='dot'), name=f"{name} 星下点投影" ), row=1, col=1) # 卫星当前位置(初始第一帧) trace_idx = len(fig.data) fig.add_trace(go.Scatter3d( x=[sat_data['ecef'][0, 0]], y=[sat_data['ecef'][0, 1]], z=[sat_data['ecef'][0, 2]], mode='markers', marker=dict(size=8, color=color, symbol='circle'), name=f"{name} 当前位置" ), row=1, col=1) scatter_indices.append(trace_idx)# ---- 右图:2D 地图 + 地面站 ----# 1) 每颗卫星的完整星下点轨迹(实线)for sat_data in all_sat_data: fig.add_trace(go.Scattergeo( lon=sat_data['lons'], lat=sat_data['lats'], mode='lines', line=dict(width=2, color=sat_data['color']), name=f"{sat_data['name']} 星下点" ), row=1, col=2)# 2) 地面站标记station_colors = ['gold', 'orange', 'magenta'] # 每个站一个颜色for (sname, sta), sc in zip(stations.items(), station_colors): fig.add_trace(go.Scattergeo( lon=[sta.lon.deg], lat=[sta.lat.deg], mode='markers+text', marker=dict(size=10, color=sc, symbol='star', line=dict(width=1, color='black')), text=[sname], textposition='top center', name=f'地面站 {sname}' ), row=1, col=2)# 地图风格(显式配置 geo2 子图,确保可旋转缩放)fig.update_layout( geo2=dict( projection=dict( type='orthographic', rotation=dict(lon=100, lat=30, roll=0) ), showcoastlines=True, coastlinecolor='Black', showland=True, landcolor='lightgray', showocean=True, oceancolor='lightblue', ))# ==================== 动画帧 ====================frames = []for frame_idx in range(num_frames): frame_data = [] for sat_idx, sat_data in enumerate(all_sat_data): pos = sat_data['ecef'][frame_idx] # 使用对 Beijing 站的仰角决定标记形状(也可以选择一个参考站) elev_beijing = sat_data['elevations']['Beijing'][frame_idx] marker_symbol = 'circle' if elev_beijing >= ELEVATION_THRESHOLD else 'x' frame_data.append(dict( type='scatter3d', x=[pos[0]], y=[pos[1]], z=[pos[2]], marker=dict(size=10, color=sat_data['color'], symbol=marker_symbol) )) frames.append(go.Frame( data=frame_data, traces=scatter_indices, name=f"t{frame_idx}" ))fig.frames = frames# 播放控件与时间滑块fig.update_layout( updatemenus=[dict( type='buttons', buttons=[ dict(label='播放', method='animate', args=[None, {'frame': {'duration': 80, 'redraw': True}, 'fromcurrent': True}]), dict(label='暂停', method='animate', args=[[None], {'frame': {'duration': 0, 'redraw': True}, 'mode': 'immediate', 'transition': {'duration': 0}}]) ], showactive=False, x=0.1, y=0, xanchor='right', yanchor='top' )], sliders=[dict( active=0, yanchor='top', xanchor='left', currentvalue={'prefix': 'UTC: '}, pad={'b': 10, 't': 50}, len=0.9, x=0.1, steps=[dict(method='animate', args=[[f't{k}'], {'frame': {'duration': 80, 'redraw': True}, 'mode': 'immediate', 'transition': {'duration': 0}}], label=time_steps[k].strftime('%H:%M')) for k in range(0, num_frames, 5)] )], scene=dict(aspectmode='data', xaxis_title='X ECEF (km)', yaxis_title='Y ECEF (km)', zaxis_title='Z ECEF (km)', dragmode='turntable', camera=dict(eye=dict(x=1.5, y=1.5, z=1.2))), title='TLE 驱动多卫星轨迹与地面站可见性', height=750)# ==================== 保存为 HTML ====================# output_html = 'satellite_animation.html'# fig.write_html(output_html)# print(f"交互式动画已保存至 {output_html},可直接用浏览器打开。")fig.show(config=dict(scrollZoom=True, displayModeBar=True, displaylogo=False))# 若仍希望在 notebook 中显示,可取消下一行注释# fig.show()