Linux 这套 Nginx 日志解决方案,真香!
- 2026-08-24 17:27:42
Linux 这套 Nginx 日志解决方案,真香! 推荐大家关注一个公众号 点击上方 "Linux中文社区" 关注,星标或者置顶 21点00分准时推送,第一时间送达 上一篇:Linux 操作的良好习惯总结 大家好,我是中文妹。
最近客户有个新需求,就是想查看网站的访问情况,由于网站没有做 google 的统计和百度的统计,所以访问情况,只能通过日志查看,通过脚本的形式给客户导出也不太实际,给客户写个简单的页面,咱也做不到 成熟的日志解决方案,那就是 ELK,还有现在比较火的 Loki,(当然还有很多其他解决方案,比如 Splunk、Datadog 等),那我们这个小网站,小体量,必然是选择 Loki 来做 所以这次就采用 Nginx+Promtail+Loki+Grafana 来做一个简单的 Nginx 日志展示 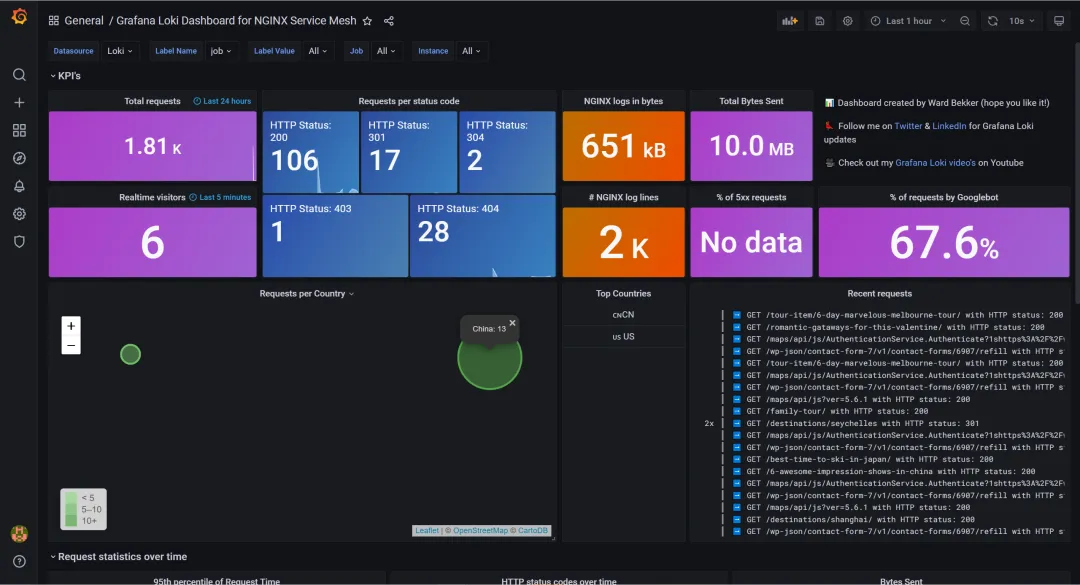
Nginx 的安装不多说,Promtail 和 Loki 都选用二进制的方式进行安装,直接下载对应版本的二进制文件,解压后指定配置文件启动即可 其中 promtail 配置文件如下配置: 日志收集工作完成后,在 Nginx 中,需要修改日志格式,修改 Nginx 的日志格式为 Json 格式,配置如下: 配置文件中,需要注意的是 geoip 的配置,需要在 nginx 中添加 geoip 模块 首先通过 yum 安装 geoip 及 lib 库 之后,重新编译 Nginx,通过 --with-http_geoip_module 添加 nginx 的 geoip 模块 编译完成后,在 objs 目录下生成新的 Nginx 可执行文件,替换原先的,通过 kill -USR2 信号,升级 Nginx。另外,搜索公众号Linux中文社区后台回复“私房菜”,获取一份惊喜礼包。 此时配置的 log_format 不会再报错 geoip 指令找不到,配置完成后,配置网站的 access 日志,引用刚才配置的 json 格式的 log_format 查看此时的日志格式 已经转为 JSON 格式,接着安装 grafana,最快捷的方式,通过 docker 直接起一个 启动后,通过 admin/admin 默认用户名密码登录,登陆后提示重置密码,之后进入 grafana 界面 我们直接添加数据源 loki 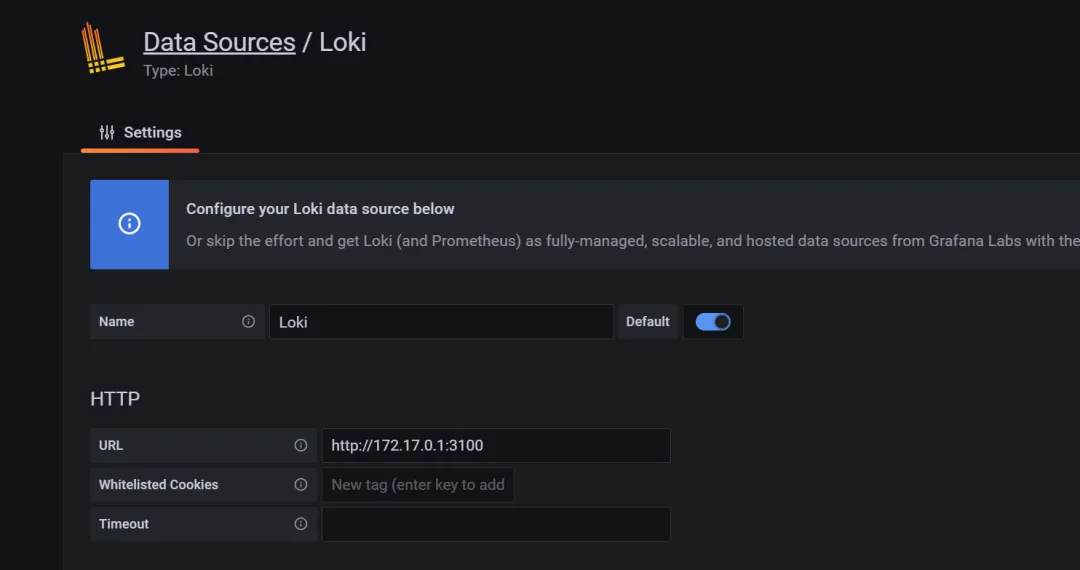
先通过 explore 查询,日志是否存入 loki 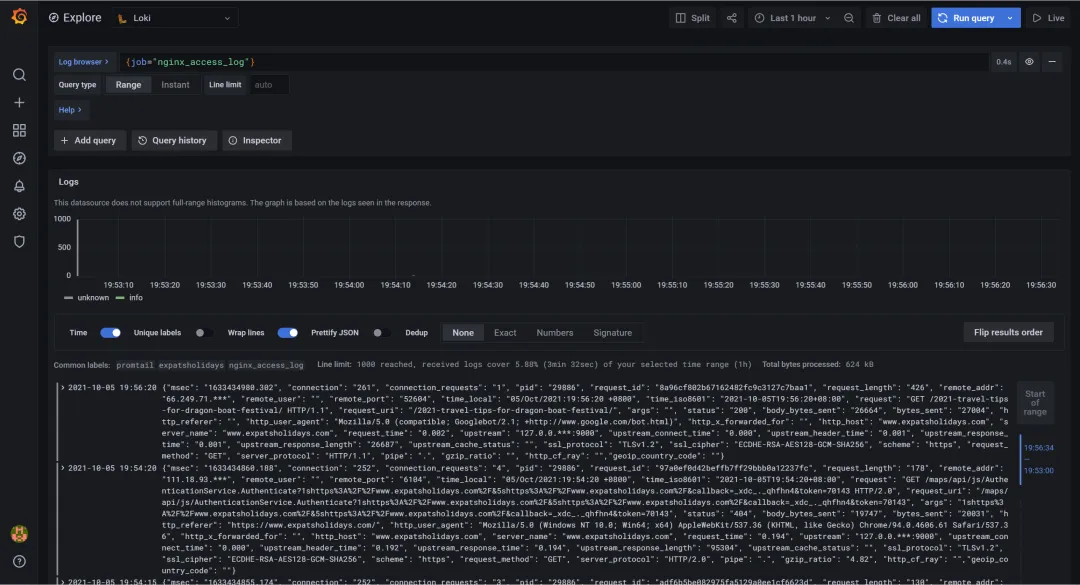
可以看到,日志已经存入 loki 接着添加 Dashboard,通过 ID 导入 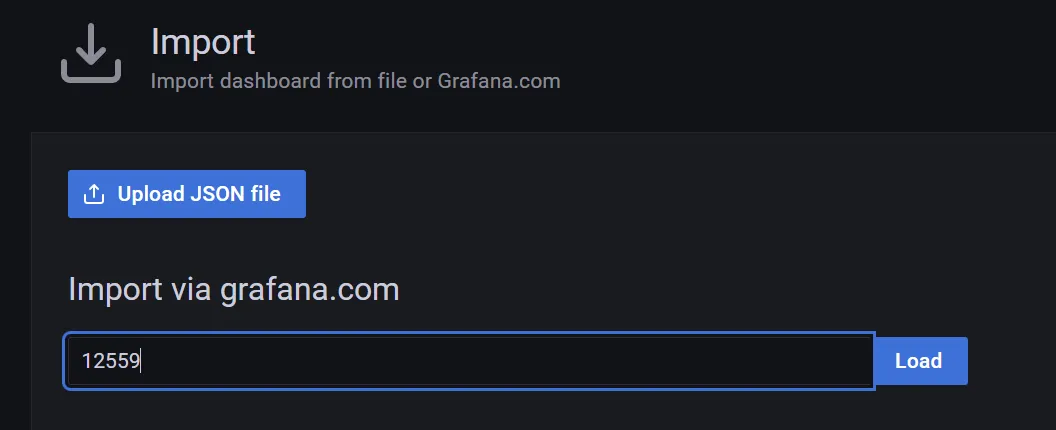
导入如下 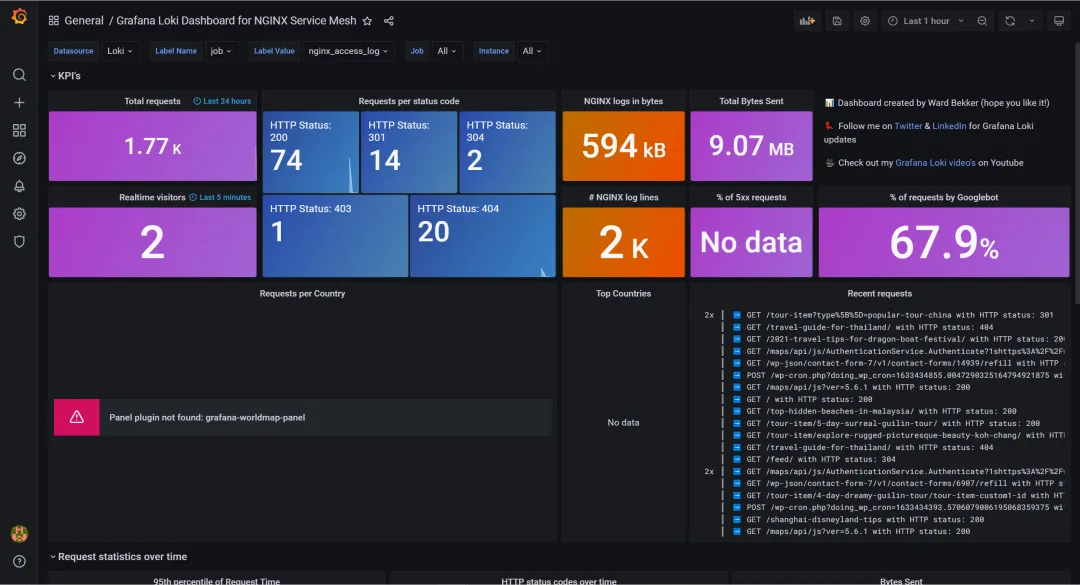
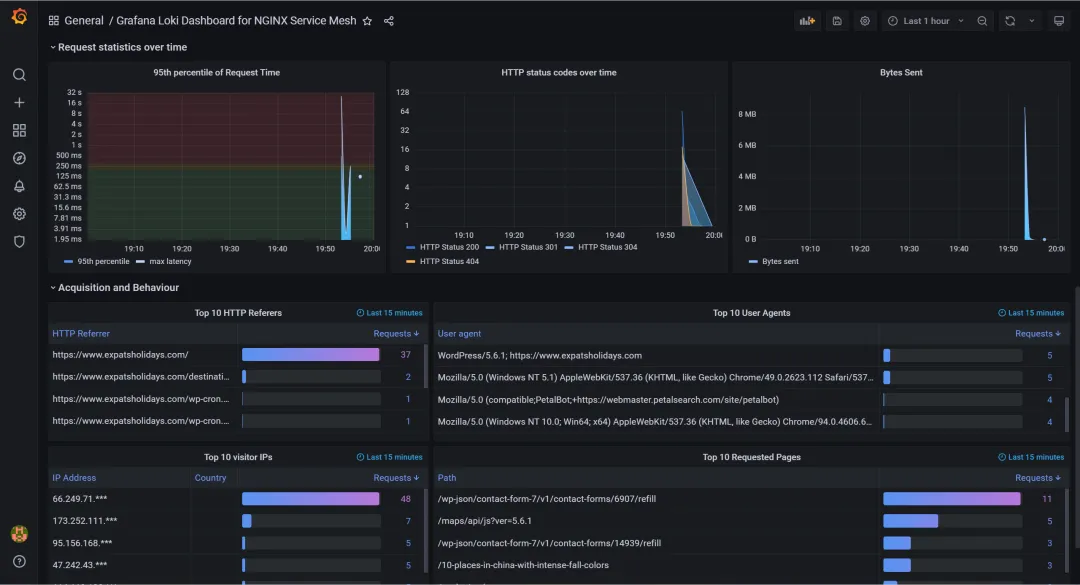
安装完成后,重启 grafana,重新查看 dashboard 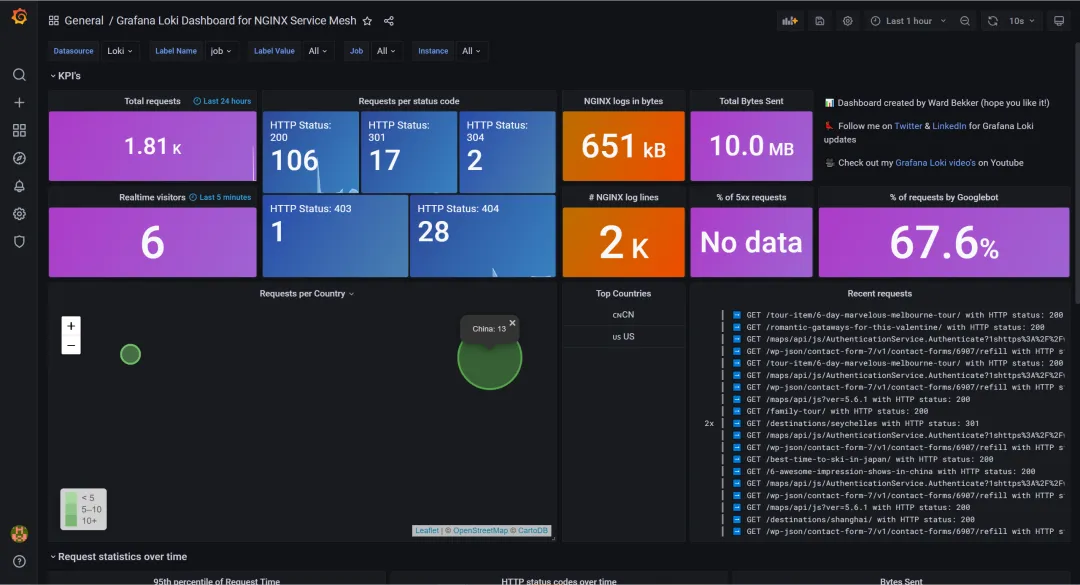
地图可以展示,这里因为地图的地址是国外的地址,所以地图的图片无法加载,可以通过反代的方式解决 ok,今天内容就这些,通过简单快速的方式,为客户呈现网站的详细访问情况,Loki+Grafana 是绝佳的组合 
责编:中文妹 | 来源:入门小站

server: http_listen_port: 9080 grpc_listen_port: 0positions: filename: /tmp/positions.yamlclients: - url: http://localhost:3100/loki/api/v1/pushscrape_configs:- job_name: nginx pipeline_stages: - replace: expression: '(?:[0-9]{1,3}\.){3}([0-9]{1,3})' replace: '***' static_configs: - targets: - localhost labels: job: nginx_access_log host: expatsxxxxs agent: promtail __path__: /var/log/nginx/expatshxxxxs.access.log
log_format json_analytics escape=json '{''"msec": "$msec", '# request unixtime in seconds with a milliseconds resolution'"connection": "$connection", '# connection serial number'"connection_requests": "$connection_requests", '# number of requests made in connection'"pid": "$pid", '# process pid'"request_id": "$request_id", '# the unique request id'"request_length": "$request_length", '# request length (including headers and body)'"remote_addr": "$remote_addr", '# client IP'"remote_user": "$remote_user", '# client HTTP username'"remote_port": "$remote_port", '# client port'"time_local": "$time_local", ''"time_iso8601": "$time_iso8601", '# local time in the ISO 8601 standard format'"request": "$request", '# full path no arguments if the request'"request_uri": "$request_uri", '# full path and arguments if the request'"args": "$args", '# args'"status": "$status", '# response status code'"body_bytes_sent": "$body_bytes_sent", '# the number of body bytes exclude headers sent to a client'"bytes_sent": "$bytes_sent", '# the number of bytes sent to a client'"http_referer": "$http_referer", '# HTTP referer'"http_user_agent": "$http_user_agent", '# user agent'"http_x_forwarded_for": "$http_x_forwarded_for", '# http_x_forwarded_for'"http_host": "$http_host", '# the request Host: header'"server_name": "$server_name", '# the name of the vhost serving the request'"request_time": "$request_time", '# request processing time in seconds with msec resolution'"upstream": "$upstream_addr", '# upstream backend server for proxied requests'"upstream_connect_time": "$upstream_connect_time", '# upstream handshake time incl. TLS'"upstream_header_time": "$upstream_header_time", '# time spent receiving upstream headers'"upstream_response_time": "$upstream_response_time", '# time spend receiving upstream body'"upstream_response_length": "$upstream_response_length", '# upstream response length'"upstream_cache_status": "$upstream_cache_status", '# cache HIT/MISS where applicable'"ssl_protocol": "$ssl_protocol", '# TLS protocol'"ssl_cipher": "$ssl_cipher", '# TLS cipher'"scheme": "$scheme", '# http or https'"request_method": "$request_method", '# request method'"server_protocol": "$server_protocol", '# request protocol, like HTTP/1.1 or HTTP/2.0'"pipe": "$pipe", '# "p" if request was pipelined, "." otherwise'"gzip_ratio": "$gzip_ratio", ''"http_cf_ray": "$http_cf_ray",''"geoip_country_code": "$geoip_country_code"''}';
yum -y install GeoIP GeoIP-data GeoIP-devel
{"msec": "1633430998.322", "connection": "4", "connection_requests": "1", "pid": "29887", "request_id": "40770fec38c2e5a68714df5f7a67283d", "request_length": "392", "remote_addr": "106.19.96.55", "remote_user": "", "remote_port": "43746", "time_local": "05/Oct/2021:18:49:58 +0800", "time_iso8601": "2021-10-05T18:49:58+08:00", "request": "GET / HTTP/2.0", "request_uri": "/", "args": "", "status": "200", "body_bytes_sent": "60949", "bytes_sent": "61222", "http_referer": "https://cn.bing.com/search?q=expat+tourism+agent+in+china&go=Search&qs=n&form=QBRE&sp=-1&pq=expat+tourism+agent+in+chi&sc=0-26&sk=&cvid=8BD2D4B79B3A4FA682571CB5BC7334D4", "http_user_agent": "Mozilla/5.0 (iPhone; CPU iPhone OS 13_6 like Mac OS X) AppleWebKit/605.1.15 (KHTML, like Gecko) Version/13.1.2 Mobile/15E148 Safari/604.1", "http_x_forwarded_for": "", "http_host": "www.expatsholidays.com", "server_name": "www.expatsholidays.com", "request_time": "0.003", "upstream": "127.0.0.1:9000", "upstream_connect_time": "0.000", "upstream_header_time": "0.002", "upstream_response_time": "0.002", "upstream_response_length": "60991", "upstream_cache_status": "", "ssl_protocol": "TLSv1.2", "ssl_cipher": "ECDHE-RSA-AES128-GCM-SHA256", "scheme": "https", "request_method": "GET", "server_protocol": "HTTP/2.0", "pipe": ".", "gzip_ratio": "", "http_cf_ray": "","geoip_country_code": ""}{"msec": "1633430998.709", "connection": "4", "connection_requests": "2", "pid": "29887", "request_id": "430fd53a457ea580c47e9b055da2b4d0", "request_length": "56", "remote_addr": "106.19.96.55", "remote_user": "", "remote_port": "43746", "time_local": "05/Oct/2021:18:49:58 +0800", "time_iso8601": "2021-10-05T18:49:58+08:00", "request": "GET /maps/api/js?ver=5.6.1 HTTP/2.0", "request_uri": "/maps/api/js?ver=5.6.1", "args": "ver=5.6.1", "status": "200", "body_bytes_sent": "41262", "bytes_sent": "41406", "http_referer": "https://www.expatsholidays.com/", "http_user_agent": "Mozilla/5.0 (iPhone; CPU iPhone OS 13_6 like Mac OS X) AppleWebKit/605.1.15 (KHTML, like Gecko) Version/13.1.2 Mobile/15E148 Safari/604.1", "http_x_forwarded_for": "", "http_host": "www.expatsholidays.com", "server_name": "www.expatsholidays.com", "request_time": "0.000", "upstream": "", "upstream_connect_time": "", "upstream_header_time": "", "upstream_response_time": "", "upstream_response_length": "", "upstream_cache_status": "", "ssl_protocol": "TLSv1.2", "ssl_cipher": "ECDHE-RSA-AES128-GCM-SHA256", "scheme": "https", "request_method": "GET", "server_protocol": "HTTP/2.0", "pipe": ".", "gzip_ratio": "3.06", "http_cf_ray": "","geoip_country_code": ""}
docker run -d -p 3000:3000 grafana/grafana


可以看到,这里地图没展示,缺少grafana-worldmap-panel插件,我们装一下,通过命令行
grafana-cli plugins install grafana-worldmap-panel
-已完结-
为了跟上AI时代我干了一件事儿,我创建了一个知识星球社群:ChartGPT与副业。想带着大家一起探索ChatGPT和新的AI时代。
有很多小伙伴搞不定ChatGPT账号,于是我们决定,凡是这三天之内加入ChatPGT的小伙伴,我们直接送一个正常可用的永久ChatGPT独立账户。
简单说下这个星球能给大家提供什么:
星球分享:
1、不断分享如何使用ChatGPT来完成各种任务,让你更高效地使用ChatGPT,以及副业思考、变现思路、创业案例、落地案例分享。
2、分享ChatGPT的使用方法、最新资讯、商业价值。
3、探讨未来关于ChatGPT的机遇,共同成长。
4、帮助大家解决ChatGPT遇到的问题。
5、提供一整年的售后服务,一起搞副业
星球福利:
1、加入星球4天后,就送ChatGPT独立账号。
2、邀请你加入ChatGPT会员交流群。
3、赠送一份完整的ChatGPT手册和66个ChatGPT副业赚钱手册。
其它福利还在筹划中...不过,我给你大家保证,加入星球后,收获的价值会远远大于今天加入的门票费用 !
本星球第一期原价399,目前属于试运营,早鸟价119,每超过50人涨价10元,星球马上要来一波大的涨价,如果你还在犹豫,可能最后就要以更高价格加入了。。
早就是优势。建议大家尽早以便宜的价格加入!
还有不到10个名额就要涨价了
昨天发的50个优惠卷已经用完,今天我又放出来了100个20元优惠卷,相当于99元就能加入。 早就是优势!对了现在加入还送一个ChatGPT独享帐号。 名额有限,先到先得:


声明:本文部分素材转载自互联网,如有侵权立即删除 。
往期精彩

喜欢本文的朋友们,欢迎长按下图,关注订阅号Linux中文社区
收看更多精彩内容
本文来自网友投稿或网络内容,如有侵犯您的权益请联系我们删除,联系邮箱:596563534@qq.com 。
随机文章
-
 10个月宝宝每天需要喝多少奶粉?
- 这108个Python项目练完,你就厉害了
- 搭建个人AI本地助手,全部代码分享
- 【Python小白速通】给函数设参数?说白了就是"给干活的留备注"!
- python全国计算机等级考试辅导课 续行符
- Python logging模块的一个“陷阱”:为何我的日志会意外打印到控制台?
- Python绘图实战:基于GridSpec构建多面板回归预测与边缘分布组合图
- Python+Spark医疗数据分析:肝硬化生存预测可视化系统教程 毕业设计 选题推荐 毕设选题 数据分析 机器学习 数据挖掘
- AI驾驭者|Python倒计时工具实战2:给倒计时器加个“时间屏”,解锁组件可视化技能
- 练Python的都来,我有题库了—必收藏
- 期刊图片复现|Python实现不同区域驱动因子归因分析棒棒糖图