如果你问我 2026 年学习 AI Agent 的最佳方式是什么,我会说:绝对是从零自己动手构建。这不仅对学习很重要,如果你要打造一个高效、个性化且健壮的生产级 AI Agent,从零开始往往是最佳选择。比如你能找到的所有 coding agent(如 Claude Code、Codex、Cursor 等),都是针对各自产品定制架构构建的。
当然别误会,LangChain、LangGraph 和 LlamaIndex 等框架在标准任务(例如 RAG 或自动化 workflow)上也很有用。关键是:在把库用到真实复杂任务之前,你需要了解它的能力与局限。
我现在仍然经常用 LangGraph,但更多用于原型阶段。它非常适合做 demo,或用于教学设计模式与 agentic 架构。
在这篇和下一篇文章里,我会手把手带你构建一个具备基础能力并包含若干高级能力的 AI Agent。我还会展示一些常用且实用的设计模式实现。
你可以在这个 Colab 笔记本中找到完整代码并自行尝试:https://colab.research.google.com/drive/1a1hAyRo5f-3ct3a2t0m2C-jdaTymhsSY?usp=sharing
AI Agent 究竟是什么?
AI Agent 的类型很多,如今你几乎到处都能见到。过去的简单 chatbot(如 ChatGPT)现在已经成了拥有工具的 AI Agent——它们可以做网页搜索、推理、生成图像等。Agent 的复杂度取决于它要达成的目标。
例如,一个面向网站访客的客服 agent,可能就是一个带 RAG 工具的 chatbot(以提供准确、最新的回答),再加一个当找不到可靠答案或需要人工介入时自动给人工客服团队起草邮件的工具。
从本质上讲,一个 AI Agent 是这样一个系统,能够:
今天我们要构建的,是一个使用 ReAct(Reasoning + Acting)模式,实现前三项能力的基础 agent。
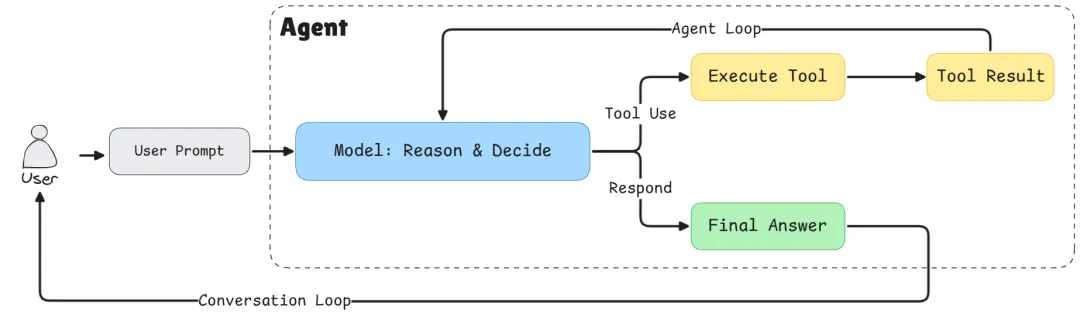 Basic Agent Architecture
架构总览
在编码之前,先理解我们要搭建的结构。本次我们会构建三大组件:
- Tool System:管理所有可用工具的灵活注册表
- Agent Orchestrator:负责整体协调的“大脑”
为什么要这样分层:
- 工具抽象(Tool Abstraction):通过工具注册表,我们可以在不改动核心逻辑的情况下轻松为 agent 增加新能力。比如你需要一个数据库查询函数?注册一个新工具即可。这就是可扩展性原则的体现,也是所有 Agent 的共性。
- LLM 与 Agent 分离(LLM/Agent Separation):对生产系统尤为关键。Agent 是 orchestrator,负责管理对话流程、决定何时调用工具、处理整体 workflow。LLM 只是一个提供推理的组件,它像 agent 的“大脑”,但我们需要能够随时“换脑”。
通过解耦,你可以:
- 在不同 LLM 提供商(Gemini、OpenAI、Claude)之间切换,无需重写 agent 逻辑;
第一步:构建 Tool System
先从基础设施开始。工具是 agent 的“手脚”,让它能与外部世界交互。
Tool 类
首先需要一种方式来表示单个工具:
from typing importDict, List, Callable, Any

classTool:
def__init__(
        self,
        name: str,
        description: str,
        input_schema: Dict[str, Any],
        output_schema: Dict[str, Any],
        func: Callable[..., Any],
):
self.name = name
self.description = description
self.input_schema = input_schema
self.output_schema = output_schema
self.func = func
def__call__(self, **kwargs):
returnself.func(**kwargs)
每个工具包含五个关键部分:
- description:工具做什么(对 LLM 理解何时使用它至关重要)
__call__ 方法让 Tool 实例可像普通函数一样调用:tool(a=5, b=3)。
Tool Registry
现在我们需要一个中心化的地方来管理所有工具。
from typing importUnion, Literal
from pydantic import BaseModel

classToolRegistry:
def__init__(self):
self.tools: Dict[str, Tool] = {}
defregister(self, tool: Tool):
self.tools[tool.name] = tool
defget(self, name: str) -> Tool:
if name notinself.tools.keys():
raise ValueError(f"Tool '{name}' not found")
returnself.tools[name]
deflist_tools(self) -> List[Dict[str, Any]]:
return [
            {
"name": tool.name,
"description": tool.description,
"input_schema": tool.input_schema.model_json_schema(),
            }
for tool inself.tools.values()
        ]
defget_tool_call_args_type(self) -> Union[BaseModel]:
        input_args_models = [tool.input_schema for tool inself.tools.values()]
        tool_call_args = Union[tuple(input_args_models)]
return tool_call_args
defget_tool_names(self) -> Literal[None]:
returnLiteral[*self.tools.keys()]
Registry 是所有能力的中央目录。我们主要用它来注册和获取工具。
list_tools():告诉 LLM 它能做什么
该方法生成所有可用工具的机器可读描述。当我们把它放到 system prompt 中,LLM 就知道自己能访问哪些能力。返回类似:
[
{
"name":"add",
"description":"Add two numbers",
"input_schema":{
"type":"object",
"properties":{
"a":{"type":"integer"},
"b":{"type":"integer"}
},
"required":["a","b"]
}
},
{
"name":"multiply",
"description":"Multiply two numbers",
"input_schema":{...}
}
]
这个 JSON schema 明确告诉 LLM 如何调用每个工具。没有它,LLM 可能会“幻觉”出不存在的工具名,或以错误格式传参。
get_tool_call_args_type():运行时校验
该方法创建所有可能工具参数 schema 的 Union 类型。在 Python typing 中,Union 表示“其中之一”。如果你有两个工具,就会得到:Union[ToolAddArgs, ToolMultiplyArgs]。
为什么重要?当 LLM 返回一次 tool 调用时,Pydantic 会校验参数是否匹配这些 schema 中的某一个。如果 LLM 尝试传 {"a": "five", "b": 3}(把 int 写成了字符串),Pydantic 会在工具执行前捕获错误。这能防止运行时异常并提供清晰反馈。
注:我们使用 Pydantic,因为它正在成为 LLM API 进行 tool 调用与结构化输出的事实标准。当然,如果你想用简易 JSON,也能轻易在 Pydantic 与 JSON 之间转换。
get_tool_names():防止幻觉
该方法生成仅包含有效工具名的 Literal 类型:Literal["add", "multiply"]。这是一个强约束:LLM 只能返回 Registry 中真实存在的工具名。
没有它,LLM 可能会自信地调用一个你从未创建过的“divide”。有了结构化输出与 Literal 约束后,LLM 被迫从允许的集合中选择;如果试图使用无效名称,API 会拒绝响应并让模型重试。
这三个方法共同打造了稳健的类型安全体系,弥合了 LLM 的概率世界与 Python 代码的确定世界之间的鸿沟,把模糊请求转化为可验证、可执行的函数调用。
下面看看如何使用工具抽象类与 Registry 来创建并注册新工具。
注册我们的第一个工具
先创建两个简单工具来演示系统:
defadd(a: int, b: int) -> int:
return a + b

defmultiply(a: int, b: int) -> int:
return a * b
以上就是执行期会被调用的工具函数。
接下来用 Pydantic 定义每个工具的输入 schema:
classToolAddArgs(BaseModel):
    a: int
    b: int

classToolMultiplyArgs(BaseModel):
    a: int
    b: int
然后实例化工具 Registry 并注册工具:
registry = ToolRegistry()

registry.register(
    Tool(
        name="add",
        description="Add two numbers",
        input_schema=ToolAddArgs,
        output_schema={"result": "int"},
        func=add,
    )
)
registry.register(
    Tool(
        name="multiply",
        description="Multiply two numbers",
        input_schema=ToolMultiplyArgs,
        output_schema={"result": "int"},
        func=multiply,
    )
)
第二步:用 Pydantic 实现类型安全
你可能会想:“为什么不用普通字典或 JSON?”这是关于结构化输出与类型安全的问题。
在与 LLM 协作时,最大挑战之一是确保它返回的数据格式能被你的代码可靠处理。即使在 2026 年,我们已经有了在工具使用上训练良好的可靠 LLM,但“幻觉”依然是未解难题,所以我们需要类型与结构校验。
Pydantic 模型就像契约,它们可以:
- 生成现代 LLM 可用的 JSON schema,用于结构化输出。
定义 Agent 可能采取的动作:
# Get type-safe tool names and arguments
ToolNameLiteral = registry.get_tool_names()
ToolArgsUnion = registry.get_tool_call_args_type()

classToolCall(BaseModel):
    action: Literal["tool"]
    thought: str
    tool_name: ToolNameLiteral
    args: ToolArgsUnion
classFinalAnswer(BaseModel):
    action: Literal["final"]
    answer: str
LLMResponse = Union[ToolCall, FinalAnswer]
这个结构强制实现 ReAct 模式。LLM 必须:
- 选择一个 action 类型("tool" 或 "final")
- 如果调用工具:提供思考过程(thought)、工具名和有效参数
ToolNameLiteral 确保 LLM 只能调用真实存在的工具;ToolArgsUnion 确保参数匹配对应工具期望的 schema。
第三步:LLM Wrapper
现在集成 Google 的 Gemini API。我在教程中常用 Gemini,因为它提供免费的 API 配额。当然你也可以用其他提供商;你只需要按其 API 文档改写此类即可。
import json
from google import genai
from google.genai import types

classGeminiLLM:
def__init__(self, client, tool_registry, model="gemini-2.5-flash"):
self.client = client
self.model = model
self.tool_registry = tool_registry
self.system_instruction = self._create_system_instruction()
System Prompt
System prompt 用来教 Agent“如何”行为。这里我们使用一个简单的 system prompt,但在实际产品中它会复杂得多。这是最关键的部分之一:
def_create_system_instruction(self) -> str:
    tools_description = json.dumps(
self.tool_registry.list_tools(),
        indent=2
    )

    system_prompt = """
You are a conversational AI agent that can interact with external tools.
CRITICAL RULES (MUST FOLLOW):
- You are NOT allowed to perform operations internally that could be performed by an available tool.
- If a tool exists that can perform any part of the task, you MUST use that tool.
- You MUST NOT skip tools, even for simple or obvious steps.
- You MUST NOT combine multiple operations into a single step unless a tool explicitly supports it.
- You may ONLY produce a final answer when no available tool can further advance the task.
TOOL USAGE RULES:
- Each tool call must perform exactly ONE meaningful operation.
- If the task requires multiple operations, you MUST call tools sequentially.
- If multiple tools could apply, choose the most specific one.
RESPONSE FORMAT (STRICT):
- You MUST respond ONLY in valid JSON.
- Never include explanations outside JSON.
- You must choose exactly one action per response.
Tool call format:
{
  "action": "tool",
  "thought": "...",
  "tool_name": "...",
  "inputs": { ... }
}
Final answer format:
{
  "action": "final",
  "answer": "..."
}""" + "\\n\\nAvailable tools with description:\\n" + tools_description
return system_prompt
为什么规则要这么严格?
LLM 受到“尽量有帮助”的训练,常会尝试在内部做运算或推理。但我们希望 Agent 具备可观测性与可靠性。强制它在每一步都使用工具,可以让我们:
这就是 ReAct 模式的精髓:显式的推理(“thought”)+ 显式的动作(“tool_name” + “args”)。
为 Gemini 格式化对话历史
不同 LLM 提供商的消息格式不同。下面将通用历史记录转换为 Gemini 所需格式:
def_format_gemini_chat_history(self, history: list[dict]) -> list:
    formatted_history = []
for message in history:
if message["role"] == "user":
            formatted_history.append(types.Content(
                    role="user",
                    parts=[
                        types.Part.from_text(text=message["content"])
                    ]
                )
            )
if message["role"] == "assistant":
            formatted_history.append(types.Content(
                    role="model",
                    parts=[
                        types.Part.from_text(text=message["content"])
                    ]
                )
            )
if message["role"] == "tool":
            formatted_history.append(types.Content(
                    role="tool",
                    parts=[
                        types.Part.from_function_response(
                            name=message["tool_name"],
                            response={'result': message["tool_response"]},
                        )
                    ]
                )
            )
return formatted_history
这种抽象很关键。我们的 Agent 使用简单、与提供商无关的消息格式,每个 LLM wrapper 自己处理各自的格式细节。
启用结构化输出的响应生成
最后,以结构化输出方式调用 LLM:
defgenerate(self, history: list[dict]) -> str:
    gemini_history_format = self._format_gemini_chat_history(history)
    response = self.client.models.generate_content(
        model=self.model,
        contents=gemini_history_format,
        config=types.GenerateContentConfig(
            temperature=0,
            response_mime_type="application/json",
            response_schema=LLMResponse,
            system_instruction=self.system_instruction,
            automatic_function_calling=types.AutomaticFunctionCallingConfig(disable=True)
        ),
    )
return response.text
关键参数:
- temperature=0:我们希望确定性、稳定的行为;
- response_mime_type="application/json":强制 JSON 输出;
- response_schema=LLMResponse:用我们的 Pydantic 模型进行校验;
- 关闭 automatic_function_calling:我们希望手动控制工具执行。
第四步:Agent Orchestrator
现在把一切整合起来。Agent 负责管理对话循环:
classAgent:
def__init__(self, llm, tool_registry, max_steps=5):
self.llm = llm
self.tool_registry = tool_registry
self.history = []
self.max_steps = max_steps
max_steps 用来防止死循环,这是 agent 卡住时的安全机制。
ReAct 循环
核心逻辑如下:
defrun(self, user_input: str):
self.history.append({"role": "user", "content": user_input})
for step inrange(self.max_steps):
# Get LLM decision
        llm_output = self.llm.generate(self.history)
        action = json.loads(llm_output)
if action["action"] == "tool":
# Record the thought process
self.history.append(
                {"role": "assistant", "content": llm_output}
            )
# Execute the tool
            tool = self.tool_registry.get(action["tool_name"])
            result = tool(**action["args"])
# Record the result
            observation = f"Tool {tool.name} returned: {result}"
self.history.append(
                {"role": "tool", "tool_name": tool.name, "tool_response": result}
            )
continue
if action["action"] == "final":
self.history.append(
                {"role": "assistant", "content": llm_output}
            )
return action["answer"]
raise RuntimeError("Agent did not terminate within max_steps")
循环解析:
第五步:整合运行
初始化并创建一个简单的对话界面:
from google import genai

# Initialize the client (you'll need your API key)
client = genai.Client(api_key=GEMINI_API_KEY)
# Create LLM and Agent
llm = GeminiLLM(client, registry)
agent = Agent(llm, registry)
defchat_with_agent(agent: Agent):
print("Welcome! Type 'exit' to quit.\n")
whileTrue:
        user_input = input("You: ")
if user_input.lower() in ["exit", "quit", "q"]:
print("Goodbye!")
break
try:
            response = agent.run(user_input)
print(f"Agent: {response}")
except RuntimeError as e:
print(f"Agent error: {e}")
except Exception as e:
print(f"Unexpected error: {e}")
# Start chatting
chat_with_agent(agent)
示例:看看 Agent 的表现
问它:“What is 5 plus 3, then multiply the result by 2?”(5 加 3,然后把结果乘以 2?)
步骤 1:LLM 收到问题并回应:
{
"action": "tool",
"thought": "I need to first add 5 and 3",
"tool_name": "add",
"args": {"a": 5, "b": 3}
}
步骤 2:Agent 执行 add(5, 3) → 返回 8
步骤 3:LLM 看到结果后回应:
{
"action": "tool",
"thought": "Now I need to multiply 8 by 2",
"tool_name": "multiply",
"args": {"a": 8, "b": 2}
}
步骤 4:Agent 执行 multiply(8, 2) → 返回 16
步骤 5:LLM 回应:
{
"action": "final",
"answer": "The result is 16"
}
注意 agent 如何把任务拆解为离散步骤、每一步都使用工具,并提供清晰解释。这种透明性让 AI Agent 更易调试且更值得信赖。
为什么这种架构很重要
你可能会想:“对一个简单计算器来说,这似乎是很多样板代码。”没错!但这套基础恰恰强大之处在于:
1. 可扩展性(Extensibility)
想加一个天气 API?写个函数然后注册即可:
classWeatherArgs(BaseModel):
city: str

defget_weather(city: str) -> str:
# API call here
return f"Weather in {city}: Sunny, 72°F"
registry.register(Tool(
    name="get_weather",
    description="Get current weather for a city",
    input_schema=WeatherArgs,
    output_schema={"weather": "str"},
    func=get_weather
))
无需改动 agent 逻辑。LLM 会从 system prompt 自动“学习”新工具。
2. 提供商灵活性(Provider Flexibility)
需要从 Gemini 切换到 OpenAI?实现一个相同接口的 OpenAILLM 类:
classOpenAILLM:
def__init__(self, client, tool_registry, model="gpt-4"):
# Similar structure, different API calls
        pass
defgenerate(self, history: list[dict]) -> str:
# OpenAI-specific implementation
            pass
# Swap it in
llm = OpenAILLM(openai_client, registry)
agent = Agent(llm, registry)  # Everything else stays the same!
3. 可测试性(Testability)
你可以分别测试每个组件:
4. 可观测性(Observability)
每一步都记录在历史中。你可以:
我们已经完成了什么
在这篇文章中,我们构建了一个基础 AI Agent,具备:
但这只是开始。我们的 agent 仍然是无状态(对话间无记忆)、没有人工把关、可观测性也有限。
下一步:第二部分
在下一篇中,我们会为这个 agent 增添生产级能力:
- Long-term Memory:用向量数据库记住过往对话,从交互中学习
- Human-in-the-Loop(HITL):在关键动作上暂停并等待人工批准
- Advanced Observability:日志、链路追踪与监控
- Error Recovery:优雅处理工具失败并实现重试逻辑
这些特性对生产系统至关重要。
自己动手试试
最好的学习方式就是动手构建。拿这份代码来:
完整代码都在这个 Colab 笔记本里,马上开玩:https://colab.research.google.com/drive/1a1hAyRo5f-3ct3a2t0m2C-jdaTymhsSY?usp=sharing
 10个月宝宝每天需要喝多少奶粉?
