Python ctypes模块详细介绍
- 2026-08-25 22:08:25



1. 创始时间与作者
创始时间:ctypes 模块首次出现在 Python 2.5 版本中,于 2006年9月 发布
核心开发者:
Thomas Heller:ctypes 模块的主要作者和长期维护者
Python 核心团队:持续改进和扩展功能
社区贡献者:来自全球开发者的改进和平台适配
项目定位:Python 外部函数接口(FFI)库,用于调用 C 语言编写的共享库和系统 API
2. 官方资源
Python 官方文档:https://docs.python.org/3/library/ctypes.html
源码地址:https://github.com/python/cpython/tree/main/Lib/ctypes
教程指南:https://docs.python.org/3/library/ctypes.html
Ctypes 教程:https://docs.python.org/3/library/ctypes.html#tutorial
3. 核心功能

4. 应用场景
1. 基础C库函数调用
import ctypesimport osfrom ctypes import c_int, c_double, c_char_p, Structure, POINTER# 加载系统C库if os.name == 'nt': # Windowslibc = ctypes.CDLL('msvcrt.dll')else: # Linux/Maclibc = ctypes.CDLL('libc.so.6') # Linux# libc = ctypes.CDLL('libc.dylib') # macOSdef basic_library_demo():"""基础库函数调用演示"""# 调用C标准库函数# printflibc.printf.restype = c_intlibc.printf.argtypes = [c_char_p]libc.printf(b"Hello from C printf! Number: %d, Float: %.2f\n", 42, 3.14159)# strlenlibc.strlen.restype = ctypes.c_size_tlibc.strlen.argtypes = [c_char_p]text = b"Hello, World!"length = libc.strlen(text)print(f"字符串 '{text.decode()}' 的长度: {length}")# atoi - 字符串转整数libc.atoi.restype = c_intlibc.atoi.argtypes = [c_char_p]number = libc.atoi(b"12345")print(f"字符串转整数: {number}")# 数学函数libm = ctypes.CDLL('libm.so.6') # 数学库libm.sqrt.restype = c_doublelibm.sqrt.argtypes = [c_double]result = libm.sqrt(25.0)print(f"平方根: {result}")# 运行示例basic_library_demo()
2. 自定义C库调用
// math_operations.c - 编译为共享库#include <stdio.h>// 基本数学运算int add(int a, int b) {return a+b;}double multiply(double a, double b) {return a*b;}// 字符串操作void reverse_string(char*str) {int length=0;while (str[length] !='\0') {length++; }for (int i=0; i<length/2; i++) {char temp=str[i];str[i] =str[length-i-1];str[length-i-1] =temp; }}// 结构体操作type def struct {int x;int y;} Point;double point_distance(Pointp1, Pointp2) {int dx=p2.x-p1.x;int dy=p2.y-p1.y;return sqrt(dx*dx+dy*dy);}
import ctypesfrom ctypes import c_int, c_double, c_char_p, Structure, POINTER# 定义结构体,与C代码匹配class Point(Structure):_fields_ = [("x", c_int), ("y", c_int)]def custom_library_demo():"""自定义C库调用演示"""try:# 加载自定义库(需要先编译)# gcc -shared -o math_operations.so math_operations.cmath_lib = ctypes.CDLL('./math_operations.so')# 配置函数原型math_lib.add.restype = c_intmath_lib.add.argtypes = [c_int, c_int]math_lib.multiply.restype = c_doublemath_lib.multiply.argtypes = [c_double, c_double]math_lib.reverse_string.restype = Nonemath_lib.reverse_string.argtypes = [c_char_p]math_lib.point_distance.restype = c_doublemath_lib.point_distance.argtypes = [Point, Point]# 调用函数result_add = math_lib.add(10, 20)print(f"加法结果: {result_add}")result_multiply = math_lib.multiply(3.14, 2.0)print(f"乘法结果: {result_multiply}")# 字符串操作(需要可写内存)text = ctypes.create_string_buffer(b"Hello, World!")math_lib.reverse_string(text)print(f"反转字符串: {text.value.decode()}")# 结构体操作p1 = Point(0, 0)p2 = Point(3, 4)distance = math_lib.point_distance(p1, p2)print(f"点之间的距离: {distance}")except OSError as e:print(f"无法加载库: {e}")print("请先编译C代码: gcc -shared -o math_operations.so math_operations.c")# 运行示例custom_library_demo()
3. Windows API 调用
import ctypesfrom ctypes import wintypesimport timedef windows_api_demo():"""Windows API 调用演示"""if hasattr(ctypes, 'windll'):# 加载Windows DLLkernel32 = ctypes.windll.kernel32user32 = ctypes.windll.user32# 获取系统信息# GetComputerNamecomputer_name = ctypes.create_unicode_buffer(16)size = wintypes.DWORD(16)kernel32.GetComputerNameW(computer_name, ctypes.byref(size))print(f"计算机名: {computer_name.value}")# GetUserNameuser_name = ctypes.create_unicode_buffer(256)size = wintypes.DWORD(256)kernel32.GetUserNameW(user_name, ctypes.byref(size))print(f"用户名: {user_name.value}")# 系统目录system_dir = ctypes.create_unicode_buffer(260)kernel32.GetSystemDirectoryW(system_dir, 260)print(f"系统目录: {system_dir.value}")# 窗口操作# 获取前台窗口foreground_window = user32.GetForegroundWindow()# 获取窗口标题window_title = ctypes.create_unicode_buffer(256)user32.GetWindowTextW(foreground_window, window_title, 256)print(f"前台窗口: {window_title.value}")# 鼠标位置class POINT(ctypes.Structure):_fields_ = [("x", wintypes.LONG), ("y", wintypes.LONG)]point = POINT()user32.GetCursorPos(ctypes.byref(point))print(f"鼠标位置: ({point.x}, {point.y})")# 系统时间class SYSTEMTIME(ctypes.Structure):_fields_ = [("wYear", wintypes.WORD), ("wMonth", wintypes.WORD), ("wDayOfWeek", wintypes.WORD), ("wDay", wintypes.WORD), ("wHour", wintypes.WORD), ("wMinute", wintypes.WORD), ("wSecond", wintypes.WORD), ("wMilliseconds", wintypes.WORD)]system_time = SYSTEMTIME()kernel32.GetLocalTime(ctypes.byref(system_time))print(f"系统时间: {system_time.wYear}-{system_time.wMonth}-{system_time.wDay} "f"{system_time.wHour}:{system_time.wMinute}:{system_time.wSecond}")else:print("此演示仅适用于Windows系统")# 运行示例(Windows系统)windows_api_demo()
4. 高级内存操作和回调
import ctypesfrom ctypes import CFUNCTYPE, c_int, c_void_p, c_char_p, Structure, POINTER, castimpor tarraydef advanced_memory_demo():"""高级内存操作演示"""# 内存分配和操作libc = ctypes.CDLL('libc.so.6') if hasattr(ctypes, 'CDLL') else ctypes.cdll.msvcrt# malloc 和 freelibc.malloc.restype = c_void_plibc.malloc.argtypes = [ctypes.c_size_t]libc.free.restype = Nonelibc.free.argtypes = [c_void_p]# 分配内存size = 100memory_ptr = libc.malloc(size)print(f"分配的内存地址: {hex(memory_ptr)}")# 使用ctypes访问内存char_array = (ctypes.c_char*size).from_address(memory_ptr)# 写入数据test_data = b"Hello from ctypes memory!"for i, byte in enumerate(test_data):if i<size:char_array[i] = byte# 读取数据read_data = bytearray()for i in range(min(size, len(test_data))):read_data.append(char_array[i])print(f"写入的数据: {test_data}")print(f"读取的数据: {read_data.decode()}")# 释放内存libc.free(memory_ptr)# 回调函数演示def callback_function(value):print(f"回调函数被调用,值: {value}")return value*2# 定义回调类型CALLBACK_TYPE = CFUNCTYPE(c_int, c_int)# 包装Python函数为C回调c_callback = CALLBACK_TYPE(callback_function)# 模拟调用带回调的C函数def call_with_callback(data, callback):result = 0for i in range(data):result += callback(i)return result# 将Python函数转换为C可调用类型callback_wrapper = CFUNCTYPE(c_int, c_int, CALLBACK_TYPE)(call_with_callback)final_result = callback_wrapper(5, c_callback)print(f"回调函数最终结果: {final_result}")# 数组操作print("\n数组操作演示:")IntArray10 = c_int*10arr = IntArray10(1, 2, 3, 4, 5, 6, 7, 8, 9, 10)# 访问数组元素for i in range(10):print(f"arr[{i}] = {arr[i]}")# 与Python数组互操作py_array = array.array('i', [10, 20, 30, 40, 50])c_array = (c_int*len(py_array))(*py_array)print(f"Python数组: {py_array.tolist()}")print(f"ctypes数组: {[c_array[i] for i in range(len(py_array))]}")# 运行示例advanced_memory_demo()
5. 底层逻辑与技术原理
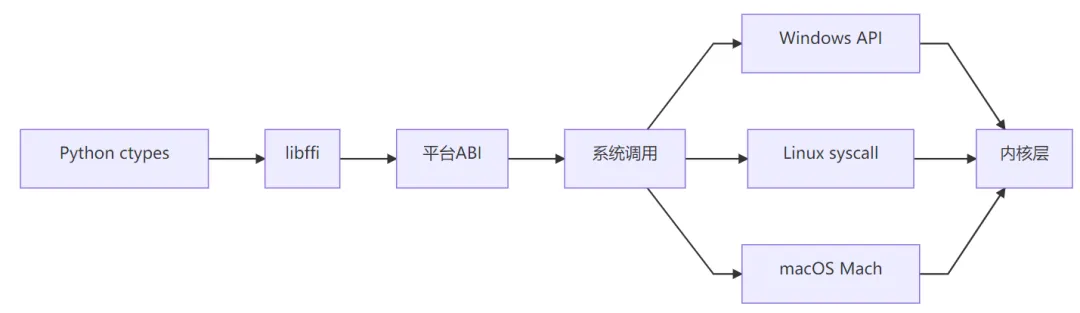
核心架构
关键技术
libffi 库集成:
外部函数接口库,处理函数调用约定
自动处理参数传递和返回值
支持多种CPU架构和调用约定
类型映射系统:
# C类型到Python类型的映射c_int<->intc_double<->floatc_char_p<->bytes/strc_void_p<->int (地址)
内存管理:
自动类型转换和内存分配
垃圾收集器集成
手动内存管理支持
调用约定处理:
cdecl:C标准调用约定
stdcall:Windows API标准
fastcall:寄存器参数传递
平台抽象层:
统一的库加载接口
自动库搜索路径处理
错误代码转换
函数调用流程
# ctypes函数调用内部流程1.参数Python对象->C类型转换2.根据调用约定准备栈/寄存器3.通过libffi调用目标函数4.返回值C类型->Python对象转换5.错误代码检查和处理
6. 安装与配置
基础安装
# ctypes 是 Python 标准库的一部分,无需额外安装# 验证安装python -c"import ctypes; print(ctypes.__doc__)"
可选依赖
# 在某些系统上可能需要开发工具# Ubuntu/Debiansudo apt-get install build-essential python3-dev# CentOS/RHELsudo yum install gcc python3-devel# Windows# 安装Visual Studio Build Tools或MinGW
环境要求
| 组件 | 最低要求 | 推荐配置 |
|---|---|---|
| Python | 2.5+ | 3.6+ |
| 操作系统 | Windows/Linux/macOS | 同左 |
| 编译器 | 可选(用于构建C扩展) | GCC/Clang/MSVC |
平台验证
import ctypesimport platformimport sysdef check_ctypes_environment():"""检查ctypes环境"""print(f"Python版本: {sys.version}")print(f"操作系统: {platform.system()} {platform.release()}")print(f"ctypes版本: {ctypes.__version__}")# 检查库加载能力try:if platform.system() == 'Windows':lib = ctypes.windll.kernel32print("Windows库加载: 正常")else:lib = ctypes.CDLL('libc.so.6')print("Unix库加载: 正常")except Exception as e:print(f"库加载测试失败: {e}")# 检查数据类型支持print(f"支持的数据类型: {[t for t in dir(ctypes) if t.startswith('c_')]}")check_ctypes_environment()
7. 性能指标
| 操作类型 | 执行时间 | 内存开销 | 适用场景 |
|---|---|---|---|
| 简单函数调用 | 0.1-1μs | 可忽略 | 高频调用 |
| 复杂结构体操作 | 1-10μs | 1-100KB | 数据交换 |
| 回调函数 | 1-5μs | 可忽略 | 事件处理 |
| 大内存操作 | 依赖数据大小 | 直接映射 | 数据处理 |
8. 高级功能使用
1. 复杂结构体和联合
import ctypesfrom ctypes import Structure, Union, c_int, c_float, c_char, c_uint32def advanced_structures_demo():"""高级结构体和联合演示"""# 复杂结构体class Employee(Structure):_fields_ = [ ("id", c_int), ("name", c_char*50), ("salary", c_float), ("department", c_char*30) ]# 位域结构体class BitField(Structure):_fields_ = [ ("flag1", c_uint32, 1), # 1位 ("flag2", c_uint32, 1), # 1位 ("value", c_uint32, 30), # 30位 ]# 联合体class DataUnion(Union):_fields_ = [ ("as_int", c_int), ("as_float", c_float), ("as_chars", c_char*4) ]# 嵌套结构体class Address(Structure):_fields_ = [ ("street", c_char*50), ("city", c_char*30), ("zipcode", c_char*10) ]class Person(Structure):_fields_ = [ ("name", c_char*50), ("age", c_int), ("address", Address) ]# 使用结构体emp = Employee()emp.id = 1001emp.name = b"John Doe"emp.salary = 75000.5emp.department = b"Engineering"print(f"员工: ID={emp.id}, 姓名={emp.name.decode()}, "f"薪资={emp.salary}, 部门={emp.department.decode()}")# 使用位域bitfield = BitField()bitfield.flag1 = 1bitfield.flag2 = 0bitfield.value = 12345print(f"位域: flag1={bitfield.flag1}, flag2={bitfield.flag2}, value={bitfield.value}")# 使用联合体data_union = DataUnion()data_union.as_int = 0x41424344# 'ABCD' in ASCIIprint(f"联合体: 整数={data_union.as_int}, "f"浮点数={data_union.as_float}, "f"字符={data_union.as_chars.decode()}")# 使用嵌套结构体addr = Address()addr.street = b"123 Main St"addr.city = b"Anytown"addr.zipcode = b"12345"person = Person()person.name = b"Alice Smith"person.age = 30person.address = addrprint(f"人员: {person.name.decode()}, {person.age}岁, "f"地址: {person.address.street.decode()}, {person.address.city.decode()}")# 运行示例advanced_structures_demo()
2. 动态库创建和调用
import ctypesimport tempfileimport osimport subprocessdef dynamic_library_demo():"""动态库创建和调用演示"""# 创建临时的C源代码c_code = '''#include <stdio.h>#include <stdlib.h>// 导出函数__attribute__((visibility("default")))int fibonacci(int n) { if (n <= 1) return n; return fibonacci(n-1) + fibonacci(n-2);}__attribute__((visibility("default"))) void process_array(int* arr, int size, int multiplier) { for (int i = 0; i < size; i++) { arr[i] = arr[i] * multiplier; }}__attribute__((visibility("default")))const char* get_greeting(const char* name) { static char greeting[100]; snprintf(greeting, sizeof(greeting), "Hello, %s!", name); return greeting;}'''# 创建临时目录with tempfile.TemporaryDirectory() as temp_dir:c_file = os.path.join(temp_dir, "dynamic_lib.c")so_file = os.path.join(temp_dir, "dynamic_lib.so")# 写入C代码with open(c_file, 'w') as f:f.write(c_code)try:# 编译为共享库if os.name == 'nt': # Windowscompile_cmd = f'gcc -shared -o "{so_file}" "{c_file}"'else: # Linux/macOScompile_cmd = f'gcc -shared -fPIC -o "{so_file}" "{c_file}"'result = subprocess.run(compile_cmd, shell=True, capture_output=True, text=True)if result.returncode == 0:# 加载动态库dyn_lib = ctypes.CDLL(so_file)# 配置函数原型dyn_lib.fibonacci.restype = ctypes.c_intdyn_lib.fibonacci.argtypes = [ctypes.c_int]dyn_lib.process_array.restype = Nonedyn_lib.process_array.argtypes = [ctypes.POINTER(ctypes.c_int), ctypes.c_int, ctypes.c_int]dyn_lib.get_greeting.restype = ctypes.c_char_pdyn_lib.get_greeting.argtypes = [ctypes.c_char_p]# 测试斐波那契函数print("斐波那契数列:")for i in range(10):result = dyn_lib.fibonacci(i)print(f"fib({i}) = {result}")# 测试数组处理print("\n数组处理:")IntArray5 = ctypes.c_int*5arr = IntArray5(1, 2, 3, 4, 5)print("处理前:", [arr[i] for i in range(5)])dyn_lib.process_array(arr, 5, 10)print("处理后:", [arr[i] for i in range(5)])# 测试字符串函数print("\n字符串处理:")name = b"Python Developer"greeting = dyn_lib.get_greeting(name)print(f"问候语: {greeting.decode()}")else:print(f"编译失败: {result.stderr}")except Exception as e:print(f"动态库演示错误: {e}")print("请确保系统已安装GCC编译器")# 运行示例dynamic_library_demo()
9. 与同类工具对比
| 特性 | ctypes | CFFI | Cython | ctypesgen |
|---|---|---|---|---|
| 学习曲线 | ⭐⭐⭐ | ⭐⭐ | ⭐ | ⭐⭐⭐⭐ |
| 性能 | ⭐⭐⭐ | ⭐⭐⭐⭐ | ⭐⭐⭐⭐⭐ | ⭐⭐⭐ |
| 无需编译 | ⭐⭐⭐⭐⭐ | ⭐⭐⭐ | ❌ | ⭐⭐⭐⭐ |
| 类型安全 | ⭐⭐ | ⭐⭐⭐⭐ | ⭐⭐⭐⭐⭐ | ⭐⭐⭐ |
| 代码生成 | ❌ | ⭐⭐ | ⭐⭐⭐⭐⭐ | ⭐⭐⭐⭐⭐ |
| 标准库 | ⭐⭐⭐⭐⭐ | ❌ | ❌ | ❌ |
10. 安全与最佳实践
安全建议
输入验证:
def safe_ctype_call(func, *args):"""安全的ctypes调用"""# 验证参数类型if not all(isinstance(arg, (int, float, str, bytes)) for arg in args):raise ValueError("无效的参数类型")# 设置合理的超时(如果适用)return func(*args)
内存安全:
# 使用create_string_buffer而不是直接指针操作buffer = ctypes.create_string_buffer(100)buffer.value = b"Safe data"# 避免内存泄漏class ManagedMemory:def __init__(self, size):self._ptr = ctypes.c_void_p(libc.malloc(size))def __del__(self):if self._ptr:libc.free(self._ptr)
错误处理:
def robust_library_call():try:result = some_c_function()if result == -1: # 假设-1表示错误# 获取错误信息error_msg = ctypes.c_char_p()get_error_message(ctypes.byref(error_msg))raise RuntimeError(f"C函数错误: {error_msg.value.decode()}")return resultexcept OSError as e:raise RuntimeError(f"库调用失败: {e}")
最佳实践
import ctypesfrom ctypes import Structure, c_int, c_char_p, POINTERclass CTypesWrapper:"""ctypes包装器最佳实践"""def __init__(self, library_path):self.lib = ctypes.CDLL(library_path)self._configure_functions()def _configure_functions(self):"""配置所有函数原型"""# 示例配置if hasattr(self.lib, 'some_function'):self.lib.some_function.restype = c_intself.lib.some_function.argtypes = [c_int, c_char_p]def safe_call(self, func_name, *args):"""安全函数调用"""func = getattr(self.lib, func_name, None)if not func:raise AttributeError(f"函数 {func_name} 不存在")try:return func(*args)except Exception as e:raise RuntimeError(f"调用 {func_name} 失败: {e}")def __enter__(self):return selfdef __exit__(self, exc_type, exc_val, exc_tb):# 清理资源if hasattr(self.lib, 'cleanup'):self.lib.cleanup()# 使用示例with CTypesWrapper('mylib.so') as wrapper:result = wrapper.safe_call('some_function', 42, b"test")
11. 企业级应用案例
系统工具开发
进程监控和管理工具
系统信息收集工具
硬件交互
设备驱动程序接口
硬件性能监控
性能优化
高性能计算库包装
数学和科学计算
游戏开发
游戏引擎接口
图形库绑定
安全工具
系统安全监控
加密库接口
总结
ctypes 是 Python 与 C 语言交互的桥梁,核心价值在于:
无需编译:直接调用现有C库,无需编写C扩展
跨平台:统一的API支持Windows、Linux、macOS
简单易用:直观的Pythonic接口设计
功能强大:支持复杂数据类型和回调函数
技术亮点:
基于libffi的高效函数调用
完整的C类型系统支持
灵活的内存管理机制
强大的错误处理能力
适用场景:
调用系统API和现有C库
快速原型开发和概念验证
性能关键组件的C语言实现
跨语言集成和系统编程
安装使用:
# 无需安装,直接导入python -c"import ctypes; print('ctypes 模块可用')"
学习资源:
官方文档:https://docs.python.org/3/library/ctypes.html
教程指南:https://docs.python.org/3/library/ctypes.html#tutorial
实战示例:https://realpython.com/python-ctypes/
ctypes 作为 Python 标准库的重要组成部分,为 Python 开发者打开了直接与底层系统交互的大门,是系统编程、性能优化和跨语言集成的强大工具。
