重温并发任务:Linux 多线程同步利器读写锁
- 2026-06-28 16:59:19
点击↑深色口袋物联,选择关注公众号,获取更多内容,不迷路
在glibc2.35中,pthread线程提供了5种同步机制,分别为条件变量、互斥锁、读写锁、自旋锁和屏障,本篇主要回顾读写锁
一、pthread 读写锁的核心作用
✅ 核心定义
在glibc2.35中,读写锁的定义在sysdeps/nptl/bits/pthreadtypes.h中pthread_rwlock_t,与互斥锁相似,
typedef union{ struct __pthread_rwlock_arch_t __data; char __size[__SIZEOF_PTHREAD_RWLOCK_T]; long int __align;} pthread_rwlock_t;其中__data是真实的数据载体,包含了操作系统所需要的全部底层信息,__size,固定大小的字符数组,保证新旧版本的二进制兼容,以及一个长整型变量,用于控制内存对齐
✅ 核心作用 & 设计初衷
读写锁的核心作用:区分「读操作」和「写操作」,实现「多读共享、单写排他」的访问控制 ——
• 读模式加锁(读锁):多个线程可同时持有读锁,并发读取共享资源,不互斥; • 写模式加锁(写锁):只有一个线程能持有写锁,且持有写锁时,所有读锁 / 写锁都无法获取(排他性); • 读写互斥:持有读锁时,写锁需等待;持有写锁时,读锁需等待。
简单说:读写锁是「互斥锁的升级版」,解决了互斥锁「无论读写都串行」的性能问题,在「多读少写」场景下,并发性能比互斥锁提升数倍甚至数十倍。
✅ 读写锁解决的核心痛点
互斥锁的核心问题是**「一刀切」**:无论线程是读还是写,都只能串行访问,而实际开发中,80% 的场景是「读多写少」(如配置读取、数据查询、日志查看),互斥锁会浪费大量并发性能:
• 无锁场景:多读并发会导致数据脏读,写操作会破坏读数据的一致性; • 互斥锁场景:多读也需串行,CPU 利用率低,并发性能差; • 读写锁场景:多读并行、写独占,既保证数据一致性,又最大化并发性能。
✅ 读写锁的底层执行逻辑(极简版,易懂)
1. 读锁申请 : • 无写锁持有 → 立即获取读锁,读锁计数 + 1; • 有写锁持有 → 阻塞等待,直到写锁释放; • 有读锁持有 → 立即获取读锁,读锁计数 + 1; 2. 写锁申请 : • 无读锁 / 写锁持有 → 立即获取写锁; • 有读锁 / 写锁持有 → 阻塞等待,直到所有读锁 / 写锁释放; 3. 解锁逻辑 : • 读解锁:读锁计数 - 1,计数为 0 时,唤醒等待的写锁线程; • 写解锁:释放写锁,优先唤醒等待的写锁线程(部分内核实现)或读锁线程。
二、pthread 读写锁 核心使用场景
读写锁的核心价值是**「多读并行」**,所有场景都围绕「多读少写」展开,覆盖 Linux 应用层开发的高频优化场景,在匹配场景下,是性能最优的同步方案,按使用频率排序如下:
✅ 场景 1:配置文件 / 静态数据的读写(最核心场景,占比 70%)
• 业务逻辑:程序启动后加载配置文件到内存,多个线程并发读取配置,仅在配置更新时触发写操作; • 同步需求:保证读配置时数据一致,写配置时排他,避免读 / 写冲突; • 典型案例:服务器的全局配置读取、嵌入式设备的参数配置管理、电商系统的商品基础信息查询。
✅ 场景 2:缓存系统的读写(高频优化场景)
• 业务逻辑:内存缓存(如 Redis 本地缓存、进程内缓存)的读操作占 99%,写操作仅在缓存更新 / 失效时触发; • 同步需求:多读并行提升缓存读取性能,写操作排他保证缓存一致性; • 核心优势:相比互斥锁,并发读性能提升 10 倍以上。
✅ 场景 3:日志系统的读写(进阶场景)
• 业务逻辑:多个线程并发读取日志(如日志查询、监控),少量线程写入日志(如业务日志、错误日志); • 同步需求:读日志时并行,写日志时排他,避免日志内容重叠; • 典型案例:分布式系统的本地日志查询、嵌入式设备的日志导出。
✅ 场景 4:数据库 / 文件的批量读写(生产级场景)
• 业务逻辑:多个线程并发读取数据库 / 文件数据(如报表统计、数据查询),批量写入时触发写操作; • 同步需求:读并行提升查询效率,写排他保证数据完整性; • 核心优化:配合超时加锁,避免线程永久阻塞。
✅ 场景 5:高并发读的实时监控(进阶优化场景)
• 业务逻辑:监控系统的多个线程并发读取系统指标(CPU、内存、磁盘),仅在指标更新时触发写操作; • 同步需求:保证读指标时数据一致,写指标时排他,兼顾性能和一致性; • 典型案例:Linux 系统监控工具、嵌入式设备的状态监控。
三、pthread 读写锁 核心接口
读写锁的接口全部在 <pthread.h> 头文件中,编译时必须加 -lpthread 链接线程库,所有接口返回值:成功返回 0,失败返回错误码(非 errno,需手动处理)。
✅ 1. 读写锁的初始化(2 种方式,按需选择)
方式 1:静态初始化(推荐,全局 / 静态变量使用)
pthread_rwlock_t rwlock = PTHREAD_RWLOCK_INITIALIZER;• 特点:一行完成初始化,无需手动销毁也不会内存泄漏,最简单高效; • 适用:全局读写锁、静态变量读写锁。
方式 2:动态初始化(局部变量 / 堆变量使用)
int pthread_rwlock_init(pthread_rwlock_t *restrict rwlock, const pthread_rwlockattr_t *restrict attr);• 参数 1 rwlock:待初始化的读写锁地址;• 参数 2 attr:读写锁属性(如优先级、共享范围),传NULL使用默认属性即可;• 配套操作:动态初始化的读写锁,使用完毕必须调用 pthread_rwlock_destroy销毁!
✅ 2. 读写锁的销毁(对应动态初始化)
int pthread_rwlock_destroy(pthread_rwlock_t *rwlock);• 作用:释放读写锁占用的内核资源,避免内存泄漏; • 注意:① 静态初始化的读写锁无需调用;② 锁被持有期间不能销毁(会返回 EBUSY 错误)。
✅ 3. 加锁(核心接口,分读 / 写)
接口①:读模式阻塞加锁(最常用)
int pthread_rwlock_rdlock(pthread_rwlock_t *rwlock);• 逻辑:申请读锁,无写锁则立即持有,有写锁则阻塞等待。
接口②:写模式阻塞加锁(最常用)
int pthread_rwlock_wrlock(pthread_rwlock_t *rwlock);• 逻辑:申请写锁,无读锁 / 写锁则立即持有,否则阻塞等待。
接口③:读模式非阻塞加锁(进阶)
int pthread_rwlock_tryrdlock(pthread_rwlock_t *rwlock);• 逻辑:申请读锁,成功返回 0;失败(有写锁)返回 EBUSY,不阻塞。
接口④:写模式非阻塞加锁(进阶)
int pthread_rwlock_trywrlock(pthread_rwlock_t *rwlock);• 逻辑:申请写锁,成功返回 0;失败(有读锁 / 写锁)返回 EBUSY,不阻塞。
接口⑤:超时加锁(生产级必备,分读 / 写)
// 读模式超时加锁int pthread_rwlock_timedrdlock(pthread_rwlock_t *restrict rwlock, const struct timespec *restrict abstime);// 写模式超时加锁int pthread_rwlock_timedwrlock(pthread_rwlock_t *restrict rwlock, const struct timespec *restrict abstime);• 逻辑:阻塞等待加锁,超过指定绝对时间后返回 ETIMEDOUT,避免永久阻塞; • 核心价值:生产环境防卡死必备。
✅ 4. 解锁(唯一接口,不分读 / 写)
int pthread_rwlock_unlock(pthread_rwlock_t *rwlock);• 逻辑:释放持有的读锁 / 写锁,唤醒等待的线程; • 强制规则:只有持有锁的线程才能解锁,读锁解锁需对应读加锁,写锁解锁需对应写加锁。
四、pthread 读写锁 核心对比(4 组高频对比,厘清技术边界)
✅ 对比 1:读写锁 vs 互斥锁(最核心对比)
二者是「互补关系」,按需选择即可,核心差异如下:
✅ 核心结论:多读少写用读写锁,其他场景用互斥锁。
✅ 对比 2:读锁 vs 写锁(读写锁内部对比)
✅ 核心结论:只读用读锁,写操作用写锁,禁止混用。
✅ 对比 3:读写锁 vs 自旋锁(pthread_spinlock_t)
自旋锁是「忙等锁」,和读写锁的核心差异在「阻塞方式」:
✅ 选型原则:锁持有时间长 + 多读少写→读写锁;锁持有时间极短→自旋锁。
✅ 对比 4:读写锁 vs 条件变量(pthread_cond_t)
条件变量是「同步机制」,读写锁是「互斥机制」,核心差异如下:
✅ 核心结论:保护共享资源用读写锁 / 互斥锁,控制执行顺序用条件变量。
五、pthread 读写锁 3 个可运行实战示例
代码才是硬道理。下面三个例子,涵盖了基础使用、写者饥饿演示和非阻塞应用,直接拷贝到你的 ARM Linux 开发板上就能跑(记得编译加 -lpthread)。
示例 1:基础读写——配置表模拟
最典型的用法。多个线程读取配置,一个线程更新配置。可以调整延时,模块执行时长
#include <stdio.h>#include <stdlib.h>#include <pthread.h>#include <unistd.h>// 模拟配置表char shared_config[1024] = "Initial Config: v1.0";pthread_rwlock_t rwlock = PTHREAD_RWLOCK_INITIALIZER;// 读者线程:频繁读取配置void* reader_thread(void *arg) { int id = *(int*)arg; while (1) { pthread_rwlock_rdlock(&rwlock); // 加读锁 printf("[读者 %d] 读取配置: %s\n", id, shared_config); pthread_rwlock_unlock(&rwlock); usleep(100000); // 100ms 模拟处理耗时 } return NULL;}// 写者线程:偶尔更新配置void* writer_thread(void *arg) { int ver = 1; while (1) { sleep(2); // 每2秒更新一次 pthread_rwlock_wrlock(&rwlock); // 加写锁(独占) sprintf(shared_config, "Updated Config: v1.%d", ver++); printf("[写者] 配置已更新!\n"); pthread_rwlock_unlock(&rwlock); } return NULL;}int main() { pthread_t readers[3], writer; int ids[3] = {1, 2, 3}; // 启动3个读者 for(int i=0; i<3; i++) { pthread_create(&readers[i], NULL, reader_thread, &ids[i]); } // 启动1个写者 pthread_create(&writer, NULL, writer_thread, NULL); // 运行5秒 sleep(5); // 实际工程中这里应该设置退出标志并 join,这里简化处理直接退出 printf("主程序退出\n"); return 0;}运行结果如下,5s内写了2次(每2秒执行1次)
[读者 1] 读取配置: Initial Config: v1.0[读者 2] 读取配置: Initial Config: v1.0[读者 3] 读取配置: Initial Config: v1.0[读者 3] 读取配置: Initial Config: v1.0[读者 1] 读取配置: Initial Config: v1.0[读者 2] 读取配置: Initial Config: v1.0[读者 1] 读取配置: Initial Config: v1.0[读者 3] 读取配置: Initial Config: v1.0[读者 2] 读取配置: Initial Config: v1.0[读者 3] 读取配置: Initial Config: v1.0[读者 1] 读取配置: Initial Config: v1.0[读者 2] 读取配置: Initial Config: v1.0[读者 2] 读取配置: Initial Config: v1.0[读者 1] 读取配置: Initial Config: v1.0[读者 3] 读取配置: Initial Config: v1.0[读者 1] 读取配置: Initial Config: v1.0[读者 2] 读取配置: Initial Config: v1.0[读者 3] 读取配置: Initial Config: v1.0[读者 2] 读取配置: Initial Config: v1.0[读者 1] 读取配置: Initial Config: v1.0[读者 3] 读取配置: Initial Config: v1.0[读者 2] 读取配置: Initial Config: v1.0[读者 3] 读取配置: Initial Config: v1.0[读者 1] 读取配置: Initial Config: v1.0[读者 3] 读取配置: Initial Config: v1.0[读者 2] 读取配置: Initial Config: v1.0[读者 1] 读取配置: Initial Config: v1.0[读者 2] 读取配置: Initial Config: v1.0[读者 3] 读取配置: Initial Config: v1.0[读者 1] 读取配置: Initial Config: v1.0[读者 3] 读取配置: Initial Config: v1.0[读者 1] 读取配置: Initial Config: v1.0[读者 2] 读取配置: Initial Config: v1.0[读者 1] 读取配置: Initial Config: v1.0[读者 3] 读取配置: Initial Config: v1.0[读者 2] 读取配置: Initial Config: v1.0[读者 1] 读取配置: Initial Config: v1.0[读者 2] 读取配置: Initial Config: v1.0[读者 3] 读取配置: Initial Config: v1.0[读者 2] 读取配置: Initial Config: v1.0[读者 1] 读取配置: Initial Config: v1.0[读者 3] 读取配置: Initial Config: v1.0[读者 3] 读取配置: Initial Config: v1.0[读者 2] 读取配置: Initial Config: v1.0[读者 1] 读取配置: Initial Config: v1.0[读者 2] 读取配置: Initial Config: v1.0[读者 1] 读取配置: Initial Config: v1.0[读者 3] 读取配置: Initial Config: v1.0[读者 1] 读取配置: Initial Config: v1.0[读者 2] 读取配置: Initial Config: v1.0[读者 3] 读取配置: Initial Config: v1.0[读者 1] 读取配置: Initial Config: v1.0[读者 3] 读取配置: Initial Config: v1.0[读者 2] 读取配置: Initial Config: v1.0[读者 3] 读取配置: Initial Config: v1.0[读者 1] 读取配置: Initial Config: v1.0[读者 2] 读取配置: Initial Config: v1.0[读者 1] 读取配置: Initial Config: v1.0[读者 3] 读取配置: Initial Config: v1.0[读者 2] 读取配置: Initial Config: v1.0[写者] 配置已更新![读者 3] 读取配置: Updated Config: v1.1[读者 1] 读取配置: Updated Config: v1.1[读者 2] 读取配置: Updated Config: v1.1[读者 1] 读取配置: Updated Config: v1.1[读者 3] 读取配置: Updated Config: v1.1[读者 2] 读取配置: Updated Config: v1.1[读者 3] 读取配置: Updated Config: v1.1[读者 1] 读取配置: Updated Config: v1.1[读者 2] 读取配置: Updated Config: v1.1[读者 3] 读取配置: Updated Config: v1.1[读者 1] 读取配置: Updated Config: v1.1[读者 2] 读取配置: Updated Config: v1.1[读者 3] 读取配置: Updated Config: v1.1[读者 1] 读取配置: Updated Config: v1.1[读者 2] 读取配置: Updated Config: v1.1[读者 3] 读取配置: Updated Config: v1.1[读者 2] 读取配置: Updated Config: v1.1[读者 1] 读取配置: Updated Config: v1.1[读者 1] 读取配置: Updated Config: v1.1[读者 3] 读取配置: Updated Config: v1.1[读者 2] 读取配置: Updated Config: v1.1[读者 3] 读取配置: Updated Config: v1.1[读者 2] 读取配置: Updated Config: v1.1[读者 1] 读取配置: Updated Config: v1.1[读者 2] 读取配置: Updated Config: v1.1[读者 3] 读取配置: Updated Config: v1.1[读者 1] 读取配置: Updated Config: v1.1[读者 3] 读取配置: Updated Config: v1.1[读者 2] 读取配置: Updated Config: v1.1[读者 1] 读取配置: Updated Config: v1.1[读者 3] 读取配置: Updated Config: v1.1[读者 1] 读取配置: Updated Config: v1.1[读者 2] 读取配置: Updated Config: v1.1[读者 1] 读取配置: Updated Config: v1.1[读者 3] 读取配置: Updated Config: v1.1[读者 2] 读取配置: Updated Config: v1.1[读者 1] 读取配置: Updated Config: v1.1[读者 2] 读取配置: Updated Config: v1.1[读者 3] 读取配置: Updated Config: v1.1[读者 3] 读取配置: Updated Config: v1.1[读者 1] 读取配置: Updated Config: v1.1[读者 2] 读取配置: Updated Config: v1.1[读者 1] 读取配置: Updated Config: v1.1[读者 3] 读取配置: Updated Config: v1.1[读者 2] 读取配置: Updated Config: v1.1[读者 1] 读取配置: Updated Config: v1.1[读者 2] 读取配置: Updated Config: v1.1[读者 3] 读取配置: Updated Config: v1.1[读者 3] 读取配置: Updated Config: v1.1[读者 1] 读取配置: Updated Config: v1.1[读者 2] 读取配置: Updated Config: v1.1[读者 2] 读取配置: Updated Config: v1.1[读者 3] 读取配置: Updated Config: v1.1[读者 1] 读取配置: Updated Config: v1.1[读者 3] 读取配置: Updated Config: v1.1[读者 1] 读取配置: Updated Config: v1.1[读者 2] 读取配置: Updated Config: v1.1[读者 1] 读取配置: Updated Config: v1.1[读者 2] 读取配置: Updated Config: v1.1[读者 3] 读取配置: Updated Config: v1.1[写者] 配置已更新![读者 2] 读取配置: Updated Config: v1.2[读者 3] 读取配置: Updated Config: v1.2[读者 1] 读取配置: Updated Config: v1.2[读者 1] 读取配置: Updated Config: v1.2[读者 3] 读取配置: Updated Config: v1.2[读者 2] 读取配置: Updated Config: v1.2[读者 1] 读取配置: Updated Config: v1.2[读者 2] 读取配置: Updated Config: v1.2[读者 3] 读取配置: Updated Config: v1.2[读者 1] 读取配置: Updated Config: v1.2[读者 3] 读取配置: Updated Config: v1.2[读者 2] 读取配置: Updated Config: v1.2[读者 3] 读取配置: Updated Config: v1.2[读者 1] 读取配置: Updated Config: v1.2[读者 2] 读取配置: Updated Config: v1.2[读者 3] 读取配置: Updated Config: v1.2[读者 1] 读取配置: Updated Config: v1.2[读者 2] 读取配置: Updated Config: v1.2[读者 1] 读取配置: Updated Config: v1.2[读者 3] 读取配置: Updated Config: v1.2[读者 2] 读取配置: Updated Config: v1.2[读者 1] 读取配置: Updated Config: v1.2[读者 2] 读取配置: Updated Config: v1.2[读者 3] 读取配置: Updated Config: v1.2[读者 2] 读取配置: Updated Config: v1.2[读者 1] 读取配置: Updated Config: v1.2[读者 3] 读取配置: Updated Config: v1.2[读者 2] 读取配置: Updated Config: v1.2[读者 1] 读取配置: Updated Config: v1.2[读者 3] 读取配置: Updated Config: v1.2主程序退出示例 2:写者饥饿现象(慎用场景)
这个例子演示读写锁的缺点:如果读者源源不断,写者可能会拿不到锁。
#include <stdio.h>#include <stdlib.h>#include <pthread.h>#include <unistd.h>int data = 0;pthread_rwlock_t rwlock = PTHREAD_RWLOCK_INITIALIZER;// 大量的“快餐”读者void* reader_thread(void *arg) { while (1) { pthread_rwlock_rdlock(&rwlock); // 模拟很快读一下 // int val = data; usleep(10000); // 10ms pthread_rwlock_unlock(&rwlock); } return NULL;}// 苦逼的写者void* writer_thread(void *arg) { int count = 0; while (1) { printf("[写者] 等待写锁...\n"); pthread_rwlock_wrlock(&rwlock); printf("[写者] 拿到锁了!更新数据 count=%d\n", ++count); data = count; sleep(1); // 模拟写操作耗时 pthread_rwlock_unlock(&rwlock); } return NULL;}int main() { pthread_t r1, r2, r3, w; // 启动3个疯狂的读者 pthread_create(&r1, NULL, reader_thread, NULL); pthread_create(&r2, NULL, reader_thread, NULL); pthread_create(&r3, NULL, reader_thread, NULL); // 启动1个苦逼写者 pthread_create(&w, NULL, writer_thread, NULL); sleep(10); printf("主程序退出\n"); return 0;}运行这个你会发现,写者的日志“拿到锁了”出现得非常少,大部分时间都在排队,这就是写者饥饿。

示例 3:非阻塞 Trylock (BSP 场景)
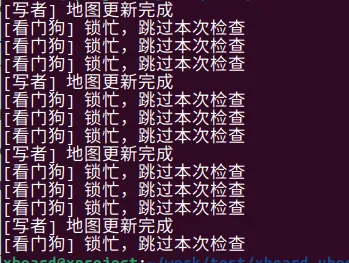
在嵌入式 BSP 开发中,我们经常不能死等锁。比如看门狗线程要检查状态,如果锁住了我就先跳过,别把狗饿死了。
#include <stdio.h>#include <stdlib.h>#include <pthread.h>#include <unistd.h>int sensor_map[10];pthread_rwlock_t rwlock = PTHREAD_RWLOCK_INITIALIZER;// 检查线程(非阻塞)void* watchdog_thread(void *arg) { while (1) { int ret = pthread_rwlock_tryrdlock(&rwlock); if (ret == 0) { // 成功拿到锁,检查数据 printf("[看门狗] 检查状态: map[0]=%d\n", sensor_map[0]); pthread_rwlock_unlock(&rwlock); } else { // 锁被占用(可能在写),不等待,直接跳过本次检查 printf("[看门狗] 锁忙,跳过本次检查\n"); } sleep(1); } return NULL;}// 更新线程void* writer_thread(void *arg) { int val = 0; while (1) { pthread_rwlock_wrlock(&rwlock); for(int i=0; i<10; i++) sensor_map[i] = ++val; printf("[写者] 地图更新完成\n"); sleep(3); // 模拟长写操作,故意占锁久一点 pthread_rwlock_unlock(&rwlock); } return NULL;}int main() { pthread_t w, dog; pthread_create(&w, NULL, writer_thread, NULL); pthread_create(&dog, NULL, watchdog_thread, NULL); sleep(10); return 0;}运行结果
七、pthread 读写锁 的优缺点
✅ 优点(核心优势,无可替代)
1. 极致的多读并发性能:多读线程可同时访问共享资源,相比互斥锁,并发性能提升数倍甚至数十倍; 2. 兼顾数据一致性:写操作排他,保证读写、写写之间无冲突,数据一致性不低于互斥锁; 3. 灵活的加锁方式:支持阻塞 / 非阻塞 / 超时加锁,适配所有业务场景; 4. 可配置优先级:支持读优先 / 写优先,可规避写线程饥饿问题; 5. 与 POSIX 线程库兼容:接口规范,适配所有 Linux 发行版,无兼容性问题。
✅ 缺点(局限性,客观认知)
1. 实现复杂,有额外开销:读 / 写判断、优先级处理等逻辑有额外开销,写多读少场景下性能不如互斥锁; 2. 写线程饥饿风险:默认读优先模式下,大量读线程会导致写线程永久等待; 3. 死锁风险更高:同一线程切换锁模式、加解锁不匹配等,极易触发死锁; 4. 不支持递归加锁:大部分 Linux 发行版的读写锁不支持递归加锁(如读锁加 2 次),递归加锁会返回 EDEADLK; 5. 调试难度高:读 / 写冲突、优先级问题等 bug 偶发,调试比互斥锁更困难。
✅ 优缺点总结
✔️ 读写锁的优点是压倒性的:在多读少写场景下,是性能最优的同步方案,没有任何技术能替代;
✔️ 读写锁的缺点都是可规避的:通过设置写优先、减小锁粒度、规范加解锁逻辑,能轻松解决所有局限性;
✔️ 结论:读写锁是 Linux 高并发读场景「必学、必会、必用」的优化技术,核心是「场景匹配」。
全文核心总结(精华提炼,直击本质,背会即用)
1. 读写锁的核心是「多读共享、单写排他」,多读少写场景用它,其他场景用互斥锁; 2. 防坑黄金法则:写优先配置防饥饿,小粒度锁提性能,不切换锁模式,超时加锁防卡死; 3. 核心接口:初始化→读 / 写加锁(阻塞 / 非阻塞 / 超时)→解锁→销毁,读 / 写加锁需严格区分; 4. 最核心场景是配置 / 缓存的读写,其次是日志、数据库批量读写、实时监控; 5. 优点是多读并发性能极高,缺点是实现复杂、有写饥饿风险,整体瑕不掩瑜; 6. 生产环境必须用「写优先 + 超时加锁」,兼顾安全性和性能。

