当前位置:首页>Linux>Ubuntu Linux系统LVM磁盘扩容至根目录全流程

Ubuntu Linux系统LVM磁盘扩容至根目录全流程

  • 2026-09-02 20:26:33
Ubuntu Linux系统LVM磁盘扩容至根目录全流程

1、文档概述

本文档面向系统管理员与运维人员,旨在提供在Ubuntu Linux系统中使用LVM(逻辑卷管理)技术对磁盘进行扩容的完整操作流程。

2、适用范围

lUbuntu Linux系统

l磁盘分区的类型为 LVM

l在线扩容

3、操作总结与提醒

备份先行:执行任何存储操作前,备份重要数据。

流程核心:牢记扩展链条:磁盘/分区 → PV → VG → LV → 文件系统,顺序不可跳跃。

验证闭环:操作后使用 pvdisplay、vgdisplay、lvdisplay、df -Th命令逐层确认扩展成功。

风险提示:重点注意最后一步扩展文件系统,这是数据可见的关键。

后续建议:建立监控,关注VG剩余空间,为下一次扩容做好准备。

4、扩容前准备

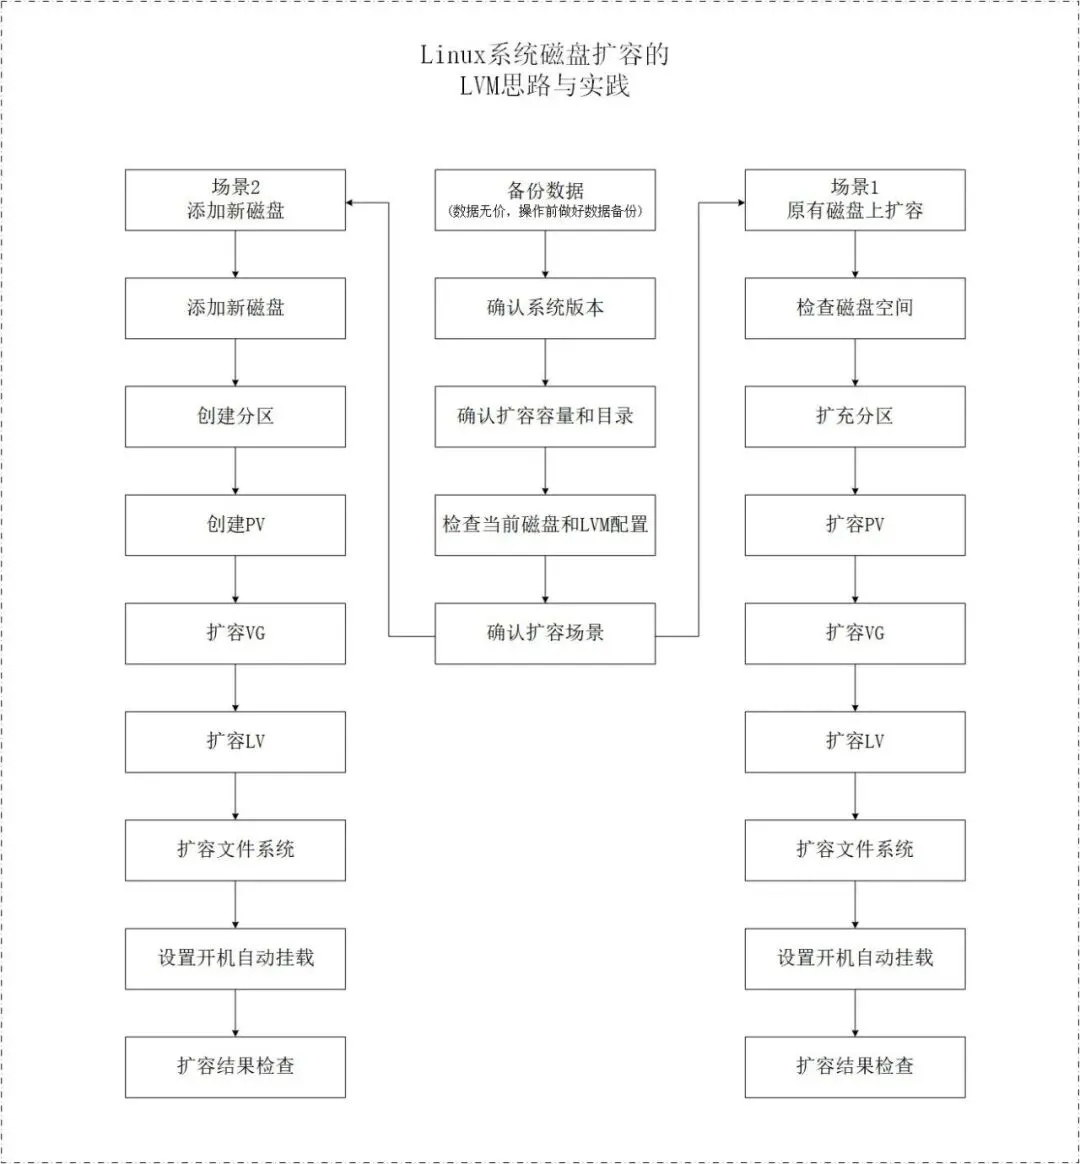
4.1扩容思路

4.2备份数据

操作前务必备份数据,并在测试环境验证。对于生产系统,建议在维护窗口进行操作。

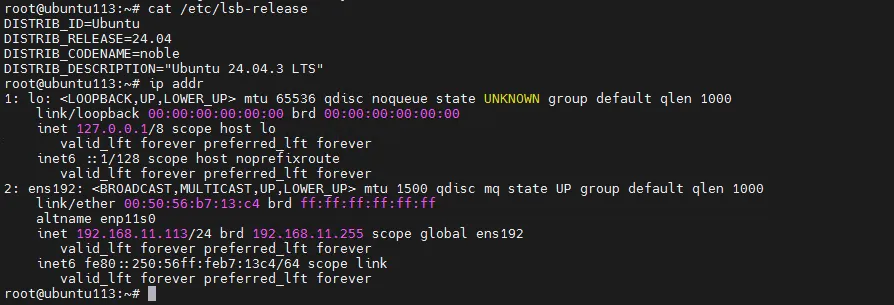
4.3系统信息

系统名称

IP地址

系统版本

Ubuntu24-192.168.11.113

192.168.11.113

Ubuntu 24.04.3 LTS

命令:#ip addr、#cat /etc/lsb-release

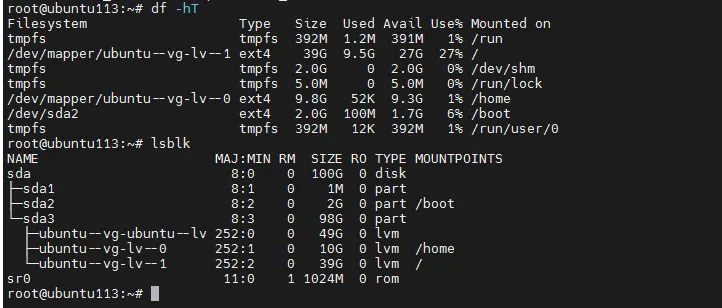
4.4计划扩容的目录和容量

系统IP地址

扩容目录

原容量

扩容

容量

最终

容量

磁盘

分区

192.168.11.113

/dev/mapper/ubuntu--vg-lv--1

39GB

10GB

49GB

lvm

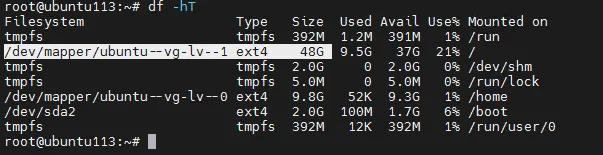
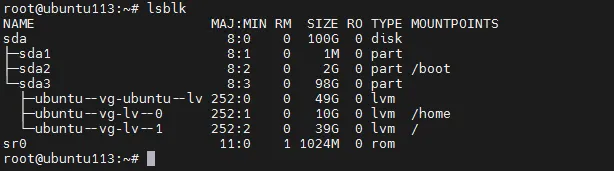
命令:#ip addr、#df -hT、#lsblk 

4.5确认扩容场景

扩容场景

原磁盘扩容

新增磁盘扩容

场景1

\

是

场景2

是

\

5、扩容操作过程

5.1场景1新增虚拟磁盘

扩容步骤

说明

添加新磁盘

编辑虚拟机设置,添加新硬盘。

扩充分区

新增加的容量进行分区。

扩容PV

创建物理卷。

扩容VG

扩容至卷组。

扩容LV

扩容至逻辑卷。

扩容文件系统

扩容至目的文件系统。

开机自动挂载

在fstab添加挂载路径。

检查

检查最终扩容扩容容量,并重启验证。

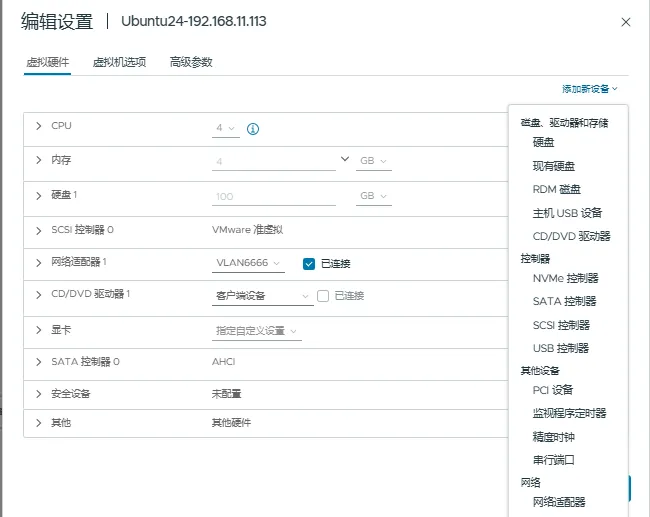
5.1.1新增磁盘

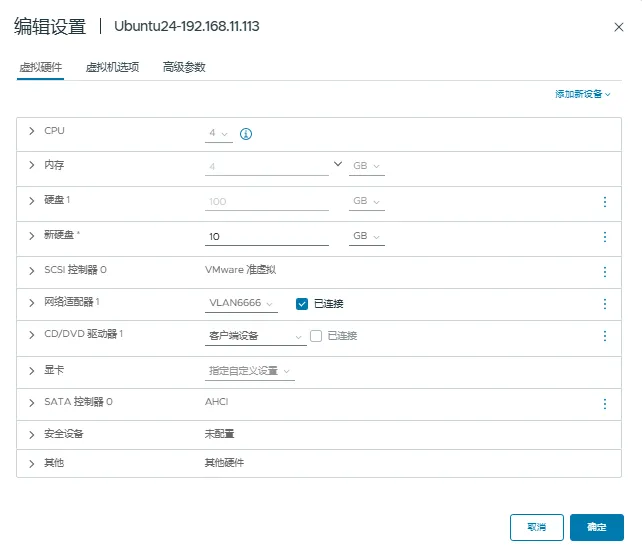
编辑虚拟机设置,添加新硬盘10GB。如图所示:

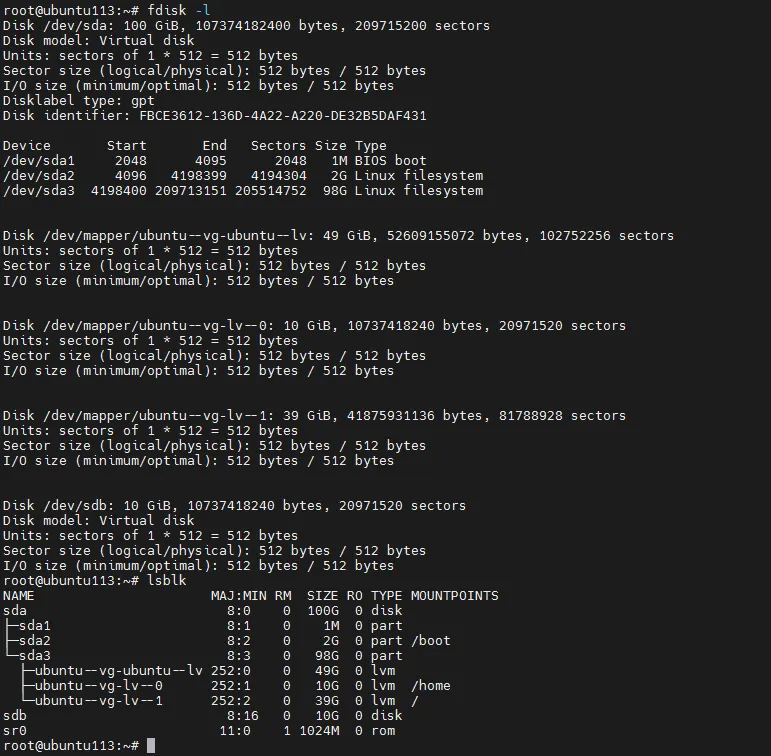
5.1.2系统查看新增加的磁盘

# fdisk -l

或者

#lsblk

注意:新添加的硬盘在系统中没有显示出来,可以进行扫盘操作,命令如下:

# 查看所有SCSI主机适配器

ls /sys/class/scsi_host/

# 扫描所有SCSI主机(通常有host0, host1, host2等)

for h in /sys/class/scsi_host/host*/scan; do echo "- - -" > $h; done

5.1.3创建分区

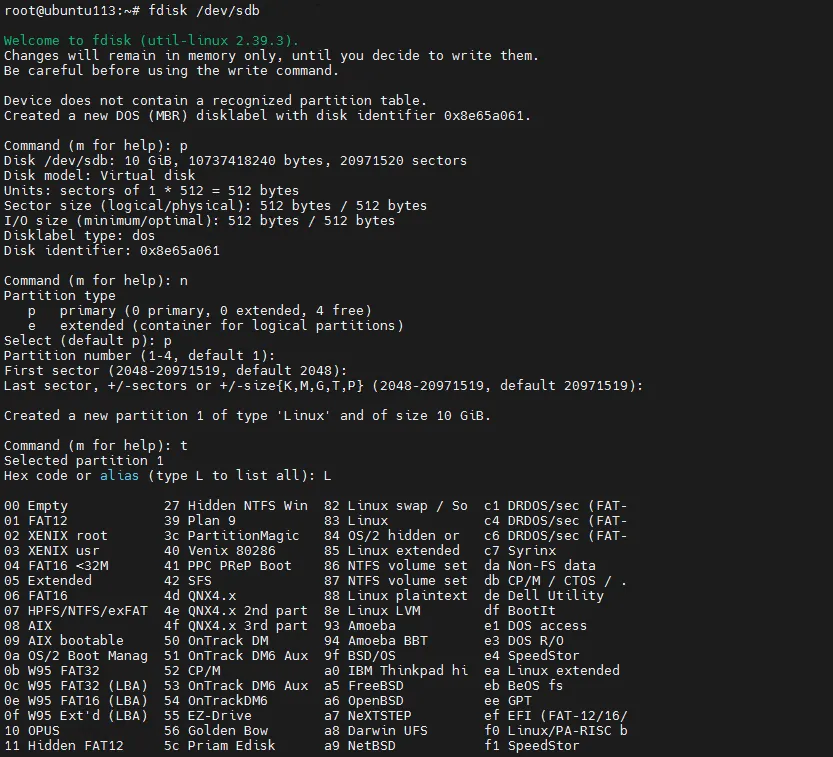
#fdisk /dev/sdb

root@ubuntu113:~# fdisk /dev/sdb

Welcome to fdisk (util-linux 2.39.3).

Changes will remain in memory only, until you decide to write them.

Be careful before using the write command.

Device does not contain a recognized partition table.

Created a new DOS (MBR) disklabel with disk identifier 0x8e65a061.

Command (m for help): p#查看当前分区表

Disk /dev/sdb: 10 GiB, 10737418240 bytes, 20971520 sectors

Disk model: Virtual disk

Units: sectors of 1 * 512 = 512 bytes

Sector size (logical/physical): 512 bytes / 512 bytes

I/O size (minimum/optimal): 512 bytes / 512 bytes

Disklabel type: dos

Disk identifier: 0x8e65a061

Command (m for help): n#创建新分区

Partition type

pprimary(0 primary, 0 extended, 4 free)

eextended(container for logical partitions)

Select (default p): p# 选择主分区

Partition number (1-4, default 1): # 分区号,直接回车使用默认值1

First sector (2048-20971519, default 2048):#起始扇区,直接回车使用默认

Last sector, +/-sectors or +/-size{K,M,G,T,P} (2048-20971519, default 20971519):

# 结束扇区,直接回车使用整个硬盘

Created a new partition 1 of type 'Linux' and of size 10 GiB.

Command (m for help): t#更改分区类型

Selected partition 1

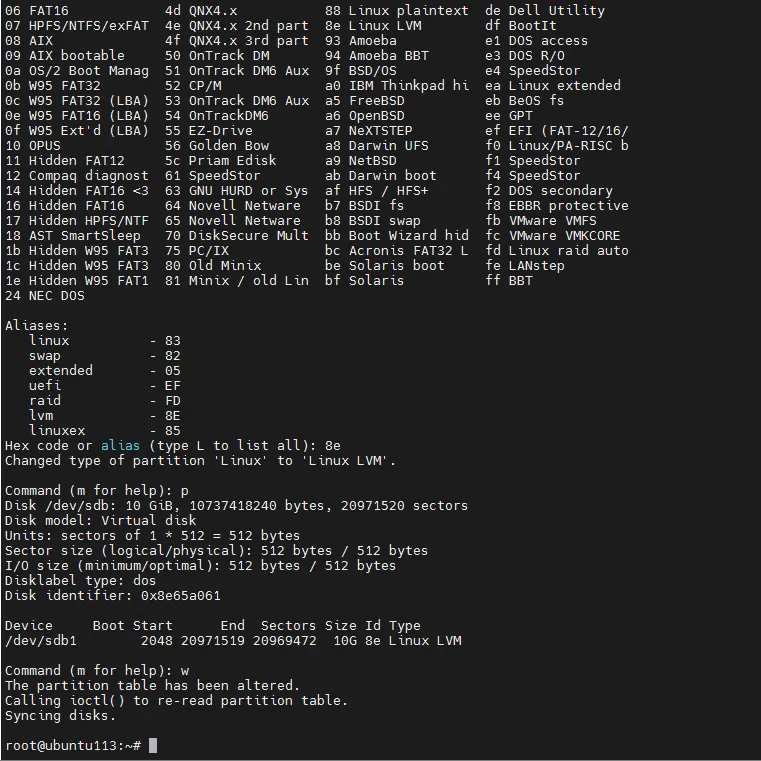
Hex code or alias (type L to list all): L#查看分区类型

00 Empty27 Hidden NTFS Win82 Linux swap / Soc1 DRDOS/sec (FAT-

01 FAT1239 Plan 983 Linuxc4 DRDOS/sec (FAT-

02 XENIX root3c PartitionMagic84 OS/2 hidden orc6 DRDOS/sec (FAT-

03 XENIX usr40 Venix 8028685 Linux extendedc7 Syrinx

04 FAT16 <32M41 PPC PReP Boot86 NTFS volume setda Non-FS data

05 Extended42 SFS87 NTFS volume setdb CP/M / CTOS / .

06 FAT164d QNX4.x88 Linux plaintextde Dell Utility

07 HPFS/NTFS/exFAT4e QNX4.x 2nd part8e Linux LVMdf BootIt

08 AIX4f QNX4.x 3rd part93 Amoebae1 DOS access

09 AIX bootable50 OnTrack DM94 Amoeba BBTe3 DOS R/O

0a OS/2 Boot Manag51 OnTrack DM6 Aux9f BSD/OSe4 SpeedStor

0b W95 FAT3252 CP/Ma0 IBM Thinkpad hiea Linux extended

0c W95 FAT32 (LBA)53 OnTrack DM6 Auxa5 FreeBSDeb BeOS fs

0e W95 FAT16 (LBA)54 OnTrackDM6a6 OpenBSDee GPT

0f W95 Ext'd (LBA)55 EZ-Drivea7 NeXTSTEPef EFI (FAT-12/16/

10 OPUS56 Golden Bowa8 Darwin UFSf0 Linux/PA-RISC b

11 Hidden FAT125c Priam Ediska9 NetBSDf1 SpeedStor

12 Compaq diagnost61 SpeedStorab Darwin bootf4 SpeedStor

14 Hidden FAT16 <363 GNU HURD or Sysaf HFS / HFS+f2 DOS secondary

16 Hidden FAT1664 Novell Netwareb7 BSDI fsf8 EBBR protective

17 Hidden HPFS/NTF65 Novell Netwareb8 BSDI swapfb VMware VMFS

18 AST SmartSleep70 DiskSecure Multbb Boot Wizard hidfc VMware VMKCORE

1b Hidden W95 FAT375 PC/IXbc Acronis FAT32 Lfd Linux raid auto

1c Hidden W95 FAT380 Old Minixbe Solaris bootfe LANstep

1e Hidden W95 FAT181 Minix / old Linbf Solarisff BBT

24 NEC DOS

Aliases:

linux-83

swap-82

extended-05

uefi-EF

raid-FD

lvm-8E

linuxex-85

Hex code or alias (type L to list all): 8e# 设置LVM分区类型

Changed type of partition 'Linux' to 'Linux LVM'.

Command (m for help): p# 验证分区表

Disk /dev/sdb: 10 GiB, 10737418240 bytes, 20971520 sectors

Disk model: Virtual disk

Units: sectors of 1 * 512 = 512 bytes

Sector size (logical/physical): 512 bytes / 512 bytes

I/O size (minimum/optimal): 512 bytes / 512 bytes

Disklabel type: dos

Disk identifier: 0x8e65a061

DeviceBoot StartEndSectors Size Id Type

/dev/sdb12048 20971519 2096947210G 8e Linux LVM

Command (m for help): w#保存并退出

The partition table has been altered.

Calling ioctl() to re-read partition table.

Syncing disks.

root@ubuntu113:~#

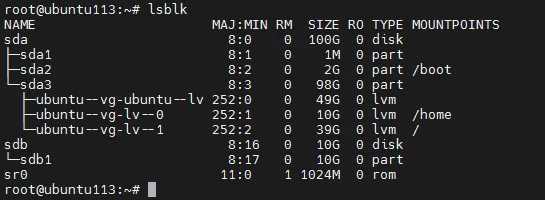
检查新建的分区sdb1:

5.1.4创建物理卷(PV)

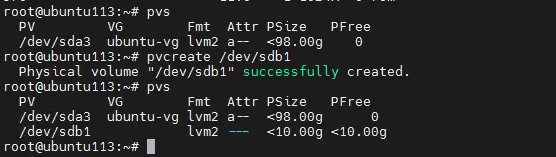
将新建的分区扩容至物理卷。

物理卷扩容前:

物理卷扩容后(将 sdb1初始化为物理卷):

#pvcreate /dev/sdb1

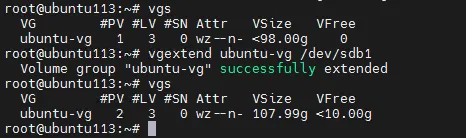
5.1.5扩容卷组(VG)

卷组扩容前:

卷组扩容后(将新物理卷加入卷组 ubuntu-vg):

#vgextend ubuntu-vg /dev/sdb1

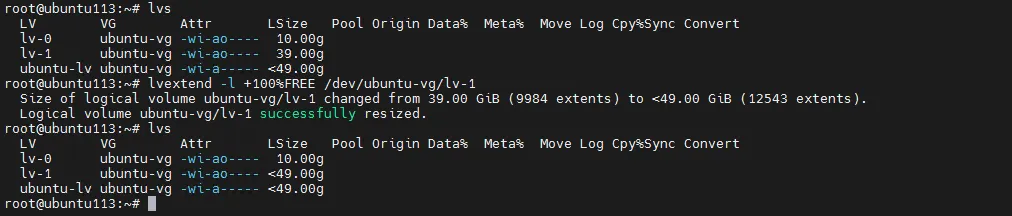
5.1.6扩容逻辑卷(LV)

扩容逻辑卷前:

扩容逻辑卷后【扩展逻辑卷(如根分区)】:

#lvextend -l +100%FREE /dev/ubuntu-vg/lv-1

5.1.7扩容文件系统

扩展文件系统。

#如果是 XFS:

xfs_growfs /

#如果是 Ext4:

resize2fs /dev/ubuntu-vg/lv-1

查看文件系统类型:

#blkid /dev/ubuntu-vg/lv-1

扩展文件系统:resize2fs /dev/ubuntu-vg/lv-1

5.1.8开机自动挂载设置

本次扩容是直接扩容至根逻辑卷,不需要 fstab 配置,因为根分区已在初始安装时配置。

5.1.9检查扩容结果

扩容前:

扩容后:

5.2场景2原磁盘扩容

扩容步骤

说明

虚拟机磁盘扩容

编辑虚拟机设置,修改原磁盘容量。

扩充分区

新增加的容量进行分区。

扩容PV

创建物理卷。

扩容VG

扩容至卷组。

扩容LV

扩容至逻辑卷。

扩容文件系统

扩容至目的文件系统。

开机自动挂载

在fstab添加挂载路径。

检查

检查最终扩容扩容容量,并重启验证。

5.2.1查看系统磁盘原容量

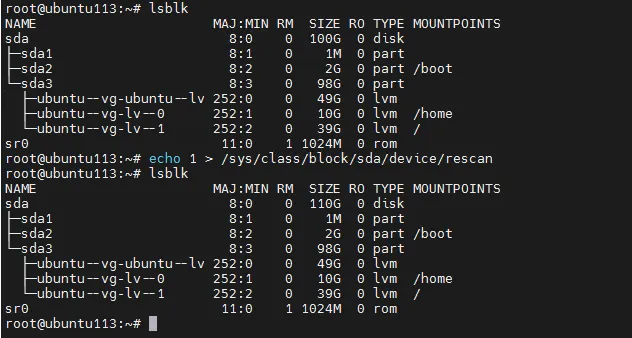
使用命令lsblk,查看系统磁盘原容量为100GB。

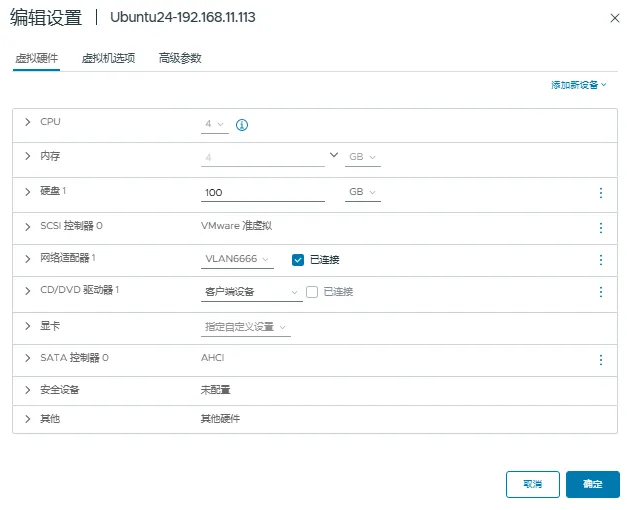
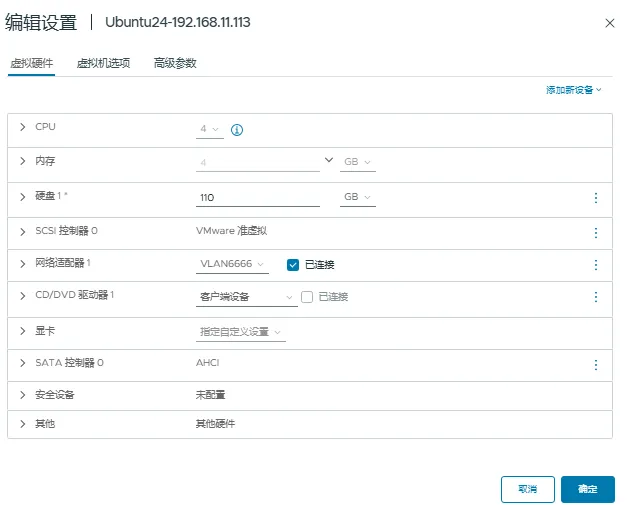
5.2.2系统原磁盘扩容

扩容前,如图所示:

扩容后,如图所示:

5.2.3重新扫描磁盘

# 先查看磁盘设备名(如sda、sdb)

lsblk

# 本次扩容磁盘是sda

5.2.4新建分区

将虚拟机磁盘扩容的容量进行分区。

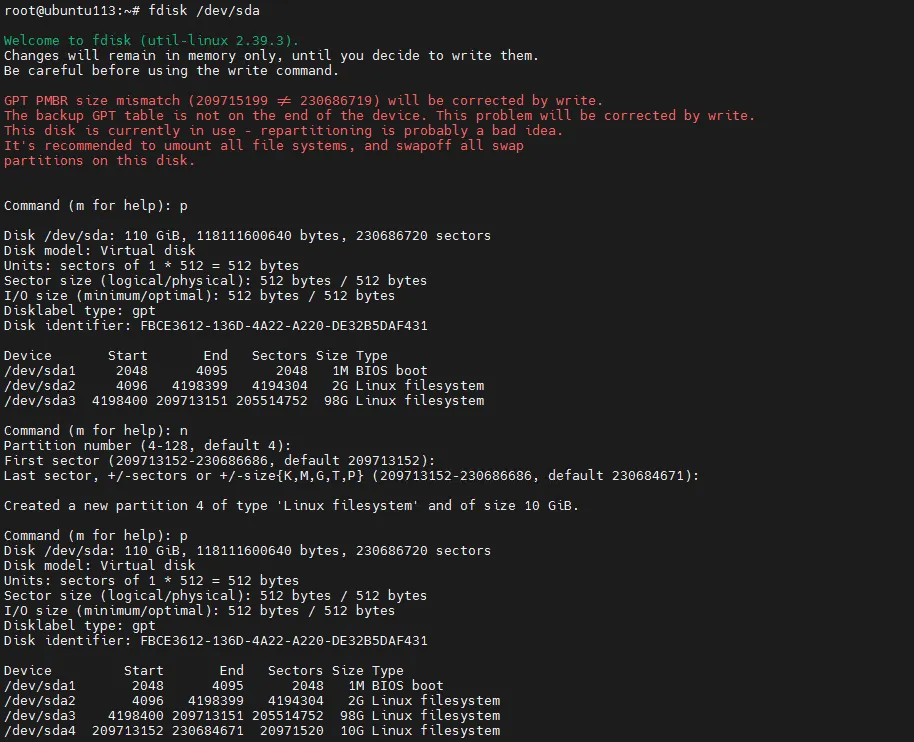
#fdisk /dev/sda;

root@ubuntu113:~# fdisk /dev/sda

Welcome to fdisk (util-linux 2.39.3).

Changes will remain in memory only, until you decide to write them.

Be careful before using the write command.

GPT PMBR size mismatch (209715199 != 230686719) will be corrected by write.

The backup GPT table is not on the end of the device. This problem will be corrected by write.

This disk is currently in use - repartitioning is probably a bad idea.

It's recommended to umount all file systems, and swapoff all swap

partitions on this disk.

Command (m for help): p#查看当前分区表

Disk /dev/sda: 110 GiB, 118111600640 bytes, 230686720 sectors

Disk model: Virtual disk

Units: sectors of 1 * 512 = 512 bytes

Sector size (logical/physical): 512 bytes / 512 bytes

I/O size (minimum/optimal): 512 bytes / 512 bytes

Disklabel type: gpt

Disk identifier: FBCE3612-136D-4A22-A220-DE32B5DAF431

DeviceStartEndSectors Size Type

/dev/sda12048409520481M BIOS boot

/dev/sda24096419839941943042G Linux filesystem

/dev/sda34198400 209713151 20551475298G Linux filesystem

Command (m for help): n#创建新分区

Partition number (4-128, default 4): #分区号,直接回车使用默认值

First sector (209713152-230686686, default 209713152):# 起始扇区,直接回车使用默认

Last sector, +/-sectors or +/-size{K,M,G,T,P} (209713152-230686686, default 230684671): # 结束扇区,直接回车使用整个硬盘

Created a new partition 4 of type 'Linux filesystem' and of size 10 GiB.

Command (m for help): p # 验证分区表

Disk /dev/sda: 110 GiB, 118111600640 bytes, 230686720 sectors

Disk model: Virtual disk

Units: sectors of 1 * 512 = 512 bytes

Sector size (logical/physical): 512 bytes / 512 bytes

I/O size (minimum/optimal): 512 bytes / 512 bytes

Disklabel type: gpt

Disk identifier: FBCE3612-136D-4A22-A220-DE32B5DAF431

DeviceStartEndSectors Size Type

/dev/sda12048409520481M BIOS boot

/dev/sda24096419839941943042G Linux filesystem

/dev/sda34198400 209713151 20551475298G Linux filesystem

/dev/sda4209713152 2306846712097152010G Linux filesystem

Command (m for help): w #保存并退出

The partition table has been altered.

Syncing disks.

root@ubuntu113:~#

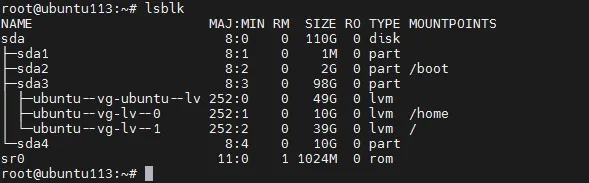
检查新建的分区sda4:

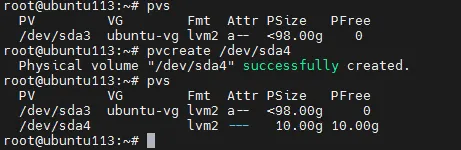
5.2.5创建物理卷(PV)

将新建的分区扩容至物理卷。

物理卷扩容前:

物理卷扩容后(将 sda4初始化为物理卷):

#pvcreate /dev/sda4

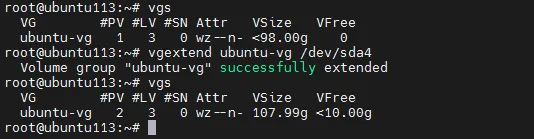
5.2.6扩容卷组(VG)

卷组扩容前:

卷组扩容后(将新物理卷加入卷组 ubuntu-vg):

#vgextend ubuntu-vg /dev/sda4

5.2.7扩容逻辑卷(LV)

扩容逻辑卷前:

扩容逻辑卷后【扩展逻辑卷(如根分区)】:

#lvextend -l +100%FREE /dev/ubuntu-vg/lv-1

5.2.8扩容文件系统

扩展文件系统。

#如果是 XFS:

xfs_growfs /

#如果是 Ext4:

resize2fs /dev/ubuntu-vg/lv-1

查看文件系统类型:

#blkid /dev/ubuntu-vg/lv-1

扩展文件系统:

5.2.9开机自动挂载设置

本次扩容是直接扩容至根逻辑卷,不需要 fstab 配置,因为根分区已在初始安装时配置。

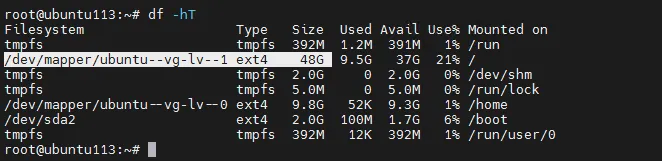
5.2.10检查扩容结果

扩容前:

扩容后:

最新文章

随机文章