为什么要压缩HDF5文件
有些文件很大,甚至达到几十GB,非常占存储空间。而 HDF5 可以进行无损压缩,读取时会完全还原原始数据。通过合理的压缩配置,不仅可以大幅度减少磁盘空间占用,在某些 I/O 瓶颈的场景下(如较慢的机械硬盘或网络存储),还可以通过减少数据读取量来提高整体读取速度。
如何压缩hdf5文件
使用内置压缩方式进行压缩
h5py 原生支持三种压缩方式,无需额外安装依赖:
1. gzip:最通用,兼容性最好,几乎所有 HDF5 工具都支持。
○ 特点:压缩率较高,但速度非常慢(尤其是写入时)。
○ 代码:compression_opts 默认值为 4,范围 1~9,等级越高压缩率越高但速度越慢。
f.create_dataset("d", data=data, compression="gzip", compression_opts=4)
2. lzf:h5py 内置的轻量级压缩。
○ 特点:速度比 gzip 快很多,但压缩率比较低。
○ 代码:
f.create_dataset("d", data=data, compression="lzf")
3. szip:专为科学数据设计的无损压缩算法(基于 Rice 编码)。
○ 特点:写入速度快,压缩率中等
○ 代码
f.create_dataset("d", data=data, compression="szip")
○ 注意事项:有商用专利限制。默认预编译包(如通过 conda install h5py 得到的默认包)在构建时通常不包含 szip 写入支持
使用 hdf5plugin 进行压缩
可以使用第三方库 hdf5plugin 可以使用更高性能的压缩算法(如 Zstd、LZ4 等)
安装
pip install hdf5plugin
使用文档见:http://www.silx.org/doc/hdf5plugin/latest/usage.html
主要压缩方法
1. 使用Blosc 高速压缩框架,可以调用不同的压缩方法
f.create_dataset("d", data=data, compression=hdf5plugin.Blosc(cname='lz4', clevel=5, shuffle=1))
| | | |
|---|
| cname | str | 压缩器:blosclz / lz4 / lz4hc / zlib / zstd / snappy | lz4 |
| clevel | int | | 5 |
| shuffle | int | 预压缩过滤器:NOSHUFFLE(0) / SHUFFLE(1) / BITSHUFFLE(2) | 1 |
2. 使用Blosc2 压缩框架
f.create_dataset("d", data=data, compression=hdf5plugin.Blosc2(cname='blosclz', clevel=5, filters=1))
| | | |
|---|
| cname | str | 压缩器:blosclz / lz4 / lz4hc / zlib / zstd | blosclz |
| clevel | int | | 5 |
| filters | int | 预压缩过滤器:NOFILTER(0) / SHUFFLE(1) / BITSHUFFLE(2) / DELTA(3) / TRUNC_PREC(4) | 1 |
其他无损压缩方法
✦ hdf5plugin.Zstd(clevel=3):Zstandard 无损压缩。压缩率和速度比较均衡,clevel 范围 1 到 22。
✦ hdf5plugin.LZ4(nbytes=0):LZ4 无损压缩。速度优先,压缩率通常不如 Zstd。
✦ hdf5plugin.BZip2(blocksize=9):BZip2 无损压缩。压缩率可能较好,但速度通常较慢。
问题
✦ 用Blosc-Zstd与Zstd有什么区别
f.create_dataset("d", data=data, compression=hdf5plugin.Blosc(cname='zstd', clevel=5))
f.create_dataset("d", data=data, compression=hdf5plugin.Zstd(clevel=5))
○ Blosc-Zstd 默认会进行shuffle,所以压缩的文件会更小,不过zstd也可以自己设置shuffle,所以就写入速度和压缩率进行考量,还是zstd更好
○ Blosc-Zstd的优势是读取速度快,但是如果每次只读取一小部分文件,其实差异不是很大
○ 综合考虑我会选择用HDF5-Shuffle + Zstd方式
✦ Blosc 和 Blosc2有什么区别
参考
○ [What is it? - Python-Blosc2 documentation](https://blosc.org/python-blosc2/getting_started/overview.html#)
○ https://github.com/Blosc/python-blosc2
总结
○ 更丰富的过滤器流水线 (Filter Pipeline):除原有的 shuffle 和 bitshuffle 外,Blosc2 新增了 Delta、trunc_prec 等过滤器,并支持过滤器的串联管线,以便更好地处理特定数据以获得更高的压缩比。
○ 64位容器支持 (Super-chunks):原版 Blosc 使用 32 位限制,而 Blosc2 引入了“超级块(Super-chunks)”,支持构建 64 位的大型容器,能够处理非常庞大的数据集
○ 多维数组 (NDim):Blosc2 原生支持多维数据集(例如 N 维 NumPy 数组),允许以多维方式高效读取局部切片(Slice)
如何读取压缩的hdf5文件
内置压缩
h5py 自动处理解压,无需任何额外操作:
import h5py

with h5py.File("data.h5", "r") as f:
    data = f["d"][:]
print(data)
hdf5plugin 压缩
保存zstd的文件
import h5py
import hdf5plugin
import numpy as np

# 创建测试数据
data = np.random.randn(1000, 1000).astype(np.float32)

# 写入 HDF5 文件,使用 zstd 压缩
with h5py.File("data_zstd.h5", "w") as f:
    f.create_dataset("mydata", data=data, compression=hdf5plugin.Zstd())

print("文件已创建,使用 zstd 压缩")
如果要读取的话,只需在读取文件前import hdf5plugin,h5py就能自动处理解压
import h5py
import hdf5plugin

with h5py.File("data_zstd.h5", "r") as f:
    data = f["mydata"][:]
print(data)
如果没有import hdf5plugin,则会报错
OSError: Can't synchronously read data (can't open directory)
Matlab 等非Python软件也是可以读取用hdf5plugin压缩的hdf5文件的,需参考http://www.silx.org/doc/hdf5plugin/latest/usage.html的文档进行设置
1. 获取hdf5plugin的路径,在终端输入:python -c "import hdf5plugin; print(hdf5plugin.PLUGIN_PATH)"
~ $ python -c "import hdf5plugin; print(hdf5plugin.PLUGIN_PATH)"
C:\Users\Achuan-2\miniforge3\lib\site-packages\hdf5plugin\plugins
2. 设置环境变量HDF5_PLUGIN_PATH
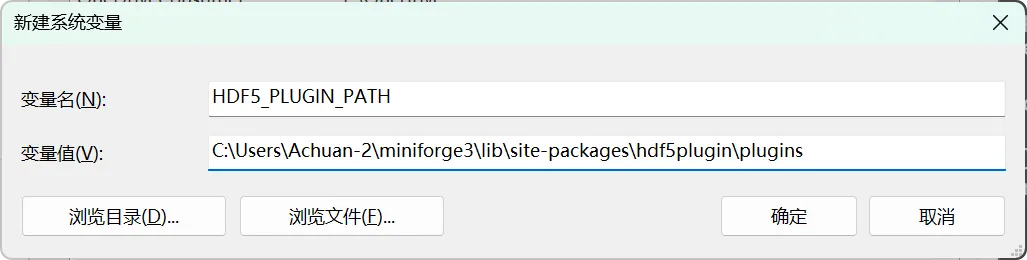
3. 之后Matlab即可正常读取
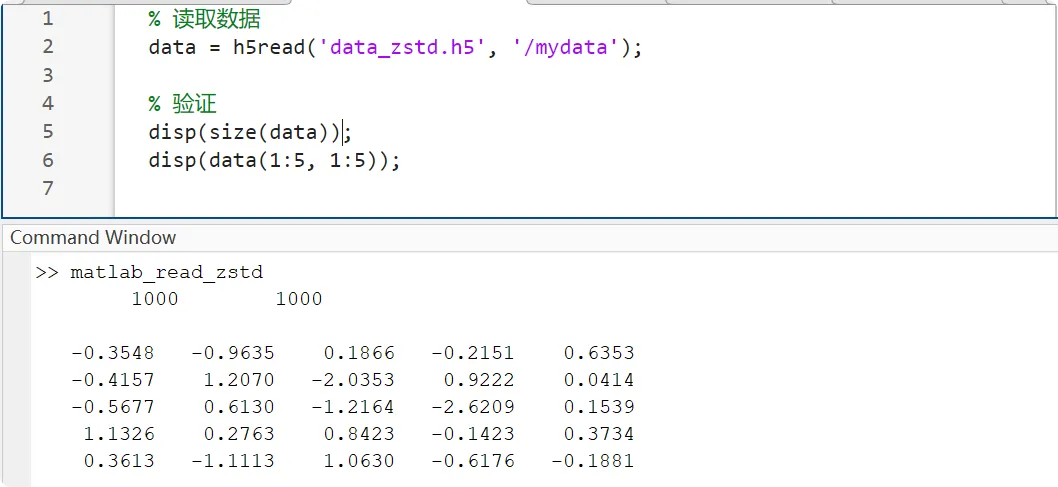
% 读取数据
data = h5read('data_zstd.h5', '/mydata');

% 验证
disp(size(data));
disp(data(1:5, 1:5));
压缩方式综合对比
基于 ~1GB uint16 钙成像数据 (Time x Width x Height = 2048 x 512 x 512, chunks=(1, 512, 512)) 跑出的基准结果如下:
| | | | | | | |
|---|
| 未压缩 (None) | | | | | | | |
| gzip-4 | | | | | | | |
| gzip-9 | | 170.20 | | 极其缓慢 | | | |
| lzf | | | | | | | |
| Blosc/lz4 | | 0.87 | 0.65 | 极快 | 极快 | | |
| Blosc/zstd | 461.05 | | 1.06 | | | 高 | |
| Blosc2/zstd | | | | | | 高 | |
| HDF5-Shuffle + Zstd | | 3.85 | | 快 | | 高 | |
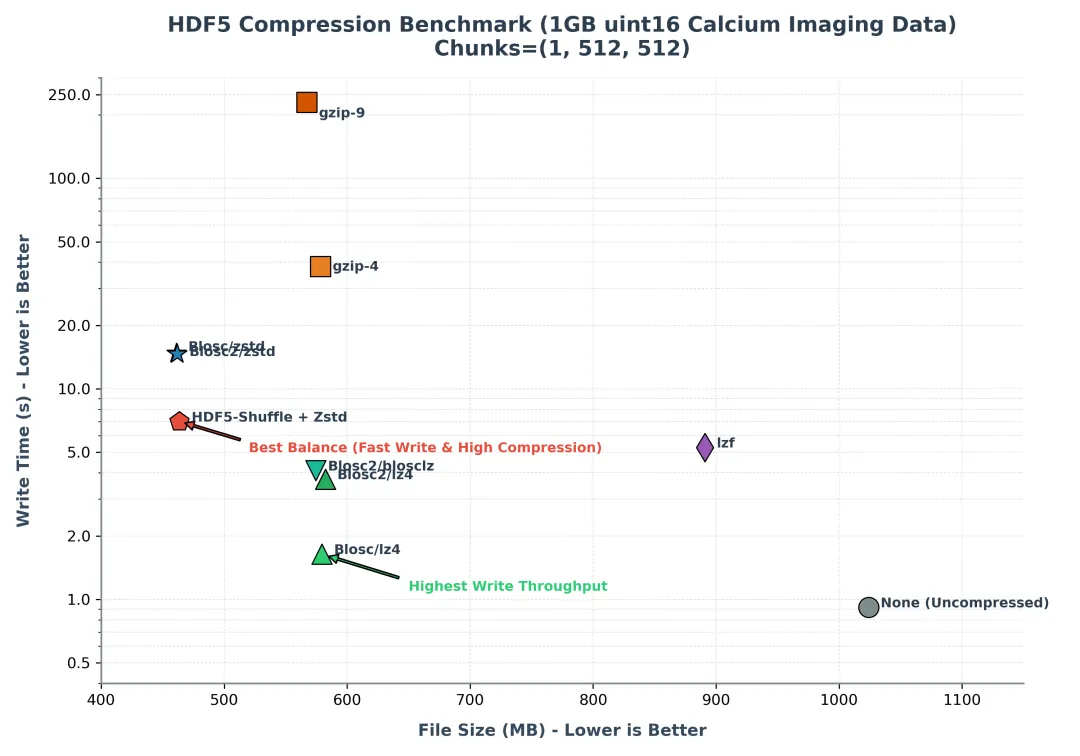
综合考虑:
✦ 追求速度用Blosc/lz4(不过只有重复数字比较多时压缩效果才好,没有重复数字压缩效果就很差了,压缩率不是很稳定)
✦ 兼顾速度和压缩比用HDF5-Shuffle + Zstd
完整脚本
import time
import os
import numpy as np
import h5py
import hdf5plugin

# 1. 准备测试数据 (uint16, 2048 x 512 x 512 => 1GB)
print("正在生成 ~1GB uint16 钙成像测试数据 (Time x Width x Height)...")
shape = (2048, 512, 512)

# 基础背景底噪 (比如 200)
data_float = np.random.normal(200, 30, shape).astype(np.float32)

# 模拟 25 个具有自发钙闪烁活动(Spikes)的神经元
num_neurons = 25
np.random.seed(42)
y_indices, x_indices = np.ogrid[:shape[1], :shape[2]]

for i inrange(num_neurons):
# 随机在 512x512 视野内放置神经元
    ny = np.random.randint(40, shape[1] - 40)
    nx = np.random.randint(40, shape[2] - 40)
    r = np.random.randint(12, 25)  # 神经元半径

# 模拟该神经元随时间产生的钙荧光强度变化 (突发上升,指数衰减)
    neuron_signal = np.zeros(shape[0], dtype=np.float32)
for _ inrange(3):  # 产生3次随机闪烁
        onset = np.random.randint(100, shape[0] - 300)
        dur = np.random.randint(40, 120)
        decay = np.exp(-np.linspace(0, 4, dur)) * np.random.randint(800, 3500)
        neuron_signal[onset:onset+dur] += decay

# 叠加到 3D 空间
    dist_sq = (y_indices - ny)**2 + (x_indices - nx)**2
    mask_neuron = dist_sq < r**2
    data_float[:, mask_neuron] += neuron_signal[:, None]

# 裁剪并确保数据在 uint16 范围内
data_float = np.clip(data_float, 0, 65535)

# 模拟每帧有 10% 的像素值为 0 (模拟FOV圆形掩码外侧或无效背景背景屏蔽)
mask_zero = np.random.rand(*shape) > 0.10
data = (data_float * mask_zero).astype(np.uint16)

print(f"数据生成完毕。内存大小: {data.nbytes / (1024**3):.2f} GB, 数据类型: {data.dtype}, 形状: {data.shape}")
print(f"验证:数据中值为 0 的比例约为: {(data == 0).sum() / data.size * 100:.2f}%")

test_dir = os.path.dirname(__file__) if os.path.dirname(__file__) else"."
results = {}

# 2. 测试函数
defrun_test(name, create_opts):
print(f"\n--- 测试 {name} ---")
    filepath = os.path.join(test_dir, f"test_{name.replace('/', '_').replace(' ', '_')}.h5")

try:
# 写入测试
        start_time = time.time()
with h5py.File(filepath, 'w') as f:
# 采用适合帧读取的 (1, Width, Height) 的 Chunk 结构,每个 Chunk 大小为 512KB (512x512x2 bytes)
            f.create_dataset("data", data=data, chunks=(1, shape[1], shape[2]), **create_opts)
        write_time = time.time() - start_time

# 文件大小
        file_size = os.path.getsize(filepath) / (1024 * 1024)

# 读取测试
        start_time = time.time()
with h5py.File(filepath, 'r') as f:
            read_data = f["data"][:]
        read_time = time.time() - start_time

# 验证
assert np.array_equal(data, read_data)

print(f"写入时间: {write_time:.4f} 秒")
print(f"读取时间: {read_time:.4f} 秒")
print(f"文件大小: {file_size:.2f} MB")

        results[name] = {
"write_time": f"{write_time:.4f}",
"read_time": f"{read_time:.4f}",
"file_size": f"{file_size:.2f}"
        }
except Exception as e:
print(f"测试失败: {e}")
        results[name] = {"file_size": "Error", "write_time": "Error", "read_time": "Error"}
finally:
if os.path.exists(filepath):
try:
                os.remove(filepath)
except Exception:
pass

# 3. 执行测试
run_test("未压缩 (None)", {})
run_test("gzip-4", {"compression": "gzip", "compression_opts": 4})
run_test("gzip-9", {"compression": "gzip", "compression_opts": 9})
run_test("lzf", {"compression": "lzf"})
run_test("Blosc/lz4", hdf5plugin.Blosc(cname="lz4"))
run_test("Blosc/zstd", hdf5plugin.Blosc(cname="zstd", clevel=5, shuffle=hdf5plugin.Blosc.SHUFFLE))
run_test("Blosc2/zstd", hdf5plugin.Blosc2(cname="zstd", clevel=5, filters=hdf5plugin.Blosc2.SHUFFLE))
run_test("HDF5-Shuffle + Zstd", {"shuffle": True, **hdf5plugin.Zstd(clevel=5)})

# 4. 打印对比结果
print("\n" + "="*80)
print(f"{'压缩方式':<25} | {'文件大小 (MB)':<15} | {'写入时间 (s)':<15} | {'读取时间 (s)':<15}")
print("-"*80)
for name, info in results.items():
    sz = info['file_size']
    wt = info['write_time']
    rt = info['read_time']
    sz_str = f"{float(sz):.2f}"if sz notin ["N/A", "Error"] else sz
    wt_str = f"{float(wt):.4f}"if wt notin ["N/A", "Error"] else wt
    rt_str = f"{float(rt):.4f}"if rt notin ["N/A", "Error"] else rt
print(f"{name:<25} | {sz_str:>15} | {wt_str:>15} | {rt_str:>15}")
print("="*80)
问题
为什么压缩时需要分块
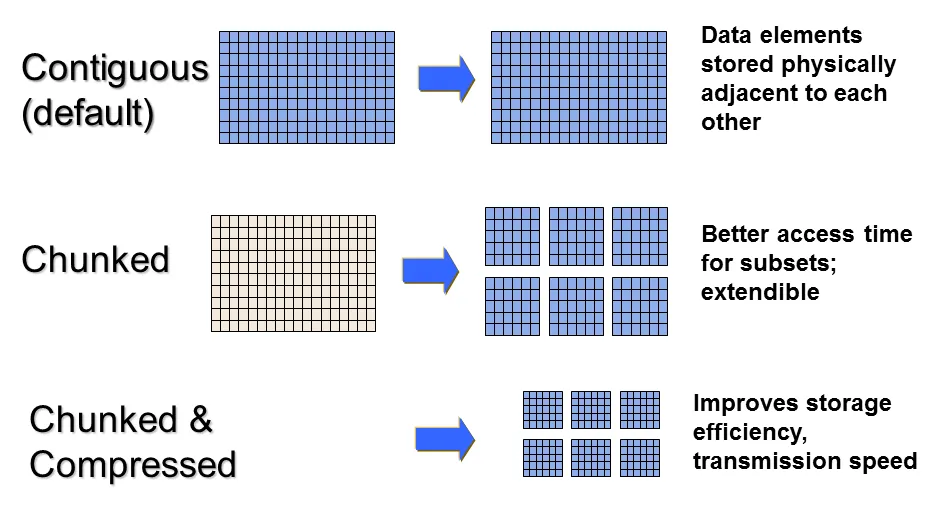
在默认情况下,如果不指定压缩或扩展,HDF5 会采用连续存储(Contiguous Storage)。也就是说,整个数据集在磁盘上就是一块完整、不间断的二进制数据流。可以在不压缩、不扩容时获得最快的直接读取速度和最低的系统开销。
而压缩后因为数据不再是等宽排列时,连续存储就有问题了
✦ 无法直接计算数据偏移量(寻址失效)
数据压缩后,原本固定大小的数组元素(例如每个 float 占 4 字节)变成了变长数据。
○ 由于数据不再是等宽排列,你无法再通过公式直接计算出 A[100][100] 在磁盘上的第几个字节。
○ 如果是连续存储,你必须把这 100 行之前的所有数据全部读取并解压,才能找到目标元素。读取一小块数据就要解压整个文件,这在处理大文件时性能是不可接受的。
✦ 局部的修改会引发“全文件重写”
如果修改了 A[50][50] 的值,压缩后这部分数据的字节大小很可能会发生变化(变大或变小)。如果是连续存储,为了塞下变大后的数据,你就必须将它后面所有的数据在磁盘上整体向后平移;如果变小了,则需要向前收缩。这会导致极其高昂的磁盘 I/O 成本。
所以需要分块,可以将多维数组分割成大小相同的子块(Chunks),每个子块在磁盘上独立存放,并通过一个 B 树(B-Tree) 索引来管理。
优势
1. 局部解压,提升速度: 当读取 A[100][100] 时,HDF5 查阅 B 树索引,得知该元素属于分块 (1,0),只需从磁盘中取出分块 (1,0) 的 9KB 压缩数据进行解压即可。其余无关的分块不需要解压。
2. 灵活应对变长数据: 每个块独立压缩后大小不同(如一个是 12KB,一个是 15KB),但这无所谓。HDF5 只需要在 B 树索引中更新该块的“物理地址”和“压缩后大小”即可,不需要移动磁盘上的其他块。
3. 支持动态追加(Resize): 当数据集扩容时,HDF5 只需要在磁盘空白处写入新的分块,并将其注册到 B 树索引中。各个分块在磁盘上不需要连续,彻底解决了扩容时的空间覆盖冲突。
相关笔记
✦ 如何压缩tiff文件
✦ 大存储格式丨HDF5

