之前一直在忙毕业论文(加上自己可能也比较懒),没有时间写公众号,今天重新拾起笔,来更新微信公众号了,依旧希望可以帮助到大家,欢迎多多交流!
简介
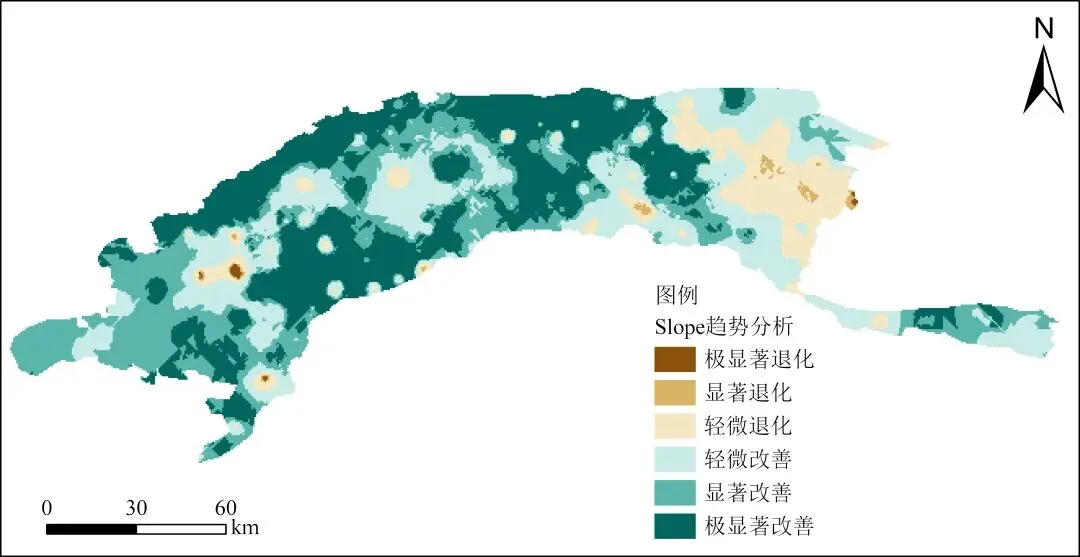
本脚本集成了一套基于 最小二乘法线性回归(Ordinary Least Squares, OLS) 的长时间序列趋势分析方案。核心算法通过计算逐像元的年度变化斜率(Slope)来量化演变速率,并结合 F 检验评估趋势的统计显著性(P 值)。与 Sen+MK 非参数方法不同,线性回归假设数据变化呈线性趋势,能够更敏感地捕捉连续变化的速率信息。脚本针对大数据量进行了底层优化,利用分块计算有效避免了高分辨率影像易导致的内存溢出问题。通过结合斜率正负与 P 值阈值,脚本可自动生成 5 分类或 7 分类生态演变专题图,为植被动态监测与生态质量评价提供科学的决策支撑。
代码工作流:
趋势定量化: 通过最小二乘法线性回归计算像素级的年度变化斜率。
置信度评估: 配合 F 检验,量化趋势的显著性(P 值)。
结果可视化级处理: 预设 5 分类和 7 分类逻辑,直接生成"显著改善、稳定、显著退化"的重分类数据。
技术亮点:
内存优化: 采用 Chunking(分块处理)技术,支持在低内存环境下处理 GB 级超大尺寸遥感影像。
工程化设计: 引入 ExitStack 上下文管理,确保多文件读写时的 IO 安全;利用 rasterio 完美保留地理坐标信息。
自动化集成: 支持一键完成"数据读取-趋势计算-显著性检验-结果重分类"的全流程工作。
公式介绍
1. 线性回归斜率(Slope)—— 趋势强度计算
对于长度为 的时间序列数据,采用最小二乘法拟合线性趋势 ,其中斜率 (即 Slope)表示单位时间内的变化速率:
2. F 检验 —— 趋势显著性评估
F 检验用于判断线性回归模型是否显著优于仅用均值预测的零模型,即趋势是否具有统计学意义。
第一步:计算回归平方和(SSR)与残差平方和(SSE)
第二步:计算 F 统计量
第三步:计算 P 值
- 意义: 表示趋势在 95% 置信水平下显著; 表示趋势在 99% 置信水平下极显著。
代码实现
导入所需库及忽略警告
import osimport globimport numpy as npimport rasterioimport warningsfrom scipy import statsfrom contextlib import ExitStack# 忽略可能的数值警告warnings.filterwarnings('ignore', category=RuntimeWarning)
构建线性回归趋势分析代码
defcalculate_trend_chunked(tif_files, output_slope_path, output_p_path, output_class_path=None, classify_mode=None, chunk_size=100):""" 核心计算函数(分块版):读取时序数据,分块计算线性回归斜率(slope)、F检验P值,并可选进行趋势重分类。 重分类标准: 5-class: -2(显著退化), -1(轻微退化), 0(稳定), 1(轻微改善), 2(显著改善) 7-class: -3(极显著退化), -2(显著退化), -1(轻微退化), 0(稳定), 1(轻微改善), 2(显著改善), 3(极显著改善) 对应 P 值阈值: 0.05 (Z=1.96) 和 0.01 (Z=2.58) Args: tif_files (list): 按时间顺序排序的栅格文件路径列表。 output_slope_path (str): Slope结果输出路径。 output_p_path (str): P值结果输出路径。 output_class_path (str, optional): 重分类结果输出路径。默认为 None。 classify_mode (str, optional): 重分类模式, '5-class' 或 '7-class'。默认为 None。 chunk_size (int): 每次处理的行数,默认 100 行。 """ifnot tif_files: print("❌ 未找到输入文件。")return# 1. 读取基准元数据with rasterio.open(tif_files[0]) as src0: meta = src0.meta.copy() height = src0.height width = src0.width# 强制更新元数据为 float32 (方便存储 NaN) meta.update(dtype='float32', count=1, compress='lzw', nodata=np.nan) n_years = len(tif_files) print(f"📊 图像尺寸: {width}x{height}, 时间跨度: {n_years} 年") print("📥 正在将所有年份数据读取到内存...")# 2. 读取所有数据到内存try: full_stack = np.zeros((n_years, height, width), dtype='float32') nodata_mask = np.zeros((height, width), dtype=bool)for idx, f_path in enumerate(tif_files):with rasterio.open(f_path) as src: data = src.read(1).astype('float32')if src.nodata isnotNone: current_nodata = (data == src.nodata) nodata_mask = nodata_mask | current_nodata data = np.where(current_nodata, np.nan, data) full_stack[idx] = dataexcept MemoryError: print("❌ 原始数据过大,无法一次性读入内存。")return# 3. 预计算时间维度常数 time_index = np.arange(1, n_years + 1, dtype='float32') n = n_years time_mean = np.mean(time_index) time_diff = time_index - time_mean # (n_years,) sxx = np.sum(time_diff ** 2) # 标量# 4. 使用 ExitStack 管理多个输出文件with ExitStack() as stack: dst_slope = stack.enter_context(rasterio.open(output_slope_path, 'w', **meta)) dst_p = stack.enter_context(rasterio.open(output_p_path, 'w', **meta)) dst_class = Noneif classify_mode and output_class_path: print(f"🔄 开启重分类模式: {classify_mode}") dst_class = stack.enter_context(rasterio.open(output_class_path, 'w', **meta)) print(f"⚙️ 开始分块计算 (每块 {chunk_size} 行)...")# 5. 按行分块循环处理for row_start in range(0, height, chunk_size): row_end = min(row_start + chunk_size, height) current_rows = row_end - row_start progress = (row_end / height) * 100 print(f" [处理进度]: {progress:.1f}% (行 {row_start}~{row_end})", end='\r')# 提取当前块 data_chunk = full_stack[:, row_start:row_end, :] # (n_years, current_rows, width)# --- 核心算法开始 ---# A. 计算每个像素的时间序列均值 y_mean = np.nanmean(data_chunk, axis=0) # (current_rows, width)# B. 计算差值 ndvi_diff = data_chunk - y_mean[np.newaxis, :, :] # (n_years, current_rows, width)# C. 计算 Sxy 和 Syy td = time_diff[:, np.newaxis, np.newaxis] # (n_years, 1, 1) sxy = np.nansum(td * ndvi_diff, axis=0) # (current_rows, width) syy = np.nansum(ndvi_diff ** 2, axis=0) # (current_rows, width)# D. 计算 slope slope_chunk = sxy / sxx# E. 计算 F 值和 P 值# SSR = slope * sxy, SSE = syy - slope * sxy sse = syy - slope_chunk * sxy# 防止除零,仅对 sse > 0 的像素计算 F 值 f_chunk = np.zeros_like(slope_chunk, dtype='float32') valid_f_mask = sse > 0 f_chunk[valid_f_mask] = (slope_chunk[valid_f_mask] * sxy[valid_f_mask] * (n - 2)) / sse[valid_f_mask]# 取绝对值并使用F分布的sf函数 p_chunk = stats.f.sf(np.abs(f_chunk), 1, n - 2)# F. 应用 nodata 掩膜 invalid_mask = nodata_mask[row_start:row_end, :] | np.isnan(slope_chunk) slope_chunk[invalid_mask] = np.nan p_chunk[invalid_mask] = np.nan# --- 重分类逻辑 ---if dst_class: class_chunk = np.zeros_like(slope_chunk, dtype='float32')# 默认设为 NoData (np.nan),之后填充有效值 class_chunk[:] = np.nan# 有效区域掩膜 valid_mask = ~invalid_mask# 提取有效区域的 slope 和 p 用于计算 s = slope_chunk[valid_mask] p = p_chunk[valid_mask] c = np.zeros_like(s) # 默认为 0 (稳定)# 阈值设定 (P值对应 Z=1.96 和 Z=2.58) P_05 = 0.05 P_01 = 0.01if classify_mode == '5-class':# 5分类: -2(显著退化), -1(轻微退化), 0(稳定), 1(轻微改善), 2(显著改善)# 退化 (Slope < 0) c[(s < 0) & (p >= P_05)] = -1 c[(s < 0) & (p < P_05)] = -2# 改善 (Slope > 0) c[(s > 0) & (p >= P_05)] = 1 c[(s > 0) & (p < P_05)] = 2elif classify_mode == '7-class':# 7分类: -3(极显著退化), -2(显著退化), -1(轻微退化), 0(稳定), 1(轻微改善), 2(显著改善), 3(极显著改善)# 退化 c[(s < 0) & (p >= P_05)] = -1 c[(s < 0) & (p < P_05) & (p >= P_01)] = -2 c[(s < 0) & (p < P_01)] = -3# 改善 c[(s > 0) & (p >= P_05)] = 1 c[(s > 0) & (p < P_05) & (p >= P_01)] = 2 c[(s > 0) & (p < P_01)] = 3# 将计算好的分类值填回 chunk class_chunk[valid_mask] = c# --- 写入文件 --- window = rasterio.windows.Window(col_off=0, row_off=row_start, width=width, height=current_rows) dst_slope.write(slope_chunk.astype('float32'), 1, window=window) dst_p.write(p_chunk.astype('float32'), 1, window=window)if dst_class: dst_class.write(class_chunk, 1, window=window) print("\n✅ 计算完成。")
批量计算
defbatch_process_trend(input_dir, output_dir, input_template, subject_name, classify_mode=None, chunk_size=200):""" 批量处理入口函数 """ifnot os.path.exists(input_dir): print(f"⚠️ 输入路径不存在: {input_dir}")return# 确保输出目录存在ifnot os.path.exists(output_dir): os.makedirs(output_dir) search_path = os.path.join(input_dir, input_template) files = glob.glob(search_path)try: files.sort(key=lambda x: int(''.join(filter(str.isdigit, os.path.basename(x)))))except ValueError: files.sort()if len(files) < 3: print(f"⚠️ {subject_name} 的文件数量不足 3 个。")return print(f"🚀 [任务启动] {subject_name} (共 {len(files)} 期) | 模式: {classify_mode or'仅计算趋势'}") out_slope_name = f"Slope_{subject_name}.tif" out_p_name = f"P_Value_{subject_name}.tif" out_slope_path = os.path.join(output_dir, out_slope_name) out_p_path = os.path.join(output_dir, out_p_name)# 处理分类路径 out_class_path = Noneif classify_mode: out_class_name = f"Trend_Class_{classify_mode}_{subject_name}.tif" out_class_path = os.path.join(output_dir, out_class_name)try: calculate_trend_chunked( files, out_slope_path, out_p_path, output_class_path=out_class_path, classify_mode=classify_mode, chunk_size=chunk_size )except Exception as e: print(f"❌ 处理失败: {e}")import traceback traceback.print_exc()
调用函数
if __name__ == "__main__":# ================= 参数配置区 =================# 输入文件路径 input_folder = r""# 输出文件路径 output_folder = r""# 匹配文件格式 file_pattern = "AGWD*.tif" task_name = "AGWD"# 输出文件的后缀名# 重分类配置# 选项: None (不分类), "5-class", "7-class"# 5-class: 阈值 P=0.05 (对应 Z=1.96,显著/不显著)# 5分类: -2(显著退化), -1(轻微退化), 0(稳定), 1(轻微改善), 2(显著改善)# 7-class: 阈值 P=0.05 和 P=0.01 (对应 Z=1.96 和 Z=2.58,显著/极显著)# 7分类: -3(极显著退化), -2(显著退化), -1(轻微退化), 0(稳定), 1(轻微改善), 2(显著改善), 3(极显著改善) do_classification = "7-class"# 分块计算行数 (根据内存大小调整,内存越小该值设置越小,如 100 或 50) process_chunk_size = 200 batch_process_trend( input_dir=input_folder, output_dir=output_folder, input_template=file_pattern, subject_name=task_name, classify_mode=do_classification, chunk_size=process_chunk_size )
 10个月宝宝每天需要喝多少奶粉?