用Python徒手画管道:让你的上位机界面"活"起来
- 2026-09-04 08:15:01
工控现场有句老话——"看得见流,才管得住流"。今天咱们就聊聊,怎么用纯Python + Tkinter,把一张死气沉沉的管道图,变成有呼吸感的动态HMI界面。
🤔 先说说,为什么要自己画?
做上位机的同学都懂那种痛:
买个商业SCADA软件?授权费贵得肉疼。用Qt?C++门槛不低,Python绑定又有坑。用Web前端?部署麻烦,离线工控环境更是头疼。
Tkinter呢?
自带标准库,零依赖,打包成exe给甲方随手就跑。很多人觉得它"丑",但丑不丑是设计问题,不是工具问题。我在某水处理项目里用Tkinter做的监控界面,客户用了三年,从没提过换。
所以今天我们就用它,认认真真做一个有流速、有方向、能拖拽的管道可视化组件。
🏗️ 架构设计:三层分离,别写意大利面
动手之前先想清楚结构。管道可视化本质上是三件事:
数据层 → 逻辑层 → 渲染层
对应到代码里就是:
• PipeNode:管道端点,只存坐标和名称• Pipe:管道本体,管流速、粒子状态、颜色• PipeCanvas:继承自tk.Canvas,负责画和交互
三层解耦的好处是——将来你要对接Modbus、OPC-UA,只需要在外部改pipe.flow_speed,画布自己会跟着变。不用动渲染逻辑,不用重构,改一行数据,界面就活了。
🖼️先看效果
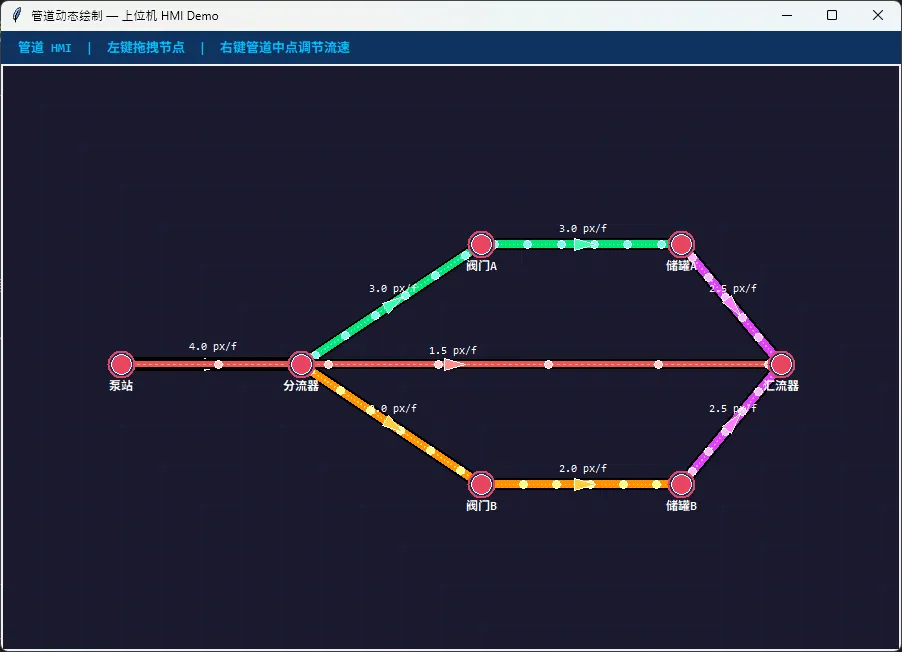
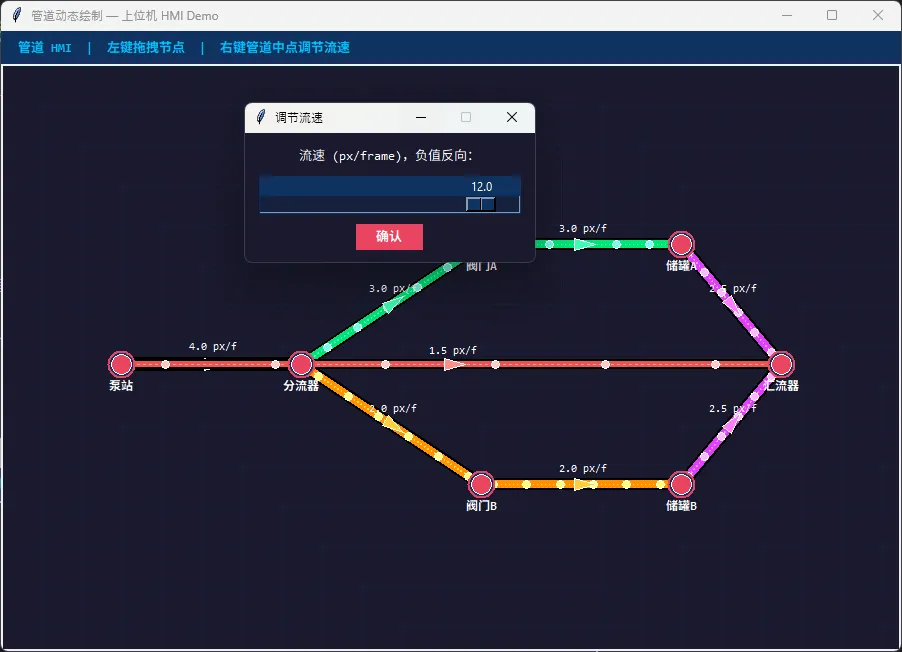
🔬 核心原理:粒子如何"流动"
很多人第一反应是画箭头动画。但箭头动画有个问题:速度感不强,方向感也弱。
更好的方案是粒子流——在管道上维护若干个t ∈ [0, 1]的浮点数,每帧按速度推进:
dt = self.flow_speed / self.length
self.particles = [(p + dt) % 1.0for p inself.particles]这里有个细节值得说:flow_speed除以pipe.length,是为了让不同长度的管道,粒子视觉速度一致。否则短管道粒子飞快,长管道粒子爬行,看起来很奇怪。
粒子位置的插值计算也很简单:
defparticle_pos(self, t):
    x = self.start.x + (self.end.x - self.start.x) * t
    y = self.start.y + (self.end.y - self.start.y) * t
return x, y
线性插值,够用。如果你要做弯管(贝塞尔曲线),把这里换成二次/三次贝塞尔公式就行,粒子逻辑完全不用改。
负流速 = 反向流动,不需要任何额外判断,dt变成负数,粒子自然往回跑,% 1.0保证不越界。这个设计我觉得是整个代码里最干净的地方。
🎨 渲染细节:让管道"有质感"
纯色管道看起来像PPT里的形状。加三层就能好很多:
# 第一层:黑色阴影,宽度+4px,制造立体感
self.create_line(sx, sy, ex, ey, fill="#000000", width=pipe.width + 4)

# 第二层:主色管道
self.create_line(sx, sy, ex, ey, fill=pipe.color, width=pipe.width)

# 第三层:高光虚线,宽度只有管道的1/4
self.create_line(sx, sy, ex, ey, fill=lighter_color, width=pipe.width//4, dash=(4,6))
三层叠加,管道就有了金属管的圆柱感。这个技巧在工控界面里很常用,成本极低,效果明显。
方向箭头用三角形多边形绘制,角度从atan2算出来:
angle = math.degrees(math.atan2(end.y - start.y, end.x - start.x))
ifself.flow_speed < 0:
    angle += 180# 反向时箭头翻转
🖱️ 拖拽交互:比你想的简单
拖拽节点的实现,很多人会绕弯子。其实核心就三个事件:
self.bind("<ButtonPress-1>",   self._on_press)    # 记录拖哪个节点
self.bind("<B1-Motion>",       self._on_drag)     # 更新节点坐标
self.bind("<ButtonRelease-1>", self._on_release) # 清空拖拽状态关键在_on_press里——你不是在记录"画布上的图形ID",而是在找最近的PipeNode对象:
def_node_at(self, x, y):
for node inself.nodes:
if math.hypot(node.x - x, node.y - y) <= self.NODE_R + 6:
return node
returnNone找到节点对象之后,_on_drag直接修改node.x和node.y。因为Pipe对象持有的是节点的引用,不是坐标副本,所以所有连接到这个节点的管道,下一帧渲染时自动就跟过去了。
这就是为什么要用对象引用而不是坐标值——数据模型设计对了,交互逻辑自然就简单了。
⚙️ 流速调节:右键弹窗,工控味十足
右键点击管道中点,弹出流速滑块。这个功能在实际项目里很实用——调试阶段可以手动模拟不同流速,看界面响应是否正确。
def_speed_dialog(self, pipe):
    dlg = tk.Toplevel(self.master)
    scale = tk.Scale(dlg, from_=-15, to=15, resolution=0.5,
orient=tk.HORIZONTAL, variable=var)滑块范围-15 ~ +15,负值即反向。resolution=0.5让调节有足够精度,又不会太碎。
实际项目里,这个弹窗可以替换成真实的设备参数写入接口——比如通过Modbus写寄存器,或者调用你的设备SDK。弹窗只是个壳,里面的逻辑你来填。
🔌 对接真实数据:只需改一行
这是很多人最关心的问题——怎么让界面跟真实设备联动?
答案出乎意料地简单。你只需要在外部起一个定时器或线程,定期更新pipe.flow_speed:
import threading

defdata_polling(pipes):
whileTrue:
# 从你的设备/PLC/数据库读数据
        real_speed = your_device.read_flow_speed()
        pipes[0].flow_speed = real_speed
        time.sleep(0.5)

t = threading.Thread(target=data_polling, args=(canvas.pipes,), daemon=True)
t.start()注意:Tkinter的Canvas操作必须在主线程,所以只在子线程里改数据,不要在子线程里调用canvas方法。数据改了,主线程的动画循环_animate会在下一帧自动读取新值并渲染。
这个模式——子线程写数据,主线程读数据渲染——是Tkinter多线程的标准做法,稳得很。
完整代码
import tkinter as tk
import math
import random

#  数据模型
classPipeNode:
"""管道端点(可拖拽)"""
def__init__(self, x, y, name=""):
self.x = x
self.y = y
self.name = name

classPipe:
"""
    连接两个 PipeNode 的管道
    flow_speed : 粒子像素/帧,正值 = 从 start→end,负值 = 反向
    color       : 管道颜色
    width       : 管道宽度
    """def__init__(self, start: PipeNode, end: PipeNode,
                 flow_speed=3.0, color="#00BFFF", width=8):
self.start = start
self.end   = end
self.flow_speed  = flow_speed   # px / frame
self.color       = color
self.width       = width
self.particles: list[float] = []   # 每个粒子的 t ∈ [0,1]        self._init_particles()

def_init_particles(self, n=6):
self.particles = [i / n for i inrange(n)]

    @property
deflength(self):
        dx = self.end.x - self.start.x
        dy = self.end.y - self.start.y
return math.hypot(dx, dy) or1

defstep(self):
"""每帧推进粒子"""
ifself.length == 0:
return
        dt = self.flow_speed / self.length
self.particles = [(p + dt) % 1.0for p inself.particles]

defparticle_pos(self, t):
"""t ∈ [0,1] → (x, y)"""
        x = self.start.x + (self.end.x - self.start.x) * t
        y = self.start.y + (self.end.y - self.start.y) * t
return x, y

defarrow_pos(self):
"""返回中点坐标和方向角(度)"""
        mx = (self.start.x + self.end.x) / 2
        my = (self.start.y + self.end.y) / 2
        angle = math.degrees(math.atan2(
self.end.y - self.start.y,
self.end.x - self.start.x))
ifself.flow_speed < 0:
            angle += 180
return mx, my, angle


#  主画布
classPipeCanvas(tk.Canvas):
    PARTICLE_R   = 4# 粒子半径
    NODE_R       = 10# 节点半径
    ARROW_SIZE   = 14# 方向箭头大小
    FPS          = 30# 刷新率

def__init__(self, master, **kw):
super().__init__(master, bg="#1a1a2e", **kw)
self.nodes: list[PipeNode] = []
self.pipes: list[Pipe]     = []

self._drag_node  = None# 正在拖拽的节点
self._drag_ox    = 0
self._drag_oy    = 0

self.bind("<ButtonPress-1>",   self._on_press)
self.bind("<B1-Motion>",       self._on_drag)
self.bind("<ButtonRelease-1>", self._on_release)
self.bind("<ButtonPress-3>",   self._on_right_click)  # 右键修改流速

self._animate()

#  公共 APIdef add_node(self, x, y, name="") -> PipeNode:
        n = PipeNode(x, y, name)
self.nodes.append(n)
return n

defadd_pipe(self, start: PipeNode, end: PipeNode,
                 flow_speed=3.0, color="#00BFFF", width=8) -> Pipe:
        p = Pipe(start, end, flow_speed, color, width)
self.pipes.append(p)
return p

#  动画循环
def_animate(self):
for pipe inself.pipes:
            pipe.step()
self._redraw()
self.after(1000 // self.FPS, self._animate)

#  绘制
def_redraw(self):
self.delete("all")
self._draw_grid()
for pipe inself.pipes:
self._draw_pipe(pipe)
for node inself.nodes:
self._draw_node(node)

def_draw_grid(self):
        w = int(self.winfo_width())
        h = int(self.winfo_height())
        step = 40
for x inrange(0, w, step):
self.create_line(x, 0, x, h, fill="#16213e", width=1)
for y inrange(0, h, step):
self.create_line(0, y, w, y, fill="#16213e", width=1)

def_draw_pipe(self, pipe: Pipe):
        sx, sy = pipe.start.x, pipe.start.y
        ex, ey = pipe.end.x,   pipe.end.y

# 管道主体(双层:阴影 + 主色)
self.create_line(sx, sy, ex, ey,
                         fill="#000000", width=pipe.width + 4,
                         capstyle=tk.ROUND)
self.create_line(sx, sy, ex, ey,
                         fill=pipe.color, width=pipe.width,
                         capstyle=tk.ROUND)

# 高光线
self.create_line(sx, sy, ex, ey,
                         fill=self._lighten(pipe.color, 80),
                         width=max(1, pipe.width // 4),
                         capstyle=tk.ROUND, dash=(4, 6))

# 流动粒子
        pr = self.PARTICLE_R
        pc = self._lighten(pipe.color, 120)
for t in pipe.particles:
            px, py = pipe.particle_pos(t)
self.create_oval(px-pr, py-pr, px+pr, py+pr,
                             fill=pc, outline="white", width=1)

# 方向箭头
        mx, my, angle = pipe.arrow_pos()
self._draw_arrow(mx, my, angle, pipe.color)

# 流速标签
        speed_txt = f"{abs(pipe.flow_speed):.1f} px/f"self.create_text(mx + 2, my - pipe.width - 8,
                         text=speed_txt, fill="white",
                         font=("Consolas", 8))

def_draw_arrow(self, cx, cy, angle_deg, color):
"""在 (cx,cy) 绘制方向三角箭头"""
        s = self.ARROW_SIZE
        rad = math.radians(angle_deg)
        cos_a, sin_a = math.cos(rad), math.sin(rad)

        tip  = (cx + s * cos_a,        cy + s * sin_a)
        left = (cx - s*0.5*cos_a + s*0.4*sin_a,
                cy - s*0.5*sin_a - s*0.4*cos_a)
        right= (cx - s*0.5*cos_a - s*0.4*sin_a,
                cy - s*0.5*sin_a + s*0.4*cos_a)
self.create_polygon(*tip, *left, *right,
                            fill=self._lighten(color, 60),
                            outline="white", width=1)

def_draw_node(self, node: PipeNode):
        r  = self.NODE_R
        x, y = node.x, node.y
# 外圈
self.create_oval(x-r-3, y-r-3, x+r+3, y+r+3,
                         fill="#0f3460", outline="#e94560", width=2)
# 内圈
self.create_oval(x-r, y-r, x+r, y+r,
                         fill="#e94560", outline="white", width=1)
# 名称
if node.name:
self.create_text(x, y + r + 12, text=node.name,
                             fill="white", font=("Consolas", 9, "bold"))

#  拖拽交互
def_node_at(self, x, y):
"""返回鼠标附近的节点,没有则 None"""for node inself.nodes:
if math.hypot(node.x - x, node.y - y) <= self.NODE_R + 6:
return node
returnNone

def_on_press(self, event):
        node = self._node_at(event.x, event.y)
if node:
self._drag_node = node
self._drag_ox   = event.x - node.x
self._drag_oy   = event.y - node.y

def_on_drag(self, event):
ifself._drag_node:
self._drag_node.x = event.x - self._drag_ox
self._drag_node.y = event.y - self._drag_oy

def_on_release(self, _event):
self._drag_node = None

def_on_right_click(self, event):
"""右键点击管道中点附近 → 弹出流速调节对话框"""
for pipe inself.pipes:
            mx, my, _ = pipe.arrow_pos()
if math.hypot(mx - event.x, my - event.y) < 20:
self._speed_dialog(pipe)
break

def_speed_dialog(self, pipe: Pipe):
        dlg = tk.Toplevel(self.master)
        dlg.title("调节流速")
        dlg.resizable(False, False)
        dlg.configure(bg="#1a1a2e")

        tk.Label(dlg, text="流速 (px/frame),负值反向:",
                 bg="#1a1a2e", fg="white",
                 font=("Consolas", 10)).pack(padx=12, pady=(12, 4))

        var = tk.DoubleVar(value=pipe.flow_speed)
        scale = tk.Scale(dlg, from_=-15, to=15, resolution=0.5,
                         orient=tk.HORIZONTAL, variable=var,
                         length=260, bg="#0f3460", fg="white",
                         highlightbackground="#1a1a2e",
                         troughcolor="#16213e", activebackground="#e94560")
        scale.pack(padx=12, pady=4)

defapply():
            pipe.flow_speed = var.get()
            dlg.destroy()

        tk.Button(dlg, text="确认", command=apply,
                  bg="#e94560", fg="white",
                  font=("Consolas", 10, "bold"),
                  relief=tk.FLAT, padx=16).pack(pady=(4, 12))

#  工具函数
@staticmethod
def_lighten(hex_color: str, amount: int) -> str:
"""将十六进制颜色加亮 amount"""        hex_color = hex_color.lstrip("#")
        r, g, b = (int(hex_color[i:i+2], 16) for i in (0, 2, 4))
        r = min(255, r + amount)
        g = min(255, g + amount)
        b = min(255, b + amount)
returnf"#{r:02x}{g:02x}{b:02x}"


#  主程序 / 示例场景
defmain():
    root = tk.Tk()
    root.title("管道动态绘制 — 上位机 HMI Demo")
    root.geometry("900x620")
    root.configure(bg="#1a1a2e")

# 顶部工具栏
    toolbar = tk.Frame(root, bg="#0f3460", height=36)
    toolbar.pack(fill=tk.X, side=tk.TOP)
    tk.Label(toolbar, text="  管道 HMI  |  左键拖拽节点  |  右键管道中点调节流速",
             bg="#0f3460", fg="#00BFFF",
             font=("Consolas", 10, "bold")).pack(side=tk.LEFT, pady=6)

    canvas = PipeCanvas(root, width=900, height=580)
    canvas.pack(fill=tk.BOTH, expand=True)

#  构建管道网络
# 节点
    n_pump   = canvas.add_node(120, 300, "泵站")
    n_split  = canvas.add_node(300, 300, "分流器")
    n_valve1 = canvas.add_node(480, 180, "阀门A")
    n_valve2 = canvas.add_node(480, 420, "阀门B")
    n_tank1  = canvas.add_node(680, 180, "储罐A")
    n_tank2  = canvas.add_node(680, 420, "储罐B")
    n_merge  = canvas.add_node(780, 300, "汇流器")

# 管道
    canvas.add_pipe(n_pump,   n_split,  flow_speed=4.0, color="#00BFFF", width=10)
    canvas.add_pipe(n_split,  n_valve1, flow_speed=3.0, color="#00e676", width=8)
    canvas.add_pipe(n_split,  n_valve2, flow_speed=2.0, color="#ff9100", width=8)
    canvas.add_pipe(n_valve1, n_tank1,  flow_speed=3.0, color="#00e676", width=8)
    canvas.add_pipe(n_valve2, n_tank2,  flow_speed=2.0, color="#ff9100", width=8)
    canvas.add_pipe(n_tank1,  n_merge,  flow_speed=2.5, color="#e040fb", width=8)
    canvas.add_pipe(n_tank2,  n_merge,  flow_speed=2.5, color="#e040fb", width=8)
# 回流管(负速 = 反向)
    canvas.add_pipe(n_merge,  n_pump,   flow_speed=-1.5, color="#ef5350", width=6)

    root.mainloop()

if __name__ == "__main__":
    main()
🚀 进阶方向:这个架构能走多远?
现在这个版本是直线管道。如果你的工艺图需要折线或弯管,改动点只有两处:
1. PipeNode从两个端点变成节点列表2. particle_pos(t)从线性插值变成分段插值(按各段长度比例分配t值)
渲染层和粒子逻辑完全不用动。
另外几个值得加的功能:
• 管道状态颜色:正常/报警/停止用不同颜色,加一个 status字段就够• 流量数值显示:在管道旁边加 create_text,实时显示数值• 节点右键菜单:弹出设备详情或控制指令 • 缩放和平移:给Canvas加 scale和move,实现整图缩放
这些都是在现有架构上自然生长出来的功能,不需要推倒重来。
📦 完整代码结构回顾
PipeNode     ← 数据:坐标、名称
Pipe         ← 逻辑:流速、粒子、颜色
PipeCanvas   ← 渲染 + 交互:动画循环、拖拽、弹窗
main() ← 场景搭建:节点连线、启动主循环四个部分,各司其职。你可以把PipeNode和Pipe单独拿出来做单元测试,完全不依赖Tkinter。这在工控项目里很重要——界面逻辑和业务逻辑混在一起,是后期维护的噩梦。
💬 最后说几句
Tkinter被很多人嫌弃,觉得它是"上古遗物"。但在工控、内网、嵌入式Linux这些场景里,零依赖、可打包、跑得稳,这三条就够了。
我见过用PyQt5做的上位机,因为动态库版本冲突,在客户现场死活跑不起来。也见过用Electron做的界面,在老旧工控机上内存直接爆掉。Tkinter呢?一个exe,双击就跑,客户那边的Windows XP机器都能用。
技术选型没有高下,只有合不合适。
这套管道组件的完整代码在上一条回复里,可以直接跑起来看效果。有问题欢迎在评论区聊,特别是对接具体设备协议这块,坑不少,有机会单独写一篇。
随机文章
-
 10个月宝宝每天需要喝多少奶粉?
- 驱动厂商最怕的一集:你不给 Linux 驱动,大模型自己“吐”一个出来
- 破解多源地学数据处理难题:基于Python常见地球科学数据(ERA5、雪深、积雪覆盖、海温、植被指数、土地利用)处理实践技术应用
- Codex来了:7岁学Python不是梦?这位硅谷AI导师用AI陪孩子学编程,发现了一件让所有家长意外的事
- 这个插进U盘就能跑Python的神器,让你告别到处装的痛
- 第337讲:分别用 VBA 和 Python 来实现:Excel数据一键生成PPT报告—从VBA到的完整实战指南
- 人工智能通识—Python基础:注释输入输出
- 别瞎学!Python学到这个程度直接找工作,对标自查!
- 我认为它是Python最伟大的网站天花板
- 【学习教程】AI+Python驱动的高光谱遥感全链路解析与典型案例
- QMT量化交易Python库频繁报错完整解析 + 实操修复