Python 的 tkinter 搭建 GUI 界面,结合 face_recognition 实现一个人脸识别项目
- 2026-07-01 08:41:40
用 Python 的 tkinter 搭建 GUI 界面,结合 face_recognition 实现一个人脸识别项目,我会为你提供一个完整、可运行的项目方案,包含环境准备、核心代码和详细说明。
一、项目前期准备
1. 安装必要依赖
该项目需要 4 个核心依赖,打开终端执行以下安装命令(注意:dlib 安装可能需要编译环境,Windows 建议使用预编译包简化安装):
# 先安装基础依赖pip install numpy pillow tkinter# 安装 dlib(关键依赖,face_recognition 基于它实现)# 方案1:直接安装(需具备 C++ 编译环境)pip install dlib# 方案2:Windows 预编译包安装(推荐新手,避免编译报错)# 1. 去 https://pypi.org/project/dlib/#files 下载对应 Python 版本和系统的 .whl 文件# 2. 执行 pip install 下载的文件路径(例如:pip install dlib-19.24.1-cp310-cp310-win_amd64.whl)# 安装 face_recognition 核心库pip install face_recognition2. 项目文件结构准备
创建一个项目文件夹,结构如下(方便管理人脸库和测试图片):
face_recognition_tkinter/├── face_database/ # 人脸数据库(存放已知人员的人脸图片,1人1张,命名为“姓名.jpg”)│ ├── 张三.jpg│ ├── 李四.jpg│ └── 王五.jpg└── main.py # 项目核心代码(后续编写)注意:face_database 中的人脸图片尽量选择正面、清晰、无遮挡的照片,提升识别准确率。
二、完整项目代码
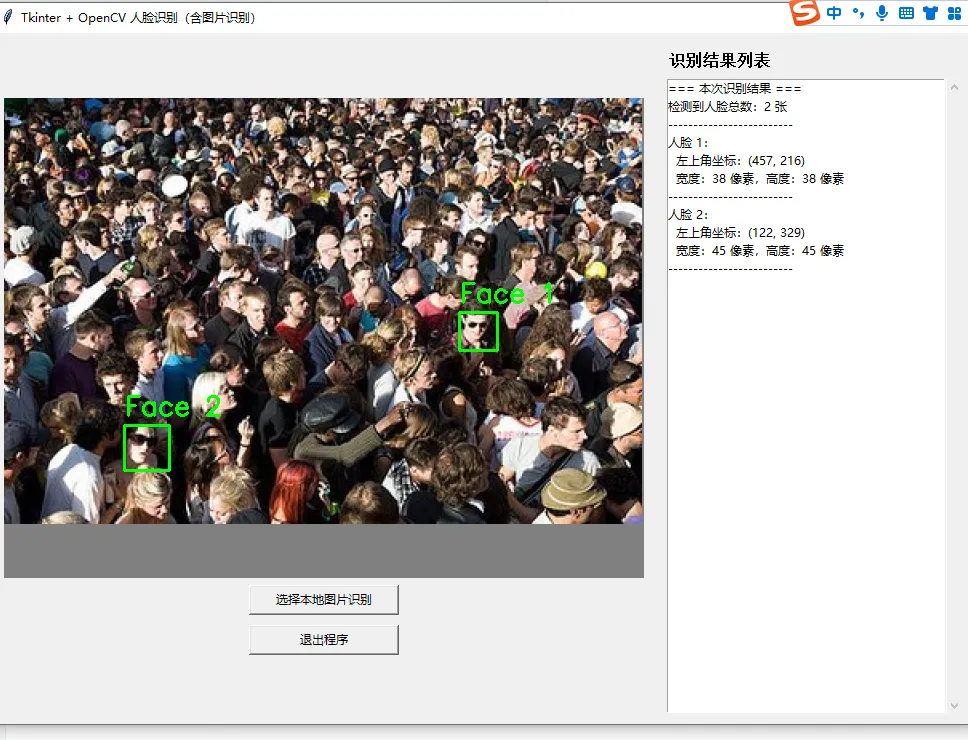
该项目实现核心功能:选择本地测试图片 → 检测人脸并提取特征 → 与人脸库比对 → 显示识别结果(含人脸标注)。
import tkinter as tkfrom tkinter import filedialog, messagebox, Labelimport face_recognitionfrom PIL import Image, ImageTk, ImageDrawimport numpy as npimport osclassFaceRecognitionApp:def__init__(self, root):# 初始化主窗口 self.root = root self.root.title("人脸识别人脸项目(tkinter + face_recognition)") self.root.geometry("800x600") # 窗口初始大小 self.root.resizable(True, True)# 初始化变量 self.face_db_path = "face_database"# 人脸库路径 self.known_face_encodings = [] # 已知人脸特征编码列表 self.known_face_names = [] # 已知人脸姓名列表 self.test_image_path = ""# 测试图片路径# 加载人脸数据库(程序启动时执行) self.load_face_database()# 构建GUI界面 self.build_gui()defload_face_database(self):"""加载人脸数据库,提取所有人脸的特征编码和姓名"""# 检查人脸库文件夹是否存在ifnot os.path.exists(self.face_db_path): os.makedirs(self.face_db_path) messagebox.showinfo("提示", "人脸库文件夹不存在,已自动创建,请先放入人脸图片再运行!")return# 遍历人脸库中的所有图片文件for filename in os.listdir(self.face_db_path):if filename.endswith((".jpg", ".jpeg", ".png")):# 提取姓名(文件名去除后缀) face_name = os.path.splitext(filename)[0]# 拼接完整图片路径 face_image_path = os.path.join(self.face_db_path, filename)# 加载图片并提取人脸特征编码try: face_image = face_recognition.load_image_file(face_image_path)# 提取人脸特征(只取第一张人脸,确保每张图片只有1个人脸) face_encoding = face_recognition.face_encodings(face_image)[0]# 添加到已知人脸列表 self.known_face_encodings.append(face_encoding) self.known_face_names.append(face_name)except IndexError: messagebox.warning("警告", f"图片 {filename} 中未检测到人脸,已跳过!")except Exception as e: messagebox.error("错误", f"处理图片 {filename} 失败:{str(e)}")if len(self.known_face_names) > 0: messagebox.showinfo("成功", f"人脸库加载完成!共加载 {len(self.known_face_names)} 个人脸信息")else: messagebox.showwarning("提示", "人脸库中无有效人脸图片,请放入有效图片后重启程序!")defselect_test_image(self):"""选择本地测试图片"""# 打开文件选择对话框,筛选图片格式 file_path = filedialog.askopenfilename( title="选择测试图片", filetypes=[("图片文件", "*.jpg *.jpeg *.png"), ("所有文件", "*.*")] )ifnot file_path:return# 用户取消选择 self.test_image_path = file_path# 执行人脸识别 self.perform_face_recognition()defperform_face_recognition(self):"""执行人脸识别:检测、比对、标注结果"""ifnot self.test_image_path or len(self.known_face_encodings) == 0: messagebox.warning("提示", "请先加载有效人脸库并选择测试图片!")returntry:# 1. 加载测试图片 test_image = face_recognition.load_image_file(self.test_image_path)# 转换为PIL格式(用于后续绘制标注框) pil_image = Image.fromarray(test_image) draw = ImageDraw.Draw(pil_image)# 2. 检测测试图片中的所有人脸位置和特征编码 face_locations = face_recognition.face_locations(test_image) face_encodings = face_recognition.face_encodings(test_image, face_locations)ifnot face_locations: messagebox.showinfo("结果", "测试图片中未检测到任何人脸!")return# 3. 遍历检测到的人脸,进行比对 recognition_results = []for (top, right, bottom, left), face_encoding in zip(face_locations, face_encodings):# 与人脸库中的特征进行比对 matches = face_recognition.compare_faces(self.known_face_encodings, face_encoding) name = "未知人员"# 计算匹配距离(距离越小,相似度越高) face_distances = face_recognition.face_distance(self.known_face_encodings, face_encoding)if len(face_distances) > 0: best_match_index = np.argmin(face_distances)if matches[best_match_index]: name = self.known_face_names[best_match_index] recognition_results.append(name)# 4. 绘制人脸标注框和姓名 draw.rectangle(((left, top), (right, bottom)), outline=(0, 255, 0), width=2)# 绘制姓名背景框 text_width, text_height = draw.textlength(name), 15 draw.rectangle( ((left, bottom - text_height - 10), (right, bottom)), fill=(0, 255, 0), outline=(0, 255, 0) ) draw.text((left + 5, bottom - text_height - 5), name, fill=(255, 255, 255), fontsize=12)# 5. 显示处理后的图片和识别结果 self.show_recognition_result(pil_image, recognition_results)except Exception as e: messagebox.error("错误", f"人脸识别过程中出现异常:{str(e)}")defshow_recognition_result(self, result_image, results):"""在GUI中显示识别结果图片和文字信息"""# 调整图片大小以适配窗口(保持比例) result_image.thumbnail((700, 500), Image.Resampling.LANCZOS) tk_image = ImageTk.PhotoImage(result_image)# 更新图片显示标签 self.image_label.config(image=tk_image) self.image_label.image = tk_image # 保留引用,防止被垃圾回收# 更新结果文字显示 result_text = "人脸识别结果:\n" + "\n".join([f"检测到:{name}"for name in results]) self.result_label.config(text=result_text)defbuild_gui(self):"""构建GUI界面元素"""# 1. 选择图片按钮 select_btn = tk.Button( self.root, text="选择测试图片", command=self.select_test_image, font=("微软雅黑", 12), bg="#4CAF50", fg="white", padx=20, pady=10 ) select_btn.pack(pady=20)# 2. 图片显示标签 self.image_label = Label(self.root) self.image_label.pack(pady=10)# 3. 识别结果显示标签 self.result_label = Label( self.root, text="人脸识别结果:请选择测试图片开始识别", font=("微软雅黑", 10), justify=tk.LEFT, wraplength=700 ) self.result_label.pack(pady=10)if __name__ == "__main__": root = tk.Tk() app = FaceRecognitionApp(root) root.mainloop()三、项目功能说明
人脸库加载:程序启动时自动扫描 face_database文件夹,提取所有有效人脸图片的特征编码,存储在内存中用于后续比对。测试图片选择:通过GUI按钮打开文件选择对话框,支持 jpg/jpeg/png格式图片。人脸检测与比对: 检测测试图片中的所有人脸位置(上下左右坐标)。 提取人脸128维特征编码,与人脸库中的特征进行相似度比对。 计算匹配距离,选择最相似的人脸作为识别结果,未知人员标注为“未知人员”。 结果可视化: 用绿色矩形框标注检测到的人脸。 人脸下方标注识别出的姓名(未知人员标注为“未知人员”)。 在GUI中显示处理后的图片和文字版识别结果。
四、运行步骤与注意事项
1. 运行步骤
① 将上述代码保存为 main.py,放在项目文件夹根目录。 ② 在 face_database 文件夹中放入几张已知人员的人脸图片(命名为“姓名.jpg”,如“张三.jpg”)。 ③ 运行 main.py,程序启动后会提示人脸库加载结果。 ④ 点击“选择测试图片”,选择一张包含人脸的测试图片,等待识别完成,即可看到标注后的结果。
2. 关键注意事项
① dlib 安装是关键:如果直接 pip install dlib 失败,优先选择预编译包安装,对应Python版本和系统位数(如Python 3.10 + Windows 64位)。 ② 人脸图片质量:已知人脸和测试图片尽量选择正面、清晰、光线充足、无遮挡(无口罩、墨镜)的照片,提升识别准确率。 ③ 性能问题:该项目为桌面端原型,处理高分辨率图片可能较慢,适合个人小项目使用,不适合高并发场景。 ④ 异常处理:代码中包含了常见异常捕获(如无人脸、文件错误),方便新手排查问题。
五、项目扩展方向
增加“添加人脸到数据库”功能,无需手动放入图片,直接通过GUI上传并保存。 支持摄像头实时人脸识别(结合 cv2捕获摄像头画面,转换为PIL格式后进行识别)。增加人脸相似度阈值设置,可调整识别严格程度(默认阈值为0.6,距离小于0.6判定为匹配)。 保存识别记录到本地文件(如 txt或csv),方便后续查看。
该项目直接运行即可实现基础的人脸识别GUI功能,代码注释详细,方便你理解和修改。如果运行过程中遇到安装或功能问题,可以随时排查对应的依赖或图片格式问题。
随机文章
-
 10个月宝宝每天需要喝多少奶粉?
- Python Nuitka将Python代码打包成.exe 的方法,很实用
- 【Python大语言模型系列】triton通过动态批处理减少调用开销提高吞吐量(案例分析)
- Python 的 Tkinter 搭建图形界面,结合 OpenCV(cv2)实现人物(人脸)识别
- 2026年最新100道Python练习题!
- 36个Python高效办公项目,自动化解放双手
- 从零开始学python-PyCharm简介
- 一个基于Python的先进基因组选择工具MultiGS-P
- Python字符串拼接:10种实用方法大集合
- python基础_p2_print函数
- Python 安装包及安装教程步骤(附全部版本安装包)
