Python项目91:绘制红楼梦人物关系图(NetworkX+Matplotlib)
- 2026-09-27 15:38:39


Python,速成心法
敲代码,查资料,问Ai
练习,探索,总结,优化

★★★★★博文创作不易,我的博文不需要打赏,也不需要知识付费,可以白嫖学习编程小技巧。使用代码的过程中,如有疑问的地方,欢迎大家指正留言交流。喜欢的老铁可以多多点赞+收藏分享+置顶,小红牛在此表示感谢。★★★★★
------★Python练手项目源码★------
Python项目89:NetworkX最短路径规划(城市交通)
Python项目88:文件备份与压缩系统2.0(tkinter+shutil+zipfile)
Python项目86:增强版画板2.0(tk.Canvas)
Python项目81:Excel工作表批量重命名工具1.0(tkinter+openpyxl)
Python项目78:学生成绩分析系统(Tkinter+SQLite3)
Python项目77:模拟炒股训练系统3.0(Mplfinance+tkinter)
Python项目76:员工排班表系统1.0(tkinter+sqlite3+tkcalendar)
Python项目74:多线程数据可视化工具2.0(tkinter+matplotlib+mplcursors)
Python项目73:自动化文件备份系统1.0(tkinter)
Python项目源码71:药品管理系统1.0(tkinter+sqlite3)
Python项目源码69:Excel数据筛选器1.0(tkinter+sqlite3+pandas)
Python项目源码63:病历管理系统1.0(tkinter+sqlite3+matplotlib)
Python源码62:酒店住房管理系统1.0(tkinter+sqlite3)
Python项目源码57:数据格式转换工具1.0(csv+json+excel+sqlite3)
Python项目源码56:食堂饭卡管理系统1.0(tkinter+splite3)
Python项目源码54:员工信息管理系统2.0(tkinter+sqlite3)
Python项目源码52:模拟银行卡系统1.0(账户管理、存款、取款、转账和交易记录查询)
Python项目源码50:理发店会员管理系统1.0(tkinter+sqlite3)
Python项目源码48:正则表达式调试工具3.0(tkinter+re+requests)
Python项目源码44:图书管理系统1.0(tkinter+sqlite3)
Python项目源码42:仓库商品管理系统1.0(tkinter+sqlite3+Excel)
Python项目源码40:字符串处理工具(tkinter+入门练习)
Python项目源码39:学生积分管理系统1.0(命令行界面+Json)
Python项目源码35:音乐播放器2.0(Tkinter+mutagen)
Python项目源码33:待办事项列表应用2.0(命令行界面+Json+类)
Python项目32:订单销售额管理系统1.0(Tkinter+CSV)
Python项目源码29:学生缴费管理系统(Tkinter+CSV)
Python项目28:设计日志管理系统2.0(Tkinter+Json)
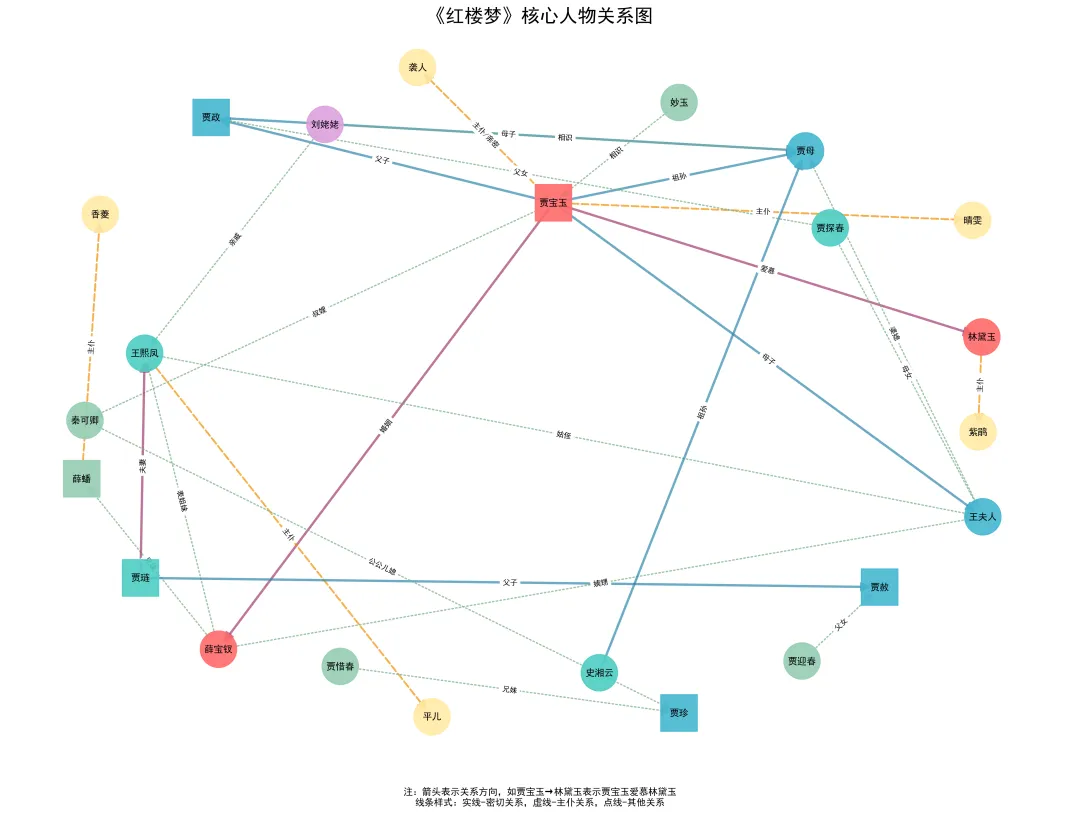
↓ 完整源码如下 ↓
# -*- coding: utf-8 -*-# @Author : 小红牛# 微信公众号:wdPythonimport networkx as nximport matplotlib.pyplot as pltimport matplotlib.font_manager as fmimport numpy as np# 设置中文字体plt.rcParams['font.sans-serif'] = ['SimHei', 'Microsoft YaHei', 'WenQuanYi Micro Hei']plt.rcParams['axes.unicode_minus'] = False# 创建有向图G = nx.DiGraph()# 定义《红楼梦》核心人物及其分类main_characters = {"贾宝玉": {"type": "主角", "gender": "男"},"林黛玉": {"type": "主角", "gender": "女"},"薛宝钗": {"type": "主角", "gender": "女"},"王熙凤": {"type": "主要", "gender": "女"},"贾母": {"type": "长辈", "gender": "女"},"贾政": {"type": "长辈", "gender": "男"},"王夫人": {"type": "长辈", "gender": "女"},"贾琏": {"type": "主要", "gender": "男"},"贾探春": {"type": "主要", "gender": "女"},"史湘云": {"type": "主要", "gender": "女"},"贾迎春": {"type": "次要", "gender": "女"},"贾惜春": {"type": "次要", "gender": "女"},"妙玉": {"type": "次要", "gender": "女"},"秦可卿": {"type": "次要", "gender": "女"},"贾珍": {"type": "长辈", "gender": "男"},"贾赦": {"type": "长辈", "gender": "男"},"袭人": {"type": "丫鬟", "gender": "女"},"晴雯": {"type": "丫鬟", "gender": "女"},"平儿": {"type": "丫鬟", "gender": "女"},"紫鹃": {"type": "丫鬟", "gender": "女"},"薛蟠": {"type": "次要", "gender": "男"},"香菱": {"type": "丫鬟", "gender": "女"},"刘姥姥": {"type": "外人", "gender": "女"}}# 添加节点for character, attributes in main_characters.items():G.add_node(character, **attributes)# 定义人物关系 (源节点, 目标节点, 关系类型)relationships = [# 家族关系("贾宝玉", "贾母", "祖孙"),("贾宝玉", "贾政", "父子"),("贾宝玉", "王夫人", "母子"),("贾政", "贾母", "母子"),("王夫人", "贾母", "婆媳"),("贾琏", "贾赦", "父子"),("贾琏", "王熙凤", "夫妻"),("王熙凤", "王夫人", "姑侄"),("贾探春", "贾政", "父女"),("贾探春", "王夫人", "母女"),("贾迎春", "贾赦", "父女"),("贾惜春", "贾珍", "兄妹"),("秦可卿", "贾珍", "公公儿媳"),("贾珍", "贾敬", "父子"),# 感情关系("贾宝玉", "林黛玉", "爱慕"),("贾宝玉", "薛宝钗", "婚姻"),("贾宝玉", "袭人", "主仆/亲密"),("贾宝玉", "晴雯", "主仆"),# 主仆关系("林黛玉", "紫鹃", "主仆"),("王熙凤", "平儿", "主仆"),("薛蟠", "香菱", "主仆"),# 亲友关系("史湘云", "贾母", "祖孙"),("薛宝钗", "王夫人", "姨甥"),("薛宝钗", "薛蟠", "兄妹"),("薛宝钗", "王熙凤", "表姐妹"),# 其他关系("刘姥姥", "王熙凤", "亲戚"),("刘姥姥", "贾母", "相识"),("妙玉", "贾宝玉", "相识"),("贾宝玉", "秦可卿", "叔嫂"),]# 添加边(关系)for source, target, relation in relationships:if source in G.nodes() and target in G.nodes():G.add_edge(source, target, relation=relation)# 设置图形布局plt.figure(figsize=(16, 12))# 使用不同的布局算法pos = nx.spring_layout(G, k=2, iterations=50, seed=42)# 根据人物类型设置节点颜色node_colors = []for node in G.nodes():char_type = G.nodes[node].get('type', '其他')if char_type == '主角':node_colors.append('#FF6B6B') # 红色elif char_type == '主要':node_colors.append('#4ECDC4') # 青色elif char_type == '长辈':node_colors.append('#45B7D1') # 蓝色elif char_type == '次要':node_colors.append('#96CEB4') # 浅绿elif char_type == '丫鬟':node_colors.append('#FFEAA7') # 黄色else:node_colors.append('#DDA0DD') # 紫色# 根据性别设置节点形状node_shapes = {'男': 's', '女': 'o'}node_shape_list = [node_shapes.get(G.nodes[node].get('gender', '男'), 'o') for node in G.nodes()]# 绘制节点for i, shape in enumerate(set(node_shape_list)):nodes_with_shape = [node for node in G.nodes() if node_shape_list[list(G.nodes()).index(node)] == shape]nx.draw_networkx_nodes(G, pos,nodelist=nodes_with_shape,node_shape=shape,node_color=[node_colors[list(G.nodes()).index(node)] for node in nodes_with_shape],node_size=1500,alpha=0.9)# 绘制边edge_colors = []edge_widths = []edge_styles = []for u, v in G.edges():relation = G.edges[u, v].get('relation', '未知')if relation in ['父子', '母子', '祖孙']:edge_colors.append('#2E86AB') # 家族关系用蓝色edge_widths.append(2.5)edge_styles.append('solid')elif relation in ['夫妻', '爱慕', '婚姻']:edge_colors.append('#A23B72') # 感情关系用紫色edge_widths.append(2.5)edge_styles.append('solid')elif relation in ['主仆', '主仆/亲密']:edge_colors.append('#F18F01') # 主仆关系用橙色edge_widths.append(2.0)edge_styles.append('dashed')else:edge_colors.append('#73AB84') # 其他关系用绿色edge_widths.append(1.5)edge_styles.append('dotted')# 绘制边for i, (u, v) in enumerate(G.edges()):nx.draw_networkx_edges(G, pos,edgelist=[(u, v)],edge_color=edge_colors[i],width=edge_widths[i],style=edge_styles[i],alpha=0.7,arrowsize=20,arrowstyle='-|>')# 添加节点标签nx.draw_networkx_labels(G, pos, font_size=10, font_family='SimHei', font_weight='bold')# 添加边标签(关系类型)edge_labels = nx.get_edge_attributes(G, 'relation')nx.draw_networkx_edge_labels(G, pos, edge_labels=edge_labels, font_size=8, font_family='SimHei')# 添加图例import matplotlib.patches as mpatches# 节点类型图例type_legend = [mpatches.Patch(color='#FF6B6B', label='主角'),mpatches.Patch(color='#4ECDC4', label='主要人物'),mpatches.Patch(color='#45B7D1', label='长辈'),mpatches.Patch(color='#96CEB4', label='次要人物'),mpatches.Patch(color='#FFEAA7', label='丫鬟'),mpatches.Patch(color='#DDA0DD', label='其他'),]# 关系类型图例relation_legend = [mpatches.Patch(color='#2E86AB', label='家族关系'),mpatches.Patch(color='#A23B72', label='感情关系'),mpatches.Patch(color='#F18F01', label='主仆关系'),mpatches.Patch(color='#73AB84', label='其他关系'),]# 节点形状图例shape_legend = [mpatches.Patch(facecolor='white', edgecolor='black', label='女性 (圆形)'),mpatches.Patch(facecolor='white', edgecolor='black', label='男性 (方形)'),]# 创建图例plt.legend(handles=type_legend, title="人物类型", loc='upper left', bbox_to_anchor=(1.02, 1), borderaxespad=0.)# 创建第二个图例plt.gca().add_artist(plt.legend(handles=relation_legend, title="关系类型", loc='upper left', bbox_to_anchor=(1.02, 0.7), borderaxespad=0.))# 创建第三个图例plt.gca().add_artist(plt.legend(handles=shape_legend, title="性别表示", loc='upper left', bbox_to_anchor=(1.02, 0.4), borderaxespad=0.))# 添加标题和说明plt.title("《红楼梦》核心人物关系图", fontsize=20, fontweight='bold', pad=5)plt.text(0.5, -0.05,"注:箭头表示关系方向,如贾宝玉→林黛玉表示贾宝玉爱慕林黛玉\n""线条样式:实线-密切关系,虚线-主仆关系,点线-其他关系",transform=plt.gca().transAxes, ha='center', fontsize=10, style='italic')plt.axis('off')plt.tight_layout()# 保存图像plt.savefig('红楼梦人物关系图.png', dpi=300, bbox_inches='tight')# 显示图形plt.show()# 输出图形的基本信息print("《红楼梦》人物关系图分析:")print(f"总人物数: {G.number_of_nodes()}")print(f"总关系数: {G.number_of_edges()}")# 计算中心性指标print("\n人物中心性分析:")print("-" * 40)# 度中心性degree_centrality = nx.degree_centrality(G)print("度中心性排名 (连接数最多的前5位):")sorted_degree = sorted(degree_centrality.items(), key=lambda x: x[1], reverse=True)[:5]for person, centrality in sorted_degree:print(f" {person}: {centrality:.3f}")# 中介中心性betweenness_centrality = nx.betweenness_centrality(G)print("\n中介中心性排名 (关键桥梁作用的前5位):")sorted_betweenness = sorted(betweenness_centrality.items(), key=lambda x: x[1], reverse=True)[:5]for person, centrality in sorted_betweenness:print(f" {person}: {centrality:.3f}")# 紧密中心性closeness_centrality = nx.closeness_centrality(G)print("\n紧密中心性排名 (信息传播最快的前5位):")sorted_closeness = sorted(closeness_centrality.items(), key=lambda x: x[1], reverse=True)[:5]for person, centrality in sorted_closeness:print(f" {person}: {centrality:.3f}")# 分析关系类型print("\n关系类型统计:")relation_types = {}for u, v, data in G.edges(data=True):rel_type = data.get('relation', '未知')relation_types[rel_type] = relation_types.get(rel_type, 0) + 1for rel_type, count in sorted(relation_types.items(), key=lambda x: x[1], reverse=True):print(f" {rel_type}: {count}次")
完毕!!感谢您的收看
------★★历史博文集合★★------

随机文章
-
 10个月宝宝每天需要喝多少奶粉?
- 西门子PLC编程入门:用TIA Portal实现简易分拣机控制系统
- AI编程:小白30分钟上手Supabase数据库 + Trae Solo全自动开发!【保姆级教程】
- 乐享课程·乐享成长!泥塑·编程·自主进阶,丽景学校寒假托管17门特色课程开班!
- 人体的基础信息与编程(32)
- 不会编程,也可以是牛人
- Vue 3 编程的 10 个实用技巧,提升开发效率与代码质量
- 邹城信奥赛C++编程基础算法之递推和递归案例:数的计算
- 60多门编程语言学习书籍超级大合集
- 孩子学编程到底有没有用?
- "可塑流体&智能流体(可编程流体)网络"将"液态化网络"从"新物种"的哲学隐喻和功能描述,直接提升到了可工程化、可操作的"生命组织"层面