Python从入门到精通day33
- 2026-07-02 13:16:06
Linux操作系统
说明:本文所有 Linux 命令讲解均基于 CentOS 发行版,个人使用环境为阿里云服务器,系统版本:CentOS Linux release 7.6.1810。不同 Linux 发行版在 Shell 命令与工具上存在少量差异,但核心用法高度一致,新手可放心学习。
一、操作系统发展史
1. 什么是操作系统
只有硬件、没有软件的计算机称为裸机,无法直接完成存储、运算等日常工作。必须依靠软件来管控硬件,其中最底层、最核心的系统软件就是操作系统。
操作系统是:
控制与管理计算机软硬件资源
负责资源分配与任务调度
为用户和应用程序提供接口与运行环境的一组程序集合
2. 操作系统演化历程
(1)无操作系统:手工操作
计算机诞生初期没有操作系统,用户需要:
装入纸带 / 卡片程序
启动输入机
控制台启动运行
取结果、卸纸带
全程独占机器、CPU 等待人工操作,资源利用率极低。
(2)批处理系统
通过监督程序自动、成批处理用户作业,实现作业自动转接,减少手工操作与建立时间,大幅提升资源利用率。
分类:
单道 / 多道批处理
联机 / 脱机批处理
(3) 分时系统 & 实时系统
分时系统:把 CPU 时间切成极短时间片,轮流分配给多个联机作业。因为速度极快,用户感觉 “独占一台计算机”,支持强人机交互。
实时系统:为解决分时响应不及时而出现,能在严格时间限制内处理事件、及时响应外部请求。
(4) 通用操作系统:从 UNIX 到 Linux
1. 1960s:IBM System/360 推出统一操作系统 OS/360。 2. 1965:贝尔实验室加入 GE、MIT 合作,开发 MULTICS。 3. 1969:MULTICS 项目失败,Ken Thompson 在闲置的 PDP-7 上,为玩游戏 Space Travel 用汇编写出 Unics。
4. 1970–1971:Ken Thompson、Dennis Ritchie 用 B 语言在 PDP-11 重写 Unics,正式定名 UNIX。 
5. 1972–1973:Dennis Ritchie 发明C 语言,替换可移植性差的 B 语言,并用 C 重写 UNIX。 6. 1974:UNIX 第 5 版发布,几乎完全用 C 实现,成为里程碑。 7. 1979:AT&T 从第 7 版起,将 UNIX 私有化、闭源。 8. 1987:Andrew S. Tanenbaum 教授为教学,不使用任何 AT&T 源码,开发兼容 UNIX 的 Minix。 
下图是Unix操作系统家族的图谱。

二 、Linux 概述
1. 什么是 Linux
Linux 是一套通用操作系统,负责:
任务调度
内存管理
外围设备 I/O 处理
一个完整操作系统由两部分组成:
内核(Kernel):管理硬件、运行程序的核心
系统程序:设备驱动、底层库、Shell、服务等
2. 关键信息
内核作者:Linus Torvalds
首次发布:1991 年 9 月
定位:自由开源操作系统
注意:自由 ≠ 免费,自由指使用、修改、分发自由。
3.Linux系统优点
1. 通用操作系统,不绑定特定硬件 2. C 语言编写,可移植性强,提供内核编程接口 3. 支持多用户、多任务,安全分层文件系统 4. 海量实用工具,完善网络功能与官方文档 5. 安全性、稳定性极强,对开发者极度友好
三、Linux 基础命令
Linux命令通用格式:
命令名称 [命名参数] [命令对象]1. 登录与用户信息
w / who:当前登录用户 last / lastb:登录历史 / 失败记录
[root ~]# w 23:31:16 up 12:16, 2 users, load average: 0.00, 0.01, 0.05USER TTY FROM LOGIN@ IDLE JCPU PCPU WHATroot pts/0 182.139.66.250 23:03 4.00s 0.02s 0.00s wjackfrue pts/1 182.139.66.250 23:26 3:56 0.00s 0.00s -bash[root ~]# whoroot pts/0 2018-04-12 23:03 (182.139.66.250)jackfrued pts/1 2018-04-12 23:26 (182.139.66.250)[root ~]# who am iroot pts/0 2018-04-12 23:03 (182.139.66.250)[root ~]# who mom likesroot pts/0 2018-04-12 23:03 (182.139.66.250)[root ~]# lastroot pts/0 117.136.63.184 Sun May 26 18:57 still logged in reboot system boot 3.10.0-957.10.1. Mon May 27 02:52 - 19:10 (-7:-42) root pts/4 117.136.63.184 Sun May 26 18:51 - crash (08:01) root pts/4 117.136.63.184 Sun May 26 18:49 - 18:49 (00:00) root pts/3 117.136.63.183 Sun May 26 18:35 - crash (08:17) root pts/2 117.136.63.183 Sun May 26 18:34 - crash (08:17) root pts/0 117.136.63.183 Sun May 26 18:10 - crash (08:42) 2. 查看当前 Shell
[root ~]# ps PID TTY TIME CMD 3531 pts/0 00:00:00 bash 3553 pts/0 00:00:00 psShell 是用户与内核的 “翻译官”,Linux 主流默认 Shell 是 bash,支持:
Tab 补全 历史命令 环境变量配置 批处理
3. 命令查询
whatis:简短说明which:命令位置whereis:命令 + 手册 + 配置文件位置[root ~]# whatis psps (1) - report a snapshot of the current processes.[root ~]# whatis pythonpython (1) - an interpreted, interactive, object-oriented programming language[root ~]# whereis psps: /usr/bin/ps /usr/share/man/man1/ps.1.gz[root ~]# whereis pythonpython: /usr/bin/python /usr/bin/python2.7 /usr/lib/python2.7 /usr/lib64/python2.7 /etc/python /usr/include/python2.7 /usr/share/man/man1/python.1.gz[root ~]# which ps/usr/bin/ps[root ~]# which python/usr/bin/python
4. 清除屏幕上显示的内容 - clear。 5. 查看帮助文档 - man / info / --help / apropos。 [root@izwz97tbgo9lkabnat2lo8z ~]# ps --helpUsage: ps [options] Try 'ps --help <simple|list|output|threads|misc|all>' or 'ps --help <s|l|o|t|m|a>' for additional help text.For more details see ps(1).[root@izwz97tbgo9lkabnat2lo8z ~]# man psPS(1) User Commands PS(1)NAME ps - report a snapshot of the current processes.SYNOPSIS ps [options]DESCRIPTION...6. 系统与主机名
uname:内核名称hostname:主机名cat /etc/centos-release:系统版本[root@izwz97tbgo9lkabnat2lo8z ~]# unameLinux[root@izwz97tbgo9lkabnat2lo8z ~]# hostnameizwz97tbgo9lkabnat2lo8z[root@iZwz97tbgo9lkabnat2lo8Z ~]# cat /etc/centos-releaseCentOS Linux release 7.6.1810 (Core)
7. 时间与日历
date:日期时间cal:日历[root@iZwz97tbgo9lkabnat2lo8Z ~]# dateWed Jun 20 12:53:19 CST 2018[root@iZwz97tbgo9lkabnat2lo8Z ~]# cal June 2018Su Mo Tu We Th Fr Sa 1 2 3 4 5 6 7 8 910 11 12 13 14 15 1617 18 19 20 21 22 2324 25 26 27 28 29 30[root@iZwz97tbgo9lkabnat2lo8Z ~]# cal 5 2017 May 2017Su Mo Tu We Th Fr Sa 1 2 3 4 5 6 7 8 9 10 11 12 1314 15 16 17 18 19 2021 22 23 24 25 26 2728 29 30 31
8. 重启和关机 - reboot / shutdown。 [root ~]# shutdown -h +5Shutdown scheduled for Sun 2019-05-26 19:34:27 CST, use 'shutdown -c' to cancel.[root ~]# Broadcast message from root (Sun 2019-05-26 19:29:27 CST):The system is going down for power-off at Sun 2019-05-26 19:34:27 CST![root ~]# shutdown -cBroadcast message from root (Sun 2019-05-26 19:30:22 CST):The system shutdown has been cancelled at Sun 2019-05-26 19:31:22 CST![root ~]# shutdown -r 23:58Shutdown scheduled for Sun 2019-05-26 23:58:00 CST, use 'shutdown -c' to cancel.[root ~]# shutdown -cBroadcast message from root (Sun 2019-05-26 19:31:06 CST):The system shutdown has been cancelled at Sun 2019-05-26 19:32:06 CST!说明:在执行
shutdown命令时会向登录系统的用户发出警告,可以在命令后面跟上警告消息来替换默认的警告消息,也可以在-h参数后通过now来表示立刻关机。9. 退出登录 - exit / logout。 10. 查看历史命令 - history。
[root@iZwz97tbgo9lkabnat2lo8Z ~]# history...452 ls453 cd Python-3.6.5/454 clear455 history[root@iZwz97tbgo9lkabnat2lo8Z ~]# !454说明:查看到历史命令之后,可以用
!历史命令编号来重新执行该命令;通过history -c可以清除历史命令。
四、实用工具:文件与目录操作
1. 目录操作
mkdir:创建目录 mkdir -p:递归创建 rmdir:删除空目录
[root ~]# mkdir abc[root ~]# mkdir -p xyz/abc[root ~]# rmdir abc2. 文件操作
touch:创建空文件 / 修改时间rm:删除文件 / 目录[root ~]# touch readme.txt[root ~]# touch error.txt[root ~]# rm error.txtrm: remove regular empty file ‘error.txt’? y[root ~]# rm -rf xyz
• rm常用参数:• -i:交互式确认• -r:递归删除目录• -f:强制删除
3. 切换与查看路径
cd:切换目录pwd:显示当前路径
4. 查列出目录内容 • -l:以长格式查看文件和目录。• -a:显示以点开头的文件和目录(隐藏文件)。• -R:遇到目录要进行递归展开(继续列出目录下面的文件和目录)。• -d:只列出目录,不列出其他内容。• -S/-t:按大小/时间排序。5. 查看文件内容
cat:正序查看tac:倒序查看head/tail:头尾more/less:分页rev:反转字符od:二进制查看[root ~]# wget http://www.sohu.com/ -O sohu.html--2018-06-20 18:42:34-- http://www.sohu.com/Resolving www.sohu.com (www.sohu.com)... 14.18.240.6Connecting to www.sohu.com (www.sohu.com)|14.18.240.6|:80... connected.HTTP request sent, awaiting response... 200 OKLength: 212527 (208K) [text/html]Saving to: ‘sohu.html’100%[==================================================>] 212,527 --.-K/s in 0.03s2018-06-20 18:42:34 (7.48 MB/s) - ‘sohu.html’ saved [212527/212527][root ~]# cat sohu.html...[root ~]# head -10 sohu.html<!DOCTYPE html><html><head><title>搜狐</title><meta name="Keywords" content="搜狐,门户网站,新媒体,网络媒体,新闻,财经,体育,娱乐,时尚,汽车,房产,科技,图片,论坛,微博,博客,视频,电影,电视剧"/><meta name="Description" content="搜狐网为用户提供24小时不间断的最新资讯,及搜索、邮件等网络服务。内容包括全球热点事件、突发新闻、时事评论、热播影视剧、体育赛事、行业动态、生活服务信息,以及论坛、博客、微博、我的搜狐等互动空间。" /><meta name="shenma-site-verification" content="1237e4d02a3d8d73e96cbd97b699e9c3_1504254750"><meta charset="utf-8"/><meta http-equiv="X-UA-Compatible" content="IE=Edge,chrome=1"/>[root ~]# tail -2 sohu.html</body></html>[root ~]# less sohu.html...[root ~]# cat -n sohu.html | more...说明:上面用到了一个名为
wget的命令,它是一个网络下载器程序,可以从指定的URL下载资源。
6. 复制 & 移动
cp:复制mv:移动 / 重命名[root ~]# mkdir backup[root ~]# cp sohu.html backup/[root ~]# cd backup[root backup]# lssohu.html[root backup]# mv sohu.html sohu_index.html[root backup]# lssohu_index.html
7. 文件重命名 - rename。
[root@iZwz97tbgo9lkabnat2lo8Z ~]# rename .htm .html *.htm8. 查找文件 & 查找内容
find:查找文件grep:查找内容[root@iZwz97tbgo9lkabnat2lo8Z ~]# find / -name "*.html"/root/sohu.html/root/backup/sohu_index.html[root@izwz97tbgo9lkabnat2lo8z ~]# find . -atime 7 -type f -print[root@izwz97tbgo9lkabnat2lo8z ~]# find . -type f -size +2k[root@izwz97tbgo9lkabnat2lo8z ~]# find . -type f -name "*.swp" -delete[root@iZwz97tbgo9lkabnat2lo8Z ~]# grep "<script>" sohu.html -n20:<script>[root@iZwz97tbgo9lkabnat2lo8Z ~]# grep -E \<\/?script.*\> sohu.html -n20:<script>22:</script>24:<script src="//statics.itc.cn/web/v3/static/js/es5-shim-08e41cfc3e.min.js"></script>25:<script src="//statics.itc.cn/web/v3/static/js/es5-sham-1d5fa1124b.min.js"></script>26:<script src="//statics.itc.cn/web/v3/static/js/html5shiv-21fc8c2ba6.js"></script>29:<script type="text/javascript">52:</script>...
9. 硬链接 & 软链接
ln:创建硬链接ln -s:创建软链接(符号链接)readlink:查看链接指向[root@iZwz97tbgo9lkabnat2lo8Z ~]# ls -l sohu.html-rw-r--r-- 1 root root 212131 Jun 20 19:15 sohu.html[root@iZwz97tbgo9lkabnat2lo8Z ~]# ln /root/sohu.html /root/backup/sohu_backup[root@iZwz97tbgo9lkabnat2lo8Z ~]# ls -l sohu.html-rw-r--r-- 2 root root 212131 Jun 20 19:15 sohu.html[root@iZwz97tbgo9lkabnat2lo8Z ~]# ln /root/sohu.html /root/backup/sohu_backup2[root@iZwz97tbgo9lkabnat2lo8Z ~]# ls -l sohu.html-rw-r--r-- 3 root root 212131 Jun 20 19:15 sohu.html[root@iZwz97tbgo9lkabnat2lo8Z ~]# ln -s /etc/centos-release sysinfo[root@iZwz97tbgo9lkabnat2lo8Z ~]# ls -l sysinfolrwxrwxrwx 1 root root 19 Jun 20 19:21 sysinfo -> /etc/centos-release[root@iZwz97tbgo9lkabnat2lo8Z ~]# cat sysinfoCentOS Linux release 7.4.1708 (Core)[root@iZwz97tbgo9lkabnat2lo8Z ~]# cat /etc/centos-releaseCentOS Linux release 7.4.1708 (Core)
硬链接:相当于文件指针,引用计数 + 1,删除一个不影响源文件 软链接:类似 Windows 快捷方式,源文件删除则失效
10. 压缩
gzip / gunzip / xz:压缩解压
[root@iZwz97tbgo9lkabnat2lo8Z ~]# wget http://download.redis.io/releases/redis-4.0.10.tar.gz--2018-06-20 19:29:59-- http://download.redis.io/releases/redis-4.0.10.tar.gzResolving download.redis.io (download.redis.io)... 109.74.203.151Connecting to download.redis.io (download.redis.io)|109.74.203.151|:80... connected.HTTP request sent, awaiting response... 200 OKLength: 1738465 (1.7M) [application/x-gzip]Saving to: ‘redis-4.0.10.tar.gz’100%[==================================================>] 1,738,465 70.1KB/s in 74s2018-06-20 19:31:14 (22.9 KB/s) - ‘redis-4.0.10.tar.gz’ saved [1738465/1738465][root@iZwz97tbgo9lkabnat2lo8Z ~]# ls redis*redis-4.0.10.tar.gz[root@iZwz97tbgo9lkabnat2lo8Z ~]# gunzip redis-4.0.10.tar.gz[root@iZwz97tbgo9lkabnat2lo8Z ~]# ls redis*redis-4.0.10.tar11. 归档和解归档
tar:打包 / 解包
[root@iZwz97tbgo9lkabnat2lo8Z ~]# tar -xvf redis-4.0.10.tarredis-4.0.10/redis-4.0.10/.gitignoreredis-4.0.10/00-RELEASENOTESredis-4.0.10/BUGSredis-4.0.10/CONTRIBUTINGredis-4.0.10/COPYINGredis-4.0.10/INSTALLredis-4.0.10/MANIFESTOredis-4.0.10/Makefileredis-4.0.10/README.mdredis-4.0.10/deps/redis-4.0.10/deps/Makefileredis-4.0.10/deps/README.md...12. 将标准输入转成命令行参数 - xargs。
[root@iZwz97tbgo9lkabnat2lo8Z ~]# find . -type f -name "*.html" | xargs rm -f下面的命令将a.txt文件中的多行内容变成一行输出到b.txt文件中,其中<表示从a.txt中读取输入,>表示将命令的执行结果输出到b.txt中。
[root@iZwz97tbgo9lkabnat2lo8Z ~]# xargs < a.txt > b.txt管道和重定向
1. 管道的使用 - |。例子:查找当前目录下文件个数。
例子:列出当前路径下的文件和文件夹,给每一项加一个编号。[root ~]# find ./ | wc -l6152
例子:查找record.log中包含AAA,但不包含BBB的记录的总数[root ~]# ls | cat -n 1 dump.rdb 2 mongodb-3.6.5 3 Python-3.6.5 4 redis-3.2.11 5 redis.conf[root ~]# cat record.log | grep AAA | grep -v BBB | wc -l2. 输出重定向和错误重定向 - > / >> / 2>。 [root ~]# cat readme.txtbananaapplegrapeapplegrapewatermelonpearpitaya[root ~]# cat readme.txt | sort | uniq > result.txt[root ~]# cat result.txtapplebananagrapepearpitayawatermelon3. 输入重定向 - <。 [root ~]# echo 'hello, world!' > hello.txt[root ~]# wall < hello.txt[root ~]#Broadcast message from root (Wed Jun 20 19:43:05 2018):hello, world![root ~]# echo 'I will show you some code.' >> hello.txt[root ~]# wall < hello.txt[root ~]#Broadcast message from root (Wed Jun 20 19:43:55 2018):hello, world!I will show you some code.4. 多重定向 - tee。下面的命令除了在终端显示命令 ls的结果之外,还会追加输出到ls.txt文件中。[root ~]# ls | tee -a ls.txt
别名
1. alias [root ~]# alias ll='ls -l'[root ~]# alias frm='rm -rf'[root ~]# ll...drwxr-xr-x 2 root root 4096 Jun 20 12:52 abc...[root ~]# frm abc2. unalias [root ~]# unalias frm[root ~]# frm sohu.html-bash: frm: command not found
文本处理
1. 字符流编辑器 - sed。sed是操作、过滤和转换文本内容的工具。假设有一个名为fruit.txt的文件,内容如下所示。
接下来,我们在第2行后面添加一个pitaya。[root ~]# cat -n fruit.txt 1 banana 2 grape 3 apple 4 watermelon 5 orange[root ~]# sed '2a pitaya' fruit.txt bananagrapepitayaapplewatermelonorange
在第2行前面插入一个waxberry。
删除第3行。[root ~]# sed '2i waxberry' fruit.txtbananawaxberrygrapeapplewatermelonorange
删除第2行到第4行。[root ~]# sed '3d' fruit.txtbananagrapewatermelonorange
将文本中的字符a替换为@。[root ~]# sed '2,4d' fruit.txtbananaorange
将文本中的字符a替换为@,使用全局模式。[root ~]# sed 's#a#@#' fruit.txt b@nanagr@pe@pplew@termelonor@nge[root ~]# sed 's#a#@#g' fruit.txt b@n@n@gr@pe@pplew@termelonor@nge2. 模式匹配和处理语言 - awk。 假设有一个名为fruit2.txt的文件,内容如下所示。
显示文件的第3行。[root ~]# cat fruit2.txt 1 banana 1202 grape 5003 apple 12304 watermelon 805 orange 400
显示文件的第2列。[root ~]# awk 'NR==3' fruit2.txt 3 apple 1230
显示文件的最后一列。[root ~]# awk '{print $2}' fruit2.txt bananagrapeapplewatermelonorange
输出末尾数字大于等于300的行。[root ~]# awk '{print $NF}' fruit2.txt 120500123080400
上面展示的只是awk命令的冰山一角,更多的内容留给读者自己在实践中去探索。[root ~]# awk '{if($3 >= 300) {print $0}}' fruit2.txt 2 grape 5003 apple 12305 orange 400
五、用户与用户组管理
1. 用户管理 useradd:创建用户userdel:删除用户[root home]# useradd hellokitty[root home]# userdel hellokitty
2. 用户组管理 groupadd:创建组 groupdel:删除组
3. 密码管理 passwd:设置 / 修改密码chage:密码有效期[root ~]# passwd hellokittyNew password: Retype new password: passwd: all authentication tokens updated successfully.4. 查看和修改密码有效期 - chage。设置hellokitty用户100天后必须修改密码,过期前15天通知该用户,过期后7天禁用该用户。 chage -M 100 -W 15 -I 7 hellokitty5. 切换用户 su:切换用户sudo:以管理员身份执行visudo:编辑 sudo 权限[root ~]# su hellokitty[hellokitty root]$6. 以管理员身份执行命令 - sudo。 [hellokitty ~]$ ls /rootls: cannot open directory /root: Permission denied[hellokitty ~]$ sudo ls /root[sudo] password for hellokitty:7. 编辑sudoers文件 - visudo。这里使用的编辑器是vi,关于vi的知识在后面有讲解。该文件的部分内容如下所示: ## Allow root to run any commands anywhere root ALL=(ALL) ALL## Allows members of the 'sys' group to run networking, software, ## service management apps and more.# %sys ALL = NETWORKING, SOFTWARE, SERVICES, STORAGE, DELEGATING, PROCESSES, LOCATE, DRIVERS## Allows people in group wheel to run all commands%wheel ALL=(ALL) ALL## Same thing without a password# %wheel ALL=(ALL) NOPASSWD: ALL## Allows members of the users group to mount and unmount the## cdrom as root# %users ALL=/sbin/mount /mnt/cdrom, /sbin/umount /mnt/cdrom## Allows members of the users group to shutdown this system# %users localhost=/sbin/shutdown -h now8. 显示用户与用户组的信息 - id。 9. 给其他用户发消息 -write / wall。发送方:
接收方:[root ~]# write hellokittyDinner is on me.Call me at 6pm.[hellokitty ~]$ Message from root on pts/0 at 17:41 ...Dinner is on me.Call me at 6pm.EOF10. 查看/设置是否接收其他用户发送的消息 - mesg。
[hellokitty ~]$ mesgis y[hellokitty ~]$ mesg n[hellokitty ~]$ mesgis n六、文件系统
1.文件命名规则
建议使用:英文大小写、数字、下划线、点
尽量不用空格,否则需要引号或转义
以
.开头为隐藏文件Linux 扩展名不决定文件类型,只是便于识别
2.经典目录结构
1. /bin - 基本命令的二进制文件。 2. /boot - 引导加载程序的静态文件。 3. /dev - 设备文件。 4. /etc - 配置文件。 5. /home - 普通用户主目录的父目录。 6. /lib - 共享库文件。 7. /lib64 - 共享64位库文件。 8. /lost+found - 存放未链接文件。 9. /media - 自动识别设备的挂载目录。 10. /mnt - 临时挂载文件系统的挂载点。 11. /opt - 可选插件软件包安装位置。 12. /proc - 内核和进程信息。 13. /root - 超级管理员用户主目录。 14. /run - 存放系统运行时需要的东西。 15. /sbin - 超级用户的二进制文件。 16. /sys - 设备的伪文件系统。 17. /tmp - 临时文件夹。 18. /usr - 用户应用目录。 19. /var - 变量数据目录。
3.访问权限
1. chmod - 改变文件模式比特。 [root ~]# ls -l...-rw-r--r-- 1 root root 211878 Jun 19 16:06 sohu.html...[root ~]# chmod g+w,o+w sohu.html[root ~]# ls -l...-rw-rw-rw- 1 root root 211878 Jun 19 16:06 sohu.html...[root ~]# chmod 644 sohu.html[root ~]# ls -l...-rw-r--r-- 1 root root 211878 Jun 19 16:06 sohu.html...
长格式查看目录或文件时显示结果及其对应权限的数值如下表所示。 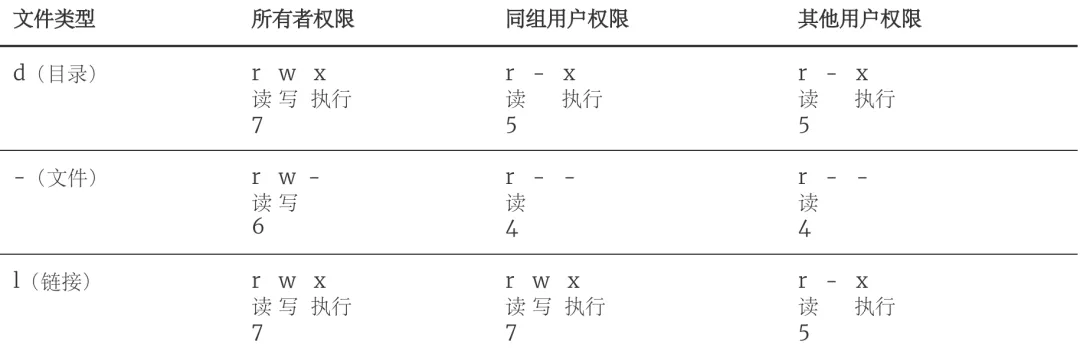
2. chown - 改变文件所有者。 [root ~]# ls -l...-rw-r--r-- 1 root root 54 Jun 20 10:06 readme.txt...[root ~]# chown hellokitty readme.txt[root ~]# ls -l...-rw-r--r-- 1 hellokitty root 54 Jun 20 10:06 readme.txt...
磁盘管理
1. 列出文件系统的磁盘使用状况 - df。 [root ~]# df -hFilesystem Size Used Avail Use% Mounted on/dev/vda1 40G 5.0G 33G 14% /devtmpfs 486M 0 486M 0% /devtmpfs 497M 0 497M 0% /dev/shmtmpfs 497M 356K 496M 1% /runtmpfs 497M 0 497M 0% /sys/fs/cgrouptmpfs 100M 0 100M 0% /run/user/02. 磁盘分区表操作 - fdisk。 [root ~]# fdisk -lDisk /dev/vda: 42.9 GB, 42949672960 bytes, 83886080 sectorsUnits = sectors of 1 * 512 = 512 bytesSector size (logical/physical): 512 bytes / 512 bytesI/O size (minimum/optimal): 512 bytes / 512 bytesDisk label type: dosDisk identifier: 0x000a42f4 Device Boot Start End Blocks Id System/dev/vda1 * 2048 83884031 41940992 83 LinuxDisk /dev/vdb: 21.5 GB, 21474836480 bytes, 41943040 sectorsUnits = sectors of 1 * 512 = 512 bytesSector size (logical/physical): 512 bytes / 512 bytesI/O size (minimum/optimal): 512 bytes / 512 bytes3. 磁盘分区工具 - parted。 4. 格式化文件系统 - mkfs。 [root ~]# mkfs -t ext4 -v /dev/sdb• -t- 指定文件系统的类型。• -c- 创建文件系统时检查磁盘损坏情况。• -v- 显示详细信息。5. 文件系统检查 - fsck。 6. 转换或拷贝文件 - dd。 7. 挂载/卸载 - mount / umount。 8. 创建/激活/关闭交换分区 - mkswap / swapon / swapoff。
说明:执行上面这些命令会带有一定的风险,如果不清楚这些命令的用法,最好不用随意使用,在使用的过程中,最好对照参考资料进行操作,并在操作前确认是否要这么做。
七、编辑器:vim
三大模式 命令模式:默认,移动、复制、删除 编辑模式:按 i 进入,编辑文字 末行模式:按 : 进入,保存、退出、设置
i 进入编辑Esc 返回命令:wq 保存退出:q! 强制不保存退出dd 删除行yy 复制行p 粘贴u 撤销Ctrl+r 恢复gg 首行G 末行/关键词 查找
set ts=4set nuset rulersyntax on
八、软件安装(CentOS)
使用包管理工具
1. yum - Yellowdog Updater Modified。 • yum search:搜索软件包,例如yum search nginx。• yum list installed:列出已经安装的软件包,例如yum list installed | grep zlib。• yum install:安装软件包,例如yum install nginx。• yum remove:删除软件包,例如yum remove nginx。• yum update:更新软件包,例如yum update可以更新所有软件包,而yum update tar只会更新tar。• yum check-update:检查有哪些可以更新的软件包。• yum info:显示软件包的相关信息,例如yum info nginx。2. rpm - Redhat Package Manager。 • 安装软件包: rpm -ivh <packagename>.rpm。• 移除软件包: rpm -e <packagename>。• 查询软件包: rpm -qa,例如可以用rpm -qa | grep mysql来检查是否安装了MySQL相关的软件包。
下面以Nginx为例,演示如何使用yum安装软件。
[root ~]# yum -y install nginx...Installed: nginx.x86_64 1:1.12.2-2.el7Dependency Installed: nginx-all-modules.noarch 1:1.12.2-2.el7 nginx-mod-http-geoip.x86_64 1:1.12.2-2.el7 nginx-mod-http-image-filter.x86_64 1:1.12.2-2.el7 nginx-mod-http-perl.x86_64 1:1.12.2-2.el7 nginx-mod-http-xslt-filter.x86_64 1:1.12.2-2.el7 nginx-mod-mail.x86_64 1:1.12.2-2.el7 nginx-mod-stream.x86_64 1:1.12.2-2.el7Complete![root ~]# yum info nginxLoaded plugins: fastestmirrorLoading mirror speeds from cached hostfileInstalled PackagesName : nginxArch : x86_64Epoch : 1Version : 1.12.2Release : 2.el7Size : 1.5 MRepo : installedFrom repo : epelSummary : A high performance web server and reverse proxy serverURL : http://nginx.org/License : BSDDescription : Nginx is a web server and a reverse proxy server for HTTP, SMTP, POP3 and : IMAP protocols, with a strong focus on high concurrency, performance and low : memory usage.[root ~]# nginx -vnginx version: nginx/1.12.2移除Nginx。
[root ~]# yum -y remove nginx下面以MySQL为例,演示如何使用rpm安装软件。要安装MySQL需要先到MySQL官方网站下载对应的RPM文件,当然要选择和你使用的Linux系统对应的版本。MySQL现在是Oracle公司旗下的产品,在MySQL被收购后,MySQL的作者重新制作了一个MySQL的分支MariaDB,可以通过yum进行安装。
[root mysql]# lsmysql-community-client-5.7.22-1.el7.x86_64.rpmmysql-community-common-5.7.22-1.el7.x86_64.rpmmysql-community-libs-5.7.22-1.el7.x86_64.rpmmysql-community-server-5.7.22-1.el7.x86_64.rpm[root mysql]# yum -y remove mariadb-libs[root mysql]# yum -y install libaio[root mysql]#rpm -ivh mysql-community-common-5.7.26-1.el7.x86_64.rpm...[root mysql]#rpm -ivh mysql-community-libs-5.7.26-1.el7.x86_64.rpm...[root mysql]#rpm -ivh mysql-community-client-5.7.26-1.el7.x86_64.rpm...[root mysql]#rpm -ivh mysql-community-server-5.7.26-1.el7.x86_64.rpm...说明:由于MySQL和MariaDB的底层依赖库是有冲突的,所以上面我们首先用
yum移除了名为mariadb-libs的依赖库并安装了名为libaio支持异步I/O操作的依赖库。关于MySQL和MariaDB之间的关系,可以阅读维基百科上关于MariaDB的介绍。
移除安装的MySQL。
[root ~]# rpm -qa | grep mysql | xargs rpm -e下载解压配置环境变量
下面以安装MongoDB为例,演示这类软件应该如何安装。
[root ~]# wget https://fastdl.mongodb.org/linux/mongodb-linux-x86_64-rhel70-3.6.5.tgz--2018-06-21 18:32:53-- https://fastdl.mongodb.org/linux/mongodb-linux-x86_64-rhel70-3.6.5.tgzResolving fastdl.mongodb.org (fastdl.mongodb.org)... 52.85.83.16, 52.85.83.228, 52.85.83.186, ...Connecting to fastdl.mongodb.org (fastdl.mongodb.org)|52.85.83.16|:443... connected.HTTP request sent, awaiting response... 200 OKLength: 100564462 (96M) [application/x-gzip]Saving to: ‘mongodb-linux-x86_64-rhel70-3.6.5.tgz’100%[==================================================>] 100,564,462 630KB/s in 2m 9s2018-06-21 18:35:04 (760 KB/s) - ‘mongodb-linux-x86_64-rhel70-3.6.5.tgz’ saved [100564462/100564462][root ~]# gunzip mongodb-linux-x86_64-rhel70-3.6.5.tgz[root ~]# tar -xvf mongodb-linux-x86_64-rhel70-3.6.5.tarmongodb-linux-x86_64-rhel70-3.6.5/READMEmongodb-linux-x86_64-rhel70-3.6.5/THIRD-PARTY-NOTICESmongodb-linux-x86_64-rhel70-3.6.5/MPL-2mongodb-linux-x86_64-rhel70-3.6.5/GNU-AGPL-3.0mongodb-linux-x86_64-rhel70-3.6.5/bin/mongodumpmongodb-linux-x86_64-rhel70-3.6.5/bin/mongorestoremongodb-linux-x86_64-rhel70-3.6.5/bin/mongoexportmongodb-linux-x86_64-rhel70-3.6.5/bin/mongoimportmongodb-linux-x86_64-rhel70-3.6.5/bin/mongostatmongodb-linux-x86_64-rhel70-3.6.5/bin/mongotopmongodb-linux-x86_64-rhel70-3.6.5/bin/bsondumpmongodb-linux-x86_64-rhel70-3.6.5/bin/mongofilesmongodb-linux-x86_64-rhel70-3.6.5/bin/mongoreplaymongodb-linux-x86_64-rhel70-3.6.5/bin/mongoperfmongodb-linux-x86_64-rhel70-3.6.5/bin/mongodmongodb-linux-x86_64-rhel70-3.6.5/bin/mongosmongodb-linux-x86_64-rhel70-3.6.5/bin/mongomongodb-linux-x86_64-rhel70-3.6.5/bin/install_compass[root ~]# vim .bash_profile...PATH=$PATH:$HOME/bin:$HOME/mongodb-linux-x86_64-rhel70-3.6.5/binexport PATH...[root ~]# source .bash_profile[root ~]# mongod --versiondb version v3.6.5git version: a20ecd3e3a174162052ff99913bc2ca9a839d618OpenSSL version: OpenSSL 1.0.1e-fips 11 Feb 2013allocator: tcmallocmodules: nonebuild environment: distmod: rhel70 distarch: x86_64 target_arch: x86_64[root ~]# mongo --versionMongoDB shell version v3.6.5git version: a20ecd3e3a174162052ff99913bc2ca9a839d618OpenSSL version: OpenSSL 1.0.1e-fips 11 Feb 2013allocator: tcmallocmodules: nonebuild environment: distmod: rhel70 distarch: x86_64 target_arch: x86_64说明:当然也可以通过yum来安装MongoDB,具体可以参照官方网站上给出的说明。
源代码构建安装
1. 安装Python 3.6。 [root ~]# yum install gcc[root ~]# wget https://www.python.org/ftp/python/3.6.5/Python-3.6.5.tgz[root ~]# gunzip Python-3.6.5.tgz[root ~]# tar -xvf Python-3.6.5.tar[root ~]# cd Python-3.6.5[root ~]# ./configure --prefix=/usr/local/python36 --enable-optimizations[root ~]# yum -y install zlib-devel bzip2-devel openssl-devel ncurses-devel sqlite-devel readline-devel tk-devel gdbm-devel db4-devel libpcap-devel xz-devel[root ~]# make && make install...[root ~]# ln -s /usr/local/python36/bin/python3.6 /usr/bin/python3[root ~]# python3 --versionPython 3.6.5[root ~]# python3 -m pip install -U pip[root ~]# pip3 --version说明:上面在安装好Python之后还需要注册PATH环境变量,将Python安装路径下bin文件夹的绝对路径注册到PATH环境变量中。注册环境变量可以修改用户主目录下的.bash_profile或者/etc目录下的profile文件,二者的区别在于前者相当于是用户环境变量,而后者相当于是系统环境变量。
2. 安装Redis-3.2.12。 [root ~]# wget http://download.redis.io/releases/redis-3.2.12.tar.gz[root ~]# gunzip redis-3.2.12.tar.gz[root ~]# tar -xvf redis-3.2.12.tar[root ~]# cd redis-3.2.12[root ~]# make && make install[root ~]# redis-server --versionRedis server v=3.2.12 sha=00000000:0 malloc=jemalloc-4.0.3 bits=64 build=5bc5cd3c03d6ceb6[root ~]# redis-cli --versionredis-cli 3.2.12
九、服务管理
我们可以Linux系统下安装和配置各种服务,也就是说我们可以把Linux系统打造成数据库服务器、Web服务器、缓存服务器、文件服务器、消息队列服务器等等。Linux下的大多数服务都被设置为守护进程(驻留在系统后台运行,但不会因为服务还在运行而导致Linux无法停止运行),所以我们安装的服务通常名字后面都有一个字母d,它是英文单词daemon的缩写,例如:防火墙服务叫firewalld,我们之前安装的MySQL服务叫mysqld,Apache服务器叫httpd等。在安装好服务之后,可以使用systemctl命令或service命令来完成对服务的启动、停止等操作,具体操作如下所示。
1. 启动防火墙服务。 [root ~]# systemctl start firewalld2. 终止防火墙服务。 [root ~]# systemctl stop firewalld3. 重启防火墙服务。 [root ~]# systemctl restart firewalld4. 查看防火墙服务状态。 [root ~]# systemctl status firewalld5. 设置/禁用防火墙服务开机自启。 [root ~]# systemctl enable firewalldCreated symlink from /etc/systemd/system/dbus-org.fedoraproject.FirewallD1.service to /usr/lib/systemd/system/firewalld.service.Created symlink from /etc/systemd/system/multi-user.target.wants/firewalld.service to /usr/lib/systemd/system/firewalld.service.[root ~]# systemctl disable firewalldRemoved symlink /etc/systemd/system/multi-user.target.wants/firewalld.service.Removed symlink /etc/systemd/system/dbus-org.fedoraproject.FirewallD1.service.
十、计划任务
1. 在指定的时间执行命令。 指定3天以后下午5点要执行的任务。
[root ~]# at 5pm+3daysat> rm -f /root/*.htmlat> <EOT>job 9 at Wed Jun 5 17:00:00 2019查看待执行的任务队列。
[root ~]# atq9 Wed Jun 5 17:00:00 2019 a root从队列中删除指定的任务。
[root ~]$ atrm 9• at - 将任务排队,在指定的时间执行。 • atq - 查看待执行的任务队列。 • atrm - 从队列中删除待执行的任务。 2. 计划任务表 - crontab。 [root ~]# crontab -e* * * * * echo "hello, world!" >> /root/hello.txt59 23 * * * rm -f /root/*.log
和crontab相关的文件在说明:输入
crontab -e命令会打开vim来编辑Cron表达式并指定触发的任务,上面我们定制了两个计划任务,一个是每分钟向/root目录下的hello.txt中追加输出hello, world!;另一个是每天23时59分执行删除/root目录下以log为后缀名的文件。如果不知道Cron表达式如何书写,可以参照/etc/crontab文件中的提示(下面会讲到)或者用搜索引擎找一下“Cron表达式在线生成器”来生成Cron表达式。/etc目录下,通过修改/etc目录下的crontab文件也能够定制计划任务。[root ~]# cd /etc[root etc]# ls -l | grep cron-rw-------. 1 root root 541 Aug 3 2017 anacrontabdrwxr-xr-x. 2 root root 4096 Mar 27 11:56 cron.ddrwxr-xr-x. 2 root root 4096 Mar 27 11:51 cron.daily-rw-------. 1 root root 0 Aug 3 2017 cron.denydrwxr-xr-x. 2 root root 4096 Mar 27 11:50 cron.hourlydrwxr-xr-x. 2 root root 4096 Jun 10 2014 cron.monthly-rw-r--r-- 1 root root 493 Jun 23 15:09 crontabdrwxr-xr-x. 2 root root 4096 Jun 10 2014 cron.weekly[root etc]# vim crontab 1 SHELL=/bin/bash 2 PATH=/sbin:/bin:/usr/sbin:/usr/bin 3 MAILTO=root 4 5 # For details see man 4 crontabs 6 7 # Example of job definition: 8 # .---------------- minute (0 - 59) 9 # | .------------- hour (0 - 23) 10 # | | .---------- day of month (1 - 31) 11 # | | | .------- month (1 - 12) OR jan,feb,mar,apr ... 12 # | | | | .---- day of week (0 - 6) (Sunday=0 or 7) OR sun,mon,tue,wed,thu,fri,sat 13 # | | | | | 14 # * * * * * user-name command to be executed
十一、网络管理
1. 安全远程连接 - ssh。 [root ~]$ ssh root@120.77.222.217The authenticity of host '120.77.222.217 (120.77.222.217)' can't be established.ECDSA key fingerprint is SHA256:BhUhykv+FvnIL03I9cLRpWpaCxI91m9n7zBWrcXRa8w.ECDSA key fingerprint is MD5:cc:85:e9:f0:d7:07:1a:26:41:92:77:6b:7f:a0:92:65.Are you sure you want to continue connecting (yes/no)? yesWarning: Permanently added '120.77.222.217' (ECDSA) to the list of known hosts.root@120.77.222.217's password:2. 通过网络获取资源 - wget。 • -b 后台下载模式 • -O 下载到指定的目录 • -r 递归下载 3. 发送和接收邮件 - mail。 4. 网络配置工具(旧) - ifconfig。 [root ~]# ifconfig eth0eth0: flags=4163<UP,BROADCAST,RUNNING,MULTICAST> mtu 1500 inet 172.18.61.250 netmask 255.255.240.0 broadcast 172.18.63.255 ether 00:16:3e:02:b6:46 txqueuelen 1000 (Ethernet) RX packets 1067841 bytes 1296732947 (1.2 GiB) RX errors 0 dropped 0 overruns 0 frame 0 TX packets 409912 bytes 43569163 (41.5 MiB) TX errors 0 dropped 0 overruns 0 carrier 0 collisions5. 网络配置工具(新) - ip。 [root ~]# ip address1: lo: <LOOPBACK,UP,LOWER_UP> mtu 65536 qdisc noqueue state UNKNOWN qlen 1 link/loopback 00:00:00:00:00:00 brd 00:00:00:00:00:00 inet 127.0.0.1/8 scope host lo valid_lft forever preferred_lft forever2: eth0: <BROADCAST,MULTICAST,UP,LOWER_UP> mtu 1500 qdisc pfifo_fast state UP qlen 1000 link/ether 00:16:3e:02:b6:46 brd ff:ff:ff:ff:ff:ff inet 172.18.61.250/20 brd 172.18.63.255 scope global eth0 valid_lft forever preferred_lft forever6. 网络可达性检查 - ping。 [root ~]# ping www.baidu.com -c 3PING www.a.shifen.com (220.181.111.188) 56(84) bytes of data.64 bytes from 220.181.111.188 (220.181.111.188): icmp_seq=1 ttl=51 time=36.3 ms64 bytes from 220.181.111.188 (220.181.111.188): icmp_seq=2 ttl=51 time=36.4 ms64 bytes from 220.181.111.188 (220.181.111.188): icmp_seq=3 ttl=51 time=36.4 ms--- www.a.shifen.com ping statistics ---3 packets transmitted, 3 received, 0% packet loss, time 2002msrtt min/avg/max/mdev = 36.392/36.406/36.427/0.156 ms7. 显示或管理路由表 - route。 8. 查看网络服务和端口 - netstat / ss。 [root ~]# netstat -nap | grep nginx9. 网络监听抓包 - tcpdump。 10. 安全文件拷贝 - scp。
[root ~]# scp root@1.2.3.4:/root/guido.jpg hellokitty@4.3.2.1:/home/hellokitty/pic.jpg11. 文件同步工具 - rsync。 说明:使用
rsync可以实现文件的自动同步,这个对于文件服务器来说相当重要。关于这个命令的用法,我们在后面讲项目部署的时候为大家详细说明。12. 安全文件传输 - sftp。 [root ~]# sftp root@1.2.3.4root@1.2.3.4's password:Connected to 1.2.3.4.sftp>• help:显示帮助信息。• ls/lls:显示远端/本地目录列表。• cd/lcd:切换远端/本地路径。• mkdir/lmkdir:创建远端/本地目录。• pwd/lpwd:显示远端/本地当前工作目录。• get:下载文件。• put:上传文件。• rm:删除远端文件。• bye/exit/quit:退出sftp。
十二、进程管理
1. 查看进程 - ps。 [root ~]# ps -efUID PID PPID C STIME TTY TIME CMDroot 1 0 0 Jun23 ? 00:00:05 /usr/lib/systemd/systemd --switched-root --system --deserialize 21root 2 0 0 Jun23 ? 00:00:00 [kthreadd]...[root ~]# ps -ef | grep mysqldroot 4943 4581 0 22:45 pts/0 00:00:00 grep --color=auto mysqldmysql 25257 1 0 Jun25 ? 00:00:39 /usr/sbin/mysqld --daemonize --pid-file=/var/run/mysqld/mysqld.pid2. 显示进程状态树 - pstree。 [root ~]# pstreesystemd─┬─AliYunDun───18*[{AliYunDun}] ├─AliYunDunUpdate───3*[{AliYunDunUpdate}] ├─2*[agetty] ├─aliyun-service───2*[{aliyun-service}] ├─atd ├─auditd───{auditd} ├─dbus-daemon ├─dhclient ├─irqbalance ├─lvmetad ├─mysqld───28*[{mysqld}] ├─nginx───2*[nginx] ├─ntpd ├─polkitd───6*[{polkitd}] ├─rsyslogd───2*[{rsyslogd}] ├─sshd───sshd───bash───pstree ├─systemd-journal ├─systemd-logind ├─systemd-udevd └─tuned───4*[{tuned}]3. 查找与指定条件匹配的进程 - pgrep。 [root ~]$ pgrep mysqld35844. 通过进程号终止进程 - kill。 [root ~]$ kill -l 1) SIGHUP 2) SIGINT 3) SIGQUIT 4) SIGILL 5) SIGTRAP 6) SIGABRT 7) SIGBUS 8) SIGFPE 9) SIGKILL 10) SIGUSR111) SIGSEGV 12) SIGUSR2 13) SIGPIPE 14) SIGALRM 15) SIGTERM16) SIGSTKFLT 17) SIGCHLD 18) SIGCONT 19) SIGSTOP 20) SIGTSTP21) SIGTTIN 22) SIGTTOU 23) SIGURG 24) SIGXCPU 25) SIGXFSZ26) SIGVTALRM 27) SIGPROF 28) SIGWINCH 29) SIGIO 30) SIGPWR31) SIGSYS 34) SIGRTMIN 35) SIGRTMIN+1 36) SIGRTMIN+2 37) SIGRTMIN+338) SIGRTMIN+4 39) SIGRTMIN+5 40) SIGRTMIN+6 41) SIGRTMIN+7 42) SIGRTMIN+843) SIGRTMIN+9 44) SIGRTMIN+10 45) SIGRTMIN+11 46) SIGRTMIN+12 47) SIGRTMIN+1348) SIGRTMIN+14 49) SIGRTMIN+15 50) SIGRTMAX-14 51) SIGRTMAX-13 52) SIGRTMAX-1253) SIGRTMAX-11 54) SIGRTMAX-10 55) SIGRTMAX-9 56) SIGRTMAX-8 57) SIGRTMAX-758) SIGRTMAX-6 59) SIGRTMAX-5 60) SIGRTMAX-4 61) SIGRTMAX-3 62) SIGRTMAX-263) SIGRTMAX-1 64) SIGRTMAX[root ~]# kill 1234[root ~]# kill -9 12345. 通过进程名终止进程 - killall / pkill。 结束名为mysqld的进程。
结束hellokitty用户的所有进程。[root ~]# pkill mysqld[root ~]# pkill -u hellokitty说明:这样的操作会让hellokitty用户和服务器断开连接。
6. 将进程置于后台运行。 [root ~]# mongod &[root ~]# redis-server...^Z[4]+ Stopped redis-server• Ctrl+Z- 快捷键,用于停止进程并置于后台。• &- 将进程置于后台运行。7. 查询后台进程 - jobs。 [root ~]# jobs[2] Running mongod &[3]- Stopped cat[4]+ Stopped redis-server8. 让进程在后台继续运行 - bg。 [root ~]# bg %4[4]+ redis-server &[root ~]# jobs[2] Running mongod &[3]+ Stopped cat[4]- Running redis-server &9. 将后台进程置于前台 - fg。 [root ~]# fg %4redis-server说明:置于前台的进程可以使用
Ctrl+C来终止它。10. 调整程序/进程运行时优先级 - nice / renice。 11. 用户登出后进程继续工作 - nohup。 [root ~]# nohup ping www.baidu.com > result.txt &12. 跟踪进程系统调用情况 - strace。 [root ~]# pgrep mysqld8803[root ~]# strace -c -p 8803strace: Process 8803 attached^Cstrace: Process 8803 detached% time seconds usecs/call calls errors syscall------ ----------- ----------- --------- --------- ---------------- 99.18 0.005719 5719 1 restart_syscall 0.49 0.000028 28 1 mprotect 0.24 0.000014 14 1 clone 0.05 0.000003 3 1 mmap 0.03 0.000002 2 1 accept------ ----------- ----------- --------- --------- ----------------100.00 0.005766 5 total说明:这个命令的用法和参数都比较复杂,建议大家在真正用到这个命令的时候再根据实际需要进行了解。
13. 查看当前运行级别 - runlevel。 [root ~]# runlevelN 314. 实时监控进程占用资源状况 - top。 [root ~]# toptop - 23:04:23 up 3 days, 14:10, 1 user, load average: 0.00, 0.01, 0.05Tasks: 65 total, 1 running, 64 sleeping, 0 stopped, 0 zombie%Cpu(s): 0.3 us, 0.3 sy, 0.0 ni, 99.3 id, 0.0 wa, 0.0 hi, 0.0 si, 0.0 stKiB Mem : 1016168 total, 191060 free, 324700 used, 500408 buff/cacheKiB Swap: 0 total, 0 free, 0 used. 530944 avail Mem...• -c- 显示进程的整个路径。• -d- 指定两次刷屏之间的间隔时间(秒为单位)。• -i- 不显示闲置进程或僵尸进程。• -p- 显示指定进程的信息。
十三、系统诊断
1. 系统启动异常诊断 - dmesg。 2. 查看系统活动信息 - sar。 [root ~]# sar -u -r 5 10Linux 3.10.0-957.10.1.el7.x86_64 (izwz97tbgo9lkabnat2lo8z) 06/02/2019 _x86_64_ (2 CPU)06:48:30 PM CPU %user %nice %system %iowait %steal %idle06:48:35 PM all 0.10 0.00 0.10 0.00 0.00 99.8006:48:30 PM kbmemfree kbmemused %memused kbbuffers kbcached kbcommit %commit kbactive kbinact kbdirty06:48:35 PM 1772012 2108392 54.33 102816 1634528 784940 20.23 793328 1164704 0• -A- 显示所有设备(CPU、内存、磁盘)的运行状况。• -u- 显示所有CPU的负载情况。• -d- 显示所有磁盘的使用情况。• -r- 显示内存的使用情况。• -n- 显示网络运行状态。3. 查看内存使用情况 - free。 [root ~]# free total used free shared buff/cache availableMem: 1016168 323924 190452 356 501792 531800Swap: 0 0 04. 虚拟内存统计 - vmstat。 [root ~]# vmstatprocs -----------memory---------- ---swap-- -----io---- -system-- ------cpu----- r b swpd free buff cache si so bi bo in cs us sy id wa st 2 0 0 204020 79036 667532 0 0 5 18 101 58 1 0 99 0 05. CPU信息统计 - mpstat。 [root ~]# mpstatLinux 3.10.0-957.5.1.el7.x86_64 (iZ8vba0s66jjlfmo601w4xZ) 05/30/2019 _x86_64_ (1 CPU)01:51:54 AM CPU %usr %nice %sys %iowait %irq %soft %steal %guest %gnice %idle01:51:54 AM all 0.71 0.00 0.17 0.04 0.00 0.00 0.00 0.00 0.00 99.076. 查看进程使用内存状况 - pmap。 [root ~]# ps PID TTY TIME CMD 4581 pts/0 00:00:00 bash 5664 pts/0 00:00:00 ps[root ~]# pmap 45814581: -bash0000000000400000 884K r-x-- bash00000000006dc000 4K r---- bash00000000006dd000 36K rw--- bash00000000006e6000 24K rw--- [ anon ]0000000001de0000 400K rw--- [ anon ]00007f82fe805000 48K r-x-- libnss_files-2.17.so00007f82fe811000 2044K ----- libnss_files-2.17.so...7. 报告设备CPU和I/O统计信息 - iostat。 [root ~]# iostatLinux 3.10.0-693.11.1.el7.x86_64 (iZwz97tbgo9lkabnat2lo8Z) 06/26/2018 _x86_64_ (1 CPU)avg-cpu: %user %nice %system %iowait %steal %idle 0.79 0.00 0.20 0.04 0.00 98.97Device: tps kB_read/s kB_wrtn/s kB_read kB_wrtnvda 0.85 6.78 21.32 2106565 6623024vdb 0.00 0.01 0.00 2088 08. 显示所有PCI设备 - lspci。 [root ~]# lspci00:00.0 Host bridge: Intel Corporation 440FX - 82441FX PMC [Natoma] (rev 02)00:01.0 ISA bridge: Intel Corporation 82371SB PIIX3 ISA [Natoma/Triton II]00:01.1 IDE interface: Intel Corporation 82371SB PIIX3 IDE [Natoma/Triton II]00:01.2 USB controller: Intel Corporation 82371SB PIIX3 USB [Natoma/Triton II] (rev 01)00:01.3 Bridge: Intel Corporation 82371AB/EB/MB PIIX4 ACPI (rev 03)00:02.0 VGA compatible controller: Cirrus Logic GD 544600:03.0 Ethernet controller: Red Hat, Inc. Virtio network device00:04.0 Communication controller: Red Hat, Inc. Virtio console00:05.0 SCSI storage controller: Red Hat, Inc. Virtio block device00:06.0 SCSI storage controller: Red Hat, Inc. Virtio block device00:07.0 Unclassified device [00ff]: Red Hat, Inc. Virtio memory balloon9. 显示进程间通信设施的状态 - ipcs。 [root ~]# ipcs------ Message Queues --------key msqid owner perms used-bytes messages ------ Shared Memory Segments --------key shmid owner perms bytes nattch status ------ Semaphore Arrays --------key semid owner perms nsems
十四、Shell 编程入门
Shell 脚本用于自动化运维、批量处理、系统管理,是 Linux 必备技能。
示例 1:m~n 求和
#!/usr/bin/bashprintf 'm = 'read mprintf 'n = 'read na=$msum=0while [ $a -le $n ]do sum=$[ sum + a ] a=$[ a + 1 ]doneecho '结果: '$sum示例 2:批量创建文件
#!/usr/bin/bashprintf '输入文件夹名: 'read dirprintf '输入文件名: 'read fileprintf '输入文件数量(<1000): 'read numif [ $num -ge 1000 ]the if [ $index -lt 10 ] then pre='00' elif [ $index -lt 100 ] then pre='0' else pre='' fi touch $dir'/'$file'_'$pre$index index=$[ index + 1 ] donefi例子3:自动安装指定版本的Redis。
#!/usr/bin/bashinstall_redis() { if ! which redis-server > /dev/null then cd /root wget $1$2'.tar.gz' >> install.log gunzip /root/$2'.tar.gz' tar -xf /root/$2'.tar' cd /root/$2 make >> install.log make install >> install.log echo '安装完成' else echo '已经安装过Redis' fi}install_redis 'http://download.redis.io/releases/' $1十五、相关资源
1. Linux命令行常用快捷键
Tab:自动补全Ctrl+a:行首Ctrl+e:行尾Ctrl+c:中断Ctrl+d:退出Ctrl+z:挂起后台Ctrl+r:搜索历史!!:执行上一条!数字:执行历史编号!$:上一条最后参数
2. man查阅命令手册的内容说明
NAME:命令名称与简介SYNOPSIS:用法格式DESCRIPTION:详细说明OPTIONS:参数EXAMPLES:示例SEE ALSO:相关命令
国内直接使用顶级AI工具
谷歌浏览器访问:https://www.nezhasoft.cloud/r/vMPJZr