1. dlib简介
dlib并不是一个纯粹的“深度学习库”,而是一个功能强大、通用的 C++ 机器学习与数据处理工具包(toolkit),它同时提供了Python接口。虽然dlib支持深度学习(特别是卷积神经网络 CNN),但它远不止于此——它还包含大量经典机器学习算法、图像处理工具、优化方法、线性代数、GUI 工具等。
我们在github上可以看到它的描述是:"A toolkit for making real world machine learning and data analysis applications in C++." 这说明dlib的目标是帮助开发者构建实际可用的机器学习和数据分析应用,强调工程实用性,而非仅限于研究或原型。
最新版本是2025.05.28发布的20.0.
编程语言采用C++编写,性能高。同时提供Python绑定,使用方便,社区广泛采用。
本文将采用python接口实践dlib的人脸识别功能。
2. dlib主要特性
机器学习:支持SVM、kNN、决策树、随机森林、AdaBoost、线性回归等传统ML算法。
优化算法:提供高效的数值优化器(如L-BFGS),用于训练模型参数。
图像处理:包括图像变换、特征提取、HOG(方向梯度直方图)等。
深度学习支持:从dlib 19.0开始引入了基于 CPU 的CNN框架,支持自定义网络结构、训练和推理。
人脸相关工具:这是 dlib 最著名的应用场景之一,包括:人脸检测(基于 HOG + SVM 或 CNN)、关键点检测(68 点/5 点人脸关键点)以及人脸识别(通过计算人脸嵌入向量 / face embedding)。
3. dlib python安装
如果足够幸运,直接pip install就可以,整个流程是先下载源码然后编译安装,需要一些等待时间。
pip install dlib
Defaulting to user installation because normal site-packages is not writeable
Collecting dlib
  Downloading dlib-20.0.0.tar.gz (3.3 MB)
     ━━━━━━━━━━━━━━━━━━━━━━━━━━━━━━━━━━━━━━━━ 3.3/3.3 MB 67.2 kB/s eta 0:00:00
  Installing build dependencies ... done
  Getting requirements to build wheel ... done
  Preparing metadata (pyproject.toml) ... done
Building wheels for collected packages: dlib
  Building wheel for dlib (pyproject.toml) ... done
  Created wheel for dlib: filename=dlib-20.0.0-cp38-cp38-win_amd64.whl size=2889309 sha256=56e563a401afc72b1b8
  Stored in directory: c:\users\appdata\local\pip\cache\wheels\81\22\d1\c303b7964c
Successfully built dlib
Installing collected packages: dlib
Successfully installed dlib-20.0.0
安装完成后,做个测试:
import dlib
print(dlib.__version__)
# 应输出版本号,如 '20.0.0'
4. 模型
所有官方预训练模型均由dlib作者Davis King托管在 dlib.net 网站上: 🔗 https://dlib.net/files/这是最权威、最安全的来源。
常用的模型文件地址我整理好了,如下表:
| | | |
|---|
| 68 点人脸关键点检测器 | shape_predictor_68_face_landmarks.dat | | https://dlib.net/files/shape_predictor_68_face_landmarks.dat.bz2 |
| 5 点人脸关键点检测器(更快) | shape_predictor_5_face_landmarks.dat | | https://dlib.net/files/shape_predictor_5_face_landmarks.dat.bz2 |
| 基于 CNN 的人脸检测器(MMOD) | mmod_human_face_detector.dat | | https://dlib.net/files/mmod_human_face_detector.dat.bz2 |
| 人脸识别 ResNet 嵌入模型(128D) | dlib_face_recognition_resnet_model_v1.dat | | https://dlib.net/files/dlib_face_recognition_resnet_model_v1.dat.bz2 |
5. 人脸识别
前文中提到,人脸识别场景包含以下步骤:人脸检测 → 关键点对齐 → 特征提取(嵌入)→ 相似度比对。dlib在每一步都提供了成熟工具。接下来我们逐个说明。
5.1 人脸检测(Face Detection)
dlib 提供两种主流方法进行人脸检测:(a) HOG + Linear SVM(默认、轻量级)基于方向梯度直方图(HOG)特征 + 线性支持向量机(SVM) 分类器。它的速度快,适合CPU实时应用。对正脸效果好,侧脸或遮挡下性能下降。 使用方法dlib.get_frontal_face_detector()直接获取。
原型
detector = dlib.get_frontal_face_detector()
# 返回一个 callable 对象(可直接调用)
输入
image: 一个 8-bit 灰度图像(NumPy array 或 dlib matrix),形状为 (height, width)。upsample_num_times=0: 可选参数,表示将图像放大多少次再检测(提高小脸检出率,但耗时增加)。
输出
- 返回
dlib.rectangle 对象列表,每个 rectangle 有 .left(), .top(), .right(), .bottom() 方法。 - 每个 rectangle 表示一个检测到的人脸边界框。
举个栗子
import dlib
import cv2
detector = dlib.get_frontal_face_detector()
img = cv2.imread("test.png")
gray = cv2.cvtColor(img, cv2.COLOR_BGR2GRAY)

faces = detector(gray, upsample_num_times=1)  # 放大1倍检测小脸

for face in faces:
    x1, y1, x2, y2 = face.left(), face.top(), face.right(), face.bottom()
    print(f"人脸位置: ({x1}, {y1}) - ({x2}, {y2})")
    cv2.rectangle(img, (face.left(), face.top()), (face.right(), face.bottom()), (0, 255, 0), 2)

cv2.imshow("Detection", img)
cv2.waitKey(0)
cv2.destroyAllWindows()
结果如下: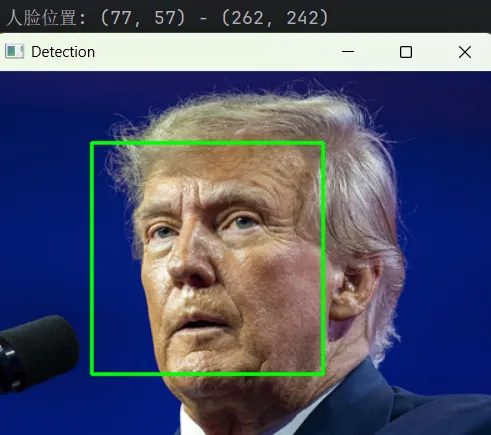
(b) CNN 人脸检测器(更准确但较慢)基于一个小型CNN模型(MMOD:Max-Margin Object Detection)。 需要下载预训练模型,如上节中的mmod_human_face_detector.dat模型。对姿态、光照、遮挡鲁棒性更强。 使用dlib.cnn_face_detection_model_v1("mmod...")调用。
这是dlib提供的一个基于深度卷积神经网络(CNN)的人脸检测器,用于在图像中高精度地定位人脸区域。它使用的是dlib自研的MMOD(Max-Margin Object Detection) 框架训练的模型。 MMOD是dlib Davis King提出的一种基于最大间隔学习的目标检测方法。
原型
cnn_detector = dlib.cnn_face_detection_model_v1("mmod_human_face_detector.dat")
faces = cnn_detector(image, upsample_num_times=N)
输入
图像格式:8-bit 单通道灰度图像(numpy.ndarray,shape: (H, W))。
输出
返回一个 list[dlib.mmod_rect],每个元素包含:
| | |
|---|
.rect | dlib.rectangle | 人脸边界框,有 .left(), .top(), .right(), .bottom() |
.confidence | float | 检测置信度(越大越可靠,通常 > 0 表示有效检测) |
举个栗子
import dlib
import cv2

# 加载 CNN 人脸检测器
cnn_detector = dlib.cnn_face_detection_model_v1("mmod_human_face_detector.dat")

# 读取图像
img = cv2.imread("test.png")
if img isNone:
raise FileNotFoundError("无法读取图像 test.png,请检查路径!")

gray = cv2.cvtColor(img, cv2.COLOR_BGR2GRAY)

# 使用 CNN 检测人脸(放大1倍以检测小脸)
faces = cnn_detector(gray, upsample_num_times=1)

print(f"检测到 {len(faces)} 张人脸")

for face in faces:
    rect = face.rect
    x1, y1 = rect.left(), rect.top()
    x2, y2 = rect.right(), rect.bottom()

    print(f"人脸位置: ({x1}, {y1}) - ({x2}, {y2}) | 置信度: {face.confidence:.2f}")

# 绘制矩形框
    cv2.rectangle(img, (x1, y1), (x2, y2), (0, 255, 0), 2)

# 显示结果
cv2.imshow("CNN Face Detection", img)
cv2.waitKey(0)
cv2.destroyAllWindows()
推理速度有点小慢,请各位看官注意。效果如下: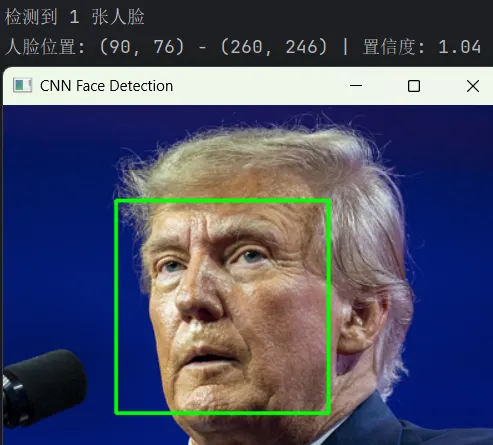
5.2 人脸关键点检测(Facial Landmark Detection)
dlib的68个关键点模型算法Ensemble of Regression Trees(ERT) 方法基于论文One Millisecond Face Alignment with an Ensemble of Regression Trees,研究算法的读者可以研习论文,为以后的算法强者打下坚实基础。 模型文件就是上面提到的shape_predictor_68_face_landmarks.dat,想必你已经下载好了。 它通过级联回归树,从初始估计(如人脸框中心)逐步优化关键点位置。优势是速度快(<1ms/face)、精度高,适合实时应用。
相关函数dlib.shape_predictor
该函数加载一个预训练的 人脸关键点检测模型,用于在给定人脸区域(rectangle)内精确定位 68 个面部特征点。
了解一下68个关键点分布
函数原型
shape_predictor = dlib.shape_predictor(model_path)
# model_path: str,指向 .dat 模型文件
输入
image: 同样为 8-bit 灰度图像(与 detector 输入一致)。face_rectangle: 一个 dlib.rectangle 对象(通常来自 detector 的输出)。
输出
- 返回
dlib.full_object_detection 对象,包含 68 个点。 - 可通过
.part(i) 获取第 i 个点(i=0..67),每个点有 .x, .y 属性。
举个栗子
import dlib
import cv2

detector = dlib.get_frontal_face_detector()
shapePredictor = dlib.shape_predictor("shape_predictor_68_face_landmarks.dat")

img = cv2.imread("test.png")
gray = cv2.cvtColor(img, cv2.COLOR_BGR2GRAY)

faces = detector(gray, upsample_num_times=1)  # 放大1倍检测小脸

for face in faces:
    x1, y1, x2, y2 = face.left(), face.top(), face.right(), face.bottom()
    print(f"人脸位置: ({x1}, {y1}) - ({x2}, {y2})")
    cv2.rectangle(img, (face.left(), face.top()), (face.right(), face.bottom()), (0, 255, 0), 2)

shape = shapePredictor(gray, faces[0])  # 对第一个检测到的人脸提取关键点
# 打印鼻尖坐标(第30个点)
nose_tip = shape.part(30)
print(f"鼻尖: ({nose_tip.x}, {nose_tip.y})")

# 可视化所有点
for i in range(68):
    x, y = shape.part(i).x, shape.part(i).y
    cv2.circle(img, (x, y), 2, (0, 255, 0), -1)

cv2.imshow("Detection", img)
cv2.waitKey(0)
cv2.destroyAllWindows()
效果如下: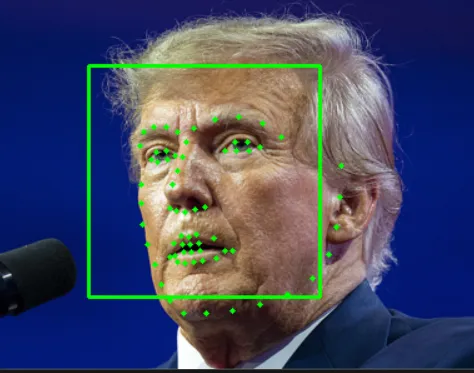
5.3 人脸识别(Face Recognition / Verification)
dlib的核心创新之一是其人脸嵌入(face embedding)模型:它使用一个ResNet-style的CNN将人脸图像映射为128维向量。该向量具有同一人的不同照片嵌入距离小,不同人则距离大的性质。 模型文件为上面提到的dlib_face_recognition_resnet_model_v1.dat,想必你也下载好了。
相关函数
faceRecognition = dlib.face_recognition_model_v1("dlib_face_recognition_resnet_model_v1.dat")这是加载一个深度卷积神经网络(CNN)模型,将对齐后的人脸图像映射为 128 维特征向量(embedding),用于人脸识别或验证。
函数原型
face_rec = dlib.face_recognition_model_v1(model_path)
compute_face_descriptor()
descriptor = face_rec.compute_face_descriptor(image, shape, num_jitters=0)
image: RGB 图像(注意!不是灰度图,必须是 3 通道)shape: dlib.full_object_detection 对象(68 点关键点)num_jitters: 数据增强次数(对图像轻微扰动后取平均,提升鲁棒性,默认 0)
注意:image 必须是 RGB 格式(OpenCV 默认 BGR,需转换)!输出
- 返回
dlib.vector(可转为 NumPy array),长度为 128。 - 同一人不同照片的 embedding 距离通常 < 0.6(欧氏距离)。
举个栗子
# OpenCV 读取的是 BGR,需转 RGB
bgr_img = cv2.imread("face.jpg")
rgb_img = cv2.cvtColor(bgr_img, cv2.COLOR_BGR2RGB)

# 先检测人脸和关键点
faces = detector(rgb_img)
shape = shapePredictor(rgb_img, faces[0])

# 提取 embedding
embedding = faceRecognition.compute_face_descriptor(rgb_img, shape)
embedding_np = np.array(embedding)  # 转为 NumPy 数组便于计算
print("Embedding shape:", embedding_np.shape)  # (128,)
5.4 识别流程
- 将对齐后的人脸输入 ResNet 模型,得到 128D 向量;
6. 完整识别流程栗子
创建一个目录叫known_people,里面放几张人像模板,如下:
known_people
|__Musk.png
|__Obama.png
|__Trump.png
这几张人像会注册到我们的人脸库,然后用一张其他照片做识别,看看是哪个人。 根据上面的说,各位看官老爷自己可以尝试写一写。我的代码请参考:
import dlib
import cv2
import numpy as np
import os

# ----------------------------
# 1. 加载模型
# ----------------------------
detector = dlib.get_frontal_face_detector()  # HOG 人脸检测器
shapePredictor = dlib.shape_predictor("shape_predictor_68_face_landmarks.dat")  # 关键点
faceRecognition = dlib.face_recognition_model_v1("dlib_face_recognition_resnet_model_v1.dat")  # 人脸识别模型


# ----------------------------
# 2. 从图像中提取人脸嵌入向量
# ----------------------------
defget_face_embedding(image_path):
    img = cv2.imread(image_path)
if img isNone:
raise FileNotFoundError(f"无法读取图像: {image_path}")

    rgb_img = cv2.cvtColor(img, cv2.COLOR_BGR2RGB)
    dets = detector(rgb_img, 1)  # 1 表示图像放大1倍以检测小脸

if len(dets) == 0:
        print(f"未在 {image_path} 中检测到人脸")
returnNone

# 只处理第一张人脸(可扩展为多个人脸)
    shape = shapePredictor(rgb_img, dets[0])
    face_descriptor = faceRecognition.compute_face_descriptor(rgb_img, shape)
return np.array(face_descriptor)


# ----------------------------
# 3. 注册已知人脸
# ----------------------------
known_faces = {}
known_dir = "known_people"# 存放已知人物照片的文件夹(每人一张,文件名即姓名)

ifnot os.path.exists(known_dir):
    os.makedirs(known_dir)
    print(f"请将已知人物的照片放入 '{known_dir}' 文件夹,文件名如 'Alice.jpg'")

# 为每个已知人提取嵌入
for filename in os.listdir(known_dir):
if filename.lower().endswith(('.png', '.jpg', '.jpeg')):
        name = os.path.splitext(filename)[0]
        path = os.path.join(known_dir, filename)
        emb = get_face_embedding(path)
if emb isnotNone:
            known_faces[name] = emb
            print(f"注册人脸: {name}")


# ----------------------------
# 4. 识别新图像中的人脸
# ----------------------------
defrecognize_face(test_image_path, threshold=0.6):
    test_emb = get_face_embedding(test_image_path)
if test_emb isNone:
return"未检测到人脸"

    best_match = "未知"
    min_dist = float('inf')

for name, known_emb in known_faces.items():
        dist = np.linalg.norm(test_emb - known_emb)
        print(f"与 {name} 的距离: {dist:.4f}")
if dist < min_dist:
            min_dist = dist
            best_match = name

if min_dist < threshold:
returnf"{best_match} (相似度: {1 - min_dist:.2f})"
else:
return"未知人员"


# ----------------------------
# 5. 测试
# ----------------------------
test_image = "test.png"# 待识别图像
result = recognize_face(test_image)
print("\n识别结果:", result)

img = cv2.imread(test_image)
dets = detector(cv2.cvtColor(img, cv2.COLOR_BGR2RGB), 1)
for det in dets:
    cv2.rectangle(img, (det.left(), det.top()), (det.right(), det.bottom()), (0, 255, 0), 2)
cv2.imshow("Detection", img)
cv2.waitKey(0)
cv2.destroyAllWindows()
运行效果如下: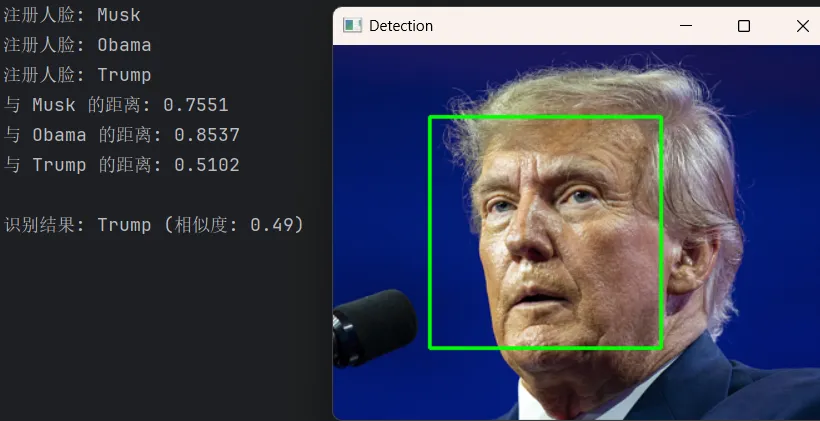
7. 最后
有了前面OpenCV旗下的人脸识别,很多场景是足够用了。技术人本着破除自己的信息茧房,还是多看看其他方案。所以就有了今天的dlib。
dlib的优点是能够开箱即用、跨平台、简单易用。 但是它也有一些缺点,比如速度较慢、模型不可微调等。 尽管它在大规模或高性能场景下可能被TensorFlow/PyTorch生态取代,但在中小型项目、教学、快速原型开发中,dlib依然是人脸识别领域的“瑞士军刀”。
模型我也放到云盘了,在公众号菜单中自行获取。
有什么需要讨论的,我们评论区见!
参考
1.ERT 集成回归树——Dlib库landmark算法解析
2.dlib.net
3.dlib github
#dlib #人脸识别 #人脸检测
 10个月宝宝每天需要喝多少奶粉?
