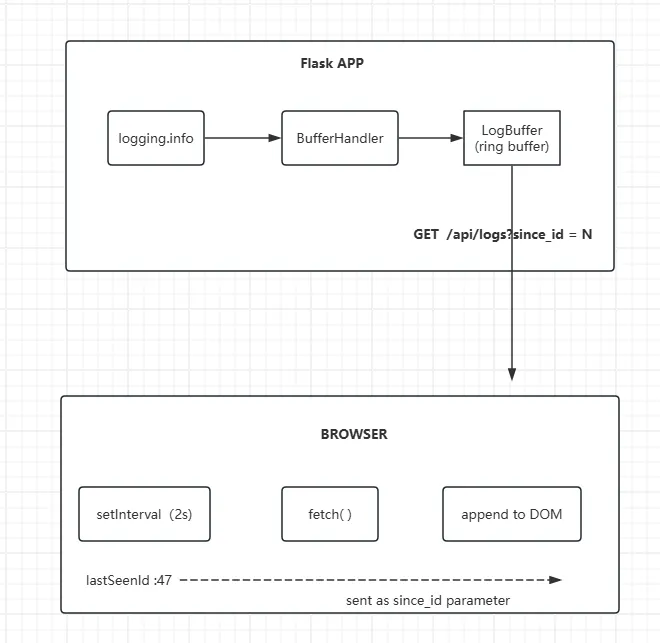
大家好,在前段时间我们演示了Flask的几个实战,今天我们再来给Flask项目的Web界面加一个实时日志控制台。具体实现过程大致如下:后端用环形缓冲区、简单的REST接口,前端用浏览器来轮询。客户端会记录最后一次的日志ID,每次只需要 请求比这个ID更新的日志,服务器不需要跟踪客户端状态。Flask会用多线程处理请求,所以缓冲区部分必须要保证线程安全,Python的deque设置maxlength后,天然就是个环形缓冲区,当队列满了,最旧的元素会自动被丢弃。import loggingfrom collections import dequefrom datetime import datetimeimport threadingclass LogBuffer: def __init__(self, max_size=500): self.buffer = deque(maxlen=max_size) self.lock = threading.Lock() self.last_id = 0 def add(self, level, message): with self.lock: self.last_id += 1 self.buffer.append({ 'id': self.last_id, 'time': datetime.now().strftime('%H:%M:%S'), 'level': level, 'message': message }) def get_logs(self, since_id=0): with self.lock: return [log for log in self.buffer if log['id'] > since_id] def clear(self): with self.lock: self.buffer.clear()log_buffer = LogBuffer(max_size=500)
这里要注意,即便清空缓冲区,last_id 也不会被重置,比如客户端记住了since_id = 47,而我们把计数器重置0,就会出问题,客户端一直请求大于47的日志,但是服务器却没有,这就会导致日志流中断。因此要保持计数器单调递增。接下来我们要自定义一个日志处理器,把日志消息推送到缓冲区class BufferHandler(logging.Handler): def __init__(self, log_buffer): super().__init__() self.log_buffer = log_buffer def emit(self, record): try: message = self.format(record) level = record.levelname.lower() # 映射到前端使用的CSS类名 level_map = { 'debug': 'info', 'info': 'info', 'warning': 'warning', 'error': 'error', 'critical': 'error' } self.log_buffer.add(level_map.get(level, 'info'), message) except Exception: self.handleError(record)
import loggingfrom log_buffer import log_buffer, BufferHandlerbuffer_handler = BufferHandler(log_buffer)buffer_handler.setFormatter(logging.Formatter('%(name)s - %(message)s'))logging.getLogger().addHandler(buffer_handler)
如此一来,任何地方用logger.info ,日志都会被放入缓冲区。from flask import Blueprint, request, jsonifyfrom log_buffer import log_bufferapi = Blueprint('api', __name__)@api.route('/api/get-server-logs')def get_server_logs(): since_id = request.args.get('since_id', 0, type=int) logs = log_buffer.get_logs(since_id) return jsonify({'success': True, 'logs': logs})@api.route('/api/clear-server-logs', methods=['POST'])def clear_server_logs(): log_buffer.clear() return jsonify({'success': True})
let lastServerLogId = 0;let pollingInterval = null;async function fetchServerLogs() { try { const response = await fetch( `/api/get-server-logs?since_id=${lastServerLogId}` ); const data = await response.json(); if (data.success && data.logs.length > 0) { data.logs.forEach(log => { appendLogEntry(log); lastServerLogId = Math.max(lastServerLogId, log.id); }); } } catch (err) { console.error('Log fetch failed:', err); }}function appendLogEntry(log) { const container = document.getElementById('logConsole'); const div = document.createElement('div'); div.className = 'log-entry ' + log.level; div.textContent = '[' + log.time + '] ' + log.message; container.insertBefore(div, container.firstChild); // 限制DOM元素数量,和后端缓冲区保持一致 while (container.children.length > 500) { container.removeChild(container.lastChild); }}function startPolling() { if (!pollingInterval) { fetchServerLogs(); pollingInterval = setInterval(fetchServerLogs, 2000); }}function stopPolling() { if (pollingInterval) { clearInterval(pollingInterval); pollingInterval = null; }}// 标签页隐藏时暂停轮询,显示时恢复document.addEventListener('visibilitychange', () => { document.hidden ? stopPolling() : startPolling();});document.addEventListener('DOMContentLoaded', startPolling);
<divclass="log-console-wrapper"> <divclass="log-header"> <span>Server Logs</span> <buttononclick="clearLogs()">Clear</button> </div> <divid="logConsole"class="log-console"></div></div>
.log-console { background: #1e1e1e; color: #d4d4d4; font-family: Consolas, Monaco, monospace; font-size: 12px; padding: 10px; height: 300px; overflow-y: auto; border-radius: 4px;}.log-entry { padding: 2px 0; border-bottom: 1px solid #333;}.log-entry.warning { color: #dcdcaa; }.log-entry.error { color: #f48771; }
基本代码逻辑之后,还要有一个权衡点,例如轮询间隔使用2秒,既能即使更新,也不会太抢占资源。另外就是缓冲区的大小控制,不要占用太多内存。需要注意的是我们没有做持久化,因此只能看实时的日志,服务重启后日志会丢失。总之,有兴趣的话,可以参考这个程序来自己实现一次。