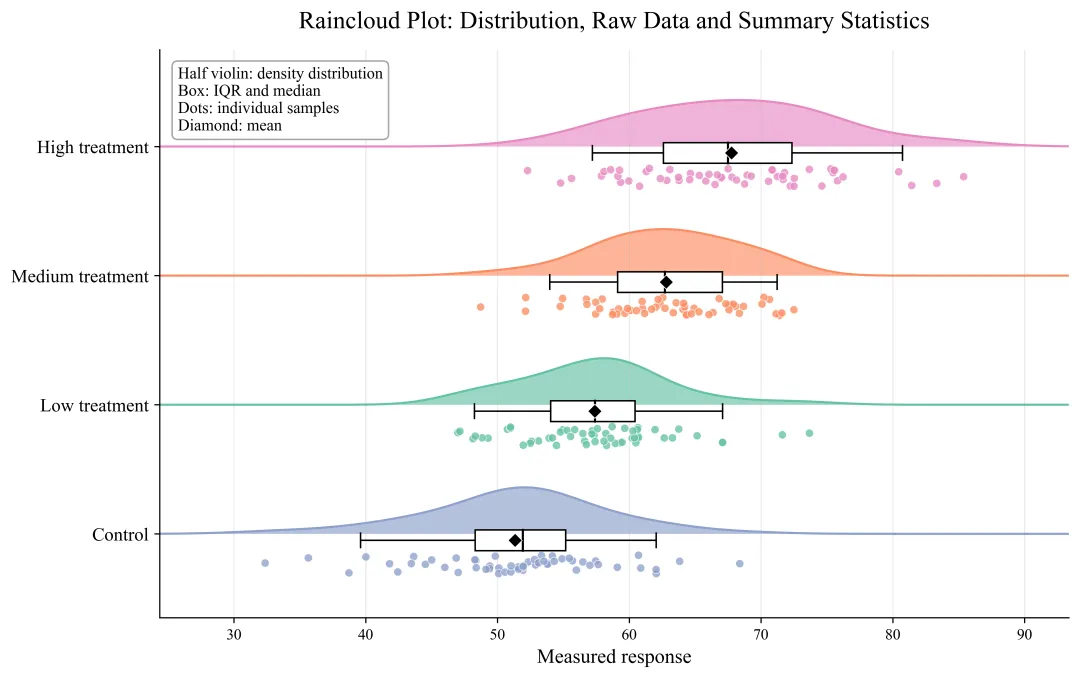
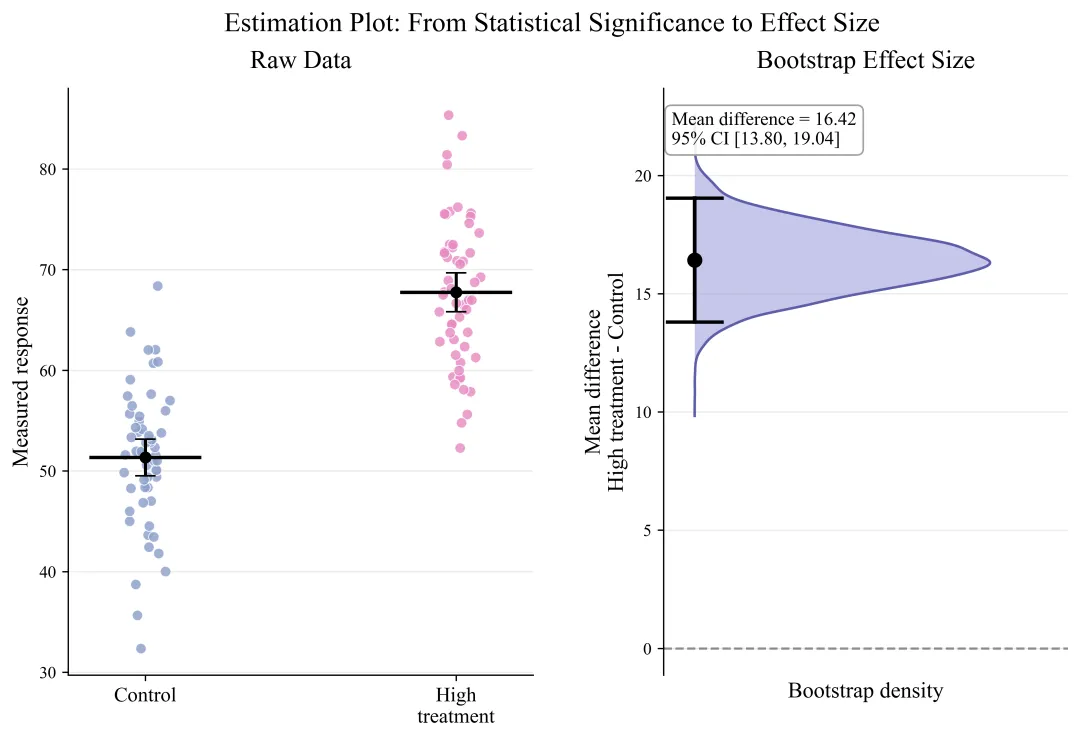
import osimport numpy as npimport matplotlib.pyplot as pltfrom matplotlib.patches import Rectanglefrom matplotlib.gridspec import GridSpecnp.random.seed(2026)plt.rcParams["font.family"] = "Times New Roman"plt.rcParams["axes.unicode_minus"] = Falseplt.rcParams["figure.dpi"] = 160plt.rcParams["savefig.dpi"] = 600out_dir = "python_statistics_advanced_figures"os.makedirs(out_dir, exist_ok=True)# 1. 随机生成科研分组数据# 假设这是不同处理条件下的材料强度、位移响应、模型误差等n = 55control = np.random.normal(loc=52, scale=6.0, size=n)group_a = np.random.normal(loc=56, scale=6.5, size=n)group_b = ( np.random.normal(loc=61, scale=6.3, size=n) + np.random.gamma(shape=1.5, scale=1.2, size=n) * 0.6)group_c = ( np.random.normal(loc=66, scale=7.0, size=n) + np.random.gamma(shape=2.0, scale=1.5, size=n) * 0.8)groups = [control, group_a, group_b, group_c]group_names = ["Control", "Low treatment", "Medium treatment", "High treatment"]colors = ["#8DA0CB", "#66C2A5", "#FC8D62", "#E78AC3"]# 2. 手写一个简单的一维 KDE,避免依赖 scipydef kde_1d(data, grid, bandwidth=None): data = np.asarray(data) data = data[np.isfinite(data)] n = len(data) std = np.std(data, ddof=1) if bandwidth is None: bandwidth = 1.06 * std * n ** (-1 / 5) if bandwidth <= 1e-8: bandwidth = 1.0 diff = (grid[:, None] - data[None, :]) / bandwidth density = np.exp(-0.5 * diff ** 2).mean(axis=1) density = density / (bandwidth * np.sqrt(2 * np.pi)) return density# 3. 图1:雨云图 Raincloud Plot# 半小提琴 + 箱线 + 原始散点def draw_raincloud_plot(groups, group_names, colors): all_data = np.concatenate(groups) x_min = np.min(all_data) - 8 x_max = np.max(all_data) + 8 fig, ax = plt.subplots(figsize=(9.8, 6.2)) for i, data in enumerate(groups): y0 = i # KDE 半小提琴 grid = np.linspace(x_min, x_max, 500) density = kde_1d(data, grid) density = density / density.max() * 0.36 ax.fill_between( grid, y0, y0 + density, color=colors[i], alpha=0.65, linewidth=0 ) ax.plot( grid, y0 + density, color=colors[i], linewidth=1.4 ) # 原始散点 jitter = np.random.uniform(-0.075, 0.075, size=len(data)) y_scatter = y0 - 0.24 + jitter ax.scatter( data, y_scatter, s=28, color=colors[i], edgecolor="white", linewidth=0.45, alpha=0.78, zorder=4 ) # 箱线统计 q1, q2, q3 = np.percentile(data, [25, 50, 75]) p5, p95 = np.percentile(data, [5, 95]) mean_val = np.mean(data) box_y = y0 - 0.05 box_h = 0.16 # 箱体 rect = Rectangle( (q1, box_y - box_h / 2), q3 - q1, box_h, facecolor="white", edgecolor="black", linewidth=1.0, zorder=5 ) ax.add_patch(rect) # 中位数 ax.plot( [q2, q2], [box_y - box_h / 2, box_y + box_h / 2], color="black", linewidth=1.4, zorder=6 ) # 5%–95% whisker ax.plot( [p5, q1], [box_y, box_y], color="black", linewidth=1.0, zorder=5 ) ax.plot( [q3, p95], [box_y, box_y], color="black", linewidth=1.0, zorder=5 ) ax.plot( [p5, p5], [box_y - box_h * 0.35, box_y + box_h * 0.35], color="black", linewidth=1.0, zorder=5 ) ax.plot( [p95, p95], [box_y - box_h * 0.35, box_y + box_h * 0.35], color="black", linewidth=1.0, zorder=5 ) # 均值点 ax.scatter( mean_val, box_y, s=42, marker="D", color="black", edgecolor="white", linewidth=0.5, zorder=7 ) ax.set_yticks(np.arange(len(group_names))) ax.set_yticklabels(group_names, fontsize=12) ax.set_xlabel("Measured response", fontsize=13) ax.set_title( "Raincloud Plot: Distribution, Raw Data and Summary Statistics", fontsize=16, pad=14 ) ax.grid(axis="x", alpha=0.25) ax.set_xlim(x_min, x_max) ax.set_ylim(-0.65, len(groups) - 0.25) ax.spines["top"].set_visible(False) ax.spines["right"].set_visible(False) ax.text( 0.02, 0.97, "Half violin: density distribution\nBox: IQR and median\nDots: individual samples\nDiamond: mean", transform=ax.transAxes, ha="left", va="top", fontsize=10.5, bbox=dict( boxstyle="round,pad=0.35", facecolor="white", edgecolor="#999999", alpha=0.88 ) ) plt.tight_layout() plt.savefig( os.path.join(out_dir, "01_raincloud_plot.png"), bbox_inches="tight", facecolor="white" )draw_raincloud_plot(groups, group_names, colors)# 4. 图2:效应量估计图 Estimation Plot# 左侧:原始数据# 右侧:bootstrap 均值差分布def bootstrap_mean_difference(x, y, n_boot=6000): """ bootstrap 计算两组均值差:mean(y) - mean(x) """ x = np.asarray(x) y = np.asarray(y) boot_diff = np.zeros(n_boot) for i in range(n_boot): xb = np.random.choice(x, size=len(x), replace=True) yb = np.random.choice(y, size=len(y), replace=True) boot_diff[i] = np.mean(yb) - np.mean(xb) return boot_diffdef draw_estimation_plot(control, treatment): boot_diff = bootstrap_mean_difference(control, treatment, n_boot=6000) observed_diff = np.mean(treatment) - np.mean(control) ci_low, ci_high = np.percentile(boot_diff, [2.5, 97.5]) fig = plt.figure(figsize=(10.5, 6.2)) gs = GridSpec( 1, 2, width_ratios=[1.15, 1.0], wspace=0.30 ) ax_raw = fig.add_subplot(gs[0, 0]) ax_eff = fig.add_subplot(gs[0, 1]) # 左侧:原始数据 x0 = np.random.normal(loc=0, scale=0.035, size=len(control)) x1 = np.random.normal(loc=1, scale=0.035, size=len(treatment)) ax_raw.scatter( x0, control, s=38, color="#8DA0CB", edgecolor="white", linewidth=0.55, alpha=0.82, label="Control" ) ax_raw.scatter( x1, treatment, s=38, color="#E78AC3", edgecolor="white", linewidth=0.55, alpha=0.82, label="High treatment" ) # 均值与95% CI for xpos, data, color in zip([0, 1], [control, treatment], ["#8DA0CB", "#E78AC3"]): mean_val = np.mean(data) se = np.std(data, ddof=1) / np.sqrt(len(data)) ci = 1.96 * se ax_raw.errorbar( xpos, mean_val, yerr=ci, fmt="o", color="black", ecolor="black", elinewidth=1.8, capsize=6, markersize=6, zorder=6 ) ax_raw.hlines( mean_val, xpos - 0.18, xpos + 0.18, color="black", linewidth=2.0, zorder=5 ) ax_raw.set_xticks([0, 1]) ax_raw.set_xticklabels(["Control", "High\ntreatment"], fontsize=12) ax_raw.set_ylabel("Measured response", fontsize=13) ax_raw.set_title("Raw Data", fontsize=15, pad=12) ax_raw.grid(axis="y", alpha=0.25) ax_raw.spines["top"].set_visible(False) ax_raw.spines["right"].set_visible(False) # 右侧:bootstrap 效应量分布 grid = np.linspace( np.min(boot_diff) - 1.0, np.max(boot_diff) + 1.0, 500 ) density = kde_1d(boot_diff, grid) density = density / density.max() * 0.38 # 横向半小提琴:y 是均值差,x 是密度 ax_eff.fill_betweenx( grid, 0, density, color="#B3B3E6", alpha=0.75, linewidth=0 ) ax_eff.plot( density, grid, color="#5E5EAA", linewidth=1.5 ) # 观测效应量 ax_eff.scatter( 0, observed_diff, s=62, color="black", zorder=6, label="Observed mean difference" ) # 95% CI ax_eff.plot( [0, 0], [ci_low, ci_high], color="black", linewidth=2.2, zorder=5 ) ax_eff.plot( [-0.035, 0.035], [ci_low, ci_low], color="black", linewidth=2.0 ) ax_eff.plot( [-0.035, 0.035], [ci_high, ci_high], color="black", linewidth=2.0 ) ax_eff.axhline( 0, color="gray", linestyle="--", linewidth=1.3, alpha=0.9 ) ax_eff.text( 0.02, 0.96, f"Mean difference = {observed_diff:.2f}\n95% CI [{ci_low:.2f}, {ci_high:.2f}]", transform=ax_eff.transAxes, ha="left", va="top", fontsize=11, bbox=dict( boxstyle="round,pad=0.35", facecolor="white", edgecolor="#999999", alpha=0.90 ) ) ax_eff.set_title("Bootstrap Effect Size", fontsize=15, pad=12) ax_eff.set_xlabel("Bootstrap density", fontsize=13) ax_eff.set_ylabel("Mean difference\nHigh treatment - Control", fontsize=13) ax_eff.set_xlim(-0.04, 0.48) ax_eff.grid(axis="y", alpha=0.25) ax_eff.spines["top"].set_visible(False) ax_eff.spines["right"].set_visible(False) ax_eff.spines["bottom"].set_visible(False) ax_eff.set_xticks([]) fig.suptitle( "Estimation Plot: From Statistical Significance to Effect Size", fontsize=16, y=0.98 ) plt.tight_layout() plt.savefig( os.path.join(out_dir, "02_estimation_plot.png"), bbox_inches="tight", facecolor="white" )draw_estimation_plot(control, group_c)

 10个月宝宝每天需要喝多少奶粉?