1. 深度学习的人脸识别简介
书接上回,哦,是第21回介绍深度学习人脸模型时,提到了FaceNet、ArcFace、VGGFace2等。这是当前主流人脸识别的趋势,也是我们今天的重头戏。接下来我们了解一下这些常用模型。
1.1 FaceNet
FaceNet来自Google团队2015年的论文《FaceNet: A Unified Embedding for Face Recognition and Clustering》,它的核心思想是直接学习一个映射函数, 使得人脸图像被嵌入到一个欧氏空间,用L2距离衡量相似性。简单来讲就是用比距离的方式,看谁跟谁像。
据说当时做训练使用了上亿张图片,基于 Inception-ResNet-v1网络,输出128维归一化向量。结果就是首次实现 99.63% LFW 准确率(超越人类 97.53%),成为了工业界的事实标准。
当年我们选择合作的旷世,也是使用了FaceNet理论。 不过它的训练成本高,开源模型弱于论文效果。而且,我个人也是找了一圈,并没有那么容易找到一个合适的模型来直接使用,
1.2 ArcFace
ArcFace来自有中科院参与的2019年的论文《ArcFace: Additive Angular Margin Loss for Deep Face Recognition》。 它的核心思想是在softmax分类loss中引入“角度间隔(angular margin)”,让类内更紧凑,类间更分离。训练的数据集使用MS1MV2,是一个公开的百万数据集。基于ResNet-100 / MobileFaceNet网络结构,输出512维向量。这个维度在表达能力和计算效率之间取得了很好的平衡。
我在onnx模型库中找到了arcface的onnx模型,接下来结合OpenCV的SFace模块和YuNet人脸检测模型做一个人脸识别的实践。
2. FaceRecognizerSF
2.1 SFace简介
OpenCV 4.5.4版本在 opencv_contrib 模块中新增了基于深度学习的人脸分析功能(简称"OpenCV DNN Face"),其核心由两个中国团队主导开发:
人脸检测模型 YuNet——由OpenCV中国团队研发;
人脸识别模型 SFace——由北京邮电大学课题组设计。
其中,cv2.FaceRecognizerSF 类作为SFace模型的接口,专为高效的人脸特征提取与相似度计算而设计,兼顾精度与性能。
SFace自带了onnx格式的模型,高精度的是face_recognition_sface_2021dec.onnx,37MB左右。在opencv_zoo-4.10.0\models\face_recognition_sface可以找到。 我们今天先用该接口调用ArcFace模型。
2.2 FaceRecognizerSF主要方法介绍
(1). 创建实例cv2.FaceRecognizerSF.create函数原型
defcreate( model: str, config: str, backend_id: int = cv2.dnn.DNN_BACKEND_DEFAULT, target_id: int = cv2.dnn.DNN_TARGET_CPU) -> cv2.FaceRecognizerSF
参数简介:
| | | |
|---|
model | str | | ONNX 模型文件路径,如 "face_recognizer_fast.onnx" |
config | str | | 配置文件路径(SFace 模型通常不需要,传空字符串 "") |
backend_id | int | cv2.dnn.DNN_BACKEND_DEFAULT | DNN 推理后端:• cv2.dnn.DNN_BACKEND_OPENCV• cv2.dnn.DNN_BACKEND_CUDA(需编译 CUDA 支持) |
target_id | int | cv2.dnn.DNN_TARGET_CPU | 推理目标设备:• cv2.dnn.DNN_TARGET_CPU• cv2.dnn.DNN_TARGET_CUDA / DNN_TARGET_CUDA_FP16(GPU 加速) |
默认 CPU 推理: 直接忽略后两个参数即可,如下:
recognizer = cv2.FaceRecognizerSF.create( model="face_recognizer_fast.onnx", config="")
也可以使用后两个参数,这样写:
recognizer = cv2.FaceRecognizerSF.create( model=arcface_model, config="", backend_id=cv2.dnn.DNN_BACKEND_DEFAULT, target_id=cv2.dnn.DNN_TARGET_CPU)
那后两个参数如何配合使用呢?一个是推理后端,一个推理目标设备,起初我是没有搞懂为啥要这样区分,我觉得它们是在干同一件事儿。推理后端决定谁来执行计算:使用哪个底层推理引擎,OpenCV自研还是CUDA,或者事Intel的推理引擎;目标设备是指在哪种硬件上运行,是CPU还是GPU或者是NPU,但必须与所选backend兼容。启用 CUDA 加速:
recognizer = cv2.FaceRecognizerSF.create( model="face_recognizer_fast.onnx", config="", backend_id=cv2.dnn.DNN_BACKEND_CUDA, target_id=cv2.dnn.DNN_TARGET_CUDA)
好了,其他的要怎么配合呢?看下面的表格你就全明白了。
| | |
|---|
| DNN_BACKEND_OPENCV | DNN_TARGET_CPU |
| DNN_BACKEND_CUDA | DNN_TARGET_CUDA |
| DNN_BACKEND_OPENCV | DNN_TARGET_OPENCL |
| DNN_BACKEND_INFERENCE_ENGINE | DNN_TARGET_MYRIAD |
| DNN_BACKEND_TIMVX | DNN_TARGET_NPU |
(2). alignCrop(src_img, face_aligned)人脸仿射变换对齐
该方法根据人脸关键点对原始图像进行仿射变换对齐,裁剪出标准 112×112 的正面人脸。原型:
defalignCrop( src_img: numpy.ndarray, face_aligned: numpy.ndarray) -> numpy.ndarray: ...
参数介绍:
src_img:原始 BGR 图像(np.ndarray)face_aligned:来自 FaceDetectorYN.detect() 的 15 维人脸信息数组(包含 5 个关键点:右眼、左眼、鼻尖、右嘴角、左嘴角) 举个栗子:
_, faces = detector.detect(image)if faces isnotNone: single_face = faces[0] # shape (15,) aligned_face = recognizer.alignCrop(image, single_face)
对齐是人脸识别的关键预处理步骤,能显著提升特征一致性。
(3). feature(aligned_face)特征提取
该方法从对齐后的人脸图像中提取 128 维特征向量。
feature = recognizer.feature(aligned_face) # shape: (128,)
(4). match(feature1, feature2, dis_type=0) 比较
该方法计算两个人脸特征之间的相似度。
0:余弦相似度(Cosine Similarity),值 ∈ [-1, 1],越接近 1 越相似。常量cv2.FaceRecognizerSF_FR_COSINE。1:L2 距离(欧氏距离),值 ≥ 0,越小越相似。常量cv2.FaceRecognizerSF_FR_NORM_L2。
score = recognizer.match(feature_A, feature_B, dis_type=0)if score > 0.363: # 余弦阈值(经验值) print("是同一个人")
推荐阈值(仅供参考):
3. 完整实践代码
对比两张照片是否为同一个人。通过YuNet的detect → SFace的alignCrop → feature → match得出结论。
import cv2import numpy as npimport osdefmain():# === 检查模型是否存在 === yunet_model = "face_detection_yunet_2023mar.onnx" arcface_model = "arcfaceresnet100-8.onnx"ifnot os.path.exists(yunet_model): print(f"❌ Error: {yunet_model} not found.")returnifnot os.path.exists(arcface_model): print(f"❌ Error: {arcface_model} not found.")return# === 加载模型 ===try: detector = cv2.FaceDetectorYN.create( model=yunet_model, config="", input_size=[320, 320], # 初始输入尺寸(后续会动态调整) score_threshold=0.6, # 置信度阈值 nms_threshold=0.3, # NMS 阈值 top_k=5000# 最多检测人脸数 ) recognizer = cv2.FaceRecognizerSF.create( model=arcface_model, config="", backend_id=cv2.dnn.DNN_BACKEND_DEFAULT, target_id=cv2.dnn.DNN_TARGET_CPU )except Exception as e: print("❌ Failed to load models:", e)return# === 读取两张图像 === img1_path = "../../face/o/8.png" img2_path = "../../face/o/2.png" img1 = cv2.imread(img1_path) img2 = cv2.imread(img2_path)if img1 isNoneor img2 isNone: print("❌ Failed to load images.")return# === 设置检测器输入尺寸=== h1, w1, _ = img1.shape h2, w2, _ = img2.shape# 处理第一张图 detector.setInputSize([w1, h1]) _, faces1 = detector.detect(img1)if faces1 isNoneor len(faces1) == 0: print("❌ No face detected in", img1_path)return# 取最大人脸(按面积),这里的逻辑根据实际情况调整 areas1 = [f[2] * f[3] for f in faces1] # w * h idx1 = int(np.argmax(areas1)) face1 = faces1[idx1] aligned_face1 = recognizer.alignCrop(img1, face1)# 处理第二张图 detector.setInputSize([w2, h2]) _, faces2 = detector.detect(img2)if faces2 isNoneor len(faces2) == 0: print("❌ No face detected in", img2_path)return areas2 = [f[2] * f[3] for f in faces2] idx2 = int(np.argmax(areas2)) face2 = faces2[idx2] aligned_face2 = recognizer.alignCrop(img2, face2)# === 提取特征=== feat1 = recognizer.feature(aligned_face1) feat2 = recognizer.feature(aligned_face2)# === 计算相似度 === cosine_score = recognizer.match(feat1, feat2, cv2.FaceRecognizerSF_FR_COSINE) l2_distance = recognizer.match(feat1, feat2, cv2.FaceRecognizerSF_FR_NORM_L2) print(f"\n✅ Recognition Result:") print(f" Cosine Similarity: {cosine_score:.4f}") print(f" L2 Distance : {l2_distance:.4f}")# 判断是否为同一人,可根据场景调整if cosine_score > 0.5: print(" 👤 Verdict: Same person!")else: print(" 👤 Verdict: Different persons.")# === 可视化===defdraw_face(img, face, color=(0, 255, 0)): x, y, w, h = map(int, face[:4]) cv2.rectangle(img, (x, y), (x + w, y + h), color, 2)# 绘制5个关键点(YuNet 输出:[x,y,w,h,5*landmarks,conf]) landmarks = face[4:14].reshape((5, 2)).astype(np.int32)for pt in landmarks: cv2.circle(img, tuple(pt), 2, (0, 0, 255), -1)return img vis1 = draw_face(img1.copy(), face1) vis2 = draw_face(img2.copy(), face2)# 显示结果 cv2.imshow("Face 1", vis1) cv2.imshow("Face 2", vis2) cv2.waitKey(0) cv2.destroyAllWindows()if __name__ == "__main__": main()
结果如下: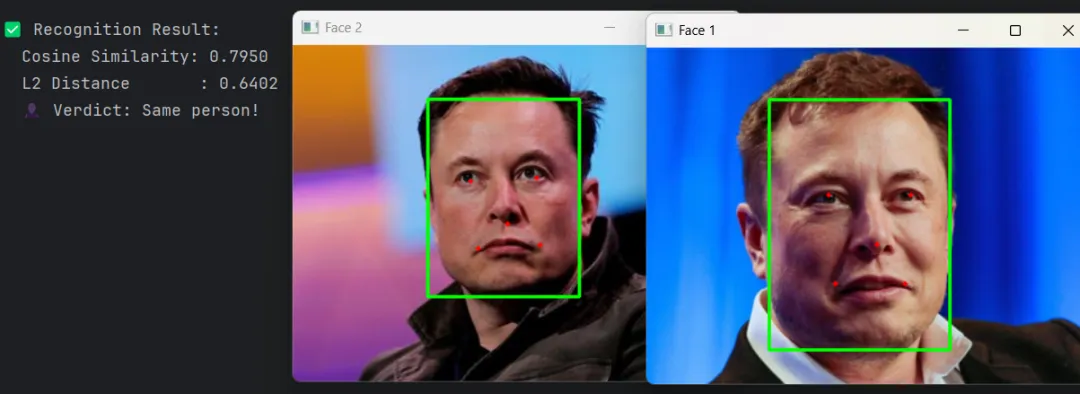
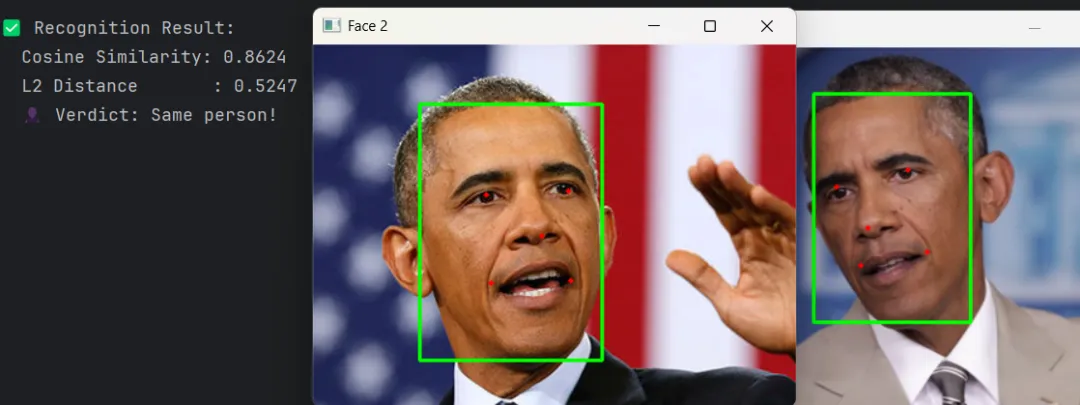 识别结果
识别结果4. 最后
如果使用OpenCV提供的SFace模型,直接替换模型即可。比如我后来使用face_recognition_sface_2021dec_int8.onnx。速度更快,后续准备在安卓设备上验证一下。
所有源码和模型等资料请公众号菜单中获取。
至此,我们的人脸识别之旅就先到这里。有问题评论区讨论。 我们下期再见!
参考
1.FaceNet: A Unified Embedding for Face Recognition and Clustering
2.ArcFace: Additive Angular Margin Loss for Deep Face Recognition
3.facenet github
4.ArcFace Model Download
5.YuNet OpenCV Zoo
#facenet #arcface #YuNet #FaceRecognizerSF

