Python项目92:绘制神雕侠侣中人物的4种社交图(NetworkX+Matplotlib)
- 2026-08-24 11:21:30


Python,速成心法
敲代码,查资料,问Ai
练习,探索,总结,优化

★★★★★博文创作不易,我的博文不需要打赏,也不需要知识付费,可以白嫖学习编程小技巧。使用代码的过程中,如有疑问的地方,欢迎大家指正留言交流。喜欢的老铁可以多多点赞+收藏分享+置顶,小红牛在此表示感谢。★★★★★
------★Python练手项目源码★------
Python项目91:绘制红楼梦人物关系图(NetworkX+Matplotlib)
Python项目89:NetworkX最短路径规划(城市交通)
Python项目88:文件备份与压缩系统2.0(tkinter+shutil+zipfile)
Python项目86:增强版画板2.0(tk.Canvas)
Python项目81:Excel工作表批量重命名工具1.0(tkinter+openpyxl)
Python项目78:学生成绩分析系统(Tkinter+SQLite3)
Python项目77:模拟炒股训练系统3.0(Mplfinance+tkinter)
Python项目76:员工排班表系统1.0(tkinter+sqlite3+tkcalendar)
Python项目74:多线程数据可视化工具2.0(tkinter+matplotlib+mplcursors)
Python项目73:自动化文件备份系统1.0(tkinter)
Python项目源码71:药品管理系统1.0(tkinter+sqlite3)
Python项目源码69:Excel数据筛选器1.0(tkinter+sqlite3+pandas)
Python项目源码63:病历管理系统1.0(tkinter+sqlite3+matplotlib)
Python源码62:酒店住房管理系统1.0(tkinter+sqlite3)
Python项目源码57:数据格式转换工具1.0(csv+json+excel+sqlite3)
Python项目源码56:食堂饭卡管理系统1.0(tkinter+splite3)
Python项目源码54:员工信息管理系统2.0(tkinter+sqlite3)
Python项目源码52:模拟银行卡系统1.0(账户管理、存款、取款、转账和交易记录查询)
Python项目源码50:理发店会员管理系统1.0(tkinter+sqlite3)
Python项目源码48:正则表达式调试工具3.0(tkinter+re+requests)
Python项目源码44:图书管理系统1.0(tkinter+sqlite3)
Python项目源码42:仓库商品管理系统1.0(tkinter+sqlite3+Excel)
Python项目源码40:字符串处理工具(tkinter+入门练习)
Python项目源码39:学生积分管理系统1.0(命令行界面+Json)
Python项目源码35:音乐播放器2.0(Tkinter+mutagen)
Python项目源码33:待办事项列表应用2.0(命令行界面+Json+类)
Python项目32:订单销售额管理系统1.0(Tkinter+CSV)
Python项目源码29:学生缴费管理系统(Tkinter+CSV)
Python项目28:设计日志管理系统2.0(Tkinter+Json)
安装必要的库:
pip install networkx matplotlib numpy1.主要功能:
3.运行代码可以看到:4种不同的可视化图表,详细的网络分析报告
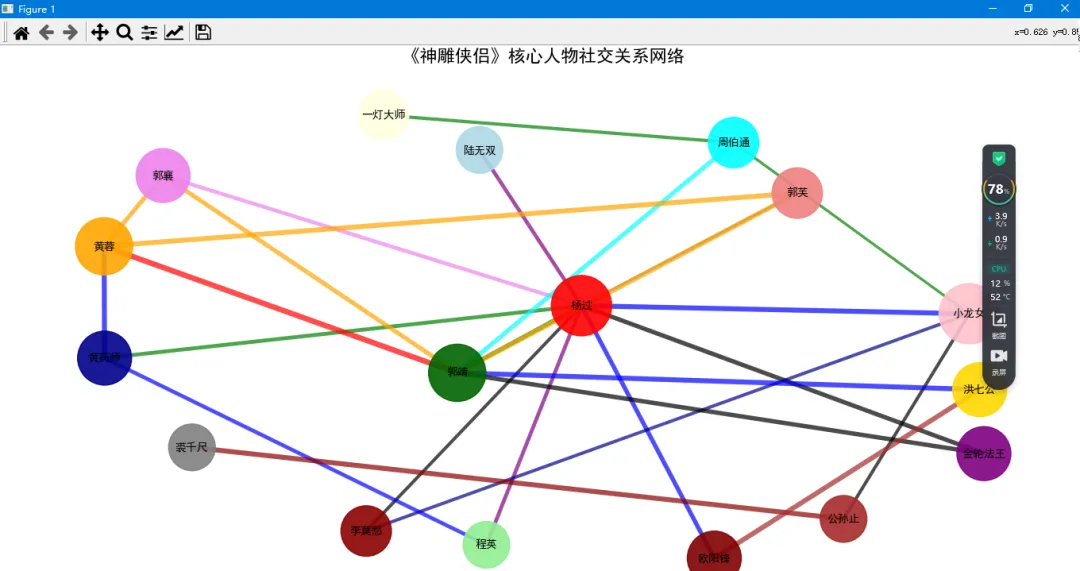
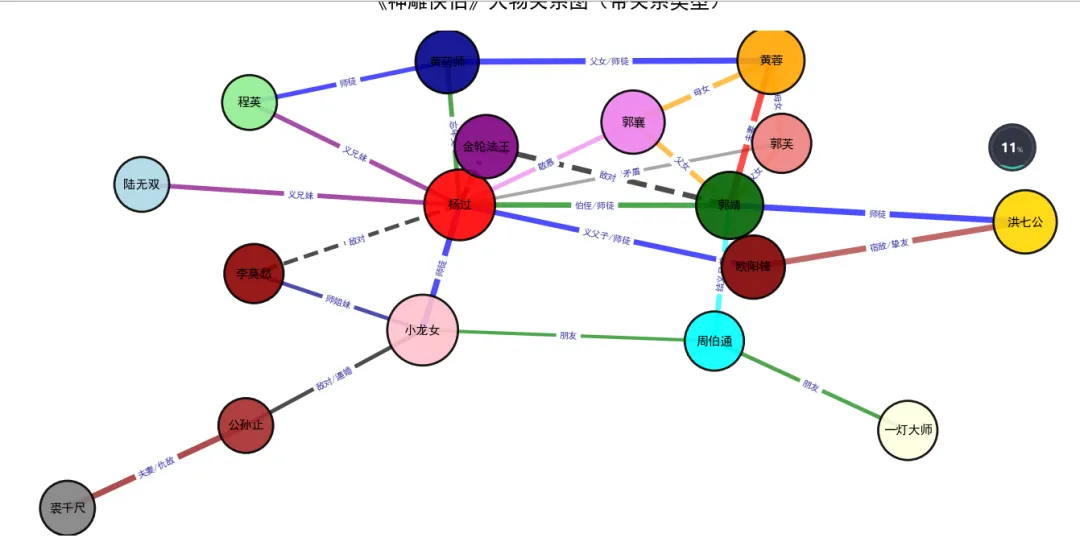
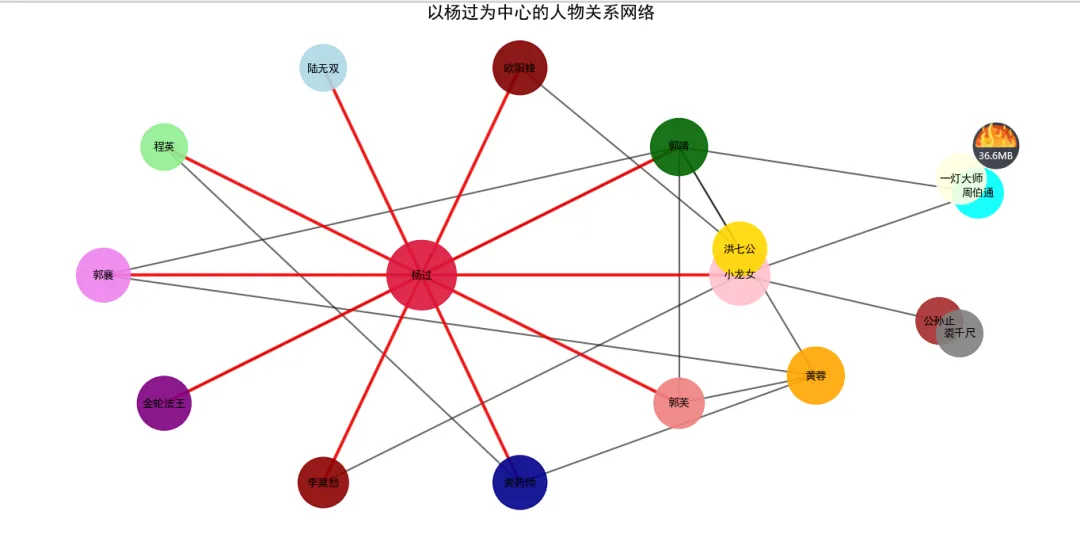
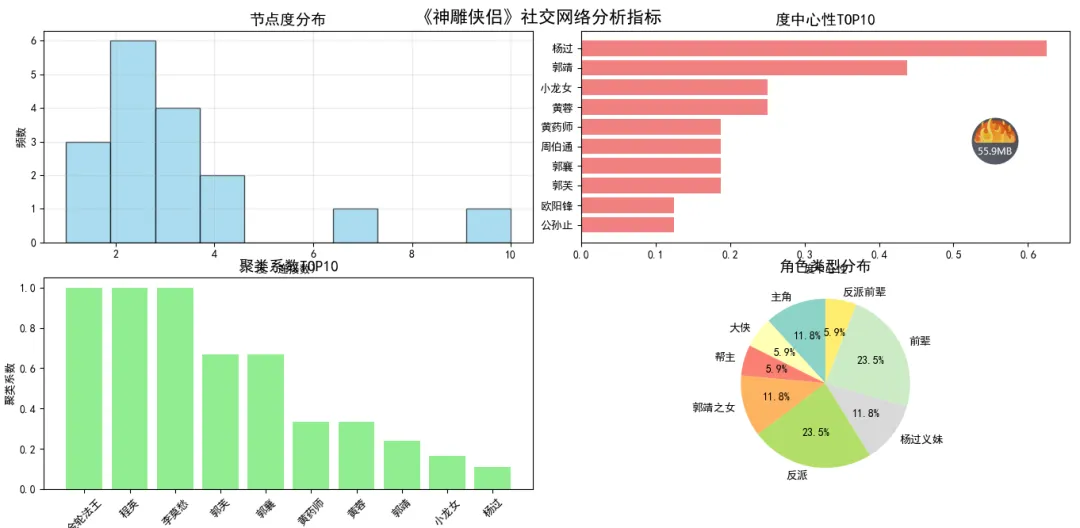
↓ 完整源码如下 ↓
# -*- coding: utf-8 -*-# @Author : 小红牛# 微信公众号:wdPythonimport networkx as nximport matplotlib.pyplot as pltimport matplotlibfrom matplotlib import font_managerimport numpy as np# 设置中文字体plt.rcParams['font.sans-serif'] = ['SimHei', 'Microsoft YaHei', 'DejaVu Sans']plt.rcParams['axes.unicode_minus'] = False# 创建社交网络图G = nx.Graph()# 定义核心人物(节点)core_characters = {'杨过': {'role': '主角', 'importance': 10, 'color': 'red'},'小龙女': {'role': '主角', 'importance': 10, 'color': 'pink'},'郭靖': {'role': '大侠', 'importance': 9, 'color': 'darkgreen'},'黄蓉': {'role': '帮主', 'importance': 9, 'color': 'orange'},'郭芙': {'role': '郭靖之女', 'importance': 7, 'color': 'lightcoral'},'郭襄': {'role': '郭靖之女', 'importance': 8, 'color': 'violet'},'金轮法王': {'role': '反派', 'importance': 8, 'color': 'purple'},'李莫愁': {'role': '反派', 'importance': 7, 'color': 'darkred'},'陆无双': {'role': '杨过义妹', 'importance': 6, 'color': 'lightblue'},'程英': {'role': '杨过义妹', 'importance': 6, 'color': 'lightgreen'},'公孙止': {'role': '反派', 'importance': 6, 'color': 'brown'},'裘千尺': {'role': '反派', 'importance': 6, 'color': 'gray'},'周伯通': {'role': '前辈', 'importance': 7, 'color': 'cyan'},'黄药师': {'role': '前辈', 'importance': 8, 'color': 'darkblue'},'欧阳锋': {'role': '反派前辈', 'importance': 8, 'color': 'maroon'},'洪七公': {'role': '前辈', 'importance': 8, 'color': 'gold'},'一灯大师': {'role': '前辈', 'importance': 7, 'color': 'lightyellow'}}# 添加节点for char, attrs in core_characters.items():G.add_node(char, **attrs)# 定义关系(边)和关系强度relationships = [# 亲情关系('杨过', '小龙女', {'relation': '夫妻', 'strength': 10, 'color': 'red'}),('郭靖', '黄蓉', {'relation': '夫妻', 'strength': 10, 'color': 'red'}),('郭靖', '郭芙', {'relation': '父女', 'strength': 9, 'color': 'orange'}),('黄蓉', '郭芙', {'relation': '母女', 'strength': 9, 'color': 'orange'}),('郭靖', '郭襄', {'relation': '父女', 'strength': 8, 'color': 'orange'}),('黄蓉', '郭襄', {'relation': '母女', 'strength': 8, 'color': 'orange'}),# 师徒关系('郭靖', '杨过', {'relation': '伯侄/师徒', 'strength': 8, 'color': 'green'}),('小龙女', '杨过', {'relation': '师徒', 'strength': 9, 'color': 'blue'}),('欧阳锋', '杨过', {'relation': '义父子/师徒', 'strength': 8, 'color': 'blue'}),('洪七公', '郭靖', {'relation': '师徒', 'strength': 9, 'color': 'blue'}),('黄药师', '黄蓉', {'relation': '父女/师徒', 'strength': 9, 'color': 'blue'}),# 朋友/义兄妹关系('杨过', '陆无双', {'relation': '义兄妹', 'strength': 7, 'color': 'purple'}),('杨过', '程英', {'relation': '义兄妹', 'strength': 7, 'color': 'purple'}),('郭靖', '周伯通', {'relation': '结义兄弟', 'strength': 8, 'color': 'cyan'}),('郭襄', '杨过', {'relation': '敬慕', 'strength': 7, 'color': 'violet'}),# 敌对关系('杨过', '金轮法王', {'relation': '敌对', 'strength': 8, 'color': 'black'}),('郭靖', '金轮法王', {'relation': '敌对', 'strength': 8, 'color': 'black'}),('小龙女', '李莫愁', {'relation': '师姐妹/敌对', 'strength': 7, 'color': 'black'}),('杨过', '李莫愁', {'relation': '敌对', 'strength': 6, 'color': 'black'}),('公孙止', '小龙女', {'relation': '敌对/逼婚', 'strength': 6, 'color': 'black'}),('公孙止', '裘千尺', {'relation': '夫妻/仇敌', 'strength': 9, 'color': 'darkred'}),# 其他重要关系('黄药师', '杨过', {'relation': '忘年交', 'strength': 7, 'color': 'green'}),('周伯通', '小龙女', {'relation': '朋友', 'strength': 5, 'color': 'green'}),('一灯大师', '周伯通', {'relation': '朋友', 'strength': 6, 'color': 'green'}),('洪七公', '欧阳锋', {'relation': '宿敌/挚友', 'strength': 9, 'color': 'brown'}),# 新增的师徒关系('小龙女', '李莫愁', {'relation': '师姐妹', 'strength': 6, 'color': 'darkblue'}),('黄药师', '程英', {'relation': '师徒', 'strength': 7, 'color': 'blue'}),('杨过', '郭芙', {'relation': '世交/矛盾', 'strength': 5, 'color': 'gray'}),]# 添加边for source, target, attrs in relationships:G.add_edge(source, target, **attrs)# 1. 基础社交网络图def plot_basic_network():plt.figure(figsize=(14, 10))# 使用spring布局pos = nx.spring_layout(G, k=2, seed=42)# 根据角色类型设置节点颜色node_colors = [core_characters[node]['color'] for node in G.nodes()]node_sizes = [core_characters[node]['importance'] * 300 for node in G.nodes()]# 根据关系类型设置边颜色edge_colors = [G[u][v]['color'] for u, v in G.edges()]edge_widths = [G[u][v]['strength'] * 0.5 for u, v in G.edges()]# 绘制网络nx.draw_networkx_nodes(G, pos, node_color=node_colors, node_size=node_sizes, alpha=0.9)nx.draw_networkx_edges(G, pos, edge_color=edge_colors, width=edge_widths, alpha=0.7, style='solid')nx.draw_networkx_labels(G, pos, font_size=10, font_weight='bold')plt.title("《神雕侠侣》核心人物社交关系网络", fontsize=16, fontweight='bold')plt.axis('off')plt.tight_layout()plt.show()# 2. 带关系标签的社交网络图def plot_network_with_labels():plt.figure(figsize=(16, 12))# 使用不同的布局算法pos = nx.kamada_kawai_layout(G)# 绘制节点node_colors = [core_characters[node]['color'] for node in G.nodes()]node_sizes = [core_characters[node]['importance'] * 400 for node in G.nodes()]nx.draw_networkx_nodes(G, pos, node_color=node_colors,node_size=node_sizes, alpha=0.9, edgecolors='black', linewidths=2)# 绘制边for u, v, data in G.edges(data=True):nx.draw_networkx_edges(G, pos, edgelist=[(u, v)],width=data['strength']*0.6,edge_color=data['color'],alpha=0.7,style='dashed' if data['relation'] in ['敌对', '仇敌'] else 'solid')# 添加节点标签nx.draw_networkx_labels(G, pos, font_size=11, font_weight='bold')# 添加关系标签edge_labels = {(u, v): data['relation'] for u, v, data in G.edges(data=True)}nx.draw_networkx_edge_labels(G, pos, edge_labels=edge_labels,font_size=8, font_color='darkblue', alpha=0.8)plt.title("《神雕侠侣》人物关系图(带关系类型)", fontsize=18, fontweight='bold', pad=20)plt.axis('off')plt.tight_layout()plt.show()# 3. 以杨过为中心的社交网络def plot_yangguo_centered():plt.figure(figsize=(14, 10))# 创建以杨过为中心的星型布局center_node = '杨过'pos = {}# 将杨过放在中心pos[center_node] = np.array([0, 0])# 将与杨过直接相连的节点放在周围neighbors = list(G.neighbors(center_node))angles = np.linspace(0, 2*np.pi, len(neighbors), endpoint=False)radius = 2for i, node in enumerate(neighbors):pos[node] = np.array([radius * np.cos(angles[i]), radius * np.sin(angles[i])])# 为其他节点添加位置(使用弹簧布局调整)other_nodes = [n for n in G.nodes() if n not in pos]if other_nodes:subgraph = G.subgraph(other_nodes)pos_other = nx.spring_layout(subgraph, center=[3, 0], seed=42)pos.update(pos_other)# 绘制node_colors = [core_characters[node]['color'] for node in G.nodes()]node_sizes = [core_characters[node]['importance'] * 300 for node in G.nodes()]# 突出显示杨过node_colors[list(G.nodes()).index('杨过')] = 'crimson'node_sizes[list(G.nodes()).index('杨过')] = 4000nx.draw_networkx_nodes(G, pos, node_color=node_colors, node_size=node_sizes, alpha=0.9)# 绘制所有边nx.draw_networkx_edges(G, pos, alpha=0.6, width=1.5)# 突出显示与杨过相连的边yangguo_edges = [(center_node, neighbor) for neighbor in neighbors]nx.draw_networkx_edges(G, pos, edgelist=yangguo_edges,edge_color='red', width=3, alpha=0.8)nx.draw_networkx_labels(G, pos, font_size=10, font_weight='bold')plt.title("以杨过为中心的人物关系网络", fontsize=16, fontweight='bold')plt.axis('off')plt.tight_layout()plt.show()# 4. 分析网络属性def analyze_network_properties():print("="*60)print("《神雕侠侣》社交网络分析报告")print("="*60)# 基本统计print(f"1. 网络基本信息:")print(f" 节点数(人物): {G.number_of_nodes()}")print(f" 边数(关系): {G.number_of_edges()}")# 度中心性(谁的关系最多)degree_centrality = nx.degree_centrality(G)top_5_degree = sorted(degree_centrality.items(), key=lambda x: x[1], reverse=True)[:5]print(f"\n2. 度中心性排名(连接关系最多的角色):")for char, centrality in top_5_degree:print(f" {char}: {centrality:.3f}")# 中介中心性(谁是最重要的桥梁)betweenness_centrality = nx.betweenness_centrality(G)top_5_between = sorted(betweenness_centrality.items(), key=lambda x: x[1], reverse=True)[:5]print(f"\n3. 中介中心性排名(最重要的桥梁角色):")for char, centrality in top_5_between:print(f" {char}: {centrality:.3f}")# 紧密中心性(谁与所有人最接近)closeness_centrality = nx.closeness_centrality(G)top_5_close = sorted(closeness_centrality.items(), key=lambda x: x[1], reverse=True)[:5]print(f"\n4. 紧密中心性排名(与所有人最接近的角色):")for char, centrality in top_5_close:print(f" {char}: {centrality:.3f}")# 社区检测(人物分组)try:from networkx.algorithms.community import greedy_modularity_communitiescommunities = list(greedy_modularity_communities(G))print(f"\n5. 社区检测结果(人物自然分组):")for i, community in enumerate(communities):print(f" 第{i+1}组 ({len(community)}人): {', '.join(sorted(community))}")except:print("\n5. 社区检测: 需要安装python-louvain包")# 杨过的直接关系yangguo_neighbors = list(G.neighbors('杨过'))print(f"\n6. 杨过的直接社会关系 ({len(yangguo_neighbors)}人):")print(f" {', '.join(yangguo_neighbors)}")# 寻找关键路径print(f"\n7. 关键人物关系路径:")paths = [('郭靖', '杨过'),('小龙女', '李莫愁'),('黄药师', '欧阳锋'),]for start, end in paths:try:path = nx.shortest_path(G, start, end)print(f" {start} → {end}: {' → '.join(path)}")except:print(f" {start} 和 {end} 之间没有路径")# 5. 可视化网络指标def plot_network_metrics():fig, axes = plt.subplots(2, 2, figsize=(15, 12))axes = axes.flatten()# 1. 度分布degrees = [d for n, d in G.degree()]ax1 = axes[0]ax1.hist(degrees, bins=10, alpha=0.7, color='skyblue', edgecolor='black')ax1.set_title('节点度分布', fontsize=14, fontweight='bold')ax1.set_xlabel('度(连接数)')ax1.set_ylabel('频数')ax1.grid(True, alpha=0.3)# 2. 节点重要性(根据度中心性)ax2 = axes[1]degree_centrality = nx.degree_centrality(G)chars = list(degree_centrality.keys())values = list(degree_centrality.values())# 取前10个角色top_10_idx = np.argsort(values)[-10:][::-1]top_10_chars = [chars[i] for i in top_10_idx]top_10_values = [values[i] for i in top_10_idx]bars = ax2.barh(top_10_chars, top_10_values, color='lightcoral')ax2.set_title('度中心性TOP10', fontsize=14, fontweight='bold')ax2.set_xlabel('度中心性')ax2.invert_yaxis()# 3. 网络聚类系数分布ax3 = axes[2]clustering = nx.clustering(G)chars = list(clustering.keys())values = list(clustering.values())# 取前10个角色top_10_idx = np.argsort(values)[-10:][::-1]top_10_chars = [chars[i] for i in top_10_idx]top_10_values = [values[i] for i in top_10_idx]bars = ax3.bar(top_10_chars, top_10_values, color='lightgreen')ax3.set_title('聚类系数TOP10', fontsize=14, fontweight='bold')ax3.set_xlabel('角色')ax3.set_ylabel('聚类系数')ax3.tick_params(axis='x', rotation=45)# 4. 角色类型分布ax4 = axes[3]role_types = {}for char, attrs in core_characters.items():role = attrs['role']role_types[role] = role_types.get(role, 0) + 1colors = plt.cm.Set3(np.linspace(0, 1, len(role_types)))ax4.pie(role_types.values(), labels=role_types.keys(), autopct='%1.1f%%',colors=colors, startangle=90)ax4.set_title('角色类型分布', fontsize=14, fontweight='bold')plt.suptitle('《神雕侠侣》社交网络分析指标', fontsize=16, fontweight='bold')plt.tight_layout()plt.show()# 执行所有可视化if __name__ == "__main__":print("正在生成《神雕侠侣》社交网络分析...")# 分析网络属性analyze_network_properties()# 绘制各种图表plot_basic_network()plot_network_with_labels()plot_yangguo_centered()plot_network_metrics()print("\n分析完成!")
完毕!!感谢您的收看
------★★历史博文集合★★------